Vintage Tulip Crochet Bedspread Pattern: Raised Floral Motifs and Lace
Introduction A crocheted bedspread is the kind of heirloom project that gets handed down through generations, and this vintage tulip design is built to...
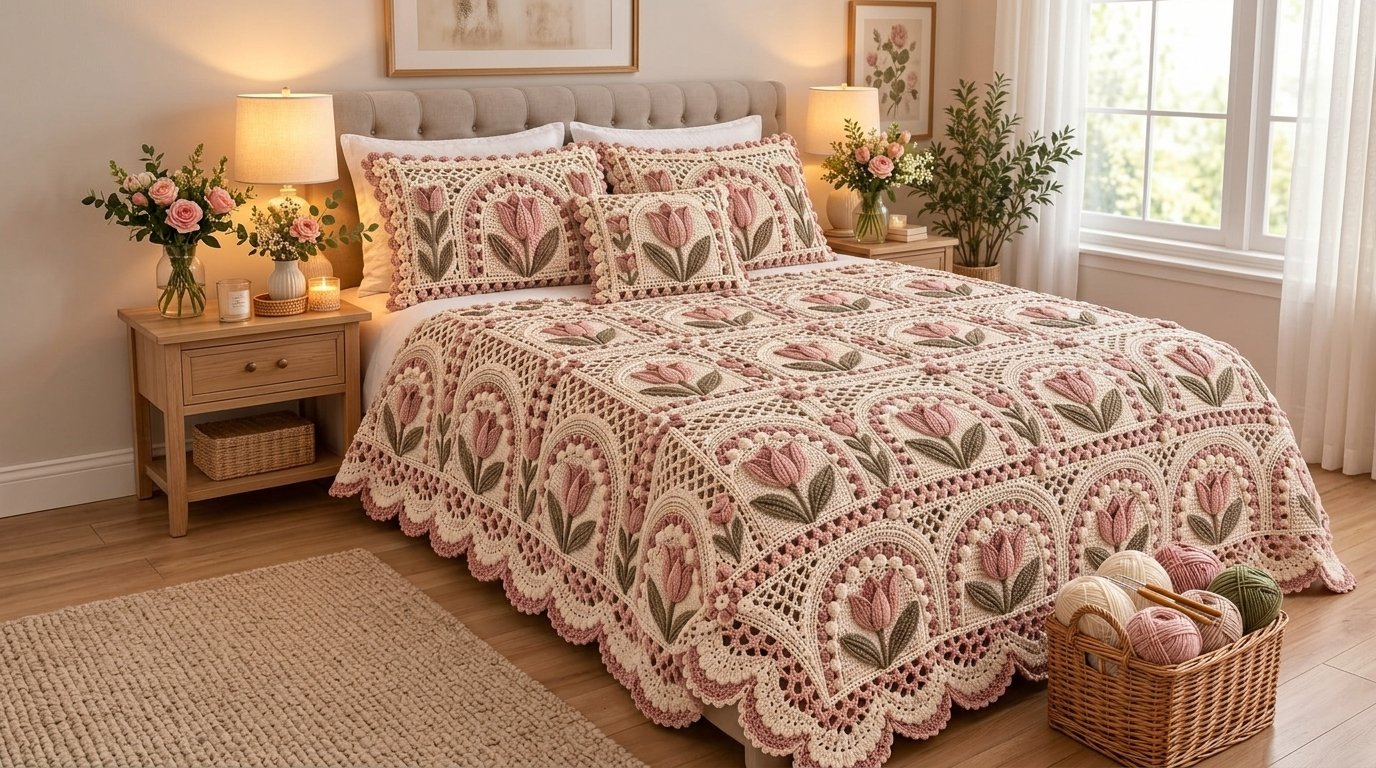
Introduction
A crocheted bedspread is the kind of heirloom project that gets handed down through generations, and this vintage tulip design is built to be exactly that. Each square motif features a raised, layered tulip flower in dusty rose, framed by an intricate cream lace arch and finished with sage-green leaves. The squares are joined with small floral corner motifs, and the finished bedspread drapes beautifully across a bed.
This is an advanced pattern. It requires patient shaping of layered petals, precise counting in the lace rounds, and careful joining to keep the squares aligned. It is a large, time-intensive project, but the result is a stunning, romantic bedspread with real presence.
Why You’ll Love This Project
- Heirloom quality. The layered tulip motif and lace arches give the bedspread a timeless, vintage look.
- A true statement piece. This is the kind of blanket that transforms a bedroom.
- Detailed, rewarding work. The lace rounds and raised petals keep the project engaging from start to finish.
- Customizable. The palette can be adjusted, and the square count can be scaled to any bed size.
- A satisfying challenge. If you’re ready for a large, detailed project, this one delivers.
Project Overview
- Project type: Crochet bedspread / large blanket
- Difficulty: Advanced
- Estimated time: About 80–120 hours, depending on size and pace
- Suggested finished size: Custom to bed size; a standard full/queen bedspread measures about 90 × 100 inches (228 × 254 cm)
- Yarn weight: Fingering or light sport (weight 1–2) cotton or cotton blend
- Crochet hook: 3.0 mm to 3.5 mm
- Main techniques: Working in rounds, raised petal motifs, lace chain spaces, scalloped edges, and join-as-you-go construction
- Construction: Individual square motifs worked from the center outward, then joined into a large bedspread with floral corner motifs
- Terminology: US crochet terms
Sizes and times are estimates and will vary with your yarn, hook, and tension.
Materials and Supplies Needed
- Fingering or light sport-weight cotton yarn in:
- Color A — warm ivory for the lace arches and background: about 2,500–3,000 yards
- Color B — dusty rose for the tulips and scalloped edges: about 800–1,000 yards
- Color C — sage green for the leaves: about 300–400 yards
- 3.0 mm to 3.5 mm crochet hook
- Stitch markers
- Yarn needle
- Scissors
Choosing the Right Yarn and Hook
Cotton or a cotton blend is the best choice for a large bedspread because it holds the shape of the motif, drapes well, and shows the intricate lace pattern clearly. A cotton blend with a small amount of acrylic will be lighter and easier to work with over a long project, while pure cotton will be more durable.
Use a 3.0 mm to 3.5 mm hook. If your squares curl at the edges, go up a hook size; if they look too loose and gappy, go down a size. Because this is a large project, gauge consistency across squares is essential. Block a test square and measure it; all squares should measure the same size so they join cleanly.
Crochet Stitches and Abbreviations
- ch — chain
- sl st — slip stitch
- sc — single crochet
- hdc — half double crochet
- dc — double crochet
- tr — treble crochet
- st — stitch
- sts — stitches
- sp — space
- ch-sp — chain space
- inc — increase
- dec — decrease
- popcorn or cluster — a raised stitch group used to form the tulip petals
Raised petal stitch (tulip): Work several partial double crochet stitches in the same space or stitch, leaving loops on the hook, then join them at the top to form a raised, rounded petal. The exact number of partial stitches and the placement of petals are specified in the pattern rounds.
Before You Start
Make one complete square first. Before committing to a full bedspread, work a single square from start to finish. Measure its finished size, block it, and check that the lace arches lie flat and the tulip petals look even. This will confirm your gauge and help you estimate how many squares you need.
Plan your square count. Measure your bed and divide the width and length by the size of one square to determine how many squares you need. Add a border allowance.
Keep colors consistent. Work all tulips in the same shade of dusty rose, and all lace arches in the same shade of ivory, so the finished bedspread looks unified.
Block as you go. Block each square before joining. This prevents the finished bedspread from bunching or curling.
Count carefully in the lace rounds. Lace patterns depend on exact chain space counts. A mistake in one round will affect the next.
Step-by-Step Crochet Instructions
The bedspread is built from repeated square motifs, each consisting of a tulip center, a lace arch frame, and a scalloped edge, then joined into the bedspread.
Center Tulip Motif (worked in Color B and Color C)
Round 1: With Color B, make a magic ring. Work 8 sc into the ring. Join with a sl st. (8 sts)
Round 2: Work 1 sc in each sc around. Join. (8 sts)
Round 3: Work the tulip petals. In each of the 8 sts, work a raised petal stitch (see abbreviations) to form a layered tulip shape. Join with a sl st. Fasten off Color B.
Round 4: With Color C, attach the leaves. Ch 3, sl st in the next st, ch 3, sl st in the next st, repeat around to form small leaf loops. Fasten off Color C.
The tulip center should now be a raised, layered flower with small green leaf loops around it.
Lace Arch Frame (worked in Color A)
Round 5: Join Color A in any leaf loop. Ch 1, work sc in the same loop. Ch 3, skip the next petal top, sc in the next leaf loop. Repeat around to form a ring of chain spaces. Join with a sl st.
Round 6: Work a round of chain spaces, increasing the chain length as needed (e.g., ch 3, sc in each ch-sp) to begin shaping the square. Join.
Round 7: Work (sc, ch 3, sc) in each corner ch-sp, and sc in each side ch-sp. Join.
Round 8: Work sc in each sc, and (2 sc, ch 2, 2 sc) in each corner ch-sp to square the motif. Join. Fasten off.
Scalloped Edge
Join Color B along the outer edge of the square. Work (ch 3, 2 dc, ch 3, sl st) in a loop to form a scallop. Repeat around the square, spacing the scallops evenly. Fasten off.
Joining Squares
Use a flat join to attach squares at the corners and edges. Align the corner ch-spaces of adjacent squares, then work a sc join along the edges to connect them. This creates the continuous, unified look of the bedspread.
Floral Corner Motifs
To join squares at the corners, work a small floral motif in Color B. Make a magic ring, work 8 sc into the ring, join with a sl st, then work (ch 2, sl st in the first ch) around to form small petals. Attach this motif to the joined corners for the floral effect.
Size Adjustments
- Larger bedspread: Add more squares in width and length.
- Smaller bedspread: Use fewer squares.
- Border: Add a wider border around the finished bedspread in Color A with a scalloped edge.
- Color variations: Change the tulip color to other shades for a different look.
Assembly and Finishing
Block all squares before joining. Once joined, block the full bedspread by pinning it to size and misting it with water. Allow it to dry completely, then gently press the edges to sharpen the scallops. Weave in all ends on the wrong side.
Tips for Best Results
- Work squares consistently. Keep the same hook and tension for every square so they join cleanly.
- Block each square. Blocking keeps the motif square and ensures the lace lies flat.
- Count your chain spaces. Lace errors compound quickly.
- Use a precise join. Line up the corner spaces carefully before joining.
- Keep the palette cohesive. Work tulips and leaves in the same shades for a unified look.
Common Mistakes and Troubleshooting
The square doesn’t lie flat. The lace rounds likely have too many or too few stitches. Check the chain space count per round.
Tulip petals look uneven. Petal stitches should be pulled up to a consistent height; check your tension on the raised stitches.
The joined bedspread bunches. The squares may be slightly different sizes. Block and measure each square before joining.
The scalloped edge is uneven. Work the scallops in evenly spaced positions, and count the number of stitches between each scallop.
The lace arches collapse. The arch stitches may be too tight. Work looser chain spaces to allow the arches to hold their shape.
Creative Variations
- Different flower colors. Use a soft blush, white, or deep burgundy for the tulips.
- Contrast palette. Use a stronger sage green and deeper rose for a bolder look.
- Pillow covers. Use single squares to make pillow covers to match the bedspread.
- Smaller throw. Reduce the number of squares to make a throw blanket for a sofa or chair.
- Border variation. Add a wide lace border instead of a plain scalloped edge.
How to Use or Style Your Crochet Project
This bedspread is designed for a bedroom, draped across a bed with matching pillows. It can also be used as a throw on a sofa or a decorative cover on a guest bed. Because it’s a large decorative piece, keep it away from open flames and supervise it around pets that chew or tug at yarn.
Care and Maintenance
Hand wash in cool water with mild soap, or use the gentle cycle in a mesh bag if the yarn label allows. Do not wring; roll in a towel to remove excess water. Lay flat to dry, reshaping the scalloped edges and lace arches while still damp. Store folded in a breathable cotton bag to protect the motifs. Always follow the yarn label’s care instructions.
Frequently Asked Questions
Can a beginner make this bedspread?
No. It’s an advanced pattern that requires familiarity with lace motifs, raised stitches, and joining.
How many squares do I need for a bedspread?
It depends on your bed size. Measure the square size and divide your bed dimensions by that size.
How much yarn does the bedspread use?
About 3,600–4,400 yards total, depending on size and yarn weight.
Do I need a special hook?
A standard 3.0–3.5 mm crochet hook works fine.
Can I use acrylic yarn?
Yes, but cotton holds the shape and texture better for a project like this.
How do I keep the squares the same size?
Block and measure each square before joining. Keep your tension consistent.
What is the best way to join the squares?
A flat join (sc along the edges, with corner ch-spaces aligned) keeps the bedspread looking seamless.
Conclusion
This vintage tulip bedspread is a true heirloom project. The raised tulip motifs, lace arches, and scalloped edges come together into a romantic, detailed bedspread that is beautiful to look at and satisfying to make. It takes time and patience, but the result is a piece you’ll be proud to keep or pass down.
Related Crochet Projects
If you enjoy this type of floral lace project, you might also like a matching floral pillow cover, a small lace table runner, a vintage-inspired doily, or a crochet blanket with raised flowers in a simpler layout.