Upcycled Crochet Clothing: Easy T-Shirt Makeover With a Colorful Crochet Peplum
Have an old T-shirt sitting in your closet that you rarely wear? Before donating it, consider giving it a beautiful handmade transformation with crochet!...
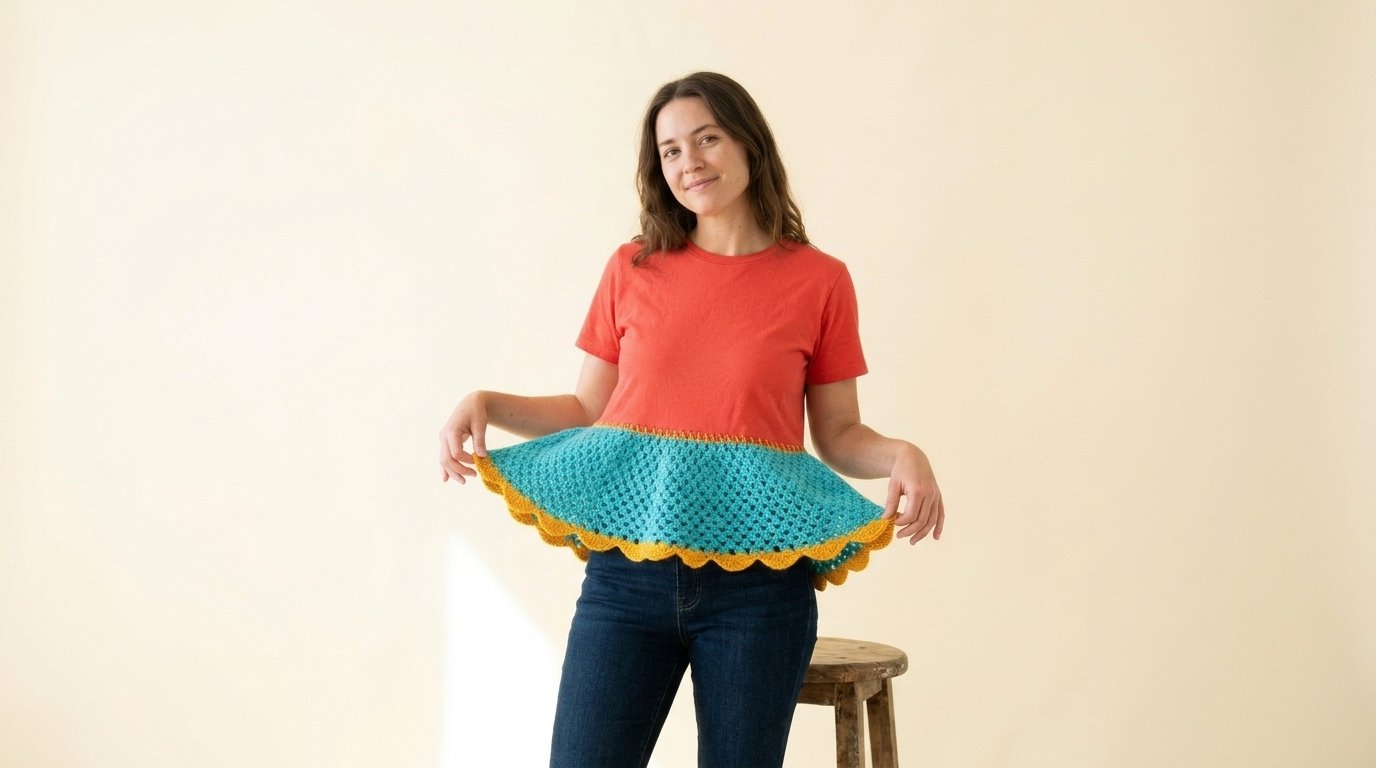
Have an old T-shirt sitting in your closet that you rarely wear? Before donating it, consider giving it a beautiful handmade transformation with crochet!
This upcycled crochet clothing project turns a simple coral-red T-shirt into a playful, colorful top featuring a flowing turquoise crochet peplum and cheerful golden-yellow scalloped edging.
The combination of soft cotton fabric and airy crochet stitches creates a unique garment that feels fresh, creative, and comfortable. The original T-shirt keeps its familiar neckline and sleeves, while the crocheted lower section adds movement, texture, and a flattering flared silhouette.
You don’t need to crochet an entire sweater or learn complicated garment construction. Instead, you’ll transform an existing shirt using basic crochet stitches, a little measuring, and simple sewing techniques.
This DIY T-shirt makeover is a wonderful project for confident beginners who love sustainable fashion, creative clothing alterations, and giving old garments a second life.
Quick Project Details
| Detail | Information |
|---|---|
| Skill level | Confident beginner |
| Project type | Upcycled crochet clothing |
| Style | Crochet peplum T-shirt |
| Estimated time | 4–6 hours |
| Base garment | Cotton or cotton-blend T-shirt |
| Yarn weight | DK weight #3 |
| Crochet hook | 4 mm (G/6) |
| Main stitches | Chain, single crochet, double crochet |
| Construction | Crochet peplum attached to existing shirt |
| Crochet terminology | US terms |
The finished length and flare depend on your shirt measurements, crochet gauge, and preferred fit.
Materials and Supplies
One of the best things about this project is that you probably already have many of the supplies.
Clothing
One Old Cotton T-Shirt
Choose a T-shirt that fits comfortably through the shoulders, bust, and upper waist.
For a look similar to the inspiration image, use a bright coral-red or warm terracotta T-shirt with a classic crew neckline and short sleeves.
A slightly relaxed shirt works particularly well because it creates a smooth transition into the flowing crochet section.
Avoid shirts with badly stretched necklines or large areas of damaged fabric.
Yarn Colors
Turquoise Blue Yarn – Main Crochet Section
Choose a bright turquoise or aqua-blue DK cotton yarn for the flowing peplum.
Estimated amount: 200–350 yards, depending on your size and desired length.
Golden Yellow Yarn – Decorative Edging
Use a warm mustard or sunflower-yellow shade for the scalloped hem and the decorative joining stitches.
Estimated amount: 40–70 yards.
A soft cotton or cotton-blend yarn works beautifully because it provides stitch definition and comfortable drape.
Additional Tools
- 4 mm crochet hook
- Yarn needle
- Fabric scissors
- Measuring tape
- Stitch markers
- Sewing pins or fabric clips
- Matching sewing thread
- Hand-sewing needle or sewing machine
- Fabric chalk
- Optional cutting mat
- Iron and pressing cloth
Yarn substitution tip: Lightweight acrylic or bamboo-blend yarn can also work. Choose a yarn that drapes softly without making the bottom of the shirt too heavy.
Crochet Abbreviations and Stitches
This project uses standard US crochet terminology.
| Abbreviation | Meaning |
|---|---|
| ch | Chain |
| sc | Single crochet |
| dc | Double crochet |
| sl st | Slip stitch |
| sp | Space |
| st(s) | Stitch or stitches |
| rnd | Round |
| rep | Repeat |
| RS | Right side |
| WS | Wrong side |
Chain: Yarn over and pull through the loop already on your hook.
Single crochet: Insert your hook into a stitch, yarn over and pull up a loop, then yarn over and pull through both loops.
Double crochet: Yarn over, insert your hook into the stitch, pull up a loop, yarn over and pull through two loops, then yarn over and pull through the remaining two loops.
Slip stitch: Insert your hook into the stitch, yarn over, and pull through the stitch and the loop on your hook.
The main peplum uses an airy double crochet mesh pattern that gradually widens to create the flared shape.
Step 1: Choose and Prepare Your T-Shirt
Start by selecting a T-shirt that you enjoy wearing but would like to update.
The inspiration design uses a simple coral-red cotton shirt with short sleeves and a round neckline.
Wash and dry the shirt according to its care label before making any alterations.
This helps prevent unexpected shrinkage after the crochet section is attached.
Lay the shirt flat on a clean table and smooth out any wrinkles.
Check that the side seams are straight and the front and back hems are aligned.
Try On the Shirt
Put the T-shirt on and decide where you want the crochet peplum to begin.
For a flattering peplum silhouette, the joining line usually sits near the natural waist or slightly above the hips.
Use fabric chalk or a few pins to mark this position.
Make sure the chosen line feels comfortable when you sit, stand, and move.
Beginner tip: Don’t cut the T-shirt immediately. Try marking the new waistline first and check the placement in a mirror.
Step 2: Measure Your Shirt
Accurate measurements will help your crochet section fit the shirt comfortably.
Lay the T-shirt flat and measure across the marked joining line.
Multiply this measurement by two to estimate the full circumference.
For example:
| Measurement | Example |
|---|---|
| Shirt width at joining line | 18 inches |
| Full circumference | 36 inches |
| Desired crochet length | 7 inches |
| Desired finished style | Relaxed, flared peplum |
The crochet section should begin at approximately the same circumference as the shirt.
As you work downward, you’ll add increases to create the flowing shape.
Check Your Crochet Gauge
Before beginning the peplum, make a small swatch using your turquoise yarn and 4 mm hook.
Work a few rows of double crochet mesh.
Measure the width of your stitches.
This helps you determine how many foundation chains you’ll need.
The sample pattern below uses 144 starting chains, forming 72 mesh repeats.
Adjust the foundation chain to match your actual shirt measurement, keeping an even number of chains.
For the exact increase sequence given below, the sample uses a starting count divisible by 24.
Step 3: Cut the T-Shirt
Once you’re satisfied with the placement, remove the shirt and lay it flat.
Measure approximately half an inch below the desired joining line.
This extra fabric will become the seam allowance.
Cut the Lower Section
- Smooth the shirt on your work surface.
- Mark a straight cutting line around the body.
- Check that the front and back markings align.
- Cut carefully through the fabric along the line.
- Set the removed lower section aside.
You should now have a shortened T-shirt that ends near your chosen waistline.
Don’t throw away the removed fabric.
You can reuse it for small sewing projects, fabric ties, cleaning cloths, or other upcycled crafts.
Secure the Raw Edge
Cotton jersey fabric usually doesn’t fray like woven fabric, but its edges can curl.
Fold the cut edge inward by approximately a quarter inch.
Secure it using a narrow zigzag stitch or a suitable stretch stitch.
Avoid using a tight, nonstretching seam that could make the shirt uncomfortable.
The finished edge should lie flat and retain some flexibility.
Step 4: Crochet the Turquoise Peplum Foundation
Now we’ll begin the beautiful turquoise crochet section.
Unlike a traditional rectangular crochet panel, the peplum is worked in joined rounds.
This creates a continuous fabric tube without a bulky side seam.
Using turquoise DK yarn and your 4 mm hook:
- Chain 144.
- Make sure the chain isn’t twisted.
- Join to the first chain with a slip stitch to form a ring.
The ring should fit comfortably around the T-shirt’s joining line without being stretched tightly.
Round 1: Create the Mesh Foundation
- Chain 4. This counts as your first double crochet and one chain.
- Skip the next foundation chain.
- Work 1 dc into the following chain.
- Chain 1 and skip the next foundation chain.
- Repeat the double crochet and chain-one sequence around.
- Join with a slip stitch into the third chain of the beginning chain 4.
You should have 72 double crochet stitches and 72 chain-one spaces.
This creates the first airy mesh row.
Rounds 2–4
- Chain 4, counting as the first dc and ch 1.
- Work 1 dc into the top of each remaining dc from the previous round.
- Chain 1 after each dc.
- Join with a slip stitch into the third chain of the beginning chain 4.
Maintain 72 double crochet stitches and 72 chain-one spaces in each round.
Common mistake: Don’t accidentally work an extra double crochet into a chain-one space. Each new double crochet should sit above a double crochet from the previous round.
Step 5: Create the Flared Crochet Shape
The key to this T-shirt makeover is the gentle flare.
We’ll add increases at regular intervals so the peplum becomes wider as it gets longer.
The finished shape should spread outward from the waist, similar to a short, flowing skirt.
Round 5: First Increase Round
Continue using turquoise yarn.
Work the mesh pattern as before, but add one extra mesh repeat at regular intervals.
For every sixth double crochet position from the previous round:
- Work 1 dc.
- Chain 1.
- Work another dc into the same stitch.
- Chain 1.
For the other five positions, work one dc followed by ch 1.
Repeat this sequence around.
You should now have 84 double crochets and 84 chain-one spaces.
Rounds 6–8
Work evenly in the established mesh pattern.
Maintain 84 double crochet stitches and 84 chain-one spaces per round.
Round 9: Second Increase Round
Increase at every seventh double crochet position.
Work six regular mesh repeats, then one increased repeat containing two double crochets separated by chain-one spaces.
Repeat around.
You should have 96 double crochets and 96 chain-one spaces.
Rounds 10–12
Continue working evenly.
Maintain 96 mesh repeats per round.
Round 13: Third Increase Round
Increase at every eighth double crochet position.
Work seven regular mesh repeats, then an increased repeat.
You should have 108 double crochets and 108 chain-one spaces.
Rounds 14–16
Work evenly in the mesh pattern.
Maintain 108 repeats per round.
Round 17: Fourth Increase Round
Increase at every ninth double crochet position.
Work eight regular mesh repeats, then an increased repeat.
You should have 120 double crochets and 120 chain-one spaces.
Rounds 18–20
Continue working evenly.
Maintain 120 mesh repeats per round.
Fasten off after Round 20 if you’re happy with the length.
Your peplum should now flare outward from the waist.
Beginner tip: Hold the crochet section against your shirt as you work. If you’d like a longer peplum, continue adding rounds before starting the decorative hem.
Step 6: Check the Peplum Length and Fit
Before adding the golden edging, try the crochet section against the shortened T-shirt.
Place the foundation edge around the shirt’s lower opening.
Check that the crochet piece fits without pulling or creating bulky folds.
The top should sit comfortably around the joining line.
The bottom should spread outward naturally.
Adjust the Length
For a short peplum, stop when the crocheted section measures approximately 5–6 inches.
For a more dramatic flared shape, aim for 7–9 inches.
You can also continue adding increases if you want extra volume.
The reference design features a wide, flowing turquoise section that spreads noticeably beyond the sides of the shirt.
Helpful tip: The weight of the yarn can make the peplum stretch slightly when worn. Check the drape by holding the garment upright rather than measuring it only on a table.
Step 7: Crochet the Golden-Yellow Scalloped Hem
The golden-yellow scalloped edging is one of the prettiest details in this makeover.
It adds a cheerful contrast to the turquoise mesh and gives the finished peplum a decorative, slightly wavy border.
Using golden-yellow yarn:
Round 1: Prepare the Edge
- Join yellow yarn into any double crochet along the bottom edge.
- Chain 1.
- Work 1 sc into every double crochet and every chain-one space around.
- Join with a slip stitch.
For the 120-repeat sample, you should have 240 single crochet stitches.
Round 2: Create the Scallops
Repeat this sequence around:
- Work 1 sc into the next stitch.
- Skip the next 2 stitches.
- Work 7 dc into the following stitch.
- Skip the next 2 stitches.
- Work 1 sc into each of the next 2 stitches.
Each repeat uses eight stitches and creates one rounded scallop.
Continue around the entire hem.
For the sample count of 240 stitches, you’ll make 30 scallops.
Join with a slip stitch and fasten off.
Shape the Scalloped Edge
Lay the crochet peplum flat.
Gently spread the golden scallops with your fingers.
If needed, lightly block the hem according to your yarn’s care instructions.
The scallops should form a soft, rounded border that adds movement to the garment.
Step 8: Attach the Crochet Peplum to the T-Shirt
Now it’s time to combine the cotton T-shirt and the handmade crochet section.
This step transforms the two separate pieces into one finished garment.
Align the Pieces
Turn the T-shirt inside out.
Place the crochet peplum inside the shirt with the right side facing the shirt’s right side.
Align the upper edge of the peplum with the prepared lower edge of the shirt.
Match the four main points:
- Center front
- Center back
- Left side seam
- Right side seam
Use fabric clips or pins to hold the pieces together.
Distribute the crochet stitches evenly around the opening.
Sew the Peplum in Place
Using a hand-sewing needle and matching thread:
- Begin at one side seam.
- Catch a small amount of the T-shirt fabric.
- Pass the needle through the crochet foundation edge.
- Continue around the waist using small, flexible stitches.
- Avoid pulling the thread too tightly.
- Reinforce the side seams.
- Secure the thread ends neatly.
You can also use a sewing machine with a suitable stretch stitch.
If machine sewing, work slowly and avoid stretching the T-shirt while stitching.
Once attached, turn the garment right side out.
The turquoise peplum should hang naturally from the coral T-shirt.
Step 9: Add the Decorative Yellow Waist Seam
The inspiration design includes a delicate golden-yellow detail where the crochet section meets the T-shirt.
This small touch creates a beautiful transition between the coral fabric and turquoise yarn.
Using golden-yellow yarn and a yarn needle:
- Thread the needle with a manageable length of yarn.
- Begin at one side seam.
- Work small, evenly spaced blanket-style stitches along the joining line.
- Catch both the shirt fabric and the crochet foundation edge.
- Keep the stitches approximately a quarter inch apart.
- Continue around the waist.
- Secure the yarn neatly on the inside.
The yellow stitches should form a subtle decorative line around the waist.
Keep the stitching relaxed enough that the fabric can still stretch slightly.
This finishing detail ties the golden scalloped hem and the upper joining seam together beautifully.
Step 10: Try On Your Upcycled Crochet Top
Your transformed T-shirt is almost complete!
Try it on and check the overall fit.
The upper portion should feel like your original comfortable T-shirt.
The crochet section should flare outward without pulling at the waist.
Lift your arms, sit down, and move around to check that the joining seam feels secure.
Check These Details
Waist seam: Make sure the crochet is attached evenly without puckering.
Peplum shape: The turquoise section should spread outward and drape naturally.
Scalloped hem: The golden edging should follow the lower curve without twisting.
Overall length: The garment should feel comfortable with your favorite jeans or trousers.
If one section looks uneven, adjust the attachment stitches before finishing.
Finishing Your Upcycled Crochet Clothing
Turn the garment inside out and weave in any remaining yarn ends.
Check the yellow decorative stitches and reinforce any loose sections.
Trim stray threads carefully.
Gently shape the turquoise peplum with your hands.
If the crochet fabric looks uneven, lightly block it according to the yarn’s care instructions.
Avoid excessive heat on synthetic yarns or delicate T-shirt fabric.
Allow the garment to dry completely before wearing it.
You now have a one-of-a-kind crochet T-shirt makeover!
Why Upcycled Crochet Clothing Is Worth Trying
Upcycling gives old clothing a new purpose without requiring you to make an entire garment from scratch.
Instead of replacing a T-shirt that feels plain or outdated, you can transform it with a handmade crochet detail.
This approach has several advantages.
It encourages creativity. You can experiment with colors, textures, and shapes.
It helps reuse existing clothing. Giving an old shirt another life can reduce unnecessary textile waste.
It saves construction time. The neckline, shoulders, and sleeves are already finished.
It allows personal customization. You can adjust the crochet section to suit your preferred style and measurements.
It creates something unique. Even when using the same basic technique, different T-shirts and yarn colors produce very different results.
The combination of fabric and crochet is especially appealing because it brings together two distinct textures in one garment.
Creative T-Shirt Crochet Makeover Variations
Once you’ve made your first crochet peplum, try experimenting with different designs.
1. Pastel Crochet Peplum Top
Use a white T-shirt with lavender crochet and soft yellow edging.
This combination creates a gentle, spring-inspired look.
2. Boho Crochet T-Shirt Makeover
Choose a beige or cream T-shirt with terracotta crochet and natural cotton edging.
Add wooden beads or decorative stitching for a relaxed bohemian style.
3. Bright Summer Crochet Top
Use a hot-pink T-shirt with turquoise crochet and orange scalloped edging.
The bold colors create a fun summer outfit.
4. Minimalist Crochet Clothing Upgrade
Choose a black T-shirt with cream crochet and a simple straight hem.
This creates a more understated version that works well with everyday clothing.
Styling Your Crochet Peplum T-Shirt
The colorful crochet section makes this top a statement piece, so simple clothing works especially well underneath.
With blue jeans: Pair the coral and turquoise top with classic denim for a cheerful casual outfit.
With white trousers: The bright colors stand out beautifully against crisp white pants.
With a denim skirt: A short or midi-length denim skirt creates a playful everyday look.
With shorts: The flared crochet peplum is especially fun for warm-weather outfits.
Keep accessories simple so the handmade crochet detail remains the focal point.
Tips for a Beautiful Crochet T-Shirt Makeover
Choose a comfortable base shirt. The upper portion should already fit well.
Measure carefully. The crochet foundation needs to match the shirt’s waistline.
Use soft yarn. Heavy or stiff yarn may pull the T-shirt downward.
Keep the joining seam flexible. A tight seam can make the garment uncomfortable.
Check the peplum length while working. It’s easier to adjust before adding the scalloped edging.
Use consistent crochet tension. Even stitches create a smoother, more balanced flare.
Take your time with assembly. Careful sewing makes the finished garment look more polished.
How to Care for Your Upcycled Crochet Top
A garment that combines cotton fabric and crochet needs gentle care.
- Check both the T-shirt and yarn care labels.
- Wash in cool water when suitable.
- Use a mild detergent.
- Turn the garment inside out before washing.
- Avoid twisting or wringing the crochet section.
- Lay flat to dry.
- Reshape the peplum and scalloped hem while damp.
- Store folded to prevent the crochet from stretching.
If the crochet section becomes wrinkled, gently smooth it with your hands or use an appropriate blocking method.
Frequently Asked Questions
Can you add crochet to an old T-shirt?
Yes! Crochet can be added to T-shirts through sewn-on panels, decorative borders, sleeves, pockets, and other embellishments. A crochet peplum is a beautiful way to transform a plain shirt into a more colorful garment.
What yarn is best for upcycled crochet clothing?
Lightweight cotton and cotton-blend yarns work well because they provide stitch definition and comfortable drape. Avoid very heavy yarns that may stretch or distort the original shirt.
Is this crochet T-shirt makeover beginner-friendly?
This project is suitable for confident beginners who know basic crochet stitches and simple sewing techniques. The repeated mesh pattern is easy to practice, while the joining seam requires a little patience.
How do I attach crochet to a cotton T-shirt?
You can sew the crochet section onto the shirt using small hand stitches or a sewing machine with a suitable stretch stitch. Keep the attachment flexible and distribute the crochet stitches evenly to prevent puckering.
Can I make the crochet peplum longer?
Absolutely! Continue adding mesh rounds before working the scalloped hem. For a more dramatic flare, add increases at regular intervals as the peplum grows.
Conclusion
This upcycled crochet clothing T-shirt makeover is a beautiful example of how simple handmade details can transform an ordinary garment.
The cheerful coral T-shirt, flowing turquoise crochet peplum, and golden-yellow scalloped edging come together to create a playful, comfortable top that’s full of personality.
With basic crochet stitches, a little measuring, and careful sewing, you can give an old favorite a completely new look.
Enjoy experimenting with different colors and lengths, and don’t be afraid to add your own creative touches.
Save this crochet T-shirt makeover idea to your favorite Pinterest DIY clothing board so you can return whenever you’re ready to transform another piece from your wardrobe!