Twisted Granny Square Crochet Pattern in Olive Green and Cream
Introduction The twisted granny square takes the familiar granny square construction and gives it a visual twist. Instead of concentric rings of color, the...
Introduction
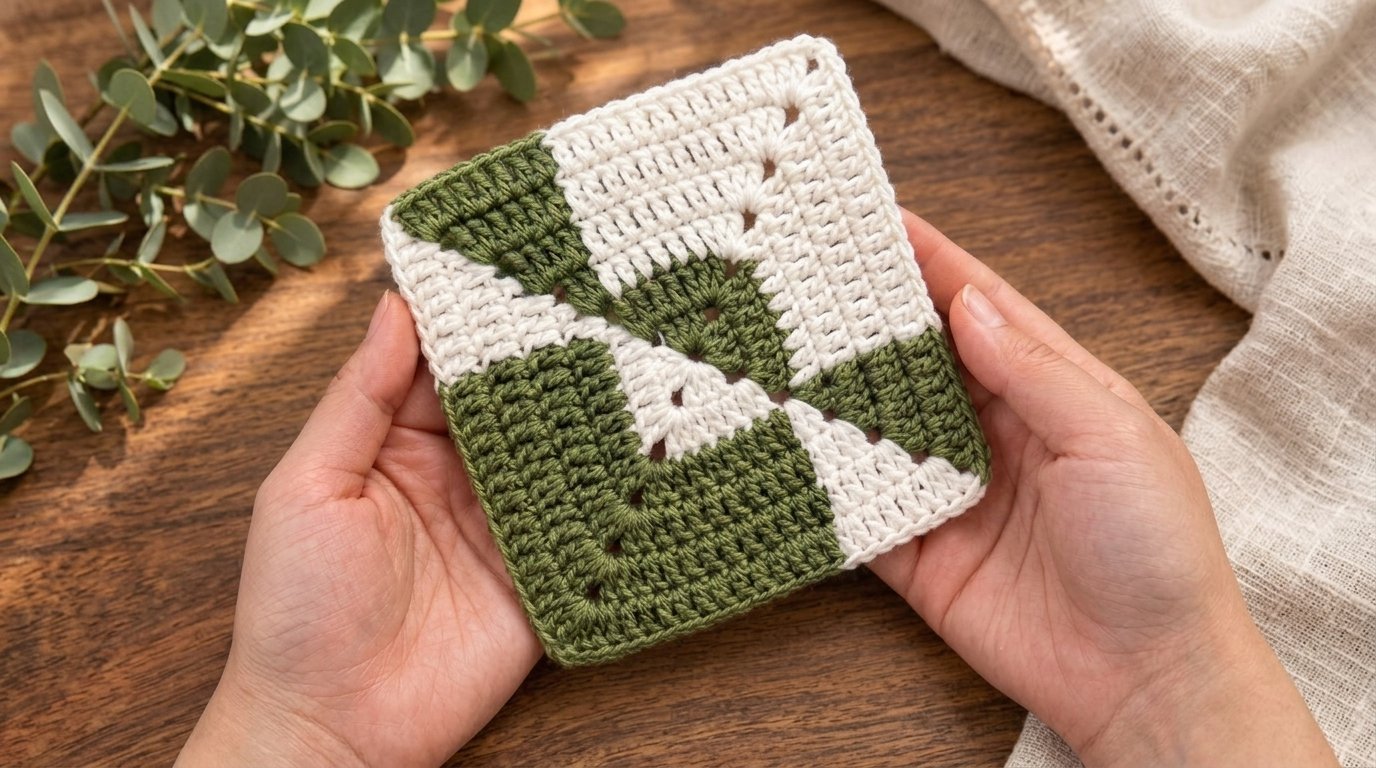
The twisted granny square takes the familiar granny square construction and gives it a visual twist. Instead of concentric rings of color, the square is built in offset blocks that appear to spiral around the center, creating a diagonal pinwheel effect. In olive green and cream, the square looks modern and calm, with a texture dense enough to work as a coaster, pillow front, or blanket square.
This is an intermediate pattern. It uses standard granny stitch groups — clusters of double crochet separated by chain spaces — but the way those groups are placed shifts from round to round to create the twist. Once you’ve worked one or two rounds, the rhythm becomes clear, and the square works up quickly.
Why You’ll Love This Project
- A fresh take on a classic. The twisted placement gives the granny square a new geometric look.
- Intermediate but approachable. Every stitch is basic double crochet and chain; the challenge is placement, not technique.
- Textured and dense. The square has a solid, fabric-like feel that works for wearables, decor, and afghans.
- Easy to color-block. Two contrasting colors show the twist clearly.
- Versatile square. Use it as a coaster, pillow front, bag panel, or blanket square.
Project Overview
- Project type: Textured crochet motif square
- Difficulty: Intermediate
- Estimated time: About 45–60 minutes per square
- Suggested finished size: About 5–6 inches (13–15 cm) square, depending on yarn and hook
- Yarn weight: Worsted (medium, weight 4) cotton or cotton blend
- Crochet hook: 4.5 mm
- Main techniques: Chain, slip stitch, double crochet, working in rounds, color changes, chain-space placement, corner shaping
- Construction: Worked in rounds from the center outward, with shifted cluster placement to create the twisted color-block effect
- Terminology: US crochet terms
Sizes and times are estimates and will vary with your yarn, hook, and tension.
Materials and Supplies Needed
- Worsted-weight cotton or cotton-blend yarn in two colors:
- Color A — olive green: about 40–50 yards per square
- Color B — warm cream: about 40–50 yards per square
- 4.5 mm crochet hook
- Stitch marker
- Yarn needle
- Scissors
No specialty tools are needed.
Choosing the Right Yarn and Hook
Cotton or a cotton blend works best because it holds the dense, structural shape of the square and keeps the color blocks crisp. Acrylic works too but may be softer and less defined.
Use a 4.5 mm hook for worsted-weight yarn. If your square looks floppy or the clusters look loose, drop to 4.0 mm. If the fabric feels too stiff to work comfortably, go up to 5.0 mm.
There is no strict gauge for this project, but the finished square should measure roughly 5–6 inches across. If yours comes out larger or smaller, adjust your hook or add or remove a border round.
Crochet Stitches and Abbreviations
- ch — chain
- sl st — slip stitch
- sc — single crochet
- dc — double crochet
- st — stitch
- sts — stitches
- sp — space
- ch-sp — chain space
- dc cluster — a group of 3 dc worked into the same stitch or chain space
All stitches are standard. No special stitches are required.
Before You Start
Understand the twist. The twisted granny square is built like a standard granny square, but each round places its clusters in different positions relative to the round before. The result is a diagonal shift instead of a straight vertical stack. Once you see this in the first two rounds, the rest becomes predictable.
Practice the color change. Change colors at the end of a round by pulling the new color through the final loop of the closing sl st. This keeps the join clean.
Watch the corners. The corners use chain spaces to turn the square, and shifting those chain spaces is part of how the twist develops. Keep corners consistent.
Mark the first stitch of each round. It’s easy to lose track with shifted clusters.
Step-by-Step Crochet Instructions
This square is worked in joined rounds, each beginning with a chain that counts as the first double crochet unless stated otherwise. The color changes create the twisted look.
Round 1 — Center (Color A)
Make a magic ring. Ch 2 (counts as the first dc). Work 2 dc into the ring (a cluster of 3 dc total, including the ch-2). Ch 1. Work 3 dc into the ring. Ch 1. Work 3 dc into the ring. Ch 1. Work 3 dc into the ring. Ch 1. Join with a sl st to the top of the ch-2. Fasten off Color A.
You now have four clusters separated by four ch-1 spaces — the framework for the square.
Round 2 — First Twist (Color B)
Join Color B in any ch-1 space. Ch 2 (counts as the first dc). Work 2 dc into the same space. Ch 1. Work 3 dc into the next ch-1 space. Ch 1. Work 3 dc into the next ch-1 space. Ch 1. Work 3 dc into the next ch-1 space. Ch 1. Join with a sl st to the top of the ch-2.
But to start the twist, shift the corners: instead of placing your corner clusters in the same ch-1 spaces as the previous round, work them into the next space in the sequence. Specifically, work (3 dc, ch 2, 3 dc) in the first corner space, then 3 dc in the next two spaces, then (3 dc, ch 2, 3 dc) in the fourth. This creates a corner cluster, a straight-edge cluster, a corner cluster, and a straight-edge cluster — turning the round motif toward the square and starting the twist.
(If your count comes out uneven, adjust by adding or removing straight-edge clusters so each side has the same number between corners.)
Round 3 — Second Twist (Color A)
Join Color A in any corner ch-2 space. Ch 2 (counts as the first dc). Work (2 dc, ch 2, 3 dc) in the same corner. Then work 3 dc in each ch-1 space along the side. In the next corner ch-2 space, work (3 dc, ch 2, 3 dc). Continue around, working corners and straight edges.
To continue the twist, shift the corner placement slightly: skip the first straight-edge space on each side and work your first corner cluster into the second space instead. This offset is what creates the diagonal twist.
Round 4 — Third Twist (Color B)
Join Color B. Work as in Round 3, but again shift the corner placements by one space in the same direction. Continue working (3 dc, ch 2, 3 dc) in each corner and 3 dc in each straight-edge space, adjusting the corner placement by one space per side.
Round 5 — Final Twist (Color A)
Join Color A. Work as in Round 4, again shifting the corners by one space in the same direction. Fasten off Color A.
Round 6 — Solid Border (Color B)
Join Color B in any corner ch-2 space. Ch 1. Work 1 sc in each stitch around, working 3 sc into each corner ch-2 space so the corners stay sharp. Join with a sl st. Fasten off Color B and weave in ends.
Size Adjustments
- Larger square: Add another twist round (or two) before the border.
- Smaller square: Stop after Round 4 and finish with a single sc border.
- Wider border: Add a second sc round in Color A before fastening off.
- Color changes: Swap colors in any round to change the visual rhythm; the twist is created by placement, not color.
Assembly and Finishing
If you’re making one square, weave in all ends on the wrong side. Block lightly by pinning the square to size and misting with water, then let it dry fully. This helps the corners stay sharp and the color blocks crisp.
If you’re making a blanket, join finished squares using a flat join along the edges. Keep the corners aligned so the twisted pattern reads clearly across the blanket.
Tips for Best Results
- Watch the offset. The twist comes from shifting corner placement by one space per round. If you forget the shift, the square becomes a standard granny square.
- Keep the colors distinct. Olive green and cream show the twist well; low-contrast pairs will blur the effect.
- Change colors cleanly. Pull the new color through the final loop of the closing sl st to hide tails.
- Keep the tension consistent. Loose or tight rounds will make the corners uneven.
- Block at the end. Blocking sharpens the corners and clarifies the twisted pattern.
Common Mistakes and Troubleshooting
The twist isn’t visible. Corners were placed in the same positions every round. Re-check that you shifted them by one space per round.
The square isn’t square. Corner ch-2 spaces may be inconsistent. Make sure each corner gets (3 dc, ch 2, 3 dc) on every round.
The color blocks look messy. Stitches may have been placed in the wrong color. Keep each round entirely in one color and change only at the join.
The edges curl. The first round may be too tight, or corners too small. Check that Round 1 has four clusters and four ch-1 spaces.
The square is uneven in size. Tension variation between rounds. Blocking helps, and going down a hook size can even out the rounds.
Creative Variations
- Reverse the palette. Cream center, olive outer, for a lighter look.
- Three colors. Add a third shade (such as a soft sage) for a more complex geometric pattern.
- Cushion front. Work two squares and join them into a cushion cover.
- Coaster set. Make four squares and back them with felt.
- Blanket. Join many squares in alternating color palettes for a striking twisted afghan.
How to Use or Style Your Crochet Project
A single square makes a textured coaster, a small wall hanging, or a decorative insert for a pillow front. Joined squares work well for blankets, cushions, and bags. Keep crochet decor away from open flames and supervise it around pets that chew or tug at yarn.
Care and Maintenance
Hand wash in cool water with mild soap, or machine wash on gentle in a mesh bag if the yarn label allows. Do not wring; press gently in a towel to remove excess water. Reshape the square and lay flat to dry, pinning corners to keep them sharp. Store flat, folded loosely, to prevent flattening the textured stitches. Always follow the yarn label’s care instructions.
Frequently Asked Questions
Can a beginner make this square?
It’s best treated as intermediate. If you’re comfortable with double crochet, chain spaces, and joined rounds, you can work it.
How much yarn does one square use?
Roughly 80–100 yards total, split between the two colors.
What does “twisted” mean in this pattern?
The corners and clusters shift by one space each round, creating a diagonal pinwheel effect rather than straight concentric rounds.
Do I have to use two colors?
No. A single color works, but the twist is less visible.
Can I use acrylic yarn?
Yes, though cotton holds the dense texture and sharp corners better.
How do I join multiple squares?
A flat join (sl st through both layers or whipstitch) keeps the color-block pattern clean.
Why is my square round instead of square?
Check that every round has four corners with ch-2 spaces and equal straight-edge clusters between them.
Conclusion
The twisted granny square is a small project with a big visual payoff. The offset placement of clusters turns the familiar granny square into a geometric, textured motif, and the olive green and cream palette gives it a calm, modern look. Make one as a coaster, or join many for a blanket that shows off the twist.
Related Crochet Projects
If you enjoy this square, you might also like a classic granny square in teal and cream, a layered sunburst motif square, a textured afghan block with popcorn stitches, or a striped half-double-crochet blanket.