Tunisian Crochet Orchid Pattern – Beautiful Potted Flower for Handmade Home Decor
If you love crochet flowers and realistic botanical decorations, this Tunisian crochet orchid pattern is a beautiful project to explore. With elegant ivory petals,...
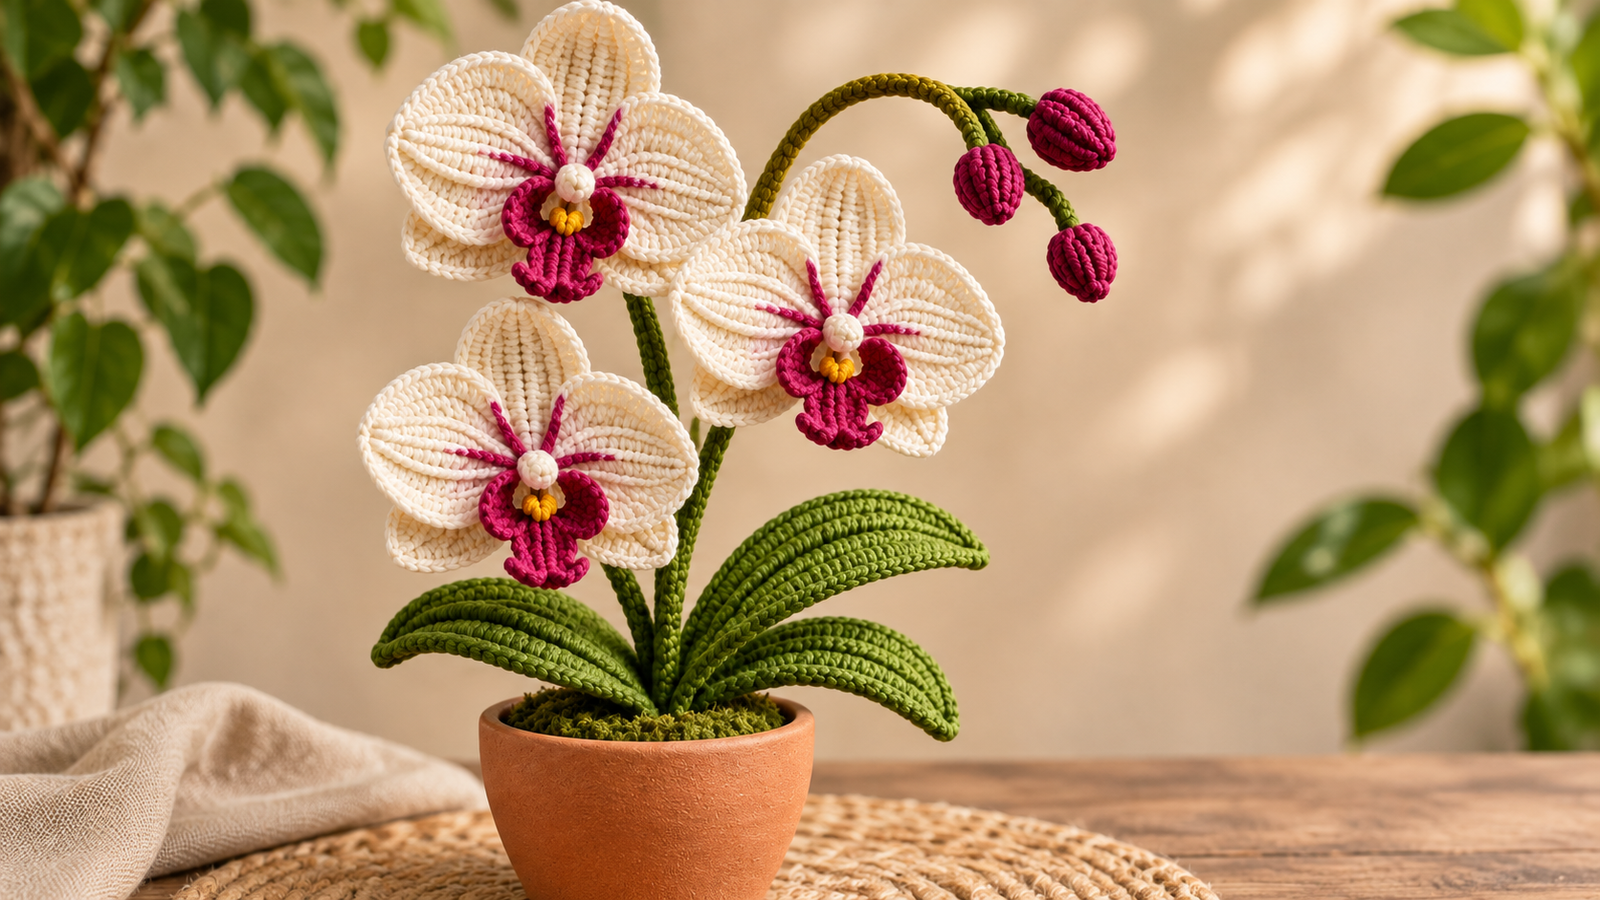
If you love crochet flowers and realistic botanical decorations, this Tunisian crochet orchid pattern is a beautiful project to explore. With elegant ivory petals, deep magenta centers, delicate flower buds, and textured green leaves, this handmade orchid brings a sophisticated floral touch to your home without needing water or sunlight.
Inspired by the graceful appearance of Phalaenopsis orchids, this design combines Tunisian crochet techniques with traditional crochet stitches to create a decorative potted plant.
The softly textured petals give the blossoms a dimensional appearance, while the rich green foliage and curved stems help recreate the elegant silhouette of a real orchid.
Whether you’re creating a handmade gift, decorating a bookshelf, or expanding your collection of crochet plants, this project is a wonderful opportunity to practice Tunisian crochet while making something beautiful.
In this guide, you’ll learn how to crochet the orchid petals, create the colorful flower centers, make realistic leaves and buds, and assemble everything into a charming terracotta pot.
What Makes This Tunisian Crochet Orchid Special?
The defining feature of this crochet orchid is its textured flower petals.
Unlike traditional crochet, Tunisian crochet combines elements of knitting and crochet to produce a distinctive fabric with beautifully defined vertical stitches.
This texture works particularly well for orchid petals because it creates subtle ridges that resemble the delicate veins found in real flowers.
The design includes five ivory petal-like segments arranged around a vibrant magenta center, creating an orchid-inspired blossom.
Why You’ll Love This Crochet Project
There are several reasons to try this beautiful floral crochet design.
- Realistic botanical appearance: Layered petals, curved stems, and textured leaves create an orchid-inspired silhouette.
- Beautiful color contrast: Cream blossoms and magenta centers look striking against deep green foliage.
- Long-lasting decoration: Your finished orchid won’t need watering, pruning, or sunlight.
- Creative learning opportunity: Practice Tunisian crochet while improving your flower-making skills.
- Customizable design: Experiment with different orchid colors, pot styles, and flower arrangements.
- Thoughtful handmade gift: A potted crochet orchid makes a lovely present for flower lovers.
- Versatile home decor: Display it on desks, bookshelves, windowsills, or living room tables.
The project can also be completed in smaller sessions because the petals, flowers, leaves, and buds are made separately.
Project Overview
| Project Detail | Description |
|---|---|
| Skill level | Intermediate |
| Crochet terminology | US terms |
| Main technique | Tunisian simple stitch |
| Yarn weight | DK / Light #3 |
| Hook size | 4 mm Tunisian hook |
| Construction | Individual motifs and wired stems |
| Number of flowers | 3 large orchid blossoms |
| Flower buds | 3 |
| Estimated finished height | 12–16 inches |
| Estimated working time | 8–12 hours |
The measurements and completion time are approximate. This is an original, untested decorative pattern, so your finished dimensions may vary depending on your yarn, tension, hook size, and arrangement.
Materials and Supplies Needed
Gather the following materials before beginning your Tunisian crochet orchid.
Yarn Colors
Choose DK-weight cotton yarn in four main colors:
- Ivory or warm white for the flower petals
- Deep magenta or raspberry pink for the orchid centers and buds
- Olive green for leaves and stems
- Golden yellow for the tiny flower details
You may also use a slightly darker shade of green to add depth to the leaves.
Crochet Tools
- 4 mm Tunisian crochet hook
- 3.5 mm regular crochet hook
- Yarn needle
- Sharp scissors
- Stitch markers
- Measuring tape
Plant Assembly Supplies
- Small terracotta pot, approximately 4–5 inches wide
- Floral wire or suitable craft stems
- Floral tape
- Floral foam or another stable pot insert
- Small amount of polyester fiberfill
- Decorative artificial moss
- Wire cutters and pliers
Choose craft wire sturdy enough to support the flowers while allowing gentle shaping. Cover all cut wire ends securely, and keep sharp wires and small assembly materials away from children and pets.
Best Yarn and Hook Recommendations
Cotton yarn is an excellent choice for realistic crochet flowers because it provides clear stitch definition and enough structure to help petals maintain their shape.
A DK-weight cotton yarn creates delicate flowers without making them overly bulky.
For the ivory petals, select a smooth yarn with minimal fuzz. This allows the Tunisian stitches to remain visible.
The magenta center can use the same yarn weight for a coordinated appearance.
For the leaves, slightly firmer cotton yarn helps maintain their elongated shape.
Recommended Hook Sizes
Use a 4 mm Tunisian crochet hook for the petals and leaves.
A regular 3.5 mm crochet hook works well for smaller details such as flower centers, buds, and narrow stem coverings.
Because the petals are relatively narrow, a short Tunisian hook with sufficient room to hold all the loops may also work.
If your fabric curls excessively, try a slightly larger Tunisian hook.
Crochet Stitches and Techniques Used
This project combines Tunisian crochet and traditional crochet stitches.
Basic crochet abbreviations:
| Abbreviation | Meaning |
|---|---|
| ch | Chain |
| sc | Single crochet |
| hdc | Half double crochet |
| dc | Double crochet |
| sl st | Slip stitch |
| st(s) | Stitch(es) |
| MR | Magic ring |
| inc | Increase |
| dec | Decrease |
| TSS | Tunisian simple stitch |
Understanding Tunisian Simple Stitch
Tunisian crochet works with forward and return passes.
During the forward pass, loops are collected onto the hook.
During the return pass, those loops are worked off the hook.
For the standard return pass:
- Yarn over and pull through one loop.
- Yarn over and pull through two loops.
- Repeat the second action until one loop remains.
That remaining loop begins the following row.
For Tunisian simple stitch, insert the hook behind the front vertical bar of the next stitch, yarn over, and pull up a loop.
This technique creates the textured vertical pattern visible in the orchid petals.
Preparation and Gauge Notes
Before making all three orchids, crochet one practice petal.
Check that your Tunisian stitches are even and that the fabric is firm enough to hold a curved flower shape.
A perfectly flat petal isn’t essential because the final flower should have a natural, slightly cupped appearance.
However, excessive curling can make assembly difficult.
Try working with relaxed tension and using a slightly larger hook if necessary.
Petal Size
For this project, aim for petals approximately 2–3 inches long, depending on your tension.
Your petals do not need to match exact measurements, but flowers look more balanced when the corresponding petals are similar in size.
Make all the flower components before assembling the stems.
Step-by-Step Tunisian Crochet Orchid Pattern
The orchid is constructed from individual petals, flower centers, green leaves, and decorative buds.
The main arrangement uses three flowers, each made with five ivory segments and a contrasting magenta center.
Step 1: Crochet the Ivory Orchid Petals
Begin with ivory yarn and a 4 mm Tunisian crochet hook.
Each flower requires five petal-like pieces: three slightly narrower sepals and two broader side petals. For a simplified beginner-friendly shape, you can use the same petal for all five pieces.
Foundation
Ch 3.
Insert your hook into the second chain from the hook, yarn over, and pull up a loop.
Repeat in the final chain.
You should have three loops on your hook.
Complete a standard Tunisian return pass.
Increasing the Petal
Work Tunisian simple stitch across the next row, adding one extra loop near each side by pulling up a loop in the space between adjacent vertical bars.
Complete the return pass.
The row now has five stitches.
Repeat the same increase method on each following row until the petal reaches approximately 11 stitches across.
You should increase gradually rather than adding multiple stitches at once.
Creating the Rounded Shape
Work 4–6 rows of Tunisian simple stitch without increasing.
Maintain even tension and keep the side edges neat.
Shaping the Petal Tip
Begin decreasing by working two adjacent vertical bars together near each edge.
To make a TSS decrease, insert the hook behind two consecutive vertical bars and draw up one loop through both.
Work the remaining stitches normally.
Complete the return pass.
Repeat the decreases on following rows until three stitches remain.
Finish with a Tunisian slip-stitch bind-off, working the remaining vertical bars and drawing the yarn through the loop on your hook.
Fasten off, leaving a long tail for sewing.
Repeat: Make 15 ivory petals for three flowers.
For a more natural orchid shape, gently stretch the two side petals wider during blocking and leave the three sepal pieces slightly narrower.
Step 2: Create the Magenta Orchid Lip
The orchid lip, also called the labellum, is the striking magenta feature beneath the center.
Using a regular crochet hook and magenta yarn:
Ch 7.
Starting in the second chain from the hook, work:
- 1 sc
- 1 hdc
- 2 dc in each of the next 2 chains
- 1 hdc
- 1 sc
Continue around the opposite side of the foundation chain.
Work a similar sequence to create a rounded, elongated shape.
Join with a slip stitch.
For a fuller lower lip, add a decorative edging of small chain loops and slip stitches along the wider end.
You can make the edging slightly ruffled by placing two stitches into selected edge stitches.
Fasten off, leaving a sewing tail.
Make three magenta lips.
Step 3: Crochet the Small Flower Centers
The center connects the ivory petals and magenta lip.
Using ivory yarn:
Round 1: Make a magic ring and work 6 sc into it.
Round 2: Work 2 sc into each stitch around. (12 sts)
Round 3: Work 1 sc into each stitch. (12 sts)
Fasten off, leaving a sewing tail.
Make three centers.
Add a small golden-yellow embroidered detail to each center using short stitches.
This creates the appearance of the tiny colorful structures found inside orchid blossoms.
Step 4: Assemble the Orchid Flowers
Place five ivory petals on a flat surface.
Arrange three petals toward the top and sides, then position the remaining two behind the lower portion.
Overlap the narrow bases slightly so the flower forms a balanced, open shape.
Sew the petal bases together using matching ivory yarn.
Position the magenta lip at the bottom center of the flower.
Sew it securely over the petal joins.
Attach the small ivory center above the magenta section.
Adjust the flower so the petals curve outward while the magenta lip projects slightly forward.
Repeat until all three orchid flowers are complete.
Step 5: Make the Magenta Flower Buds
Flower buds give the orchid arrangement a more natural appearance.
Using magenta yarn and a 3.5 mm crochet hook:
Round 1: Make a magic ring and work 6 sc. (6 sts)
Round 2: Work 2 sc into each stitch. (12 sts)
Rounds 3–5: Work 1 sc in each stitch around. (12 sts)
Round 6: Work 2 sc together around. (6 sts)
Add a small amount of fiberfill before closing.
Fasten off and draw the remaining opening closed.
Make three buds.
You can gently shape each bud into an oval using your fingers.
Step 6: Crochet the Green Leaves
The broad green leaves help create the recognizable appearance of an orchid plant.
Using olive-green yarn and your Tunisian hook:
Ch 5.
Work a Tunisian foundation row by pulling up loops across the chain.
Complete the return pass.
Increase one stitch near each edge over the next two rows.
Continue working evenly in Tunisian simple stitch for approximately 10–12 rows.
Begin decreasing one stitch near each edge on alternate rows until the leaf narrows toward the tip.
Bind off and leave a long sewing tail.
Make four leaves.
For a natural effect, vary the leaf lengths slightly.
You can add a simple embroidered central vein using darker green yarn.
Gently shape the leaves before assembling the plant.
Step 7: Prepare the Orchid Stems
Cut three lengths of floral wire suitable for your desired arrangement.
Cover each length with floral tape, starting at the top and wrapping downward.
For a more crocheted appearance, you can also make a narrow green cord using chains and slip stitches.
Wrap the crocheted cord around the covered wire.
Secure the ends with stitches or floral tape.
Prepare additional shorter wired branches for the flower buds.
Make sure every wire end is safely covered.
Step 8: Attach the Flowers and Buds
Attach one finished flower to the upper end of each main stem.
Secure the flower base with sewing stitches and floral tape.
Position the remaining flowers at staggered heights.
Bend the stems gently so the blossoms face slightly different directions.
Attach the three magenta buds near the upper portion of the arrangement.
Keep the buds smaller and slightly higher than the open flowers to imitate new orchid growth.
Avoid overcrowding the top of the plant.
Step 9: Arrange the Green Leaves
Place the four leaves around the base of the stems.
Allow the leaves to extend outward in different directions.
Attach them to the central structure using yarn and floral tape.
For a fuller appearance, overlap the leaf bases slightly.
The leaves should frame the orchid flowers without hiding the main blossoms.
Step 10: Place the Orchid in Its Pot
Insert floral foam or another stable support into your terracotta pot.
Position the main stems in the center.
Push the covered wire ends securely into the support.
Arrange the stems until the orchid has a balanced, graceful shape.
Cover the visible support with decorative artificial moss.
Add extra support beneath the plant if necessary to prevent the pot from tipping.
Your decorative crochet orchid is now ready for finishing.
Assembly and Finishing
Inspect the entire orchid before displaying it.
Make sure the flowers are firmly attached and that no exposed wire ends remain.
Check that each leaf is securely connected to the base.
Adjust the flower angles so the blossoms face outward.
Use your fingers to gently curve the ivory petals and create a realistic flower shape.
If needed, lightly block individual petals before final assembly using a method appropriate for your yarn.
Avoid wetting materials inside the finished pot.
Finally, trim any loose yarn ends and arrange the artificial moss neatly around the stems.
Tips for a More Realistic Crochet Orchid
Small design choices can make a big difference.
Use natural flower spacing. Real orchids rarely have perfectly symmetrical flower arrangements.
Keep the petals softly curved. Slight curvature makes crochet flowers look more dimensional.
Choose muted botanical greens. Olive and moss green create a realistic contrast against ivory blossoms.
Add subtle color details. Thin magenta embroidery lines extending from the flower center can enhance the orchid appearance.
Vary stem heights. Staggered blossoms create a graceful display.
Avoid excessive stuffing. Use only enough fiberfill to shape the buds.
The goal is to achieve a natural botanical appearance without making the flowers overly rigid.
Troubleshooting Common Mistakes
Why Are My Tunisian Crochet Petals Curling?
Tunisian simple stitch naturally tends to curl because of the way the fabric is constructed.
Try using a slightly larger hook and maintaining relaxed tension.
Gentle blocking may also help.
Why Are My Flowers Uneven?
Different stitch counts or inconsistent tension can make the petals vary in size.
Count your stitches carefully after increasing and decreasing.
Make a sample petal to use as a size reference.
Why Are My Orchid Stems Falling Over?
The floral wire might be too flexible, or the base may not provide enough support.
Use appropriately sturdy craft stems and secure them firmly inside the pot.
Why Do My Leaves Look Too Flat?
Try gently bending the leaves along their central veins.
You can also add a second layer of crochet fabric for a firmer appearance.
Variations and Customization Ideas
One of the best things about this Tunisian crochet orchid pattern is the opportunity to experiment with beautiful colors.
Classic White Orchid
Use pure white petals, soft yellow centers, and dark green leaves.
Pink Phalaenopsis Orchid
Create blush pink petals with darker rose-colored centers.
Purple Orchid
Combine lavender petals with deep purple lips and soft yellow details.
Mini Crochet Orchid
Use lighter yarn, a smaller hook, and fewer flowers to create a compact desktop decoration.
Large Statement Orchid
Add more flower stems and buds to create a fuller arrangement for a console table.
You can also replace the terracotta pot with a ceramic planter to match your interior style.
How to Style Your Crochet Orchid
A potted crochet orchid looks beautiful in several areas of the home.
Place it on a wooden bookshelf alongside books and ceramic accessories for a cozy botanical display.
Use it as a centerpiece on a coffee table or sideboard.
For an elegant bedroom decoration, position it on a dresser or bedside table.
The cream and magenta combination pairs especially well with neutral interiors, warm wood finishes, and natural woven textures.
You can also give the finished orchid as a handmade housewarming or birthday gift.
Unlike fresh flowers, this decorative plant can be enjoyed throughout the year.
Care and Cleaning Instructions
Because this orchid contains yarn, wire, and decorative support materials, it should not be submerged in water.
Use a soft brush or microfiber cloth to remove dust from the flowers and leaves.
For stubborn dust, a gentle stream of cool air may help.
Avoid pulling the petals or bending the stems repeatedly.
Keep the arrangement away from prolonged direct sunlight to reduce the risk of color fading.
Store it in a dry place and avoid exposing the terracotta pot’s contents to excess moisture.
If the flower petals become slightly misshapen, gently reshape them by hand.
Frequently Asked Questions
Is Tunisian Crochet Difficult for Beginners?
Tunisian crochet is approachable for crocheters who already know basic stitches. This orchid project is better suited to intermediate makers because it combines shaping, flower construction, and assembly.
Can I Use a Regular Crochet Hook?
A regular hook may work for narrow petals if it can comfortably hold all the loops. However, a Tunisian crochet hook is recommended.
How Long Does It Take to Make a Crochet Orchid?
A three-flower arrangement may take approximately 8–12 hours, depending on your experience and the complexity of your finishing details.
What Yarn Is Best for Crochet Orchids?
DK-weight cotton is a good choice because it offers clear stitch definition and helps petals maintain their shape.
Can I Make the Orchid Without Wire?
Yes, but the stems will need another form of support. A wire-free design may not hold the same upright, curved shape.
Can I Change the Number of Flowers?
Absolutely. Make one flower for a miniature decoration or add more flowers for a larger arrangement.
Can This Crochet Orchid Be Used as a Gift?
Yes. A handmade potted orchid makes a thoughtful gift for birthdays, housewarmings, Mother’s Day, and other celebrations.
Conclusion
Creating a Tunisian crochet orchid is a rewarding way to combine decorative crochet techniques with the beauty of botanical design.
The textured ivory petals, vibrant magenta centers, delicate buds, and graceful green leaves work together to create an elegant handmade floral arrangement.
Although the project involves several separate components, the modular construction makes it easy to work at your own pace.
You can experiment with colors, adjust the number of blossoms, and personalize the pot to suit your decorating style.
Whether displayed in your home or given as a thoughtful handmade gift, this crochet orchid is a beautiful reminder that yarn can be transformed into something truly special.
Related Crochet Projects to Try Next
If you enjoyed making this Tunisian crochet orchid, explore these botanical crochet ideas:
- Crochet Rose Bouquet: Create beautiful roses in soft pastel or rich romantic colors.
- Crochet Lavender Plant: Make delicate purple flowers with slender green stems.
- Crochet Potted Succulent: Create a compact plant with textured leaves for small-space decorating.
- Crochet Lily Flower: Explore elegant petals and dimensional flower centers.
- Crochet Daisy Arrangement: Combine cheerful white blossoms with bright yellow centers for a fresh floral display.
These handmade projects are wonderful ways to continue exploring realistic crochet flowers and expand your collection of everlasting yarn plants.