Textured Crochet Tote Bag – Free Pattern with Floral Stitches and Sturdy Handles
A beautiful handmade bag can turn even the simplest outfit into something special. This textured crochet tote bag pattern combines rich forest-green yarn, raised...
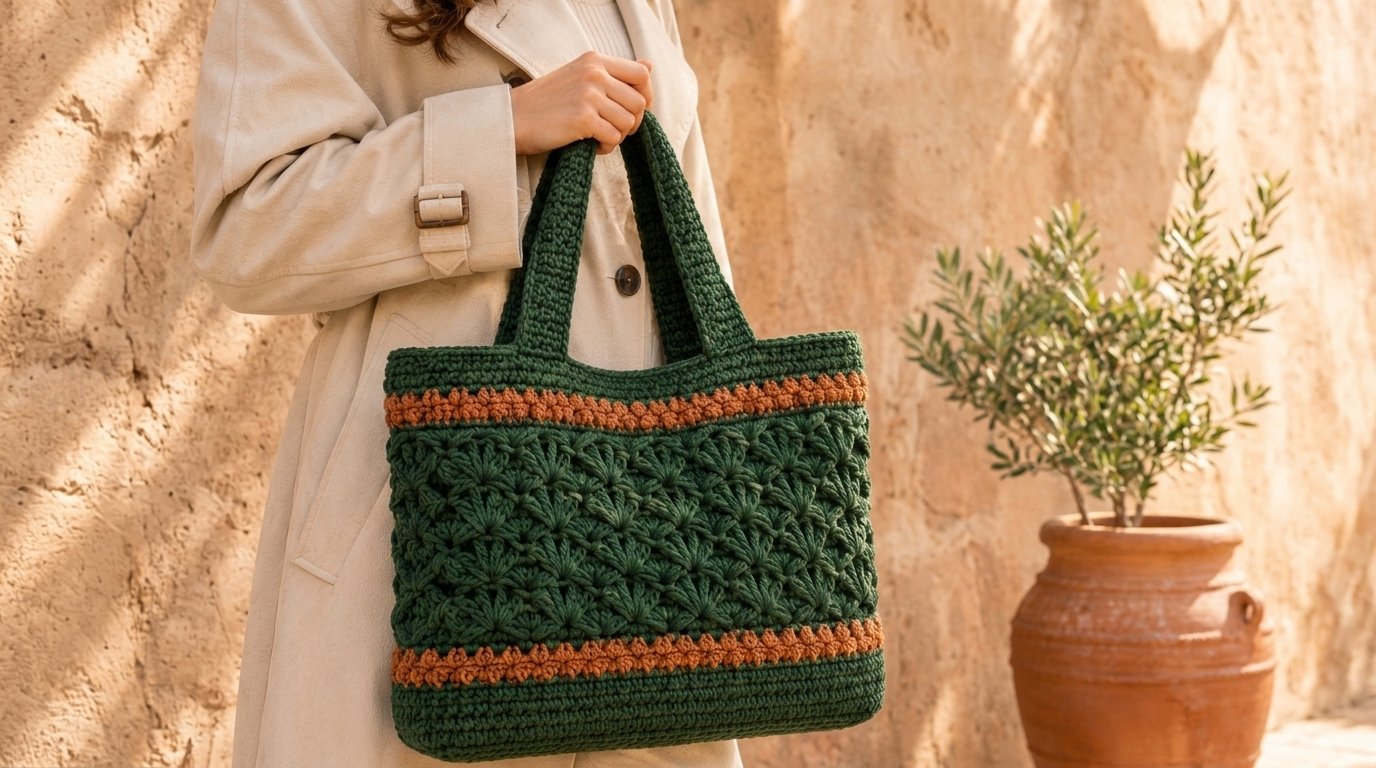
A beautiful handmade bag can turn even the simplest outfit into something special. This textured crochet tote bag pattern combines rich forest-green yarn, raised floral stitches, warm burnt-orange accents, and sturdy shoulder straps to create an eye-catching accessory that’s both practical and stylish.
Inspired by cozy autumn colors and classic handmade accessories, this crochet bag features a structured rectangular body decorated with dimensional flower-like stitches. Two narrow orange bands frame the textured center panel, giving the design a warm, earthy appearance.
The thick green handles make the tote comfortable to carry, while the spacious body provides room for everyday essentials such as a wallet, small notebook, sunglasses, and other lightweight belongings.
Whether you’re looking for a unique handmade gift or want to add another beautiful accessory to your wardrobe, this project is a wonderful opportunity to experiment with textured crochet.
In this free crochet tote bag tutorial, you’ll learn how to make the bag panels, create the raised floral texture, crochet decorative accent stripes, attach sturdy handles, and finish your bag neatly.
What Makes This Textured Crochet Tote Bag Special?
The standout feature of this crochet tote is its richly textured floral surface.
Unlike plain crochet bags made entirely with single crochet or double crochet, this design combines a sturdy base fabric with raised puff-stitch flower motifs.
The floral details create a dimensional pattern that catches the light and gives the bag a handmade, almost woven appearance.
Deep forest-green yarn provides a sophisticated base color, while burnt-orange decorative stripes introduce warmth and contrast.
The combination works particularly well for fall-inspired accessories, although the finished bag can be worn throughout the year.
The rectangular shape offers useful storage space without requiring complicated shaping techniques.
Because the bag is constructed from two panels, it’s also easy to adjust the finished width and height.
Why You’ll Love This Crochet Project
There are several reasons to add this textured tote bag to your crochet project list.
- Beautiful raised texture: Puff-stitch flowers add depth and visual interest to the bag.
- Rich, earthy colors: Forest green and burnt orange create a stylish combination.
- Practical everyday accessory: The roomy shape is useful for carrying lightweight essentials.
- Customizable dimensions: Adjust the panel width or height to create your preferred bag size.
- Comfortable shoulder straps: Wide crocheted handles complement the structured design.
- Creative stitch practice: Learn to combine single crochet, bobble stitches, and floral puff motifs.
- Thoughtful handmade gift: A personalized crochet tote makes a lovely present for someone who appreciates handmade accessories.
You can also experiment with different color combinations to create a completely different look using the same construction method.
Project Overview
| Project Detail | Description |
|---|---|
| Skill level | Confident beginner to intermediate |
| Crochet terminology | US terms |
| Yarn weight | Bulky Weight #5 |
| Main hook | 6 mm |
| Handle hook | 5 mm |
| Construction | Two rectangular panels |
| Main texture | Applied puff-stitch flower motifs |
| Accent detail | Burnt-orange bobble stripes |
| Finished width | Approximately 15–17 inches |
| Finished height | Approximately 13–15 inches |
| Estimated working time | 18–25 hours |
The dimensions and working time are estimates. This is an original, untested design-inspired pattern, so exact results will depend on yarn, gauge, and finishing.
Materials and Supplies Needed
Gather your supplies before beginning the project.
Yarn
Choose bulky-weight cotton or a sturdy cotton-blend yarn.
Main Color (MC): Forest Green
Used for the bag body, raised floral texture, upper edging, and shoulder straps.
Approximate amount: 650–950 yards.
Contrast Color (CC): Burnt Orange
Used for the two decorative bobble stripes on each panel.
Approximate amount: 70–130 yards.
The amounts are planning estimates rather than measured requirements. Purchasing extra yarn is recommended, especially if you want a larger bag.
Crochet Tools
- 6 mm crochet hook
- 5 mm crochet hook for handles
- Yarn needle
- Sharp scissors
- Stitch markers
- Measuring tape
- Row counter
Optional Supplies
- Cotton fabric for lining
- Sewing needle and matching thread
- Magnetic snap or zipper
- Lightweight bag-bottom insert
- Blocking mat
A fabric lining is useful if you plan to carry smaller items because it can prevent them from slipping through gaps in the textured fabric.
Best Yarn and Hook Recommendations
Yarn choice has a significant effect on the structure of a crochet bag.
For this project, choose a yarn that provides good stitch definition and enough firmness to support the bag’s shape.
Cotton Yarn
Cotton is an excellent option for crochet bags because it generally holds its shape better than highly elastic fibers.
It also provides clear stitch definition, making the raised floral motifs easy to see.
Cotton Blends
A sturdy cotton-blend yarn can provide a softer texture while maintaining some structure.
Acrylic Yarn
Acrylic can be used, although some varieties may stretch more noticeably when carrying weight.
For the pictured style, bulky forest-green cotton yarn is a suitable choice.
Start with a 6 mm hook for the body panels and floral motifs.
Use a 5 mm hook for the handles to create a firmer fabric.
If your bag feels too loose, reduce your hook size slightly.
Skill Level and Estimated Size
This pattern is suitable for confident beginners who are comfortable with basic crochet stitches.
The rectangular panels are straightforward, but the decorative bobbles, puff flowers, and handle attachment require additional attention.
The sample bag is designed to measure approximately:
- Width: 15–17 inches
- Height: 13–15 inches
- Handle drop: 8–10 inches
These dimensions are approximate rather than guaranteed.
To customize the size, make a gauge swatch and calculate your desired stitch count before beginning.
A smaller tote may work well as a casual handbag, while a larger version could serve as a lightweight shopping or project bag.
Crochet Stitches and Techniques Used
This pattern uses standard US crochet abbreviations.
| Abbreviation | Meaning |
|---|---|
| ch | Chain |
| sc | Single crochet |
| hdc | Half double crochet |
| dc | Double crochet |
| sl st | Slip stitch |
| st(s) | Stitch(es) |
| MR | Magic ring |
| rep | Repeat |
| RS | Right side |
| WS | Wrong side |
Bobble Stitch
For this pattern, work a four-double-crochet bobble into one stitch.
- Yarn over and insert the hook into the indicated stitch.
- Yarn over and pull up a loop.
- Yarn over and pull through two loops.
- Repeat Steps 1–3 three more times into the same stitch.
- Yarn over and pull through all five loops remaining on the hook.
- Chain one to secure the bobble.
The securing chain does not count as an additional stitch.
Puff Stitch
Yarn over and insert the hook into the indicated stitch.
Pull up a long loop to the desired height.
Repeat three more times in the same stitch.
Yarn over and pull through all the loops on the hook.
Chain one to close the puff.
Pull the loops up evenly to give each puff a rounded appearance.
Preparation and Gauge Notes
Before making the complete bag, crochet a small swatch using the main yarn and hook.
Work approximately 15 single crochet stitches across several rows.
Check that the stitches are firm and reasonably close together.
The bag should have enough structure to maintain its rectangular shape.
Loose stitches may create excessive stretching, particularly when the bag contains belongings.
If needed, try a smaller hook.
For the sample construction, each panel begins with 48 single crochet stitches.
You can increase or decrease the panel width by adjusting the number of foundation chains.
Keep an even stitch count if you want to follow the bobble-stripe instructions exactly.
Step-by-Step Textured Crochet Tote Bag Pattern
The bag consists of:
- One front panel
- One back panel
- Four decorative orange bobble rows, two on each panel
- Raised floral puff motifs
- Two shoulder straps
- Optional fabric lining
Begin by making the rectangular panels.
Step 1: Crochet the Front Panel Foundation
Using forest-green yarn and a 6 mm hook:
Foundation: Ch 49.
Row 1: Sc in the second chain from the hook and in every remaining chain. (48 sts)
Row 2: Ch 1, turn, sc in each stitch across. (48 sts)
Rows 3–6: Repeat Row 2.
You should now have six rows of firm green fabric.
This section forms the lower border of your tote bag.
Keep your edges straight and count your stitches occasionally.
Step 2: Crochet the Lower Orange Accent Stripe
Change to burnt-orange yarn.
Row 7: Ch 1, turn.
Work 1 sc in the next stitch, 1 bobble stitch in the following stitch.
Repeat across the row. (48 working stitches, including 24 bobbles)
Fasten off the orange yarn.
The bobbles should project toward the right side of the fabric.
This creates a narrow decorative stripe made of raised orange details.
Rejoin forest-green yarn.
Row 8: Ch 1, turn, sc in each stitch across. (48 sts)
The green row helps frame the orange bobbles and creates a clean transition into the textured center section.
Step 3: Crochet the Main Green Body Section
Continue working in forest-green yarn.
Rows 9–28: Ch 1, turn, and sc in each stitch across. (48 sts)
This creates a firm rectangular center panel.
The raised puff-stitch flowers will be sewn onto this area after both panels are complete.
Working the body in single crochet provides a stable background and makes it easier to position the floral motifs evenly.
You should now have a green panel with one decorative orange stripe near the lower edge.
Step 4: Add the Upper Orange Stripe
Change to burnt-orange yarn.
Row 29: Ch 1, turn.
Work 1 sc, 1 bobble stitch across the entire row.
Repeat until you reach the end. (48 working stitches, including 24 bobbles)
Fasten off the orange yarn.
Rejoin forest green.
Rows 30–34: Ch 1, turn, and work 1 sc in each stitch across. (48 sts)
Fasten off, leaving a long sewing tail.
The front panel is now complete.
It should feature two burnt-orange decorative stripes separated by a broad forest-green center section.
Step 5: Crochet the Back Panel
Repeat Steps 1–4 to create a second identical panel.
Use the same yarn, hook size, and stitch count.
Make sure both panels have the same number of rows.
Lay them flat beside each other.
The orange stripes should line up at approximately the same heights.
If the panels differ slightly in dimensions, check your stitch counts and tension before joining them.
Step 6: Crochet the Raised Floral Puff Motifs
The raised flower motifs create the textured centerpiece of the bag.
Using forest-green yarn and a 6 mm hook, begin with a magic ring.
Round 1: Work 8 sc into the magic ring. Pull tight and join with a sl st. (8 sts)
Round 2: Work the following sequence:
Sl st in the next sc, then work (puff stitch, ch 1, puff stitch) into the following sc.
Repeat four times around.
Each pair of puff stitches creates one rounded, raised petal.
Fasten off, leaving a long yarn tail.
You should now have a small four-petal puff flower.
Make approximately 48 motifs for the sample bag, allowing 24 flowers per panel.
These flower motifs provide a dimensional texture similar to the raised floral surface in the inspiration image.
Step 7: Attach the Floral Motifs
Lay the front bag panel flat with the right side facing upward.
Arrange 24 puff flowers across the central green section.
A useful starting layout is:
- Six flowers across
- Four rows of flowers
Position the motifs close together to create a dense textured appearance.
Adjust the spacing according to the actual dimensions of your flowers.
Use stitch markers or removable pins to hold the motifs in place.
Once you’re satisfied with the arrangement, sew each flower securely to the panel through its center and petal bases.
Avoid flattening the raised puff stitches.
Repeat on the back panel.
The center sections should now have a richly textured floral appearance.
Assembly and Finishing
Step 8: Join the Bag Panels
Place the front and back panels together with their wrong sides facing inward.
Align the bottom edges and the two sides.
Using forest-green yarn, join the panels with single crochet stitches along one side, across the bottom, and up the opposite side.
Work through the corresponding edge stitches and row ends of both panels.
Use stitch markers to keep the edges aligned.
Leave the upper opening unjoined.
The single crochet seam creates a decorative edge while reinforcing the bag’s structure.
Fasten off and weave in the yarn tail.
Step 9: Reinforce the Upper Opening
Join forest-green yarn at one side of the bag opening.
Work one round of single crochet around the entire upper edge.
Place stitches evenly along the tops of the front and back panels.
Join with a slip stitch.
Work another round of single crochet for extra reinforcement.
This firm upper border helps the tote maintain its shape and provides a stronger foundation for the straps.
Step 10: Crochet the Shoulder Straps
Use forest-green yarn and a 5 mm hook.
Foundation: Ch 7.
Row 1: Sc in the second chain from the hook and in every remaining chain. (6 sts)
Row 2: Ch 1, turn, sc across. (6 sts)
Repeat Row 2 until the strap reaches approximately 20–24 inches long.
Measure the strap to achieve your preferred shoulder drop.
Fasten off, leaving long sewing tails.
Make two identical straps.
The tighter stitch tension helps produce relatively sturdy handles.
Step 11: Attach the Handles
Lay the bag flat.
Place one strap on the front panel and the second strap on the back panel.
For the 48-stitch-wide sample, position the strap ends approximately over stitches 9–14 and 35–40 along each panel’s upper edge.
Adjust the positions slightly if needed to achieve a balanced appearance.
Sew each strap end securely to the inside of the bag using several rows of stitching.
A rectangular stitching pattern with diagonal reinforcement helps distribute the weight.
Repeat for all four strap ends.
Test the handles gently before using the bag.
For carrying heavier belongings, consider reinforcing the straps with woven cotton tape or a fabric lining that includes reinforced attachment points.
Step 12: Add an Optional Fabric Lining
A fabric lining can make the finished tote more practical.
Measure the inside width and height of your bag.
Cut two pieces of cotton fabric slightly larger than these measurements to allow for seams.
Sew the fabric pieces together along the sides and bottom.
Fold the upper fabric edges inward to create a neat finish.
Place the lining inside the crochet bag with the wrong sides facing each other.
Hand-sew the lining around the upper opening.
Avoid pulling the crochet fabric out of shape while attaching the lining.
If desired, add a small interior pocket for keys or other accessories.
Tips for a Beautiful Finished Crochet Tote
Maintain consistent tension. Firm, even stitches help the bag keep its shape.
Use the same hook for both body panels. This reduces differences in width and height.
Keep the floral motifs evenly spaced. Arrange all the flowers before sewing them permanently.
Choose a strong handle construction. Straps experience more tension than most other parts of the bag.
Reinforce the upper edge. Additional single crochet rounds provide better structure.
Consider adding a lining. This can improve durability and reduce stretching.
Check the bag while assembling. Small alignment adjustments are easier before the seams are complete.
Troubleshooting Common Mistakes
Why Is My Crochet Tote Bag Stretching?
Crochet fabric can stretch when carrying weight, particularly when made with loose stitches or elastic yarn.
Try a firmer hook size, reinforced handles, and a supportive lining.
Why Are My Panels Different Sizes?
Inconsistent tension or missed stitches may produce uneven panels.
Count your stitches regularly and compare the two pieces before assembly.
Why Are My Puff Flowers Uneven?
The height of the pulled-up loops affects the size of each puff.
Try pulling every loop to approximately the same height.
Why Is My Bag Opening Too Loose?
The upper edging may be worked too loosely.
Add another round of firm single crochet stitches using a slightly smaller hook.
Why Do the Handles Twist?
Make sure each strap is lying flat before sewing the ends to the bag.
Check that both ends are attached in the same orientation.
Creative Variations and Customization Ideas
The forest-green and burnt-orange combination is beautiful, but you can easily customize this textured crochet tote bag.
Neutral Everyday Tote
Use oatmeal or beige yarn with cream accent stripes for a minimalist look.
Autumn Crochet Bag
Combine chocolate brown, mustard yellow, and terracotta for a warm fall-inspired design.
Spring Floral Tote
Choose sage green, blush pink, and ivory for a softer seasonal style.
Monochrome Textured Bag
Make the entire bag in one color to emphasize the raised puff-stitch texture.
Mini Textured Handbag
Reduce the foundation chain and number of body rows to create a compact handbag.
Extra-Large Crochet Tote
Increase the width and height for a larger project bag. Add structural reinforcement if you plan to carry additional weight.
You can also change the flower motif arrangement, add pockets, or experiment with different strap lengths.
How to Style Your Textured Crochet Tote Bag
This forest-green crochet tote pairs beautifully with neutral and earth-toned outfits.
For a relaxed autumn look, wear it with a beige trench coat, cream sweater, and dark denim jeans.
The burnt-orange accents complement tan, camel, chocolate brown, and rust-colored clothing.
For casual everyday styling, pair the bag with a simple white shirt and light-wash jeans.
You can also use the tote as a handmade accessory for visiting bookstores, craft shops, or casual weekend outings.
The textured design provides enough visual interest that the rest of your outfit can remain simple.
During warmer months, the forest-green color also looks beautiful with linen clothing and light neutral fabrics.
Care and Washing Instructions
Proper care will help your handmade crochet bag maintain its shape and texture.
Always follow the care instructions for your chosen yarn.
For many cotton yarns, gentle handwashing is a suitable option.
Fill a basin with cool water and a small amount of mild detergent.
Gently clean the bag without scrubbing the raised floral motifs.
Avoid twisting or wringing the fabric.
Press out excess water using a clean towel.
Reshape the bag and lay it flat to dry.
Do not hang the bag while wet because the weight of the water may stretch the handles.
If your bag has a lining or additional structural materials, spot cleaning may be preferable.
Store the bag in a dry place and avoid leaving heavy objects inside it for extended periods.
Frequently Asked Questions
Is This Textured Crochet Tote Bag Beginner-Friendly?
Confident beginners can make this bag if they understand basic crochet stitches. The puff flowers, bobble stripes, and handle attachment may require additional practice.
What Yarn Is Best for a Crochet Tote Bag?
Cotton or a sturdy cotton blend is a good choice because it offers stitch definition and helps the bag maintain its shape.
Can I Make This Bag Without the Floral Motifs?
Yes. Simply follow the body-panel instructions and omit the raised puff flowers for a simpler striped crochet tote.
How Can I Make the Handles Stronger?
Use a smaller hook, reinforce the strap attachment points, and consider adding cotton webbing or a supportive lining.
Can I Make the Tote Bag Bigger?
Absolutely. Increase the number of foundation stitches and body rows while keeping both panels identical.
Do I Need to Add a Lining?
A lining isn’t essential for decorative or very light use, but it’s recommended if you plan to carry small items or want better structural support.
Can I Use Different Colors?
Yes. The pattern looks beautiful in neutrals, pastels, autumn shades, and bold contrasting colors.
How Do I Keep the Bag from Losing Its Shape?
Use firm stitches, strong seams, reinforced handles, and an optional bag-bottom insert.
Conclusion
This textured crochet tote bag pattern is a wonderful way to combine practical accessory making with beautiful decorative crochet techniques.
The rich forest-green yarn, dimensional puff-stitch flowers, warm burnt-orange stripes, and sturdy shoulder straps create a unique handmade bag full of personality.
Although the raised floral texture requires some patience, the simple rectangular construction makes the project approachable for crocheters who are ready to expand their skills.
You can customize the size, experiment with different colors, and add your own finishing details to create a tote that reflects your personal style.
Whether you’re making it for yourself or as a thoughtful handmade gift, this crochet bag is a beautiful project that can become a favorite everyday accessory.
Gather your yarn, prepare your crochet hooks, and enjoy making your own textured crochet tote.