Teal Crochet Hobo Bag Pattern: A Chic Crescent Purse Tutorial
Introduction This teal crochet hobo bag is a sophisticated take on a classic silhouette. The crescent shape is both roomy and flattering to carry,...
Introduction
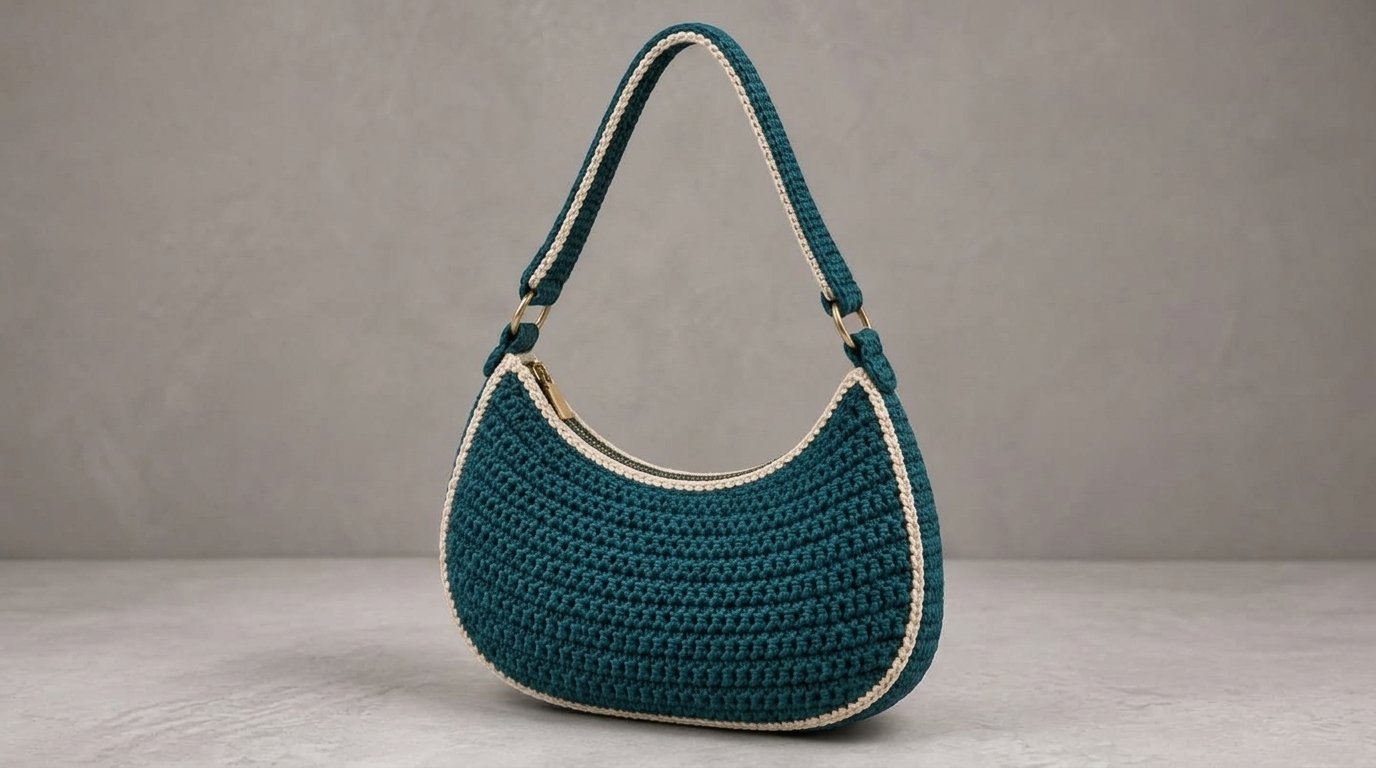
This teal crochet hobo bag is a sophisticated take on a classic silhouette. The crescent shape is both roomy and flattering to carry, and the dense single-crochet fabric gives it a sturdy, high-quality feel. A cream contrast trim outlines the edges, adding a subtle pop of color, while two gold-tone rings and a wide shoulder strap give it a polished, boutique look. A zipper closure keeps your essentials secure.
This is an intermediate pattern. The bag body is built from simple stitches, but shaping the crescent, inserting a zipper, and attaching hardware require more precision than a beginner project. If you’re comfortable with basic shaping and sewing, this bag is a satisfying next step.
Why You’ll Love This Project
- A polished, wearable silhouette. The crescent hobo shape is both practical and flattering.
- Dense, durable fabric. Single crochet with a tight tension creates a sturdy bag that holds its shape.
- Contrast trim. The cream border gives the bag a finished, professional look.
- Secure closure. A zipper keeps your belongings safe.
- Customizable. Change the colors, strap length, or hardware for a different look.
Project Overview
- Project type: Crochet bag / hobo bag
- Difficulty: Intermediate
- Estimated time: About 12–16 hours
- Suggested finished size: About 12 inches (30 cm) wide, 8 inches (20 cm) tall, and 3 inches (8 cm) deep
- Yarn weight: Worsted (medium, weight 4) cotton or cotton blend
- Crochet hook: 4.0 mm
- Main techniques: Single crochet, shaping a curved body, contrast edging, inserting a zipper, attaching hardware
- Construction: Front and back panels shaped into a crescent, joined along the edges, with a cream trim, a zipper, and a strap attached with rings
- Terminology: US crochet terms
Sizes and times are estimates and will vary with your yarn, hook, and tension.
Materials and Supplies Needed
- Worsted-weight cotton yarn in:
- Color A — teal for the body and strap: about 350–400 yards
- Color B — cream for the trim and strap accent: about 50 yards
- 4.0 mm crochet hook
- Stitch marker
- Yarn needle
- Scissors
- A zipper (about 10–12 inches)
- Two gold-tone metal rings (1-inch diameter)
- (Optional) A fabric lining and a sewing needle and thread
Choosing the Right Yarn and Hook
Cotton or a cotton blend is the best choice for this bag because it holds its shape, supports the zipper and hardware, and gives the crochet fabric a dense, durable texture. Acrylic will stretch and may not hold the bag’s shape as well.
Use a 4.0 mm hook for worsted-weight yarn. If the fabric feels too loose, go down to 3.5 mm. If it feels too stiff, go up to 4.5 mm. The finished fabric should be dense enough to be sturdy but still flexible.
There is no strict gauge for this bag, but the finished fabric should be firm enough to hold the zipper and keep the bag’s shape.
Crochet Stitches and Abbreviations
- ch — chain
- sl st — slip stitch
- sc — single crochet
- sc2tog — single crochet two stitches together (decrease)
- st — stitch
- sts — stitches
- inc — increase (two single crochet in the same stitch)
Before You Start
Check your fabric density. A bag needs a firm fabric. Work a small single crochet swatch and hold it up to the light. If you can see obvious gaps, switch to a smaller hook.
Plan the crescent shape. The crescent curve comes from increasing and decreasing at the edges of the panels. Keep track of your stitch counts so the two sides match.
Choose your zipper. A zipper that is slightly longer than the bag opening is easier to install and trim to size.
Decide on a lining. A fabric lining adds structure, protects the crochet, and makes the zipper installation neater.
Step-by-Step Crochet Instructions
The bag is built from two crescent-shaped panels, joined along the edges, with a cream trim, a zipper, and a strap.
Front Panel
Worked in rows in teal yarn.
Row 1: Ch 5. Sc in the second ch from the hook and in each ch across. (4 sts)
Row 2: Ch 1, turn. Work 1 inc in the first st, sc in the next 2 sts, inc in the last st. (6 sts)
Rows 3–10: Ch 1, turn. Work 1 inc at the beginning and end of each row. (22 sts after Row 10)
Rows 11–20: Ch 1, turn. Sc in each st across. (22 sts)
Rows 21–30: Ch 1, turn. Work 1 sc2tog at the beginning and end of each row. (2 sts after Row 30)
Row 31: Ch 1, turn. Sc2tog. Fasten off. (1 st)
The panel should now have a curved crescent shape. Repeat for the second panel.
Joining the Panels
Place the two panels together with wrong sides facing. Whipstitch or slip-stitch the side and bottom edges together, leaving the top opening free.
Turn the bag right side out.
Cream Trim
Join cream yarn at the top edge of the bag. Work sc evenly around the entire top opening. Work a second round of sc for a slightly thicker trim.
Zipper Installation
If you’re adding a lining, sew it to the inside of the bag first. Then pin the zipper along the top opening of the bag, with the zipper teeth facing inward. Hand-sew the zipper to the top edge of the bag, keeping the stitches neat and hidden.
Strap
Worked in teal with a cream stripe.
Row 1: With teal, ch 6. Sc in the second ch from the hook and in each ch across. (5 sts)
Rows 2–50: Ch 1, turn. Sc in each st across. (5 sts)
Row 51: Change to cream, work 1 row of sc. Change back to teal, work 3 rows of sc. Fasten off.
Sew the ends of the strap to the two metal rings, and attach the rings to the sides of the bag.
Size Adjustments
- Larger bag: Add more rows to the panel before decreasing.
- Smaller bag: Reduce the number of straight rows before the decreases.
- Longer strap: Add more rows to the strap.
Assembly and Finishing
Weave in all ends on the inside of the bag. If you added a lining, sew it to the inside of the bag along the top edge. Block the bag lightly by pinning it to shape and misting it with water, then let it dry fully.
Tips for Best Results
- Keep the fabric dense. A tighter tension gives the bag a sturdier, more professional look.
- Match your panels. Count stitches in both panels to ensure they are the same size before joining.
- Sew the zipper carefully. Hand-sewing the zipper gives you the most control and a neater finish.
- Reinforce the strap. Sew the strap ends to the rings with a double strand of yarn and several passes.
- Block the finished bag. Blocking helps the bag hold its crescent shape.
Common Mistakes and Troubleshooting
The bag looks floppy. The fabric is likely too loose. Switch to a smaller hook or add a fabric lining.
The zipper is difficult to sew. Pin the zipper in place first, and use a fine needle and thread. A zipper that is slightly longer than the bag opening is easier to install.
The strap sags. A cotton strap will stretch over time. Add a fabric strap inside the crochet strap for support.
The bag isn’t symmetrical. The two panels may have different stitch counts. Recount before joining.
The cream trim looks uneven. Work the trim with an even tension and count the stitches along the top edge.
Creative Variations
- Different colors. Swap the teal for a sage green, or a classic black.
- Lined version. Add a cotton lining for a more finished interior and additional structure.
- Shorter strap. Use a wristlet handle for a small evening bag.
- Larger bag. Increase the number of rows in the body panels for a tote-sized bag.
How to Use or Style Your Crochet Project
This bag suits casual and smart-casual outfits. Pair it with a simple white top and jeans, or a summer dress. Because the bag is decorative, keep it away from open flames and supervise it around pets that chew on yarn.
Care and Maintenance
Hand wash in cool water with mild soap, or machine wash on gentle in a mesh bag if the yarn label allows. Do not wring; roll in a towel to remove excess water. Reshape the bag while damp and let it dry flat. Store it in a dust bag or pillowcase to protect the strap and hardware. Always follow the yarn label’s care instructions.
Frequently Asked Questions
Can a beginner make this bag?
It’s best treated as intermediate. Beginners who are comfortable with shaping and sewing can make it.
How much yarn does the bag use?
About 350–400 yards of teal yarn, plus about 50 yards of cream for the trim.
Do I need to line the bag?
It’s optional, but a lining adds structure and makes the zipper installation neater.
Will the bag stretch?
Cotton holds its shape better than acrylic. If it stretches, a lining will help.
Can I use acrylic yarn?
Yes, but cotton is recommended for durability and shape.
How do I attach the handle securely?
Sew the strap ends to the rings with a double strand of yarn, then reinforce with several passes.
Can I make the bag in a different color?
Yes. The bag is easy to customize with different colors.
Conclusion
This teal crochet hobo bag is a chic, practical project that comes together with simple single crochet and a few thoughtful details. The crescent shape is both roomy and flattering, the cream trim adds a polished touch, and the gold hardware and zipper give it a boutique feel. Make one for yourself or as a gift, and enjoy a bag that’s as stylish as it is handmade.
Related Crochet Projects
If you enjoy this bag, you might also like a simple crochet tote with a striped handle, a crochet wristlet with a zipper, a crochet market bag with netting, or a crochet crossbody bag with a long strap.