Sunrise Ridge Crochet Baby Blanket Free Pattern
The Sunrise Ridge blanket is a colorful, textured baby blanket made almost entirely with half double crochet. Its deep teal sections are balanced by...
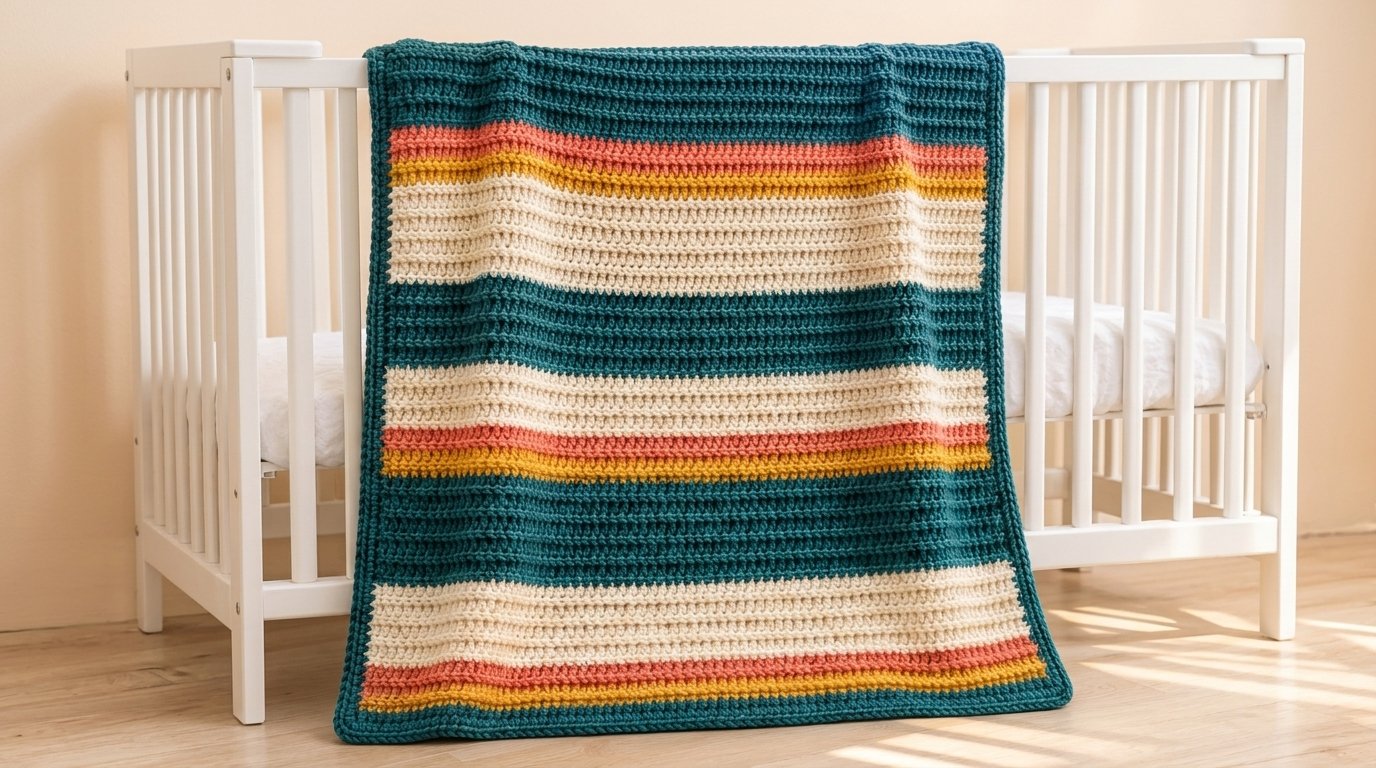
The Sunrise Ridge blanket is a colorful, textured baby blanket made almost entirely with half double crochet. Its deep teal sections are balanced by warm ivory panels and narrow coral and mustard stripes, creating a modern design that works well in many nursery color schemes.
This crochet baby blanket free pattern uses back-loop stitches to form horizontal ridges without complicated post stitches or open lace. The solid fabric, repetitive rows, and simple rectangular construction make it approachable for beginners who can already chain and work half double crochet.
The instructions below provide a complete, accessible pattern. The stitch counts and dimensions have been mathematically checked, but the pattern has not been physically tested. Crochet a gauge swatch and measure your work as you go.
Why You’ll Love This Project
The body is worked as one rectangle, so there are no motifs to join and no panels to sew together. After the foundation row, every body row uses the same basic stitch placement.
Color changes add visual interest without introducing difficult techniques. Because the narrow accent stripes are only two rows deep, you can use small amounts of leftover yarn for the coral and mustard sections.
The raised ridges give the blanket a polished texture while maintaining a relatively solid surface. A simple two-round border straightens the edges and reinforces the corners.
It is a practical project for nursery décor, supervised stroller use, tummy time, or a baby-shower gift. Parents and caregivers should follow current safe-sleep guidance and keep loose blankets out of an infant’s unsupervised sleep space.
Project Overview
- Project type: Rectangular crochet baby blanket
- Difficulty: Beginner
- Estimated time: 16–22 hours
- Estimated finished size: 30½ by 36 inches after edging
- Yarn weight: Medium or worsted weight, category 4
- Hook: 5.5 mm, US I-9, or size needed for gauge
- Main techniques: Chain, half double crochet, back-loop-only crochet, single crochet, slip stitch, and color changes
- Construction: One striped rectangle with a two-round border
- Terminology: US crochet terms
Final dimensions are estimates. Yarn choice, hook size, tension, washing, and blocking can all affect the result.
Materials and Supplies Needed
- Approximately 1,150–1,300 yards of soft category 4 yarn
- Approximately 650 yards deep teal
- Approximately 400 yards warm ivory
- Approximately 100 yards coral
- Approximately 75 yards golden mustard
- 5.5 mm crochet hook
- Two locking stitch markers
- Yarn needle
- Scissors
- Flexible measuring tape
Choose smooth yarn with securely spun fibers. Avoid novelty yarn, eyelash yarn, loose sequins, beads, buttons, and decorations that could detach.
Choosing the Right Yarn and Hook
A smooth, washable acrylic, cotton-acrylic blend, or another soft yarn labeled as suitable for baby projects is a practical choice. Check the yarn label for fiber content and care instructions before purchasing.
Worsted-weight yarn creates a warm blanket with clearly defined ridges. A lighter yarn can also work, but it will produce a smaller, thinner blanket unless you increase the stitch and row counts.
The suggested 5.5 mm hook should create fabric that is flexible without having large gaps. If your stitches feel stiff, try a hook one size larger. If the fabric is loose or the gaps are wider than desired, try a smaller hook.
Because finished size matters more than matching a particular hook, make a swatch and adjust your hook until your gauge is close to the pattern gauge.
Crochet Stitches and Abbreviations
- ch — chain: Yarn over and pull the yarn through the loop on the hook.
- sl st — slip stitch: Insert the hook into the indicated stitch, yarn over, and pull through the stitch and the loop on the hook.
- sc — single crochet: Insert the hook, yarn over, pull up a loop, yarn over, and pull through both loops.
- hdc — half double crochet: Yarn over, insert the hook, yarn over, pull up a loop, yarn over, and pull through all three loops.
- BLO — back loop only: Work into only the loop farthest from you at the top of the stitch.
- st — stitch
- sts — stitches
- RS — right side
- WS — wrong side
The turning chain does not count as a stitch anywhere in this pattern.
Before You Start
Gauge
Work a swatch at least 6 inches square in back-loop-only half double crochet.
The target gauge is approximately:
- 13 hdc = 4 inches
- 11 rows = 4 inches
Wash and dry the swatch according to the yarn label before measuring if you expect to launder the finished blanket the same way.
Pattern Notes
The blanket begins with 98 chains and has 96 working stitches in every body row.
Place one stitch marker in the first stitch and another in the last stitch. Move them up with each row until you can identify the edge stitches confidently.
Every body row is worked in the back loops. This creates the horizontal ridge visible on the front and back of the blanket.
Change color while completing the final hdc of the row before the new color begins. On the final yarn-over of that stitch, drop the old color and pull through with the new color.
Cut and secure the old yarn at each color change. The stripe intervals are too far apart to carry yarn neatly along the edge.
Step-by-Step Crochet Instructions
Color Key
- A: Deep teal
- B: Golden mustard
- C: Coral
- D: Warm ivory
Foundation and First Row
With Color A, ch 98.
Row 1, RS: Hdc in the third ch from the hook and in each remaining ch across. You should have 96 hdc. Ch 2 and turn.
The skipped two chains create the turning space and do not count as a stitch.
Establish the Ridge Pattern
Row 2, WS: Working BLO, hdc in the first st and in every st across. Confirm that you have 96 hdc. Ch 2 and turn.
Repeat Row 2 for all remaining body rows, following the color sequence below. Every row must contain 96 hdc.
Complete Color Sequence
Work the following 96-row sequence:
- Rows 1–4: Color A
- Rows 5–6: Color B
- Rows 7–8: Color C
- Rows 9–16: Color D
- Rows 17–28: Color A
- Rows 29–30: Color B
- Rows 31–32: Color C
- Rows 33–40: Color D
- Rows 41–52: Color A
- Rows 53–60: Color D
- Rows 61–62: Color B
- Rows 63–64: Color C
- Rows 65–76: Color A
- Rows 77–78: Color B
- Rows 79–80: Color C
- Rows 81–88: Color D
- Rows 89–96: Color A
At the end of Row 96, do not fasten off Color A. Remove the hook temporarily, lengthen the working loop, and weave in all other yarn tails before starting the border.
Checking the Body
The unbordered rectangle should measure approximately 29½ inches wide by 35 inches long.
Count the stitches at several points across the final row. If you still have 96 stitches and the rectangle lies reasonably flat, you can continue to the border.
Small differences in size are normal. If the width is correct but the blanket is short, add an even number of teal rows before beginning the border. If it is too long, stop after an even-numbered row in the final teal section.
First Border Round
Continue with Color A.
Rotate the blanket so you can work around its perimeter. Keep the right side facing you.
- Ch 1.
- Work 3 sc in the first corner stitch.
- Work 1 sc in each of the next 94 stitches across the top.
- Work 3 sc in the final top stitch.
- Work 72 sc evenly down the first side edge. A useful rhythm is approximately 3 sc for every 4 row ends.
- Work 3 sc in the first foundation-chain corner.
- Work 1 sc into each of the next 94 unused foundation loops.
- Work 3 sc in the final foundation-chain corner.
- Work 72 sc evenly up the second side.
- Join with a sl st to the first sc.
The first border round contains approximately 344 sc. The exact side count may need a small adjustment if your row gauge differs, but both sides must contain the same number of stitches.
If the side edge puckers, remove a few evenly spaced side stitches. If it pulls inward, add a few. Do not change the 96-stitch top and bottom counts.
Second Border Round
Ch 1.
Sc in each stitch until you reach the center stitch of the first three-stitch corner group. Work 3 sc in that center stitch.
Continue working one sc in every stitch and 3 sc in the center stitch of each remaining corner group. Join with a sl st to the first sc.
Fasten off, leaving a 6-inch tail for weaving.
Assembly and Finishing
This blanket does not require conventional assembly. Finishing consists of securing the yarn tails, shaping the corners, and lightly blocking the fabric.
Thread each yarn tail onto a yarn needle. Weave it back and forth through several stitches on the wrong side, change direction once, and trim the excess. Pay particular attention to the short tails created by the narrow accent stripes.
Lay the blanket on a clean, flat surface. Smooth the sides until the ridges lie straight and the corners are square. Block only with a method suitable for the yarn fiber.
Avoid applying a hot iron directly to the fabric. Excessive heat can flatten acrylic fibers permanently.
Tips for Best Results
Count all 96 stitches at the end of every few rows. Missing the final stitch is the most common cause of slanted blanket edges.
Keep the two edge stitches slightly looser than the center stitches. Tight edge stitches can shorten the sides and make the finished rectangle curve.
Make all color changes on the same edge. This keeps the tails together and makes them easier to secure before adding the border.
Use a smooth, solid-color yarn if you want the raised ridges to remain clearly visible. Highly variegated yarn can obscure the texture and compete with the planned stripe sequence.
Measure the blanket while it lies flat without stretching it. Back-loop fabric has some vertical flexibility, so hanging measurements may be misleading.
Common Mistakes and Troubleshooting
The edges are becoming narrower
You are probably missing the first or last stitch. Use markers in both edge stitches and confirm that every row contains 96 hdc.
The blanket is growing wider
An accidental stitch may have been worked into the turning chain. The ch 2 never counts as a stitch, so work the final hdc into the marked last stitch instead.
The ridges are inconsistent
Check that every hdc is being placed into the back loop only. Working through both loops creates a flatter section.
The color changes look loose
Tug the old and new yarn gently after completing the first few stitches of the new row. Do not tie bulky knots. Secure both tails carefully with a yarn needle.
The border is wavy
Too many stitches were probably placed along the side edges. Remove the first border round and reduce the number of side stitches evenly.
The border pulls inward
The side edges need more stitches, or the border was made with tighter tension. Add several evenly distributed side stitches or use a hook one size larger for the border.
Creative Variations
For a quieter nursery palette, replace coral and mustard with powder blue and sage while retaining the same stripe sequence.
For a nearly monochromatic version, use three shades from one color family. A combination of deep teal, medium teal, pale aqua, and ivory would preserve the design’s visual rhythm.
To change the width, begin with any number of chains that produces your preferred measurement, then add two turning chains. No stitch multiple is required.
To change the length, add or remove rows within the wide teal or ivory sections. Keep each modification symmetrical if you want the stripe balance to remain similar.
A wider border can be created by adding one or two more single-crochet rounds. Continue placing 3 sc in the center corner stitch on every round.
How to Use or Style Your Crochet Project
The finished blanket can add a strong modern accent to a neutral nursery. The teal border frames the lighter panels, while the narrow warm-colored stripes coordinate well with cream, natural wood, and simple white furniture.
It can also be used during supervised stroller outings, floor play, or tummy time. Fold it over the back of a nursery chair when it is not in use to display the textured ridges.
When gifting the blanket, include the yarn label so the recipient has accurate fiber and care information. Avoid tying detachable decorations onto the blanket itself.
A loose blanket should not be placed in an infant’s unsupervised sleep area. Parents and caregivers should follow current safe-sleep recommendations for the child’s age and situation.
Care and Maintenance
Always follow the care instructions printed on the yarn label.
If the selected yarn is machine washable, place the blanket in a mesh laundry bag and use a gentle cycle with cool water. A mild detergent can help protect the yarn’s color and texture.
Air-drying the blanket flat is the gentlest option. Smooth the border, straighten the ridges, and reshape the corners before allowing it to dry completely.
Do not hang a wet blanket from one edge because the additional weight may stretch the fabric. Store it clean, dry, and loosely folded.
Inspect the blanket periodically for pulled loops, loose ends, or damaged edging. Repair any damage before returning it to use.
Frequently Asked Questions
Is this pattern suitable for a complete beginner?
It is suitable for a beginner who can make chains and half double crochet stitches. Practice working in the back loop on a small swatch before beginning the full foundation chain.
Can I use DK-weight yarn?
Yes, but DK yarn will make a smaller and lighter blanket at the listed stitch count. Make a swatch, calculate the number of stitches needed for the desired width, and expect to add more rows.
Can I make the blanket in one color?
Yes. The back-loop ridges provide enough texture for an attractive solid-color blanket. Ignore the color changes and work all 96 rows with one yarn.
How can I make a stroller-size blanket?
Aim for approximately 26 by 30 inches. Use your gauge swatch to reduce the foundation width and stop the body when it reaches about 29 inches before edging.
Why doesn’t the turning chain count as a stitch?
Treating it only as turning height helps keep the edges dense and prevents visible gaps. The first hdc is always worked into the first actual stitch.
Can I carry the yarn instead of cutting it?
Carrying yarn through two-row accent stripes is possible, but carrying it across the wide sections would create long floats. Cutting and weaving the yarn produces a cleaner and safer finish.
How much yarn should I buy?
Plan for approximately 1,150–1,300 yards of worsted-weight yarn. Buy a little extra if your tension is loose, you want a larger blanket, or your yarn has limited yardage per skein.
Has this pattern been physically tested?
No. It is an original, mathematically checked pattern draft and has not been physically tested. Make a gauge swatch, measure regularly, and adjust the hook or dimensions when necessary.
Conclusion
The Sunrise Ridge blanket combines a beginner-friendly stitch with a distinctive modern palette. Its repeated back-loop rows create texture without complicated shaping, while the narrow coral and mustard accents brighten the broader teal and ivory sections.
Once you are comfortable finding the back loop, the body settles into a relaxing rhythm. Keep the original palette or adapt the stripes to suit a nursery, season, or gift recipient.
Related Crochet Projects
- A coordinating back-loop crochet stroller blanket
- A solid-color textured crib blanket with a wider border
- A striped half double crochet nursery cushion
- A small crochet lovey-style comfort square without attached decorations