Ribbed Crochet Ankle Socks Pattern in Burgundy and Ivory
Introduction Crocheted socks have a bad reputation for being bulky or slipping off. This ribbed ankle sock pattern solves both problems. Worked in a...
Introduction
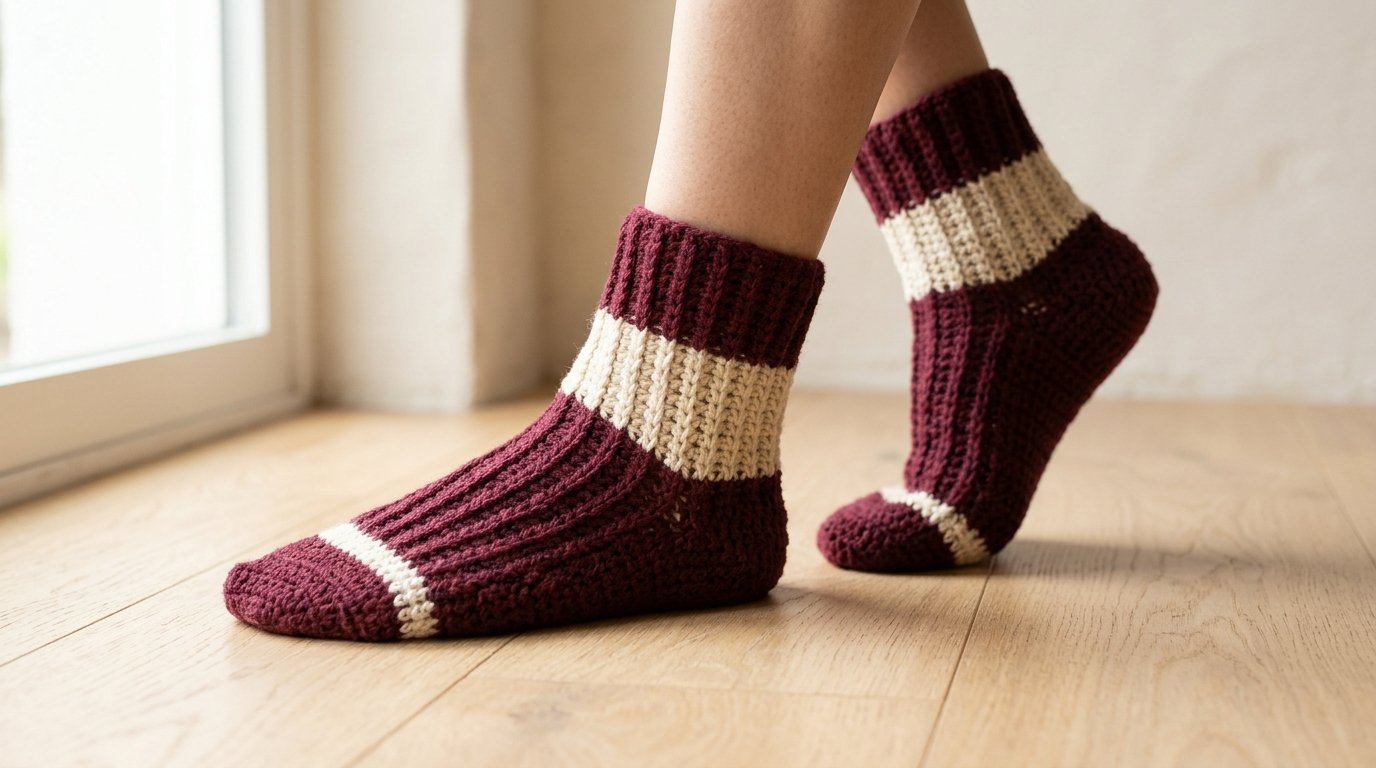
Crocheted socks have a bad reputation for being bulky or slipping off. This ribbed ankle sock pattern solves both problems. Worked in a simple 2×2 single crochet ribbing, the fabric stretches to hug the ankle and foot, and a short-row heel shapes the sock so it sits comfortably on the foot instead of bunching.
The design uses a warm color-block: deep burgundy for the cuff and foot, a wide band of warm ivory at the ankle, and a narrow ivory stripe near the toe. The result is a cozy, handmade pair that works as house socks, a quick gift, or a warm layer under boots.
This is a beginner-friendly pattern. If you can single crochet, work in the back loop, and make basic increases and decreases, you can make these socks.
Why You’ll Love This Project
- Stretchy and comfortable. The ribbed fabric moves with the foot and stays up on the ankle.
- Beginner-friendly. Only chain, single crochet, and basic shaping are used.
- Quick to make. Each sock works up in a few hours.
- Gift-worthy. A handmade pair makes a thoughtful gift, especially with a personalized color palette.
- Simple shaping. The short-row heel is easier than a heel flap and gusset.
Project Overview
- Project type: Crochet socks / ankle socks
- Difficulty: Beginner
- Estimated time: About 3–5 hours per sock
- Suggested finished size: Fits adult women’s shoe sizes 6–9 (adjustable for other sizes); sock length about 8 inches (20 cm)
- Yarn weight: Worsted (medium, weight 4) cotton or wool blend
- Crochet hook: 4.0 mm
- Main techniques: Single crochet in the back loop, working in the round, simple increases and decreases, short-row heel
- Construction: Worked cuff-down from the ankle, with the foot and a short-row heel, and a toe closing at the end
- Terminology: US crochet terms
Sizes and times are estimates and will vary with your yarn, hook, and tension.
Materials and Supplies Needed
- Worsted-weight sock yarn, wool blend, or soft cotton in:
- Color A — deep burgundy: about 150 yards per pair
- Color B — warm ivory: about 60 yards per pair
- 4.0 mm crochet hook
- Stitch markers
- Yarn needle
- Scissors
Choosing the Right Yarn and Hook
Yarn choice makes a big difference in crocheted socks. A wool or wool-blend sock yarn is the best option because it’s warm, stretchy, and durable. A soft cotton or cotton-blend yarn is a good alternative for people who prefer non-wool fibers or who live in warmer climates.
Avoid 100% acrylic yarn, which does not stretch well and can make socks feel stiff and clammy. A small amount of nylon in the blend adds durability, which matters for socks.
Use a 4.0 mm hook for worsted-weight yarn. If your fabric feels too dense and stiff, go up to 4.5 mm. If it feels too loose and gappy, go down to 3.5 mm. The finished fabric should be dense enough to be warm but stretchy enough to pull over the foot.
Crochet Stitches and Abbreviations
- ch — chain
- sl st — slip stitch
- sc — single crochet
- sc2tog — single crochet two stitches together (decrease)
- sc in blo — single crochet in the back loop only
- st — stitch
- sts — stitches
- inc — increase
Before You Start
Check your stretch. Work a short ribbed swatch and stretch it gently. If it doesn’t stretch enough, adjust your hook or choose a more elastic yarn.
Mark the start of the round. These socks are worked in continuous rounds, so placing a stitch marker at the start of each round keeps you on track.
Plan for a good fit. Measure the foot you’re making the socks for: around the ankle, around the instep, and the foot length from heel to toe tip. Adjust the stitch counts to match.
Change colors cleanly. Work the final stitch of a round in the new color by pulling the new color through the final loop. This avoids visible tails on the outside.
Step-by-Step Crochet Instructions
These socks are worked from the cuff down. Each sock has the same construction, so you can work them one at a time or in parallel.
Cuff
Round 1: With Color A, ch 30. Join with a sl st to form a ring. Work 1 sc in each ch around. Join with a sl st. (30 sts)
Round 2: Ch 1, sc in blo in each st around. Join with a sl st. (30 sts)
Rounds 3–6: Repeat Round 2, working sc in blo in each st around. (30 sts)
Fasten off Color A after Round 6.
Ankle Band
Rounds 7–12: Join Color B. Ch 1, sc in blo in each st around. Join with a sl st. (30 sts)
Fasten off Color B after Round 12.
Foot
Rounds 13–16: Join Color A. Ch 1, sc in blo in each st around. Join with a sl st. (30 sts)
Round 17: Work a narrow ivory stripe. Join Color B and work sc in blo in each st around. Join with a sl st. (30 sts)
Rounds 18–22: Join Color A again and work sc in blo in each st around. Join with a sl st. (30 sts)
Short-Row Heel
The heel is worked flat on the back half of the sock.
Heel row 1: With Color A, work 15 sc (half the stitches) in blo, then chain 1 and turn. (15 sts)
Heel rows 2–3: Work sc in blo in each st across. Chain 1 and turn. (15 sts)
Heel row 4: Sc in blo in the first 4 sts, sc2tog, sc in blo in the next 5 sts, sc2tog, sc in blo in the last 4 sts. Chain 1 and turn. (13 sts)
Heel rows 5–6: Work sc in blo in each st across. Chain 1 and turn. (13 sts)
Heel row 7: Sc in blo in the first 3 sts, sc2tog, sc in blo in the next 3 sts, sc2tog, sc in blo in the last 3 sts. Chain 1 and turn. (11 sts)
Heel row 8: Work sc in blo in each st across. Fasten off. (11 sts)
Sew the heel flap to the back half of the sock with a simple whipstitch.
Toe
Round 23: Join Color A and work sc in blo in each st around the toe opening. Join with a sl st. (30 sts)
Round 24: Sc in blo in the next 3 sts, sc2tog. Repeat from * to * around. (24 sts)
Round 25: Sc in blo in the next 2 sts, sc2tog. Repeat from * to * around. (18 sts)
Round 26: Sc in blo in the next st, sc2tog. Repeat from * to * around. (12 sts)
Fasten off, leaving a tail. Thread the tail through the remaining stitches and pull closed.
Size Adjustments
- Smaller sock: Use a 3.5 mm hook and 28 starting chains; follow the same pattern.
- Larger sock: Use a 4.5 mm hook and 34 starting chains; adjust rounds to match.
- Longer sock: Add extra rounds in the foot section.
- Tighter cuff: Work more rib rounds at the cuff.
Assembly and Finishing
Weave in all ends on the inside of the sock. Block the socks by pinning them lightly to shape and misting them with water, then letting them dry fully. Blocking helps the ribbing stretch and recover evenly and smooths the heel join.
Tips for Best Results
- Work the ribbing with a firm tension. If the ribbing is too loose, the socks will sag.
- Check the foot length. Crocheted socks can stretch. Measure the foot, then subtract about ½ inch so the sock doesn’t overstretch.
- Count stitches in the heel. The short rows depend on stitch counts.
- Match your second sock to the first. Use the same hook and tension so the pair fits the same.
- Block before wearing. Blocking gives the ribbing a chance to settle.
Common Mistakes and Troubleshooting
The cuff is too tight or too loose. Check the starting chain count. If the cuff is too tight, switch to a larger hook. If it’s too loose, go smaller.
The heel doesn’t fit well. The short rows may be off by a stitch or two. Recount the heel rows and double-check the join.
The sock twists. Working in the back loop only should prevent twisting, but check that you’re joining correctly each round.
The toe looks lumpy. The last round may need fewer decreases or a firmer tension.
The socks aren’t stretchy enough. The yarn may be too stiff. Wool blends stretch better than cotton or acrylic.
Creative Variations
- Stripes. Alternate burgundy and ivory every three rounds for a striped sock.
- Solid color. Work the entire sock in one color for a minimalist look.
- Longer length. Add rounds before the cuff to make mid-calf socks.
- Ribbing options. Use a different rib pattern (like 3×1) for a different texture.
- House slipper. Add a leather or anti-slip pad to the sole for house slippers.
How to Use or Style Your Crochet Project
These ankle socks are ideal for lounging at home, wearing under boots in winter, or layering with slippers. Keep them away from open flames, and supervise them around pets that chew on yarn. They’re also a thoughtful handmade gift for friends and family.
Care and Maintenance
Hand wash in cool water with mild soap, or machine wash on gentle in a mesh bag if the yarn label allows. Do not wring; roll in a towel to remove excess water. Reshape and lay flat to dry, keeping the ribbing smooth. Store the socks flat or rolled to prevent stretching out of shape. Always follow the yarn label’s care instructions.
Frequently Asked Questions
Are crocheted socks comfortable?
Yes, when they’re made from the right yarn and fit properly. Wool blends and cotton blends work best.
Can I use acrylic yarn for socks?
Acrylic is not recommended because it doesn’t stretch well and can make socks feel clammy.
How do I make socks in a different size?
Adjust the starting chain count and the number of rounds. Measure the foot you’re fitting.
Do I have to make a short-row heel?
For this pattern, yes, but it’s a simple version. If you’re more comfortable with a heel flap, adapt the pattern accordingly.
How long does it take to make a pair?
About 6–10 hours total for the pair, depending on your pace.
Can I make these with a different yarn weight?
Yes, but you’ll need to adjust the hook size and stitch counts. A swatch is essential.
How do I keep the socks from slipping off?
The ribbing should hold them in place. If they still slip, reduce the starting chain count or add more ribbing rounds at the cuff.
Conclusion
These ribbed crochet ankle socks are a cozy, practical project that even a beginner can tackle. The 2×2 ribbing gives them stretch and comfort, and the short-row heel shapes them to the foot. With a burgundy and ivory color-block, they look handmade in the best way, and they make a warm, thoughtful gift.
Related Crochet Projects
If you enjoy this sock pattern, you might also like a pair of crochet slippers with a simple sole, a crochet leg warmer in the same ribbing, a crochet boot cuff for winter boots, or a pair of fingerless gloves in matching yarn.