Oversized Crochet Sweater Pattern – Cozy Textured Pullover with Balloon Sleeves
There’s something special about a handmade sweater that feels like a warm hug. This oversized crochet sweater pattern combines cozy texture, beautiful balloon sleeves,...
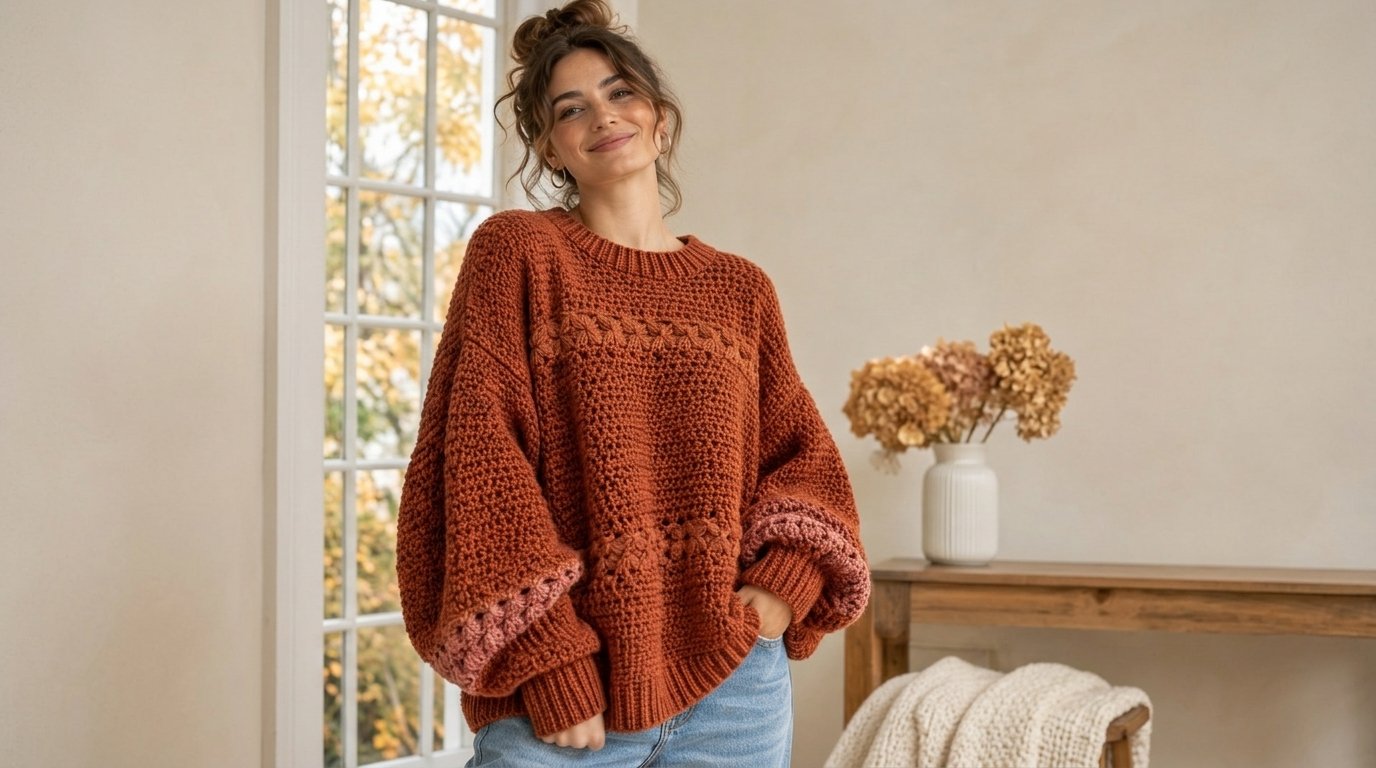
There’s something special about a handmade sweater that feels like a warm hug. This oversized crochet sweater pattern combines cozy texture, beautiful balloon sleeves, decorative floral details, and a relaxed silhouette to create the perfect statement piece for fall and winter.
Made with rich rust-orange yarn and delicate dusty-pink accents, this chunky-looking crochet pullover brings warmth and personality to everyday outfits. Its generous sleeves, ribbed neckline, and textured body give it a modern, comfortable appearance while maintaining a charming handmade style.
Whether you love wearing oversized sweaters with jeans, leggings, or skirts, this design is a versatile addition to your handmade wardrobe.
The sweater is constructed using simple rectangular body panels, gently tapered sleeves, decorative flower motifs, and separate ribbed edges. This approach makes the project approachable for crocheters who are comfortable with basic stitches and ready to explore garment construction.
In this free crochet sweater tutorial, you’ll learn how to choose your size, crochet the body panels, create the oversized balloon sleeves, add floral embellishments, and assemble your pullover.
What Makes This Oversized Crochet Sweater Special?
The main attraction of this sweater is its combination of relaxed proportions and textured crochet details.
Unlike fitted crochet tops, this pullover features a roomy body with plenty of positive ease. The relaxed shape makes it comfortable to wear over a lightweight shirt or fitted top.
The balloon sleeves add personality to the design. They’re wide through the upper arms, then narrow toward the wrists, where ribbed cuffs create a softly gathered appearance.
Decorative flower motifs across the chest and lower body provide additional texture without overwhelming the sweater.
Dusty-pink accents around the sleeves add a beautiful contrast against the warm rust-orange yarn.
The ribbed neckline, cuffs, and hem bring the entire design together, giving the sweater a neat, finished appearance.
Why You’ll Love This Crochet Project
This oversized crochet sweater offers several features that make it worth adding to your project list.
- Comfortable oversized fit: The relaxed body provides room for movement and easy layering.
- Beautiful balloon sleeves: Voluminous sleeves create a trendy, cozy silhouette.
- Textured crochet stitches: Raised details add visual interest to the fabric.
- Customizable colors: Choose warm autumn tones, neutrals, soft pastels, or brighter shades.
- Simple construction: Flat body panels and sleeves are assembled with straightforward seams.
- Decorative floral accents: Small crochet flowers make the sweater feel more distinctive.
- Versatile styling: Wear it casually with jeans or dress it up with a skirt and boots.
You can also adjust the sweater length, sleeve volume, and neckline to suit your preferred fit.
Project Overview
| Project Detail | Description |
|---|---|
| Skill level | Intermediate |
| Crochet terminology | US terms |
| Yarn weight | Worsted Weight #4 |
| Recommended hook | 5.5 mm |
| Ribbing hook | 4.5 mm |
| Available sizes | XS–2XL |
| Fit | Relaxed, oversized |
| Construction | Flat panels with sewn seams |
| Main stitch | Half double crochet |
| Decorative details | Flower motifs and contrast trim |
| Estimated completion time | 18–30 hours |
The dimensions, yarn quantities, and working times in this original pattern are estimates. The pattern has not been sample-tested across all sizes. Make a gauge swatch and check your measurements as you work.
Materials and Supplies Needed
Before beginning your oversized sweater, gather the following supplies.
Yarn
Choose a soft worsted-weight yarn in two colors.
- Main Color (MC): Rust orange or terracotta
- Contrast Color (CC): Dusty pink
Approximate total yarn requirements:
| Size | Estimated Yardage |
|---|---|
| XS | 1,200–1,400 yards |
| S | 1,400–1,600 yards |
| M | 1,600–1,800 yards |
| L | 1,800–2,000 yards |
| XL | 2,000–2,300 yards |
| 2XL | 2,300–2,600 yards |
Reserve approximately 100–200 yards for the contrast-colored details, depending on how many embellishments you add.
Tools
- 5.5 mm crochet hook
- 4.5 mm crochet hook for ribbing
- Yarn needle
- Stitch markers
- Sharp scissors
- Measuring tape
- Blocking mat
- Rustproof pins
A row counter or notebook is also helpful for tracking the number of rows in each garment piece.
Best Yarn and Hook Recommendations
The best yarn for an oversized crochet sweater should feel comfortable against your skin while providing enough structure for the garment.
Acrylic Yarn
Premium acrylic yarn is often affordable, easy to care for, and available in beautiful colors. It can work well for a cozy everyday sweater.
Wool Blends
A wool-acrylic blend provides warmth and can give the sweater a soft, comfortable drape.
Cotton Blends
Cotton blends create breathable garments, although they may feel heavier and stretch differently from wool or acrylic.
For the sweater pictured, a soft rust-colored yarn with clear stitch definition is ideal.
Use a 5.5 mm hook for the main body and sleeves. A 4.5 mm hook creates firmer ribbed edges.
Always prioritize your measured gauge over the hook size printed on the yarn label.
Skill Level and Sizing Guide
This pattern is best suited to intermediate crocheters or confident beginners who have completed basic crochet projects.
You should be comfortable working in rows, counting stitches, making decreases, and sewing crocheted pieces together.
The sweater is designed with positive ease, meaning the finished garment is larger than the wearer’s body measurements.
| Size | Suggested Bust | Approx. Finished Chest |
|---|---|---|
| XS | 30–33 in | 39.5 in |
| S | 34–37 in | 44.5 in |
| M | 38–41 in | 49.25 in |
| L | 42–45 in | 54.25 in |
| XL | 46–49 in | 59 in |
| 2XL | 50–53 in | 64 in |
Choose your size based on the finished chest measurement and how oversized you want the sweater to feel.
For example, if your bust measures 38 inches and you want a relaxed fit, the medium size provides approximately 11 inches of positive ease.
For a less oversized look, consider a smaller size, provided the shoulder and armhole measurements will still fit comfortably.
Crochet Stitches and Techniques Used
This pattern uses standard US crochet terminology.
| Abbreviation | Meaning |
|---|---|
| ch | Chain |
| sc | Single crochet |
| hdc | Half double crochet |
| dc | Double crochet |
| sl st | Slip stitch |
| BLO | Back loop only |
| st(s) | Stitch(es) |
| dec | Decrease |
| rep | Repeat |
| RS | Right side |
| WS | Wrong side |
Half Double Crochet (hdc)
Yarn over, insert your hook into the next stitch, yarn over and pull up a loop. Yarn over and pull through all three loops.
Half Double Crochet Decrease (hdc2tog)
Yarn over, insert the hook into the next stitch, and pull up a loop.
Yarn over, insert the hook into the following stitch, and pull up another loop.
Yarn over and pull through all five loops.
Back Loop Only Ribbing
Working single crochet through the back loops creates a flexible, ribbed fabric suitable for cuffs, necklines, and hems.
Preparation and Gauge Notes
For a properly fitting crochet garment, gauge is especially important.
Target Gauge
13 half double crochet stitches and 10 rows = 4 inches (10 cm), measured after washing and drying the swatch.
Make a swatch larger than 4 inches so you can measure the center without including the edges.
If you have too many stitches within 4 inches, try a larger hook.
If you have too few stitches, use a smaller hook.
Because this sweater uses roomy panels, small differences in gauge can noticeably change the finished width.
Pattern Notes
- Sizes are written in the order XS (S, M, L, XL, 2XL).
- Beginning chains do not count as stitches.
- Turn at the end of every row.
- Use MC unless otherwise stated.
- Work hdc through both loops for the main sweater fabric.
- Flower motifs and contrast trim are added after garment construction.
Step-by-Step Oversized Crochet Sweater Pattern
This sweater is made in four main sections:
- Front body panel
- Back body panel
- Two balloon sleeves
- Ribbed edging and decorative motifs
The pieces are crocheted separately and sewn together.
Step 1: Crochet the Back Panel
Using MC and a 5.5 mm hook, make the following foundation chains:
| Size | Foundation Chain | Hdc Stitches |
|---|---|---|
| XS | 66 | 64 |
| S | 74 | 72 |
| M | 82 | 80 |
| L | 90 | 88 |
| XL | 98 | 96 |
| 2XL | 106 | 104 |
Row 1: Hdc in the third chain from the hook and in each remaining chain. Turn.
Row 2: Ch 2, hdc in each stitch across. Turn.
Repeat Row 2 until your back panel reaches the following row counts:
- XS: 50 rows
- S: 52 rows
- M: 54 rows
- L: 56 rows
- XL: 58 rows
- 2XL: 60 rows
Keep the same stitch count throughout.
Fasten off, leaving a long tail for sewing.
This creates the back of your oversized sweater. The separate bottom ribbing will add approximately 2 inches to the finished length.
Step 2: Crochet the Front Panel
Begin the front panel using the same foundation chain and stitch count as the back.
Work in hdc until four rows remain before the total back-panel row count for your size.
For example, for size M, work 50 full-width rows before shaping the neckline.
The front panel now needs two shoulder sections separated by an opening.
Neckline stitch counts:
| Size | Each Shoulder | Center Neck Opening |
|---|---|---|
| XS | 17 sts | 30 sts |
| S | 20 sts | 32 sts |
| M | 23 sts | 34 sts |
| L | 26 sts | 36 sts |
| XL | 29 sts | 38 sts |
| 2XL | 32 sts | 40 sts |
First Shoulder
Continue working hdc across only the first shoulder’s stitches.
Turn and work three more rows across those stitches.
Fasten off.
Second Shoulder
With the panel’s right side facing you, join yarn to the first stitch of the opposite shoulder section, after the center neckline stitches.
Work four rows of hdc across the remaining shoulder stitches.
Fasten off.
Both shoulders should now have the same total height as the back panel.
The center gap forms a shallow front neckline.
Step 3: Join the Front and Back Panels
Lay the front and back panels together with their right sides facing inward.
Align the upper edges.
Using a yarn needle and MC, sew the shoulder seams together.
Match the shoulder stitches carefully and leave the neckline opening unsewn.
Next, identify the armhole openings.
Measure downward from each shoulder seam:
- XS: approximately 9.5 inches
- S: 10 inches
- M: 10.75 inches
- L: 11 inches
- XL: 11.75 inches
- 2XL: 12.25 inches
Place stitch markers at these points.
Sew the side seams from the bottom of the sweater upward to the markers, leaving the upper sides open for the sleeves.
Turn the joined body right side out.
Step 4: Crochet the Oversized Balloon Sleeves
The balloon sleeves are what give this design its dramatic, cozy appearance.
Make two identical sleeves.
Using MC and a 5.5 mm hook, start with these foundation chains:
| Size | Foundation Chain | Starting Stitches |
|---|---|---|
| XS | 64 | 62 |
| S | 68 | 66 |
| M | 72 | 70 |
| L | 74 | 72 |
| XL | 78 | 76 |
| 2XL | 82 | 80 |
Row 1: Hdc in the third chain from the hook and across.
Rows 2–3: Ch 2, hdc across. Turn.
Beginning on Row 4, decrease one stitch at each end of selected rows by working hdc2tog over the first two stitches and again over the last two stitches.
Work these decrease rows on Rows 4, 6, 8, 10, and every other row thereafter.
Continue until you’ve completed:
- XS: 14 decrease rows
- S: 15 decrease rows
- M: 16 decrease rows
- L: 16 decrease rows
- XL: 17 decrease rows
- 2XL: 18 decrease rows
You should now have 34 (36, 38, 40, 42, 44) stitches.
Work evenly, without further decreases, until the sleeve has a total of:
- XS: 40 rows
- S: 42 rows
- M: 44 rows
- L: 46 rows
- XL: 48 rows
- 2XL: 50 rows
Fasten off.
The sleeve should be very wide at the upper edge and noticeably narrower toward the wrist.
Step 5: Sew and Attach the Sleeves
Fold each sleeve lengthwise with the right sides together.
Sew the long sleeve seam from the wrist toward the upper arm.
Turn the sleeve right side out.
Position the upper sleeve edge inside the armhole, matching the sleeve seam to the body side seam and centering the remaining sleeve edge over the shoulder seam.
Pin or clip the fabric evenly around the opening.
Sew the sleeve into place using mattress stitch or a neat whipstitch.
Because the sleeve width and armhole circumference are designed to be similar, the fabric should fit with only minor easing.
Repeat for the second sleeve.
Step 6: Crochet the Ribbed Hem
Use MC and a 4.5 mm hook.
Ch 9.
Row 1: Sc in the second chain from the hook and across. (8 sts)
Row 2: Ch 1, turn, sc BLO across. (8 sts)
Repeat Row 2 to create a long ribbed strip.
Continue until the strip fits comfortably around the bottom of the sweater.
The ribbing can be slightly shorter than the sweater’s lower circumference for a gently gathered fit.
Join the short ends of the ribbed strip.
Sew it evenly to the bottom edge, distributing any excess body fabric around the circumference.
The ribbing should measure approximately 2 inches deep, depending on your gauge.
Step 7: Crochet the Ribbed Sleeve Cuffs
Using MC and the 4.5 mm hook, ch 11.
Row 1: Sc in the second chain from the hook and across. (10 sts)
Row 2: Ch 1, turn, sc BLO across. (10 sts)
Continue until the cuff strip fits comfortably around your wrist.
Leave enough stretch so the cuff can pass over your hand.
Join the short ends to form a loop.
Attach the cuff to the sleeve opening, evenly gathering the wider sleeve edge into the narrower ribbing.
This creates the balloon effect.
Repeat for the second sleeve.
Step 8: Add the Ribbed Neckline
Use MC and a 4.5 mm hook.
Ch 7.
Row 1: Sc in the second chain from the hook and across. (6 sts)
Row 2: Ch 1, turn, sc BLO across. (6 sts)
Continue until the strip fits around the neckline with gentle stretch.
Join the ends to form a loop.
Pin the ribbing around the neck opening, distributing the fabric evenly.
Sew carefully, ensuring the neckline remains comfortable and flexible.
Avoid pulling the ribbing too tightly.
Step 9: Crochet the Decorative Flower Motifs
Small floral embellishments add charming texture to the sweater.
Using MC or CC and a 4.5 mm hook, make a magic ring.
Round 1: Work 5 sc into the ring. Join.
Round 2: In each stitch, work the following sequence:
Sl st, ch 2, 3 dc, ch 2, sl st.
Work the complete sequence into the same stitch before moving to the next.
Repeat around to create five rounded petals.
Fasten off, leaving a sewing tail.
Make approximately 12–18 flowers, depending on your size and preferred decoration.
Position the flowers in horizontal rows across the upper chest and lower front panel.
For a subtler appearance, use the main rust color.
For more contrast, use dusty pink around the lower decorative band.
Sew each flower securely through its center.
Keep the petals free so they retain their raised appearance.
Step 10: Add the Dusty-Pink Sleeve Details
Using CC and a 4.5 mm hook, add a decorative border near each sleeve cuff.
Join the yarn to the sleeve just above the ribbing.
Work one round of sc evenly around the sleeve.
Join with a slip stitch.
For a textured finish, work another round with small raised stitch groups or attach a series of dusty-pink flower motifs along the edge.
Repeat on the second sleeve.
The contrast color should complement the rust-orange body without overpowering the design.
Assembly and Finishing
Once all the sweater pieces are attached, check every seam.
Make sure the shoulders are secure, the sleeves are evenly positioned, and the ribbed edges aren’t twisted.
Weave in all loose yarn tails.
Try the sweater on before blocking.
Check the overall length, sleeve volume, and neckline comfort.
If the sleeve cuffs feel too loose, you can remake them with fewer ribbing rows.
If the hem feels too tight, remove and lengthen the ribbed strip.
Blocking
Follow the care instructions for your yarn.
Gently wash or dampen the garment if appropriate, then lay it flat on a clean blocking surface.
Arrange the body panels and sleeves into their intended shape.
Avoid overstretching the textured stitches.
Allow the sweater to dry completely before wearing it.
Tips for a Beautiful Oversized Sweater
Choose the right amount of ease. An oversized sweater should feel roomy, but it shouldn’t overwhelm your body.
Check your gauge carefully. Small changes in tension can significantly affect garment measurements.
Match your panel measurements. The front and back panels should have compatible widths and shoulder lengths.
Keep sleeve decreases symmetrical. This helps both sleeves achieve the same shape.
Use stitch markers. Mark the armholes, shoulder seams, and decorative band placement.
Try on your sweater before finishing. Small adjustments are easier before all the yarn tails are woven in.
Avoid overly tight seams. Garment seams should be secure but still allow comfortable movement.
Troubleshooting Common Mistakes
Why Is My Sweater Too Wide?
Your gauge may be looser than the recommended measurement, or you may have chosen a size with more positive ease than intended.
Measure your panel before continuing and adjust your hook size or stitch count if necessary.
Why Are My Sleeves Different Sizes?
You may have missed a decrease row or worked a different number of rows.
Count the stitches and rows carefully, particularly around the sleeve-shaping sections.
Why Does My Neckline Feel Tight?
The ribbed strip may be too short or attached with excessive tension.
Remove the neckline ribbing and remake it slightly longer.
Why Is My Sweater Stretching?
Some yarns become heavier or longer after washing and wearing.
Make a washed gauge swatch before starting and avoid hanging a wet crochet sweater.
Variations and Customization Ideas
One of the best features of this pattern is how easily it can be personalized.
Neutral Everyday Sweater
Use cream, oatmeal, or warm beige yarn for a timeless look.
Pastel Balloon Sleeve Sweater
Choose blush pink, lavender, or powder blue for a soft, playful design.
Autumn Color Palette
Combine terracotta, mustard yellow, burnt orange, and dusty rose.
Cropped Oversized Sweater
Reduce the number of body rows before shaping the neckline. Keep both panels the same adjusted length.
Extra-Long Cozy Sweater
Add rows to the front and back panels for a longer silhouette.
Minimalist Version
Omit the flower motifs and contrast trim for a simpler textured pullover.
How to Style Your Oversized Crochet Sweater
This sweater is easy to incorporate into everyday outfits.
For a casual fall look, pair it with light-wash jeans and ankle boots.
For relaxed weekends, style it with leggings and comfortable sneakers.
You can also wear the sweater over a fitted dress for a cozy layered appearance.
If you want to emphasize the oversized silhouette, tuck a small section of the front hem into high-waisted jeans.
The rust-orange color looks especially beautiful with cream, denim blue, chocolate brown, olive green, and other warm neutral shades.
For accessories, keep things simple with small gold earrings, a neutral handbag, or a lightweight scarf.
Care and Washing Instructions
Proper care will help your handmade crochet sweater maintain its shape.
Always follow the washing instructions for your chosen yarn.
For many wool blends and delicate crochet garments, gentle handwashing is a suitable option.
Use cool water and a mild detergent.
Avoid scrubbing or twisting the fabric.
After washing, gently press out excess water and roll the sweater inside a clean towel.
Lay it flat to dry, reshaping the sleeves, neckline, and hem.
Avoid hanging the sweater while wet because the weight of the yarn may stretch the fabric.
For storage, fold the sweater neatly rather than hanging it on a narrow hanger.
Frequently Asked Questions
Is This Oversized Crochet Sweater Beginner-Friendly?
Confident beginners who understand basic stitches may be able to complete the project. However, sleeve shaping, neckline construction, and garment assembly make it more suitable for intermediate crocheters.
How Much Yarn Do I Need?
Depending on the size and yarn, approximately 1,200–2,600 yards of worsted-weight yarn may be needed. Always allow extra yarn for swatching and decorative details.
Can I Make the Sleeves Less Oversized?
Yes. Start with fewer sleeve stitches and adjust the decreases accordingly. Make sure the upper sleeve width still matches the armhole circumference.
Can I Use Chunky Yarn?
You can, but the gauge and finished measurements will change significantly. A chunky-yarn version requires recalculating stitch counts and row counts.
How Do I Make the Sweater Longer?
Add rows to both the front and back panels before starting neckline shaping.
Can I Skip the Decorative Flowers?
Absolutely. The sweater works beautifully as a simple textured pullover without any floral embellishments.
How Do I Get the Perfect Oversized Fit?
Measure your bust and compare it with the finished garment measurements. Choose the amount of positive ease that feels comfortable for your preferred style.
Conclusion
This oversized crochet sweater pattern is a beautiful combination of cozy comfort, handmade texture, and modern style.
The relaxed body, statement balloon sleeves, ribbed edges, and delicate floral details create a distinctive garment that’s both comfortable and fashionable.
Although the project requires patience, constructing the sweater from separate panels makes it easier to work through one section at a time.
Whether you choose the warm rust-orange color palette or experiment with your favorite shades, this crochet pullover can become a special addition to your handmade wardrobe.
Gather your yarn, prepare your gauge swatch, and enjoy creating a beautiful sweater that reflects your personal style.