Oversized Crochet Cardigan Style
An oversized crochet cardigan style is the perfect combination of cozy comfort, colorful handmade texture, and relaxed everyday fashion. With its roomy silhouette, beautiful...
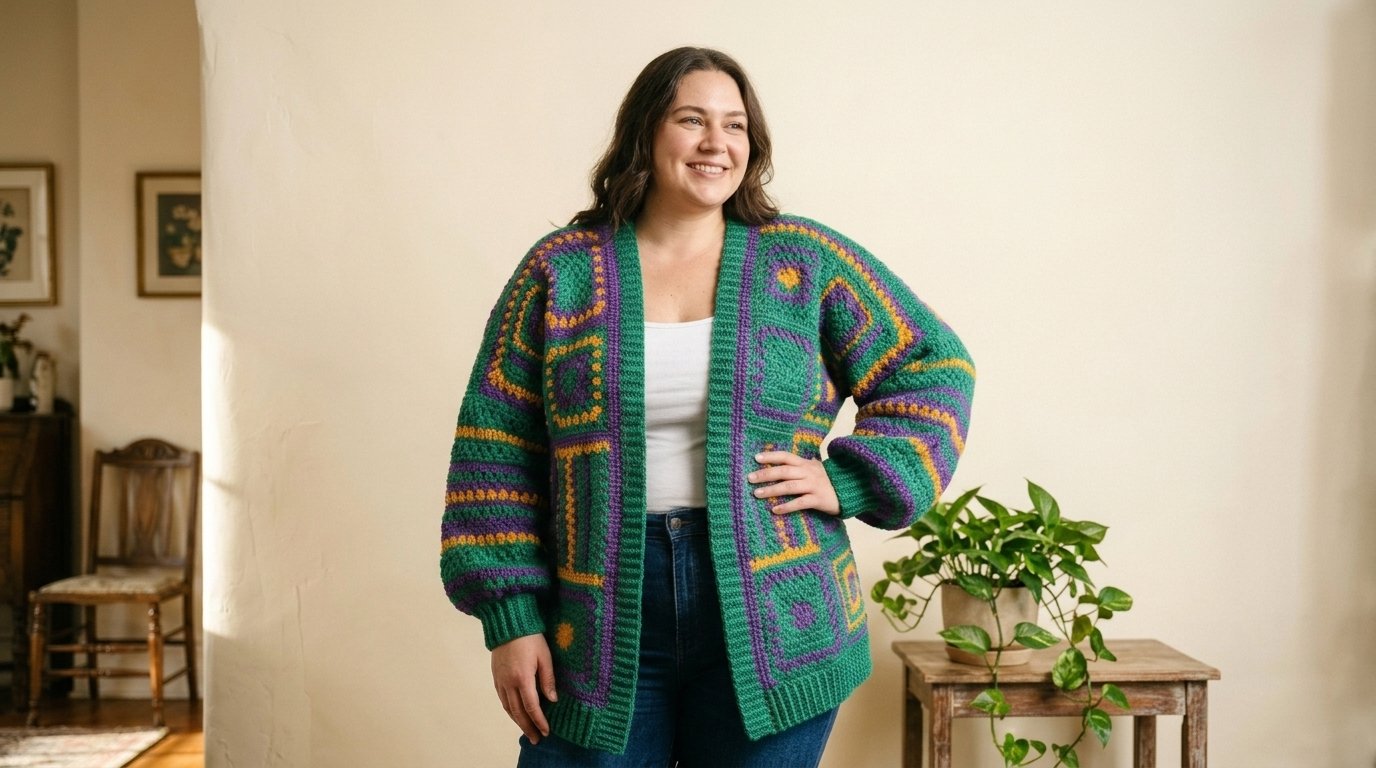
An oversized crochet cardigan style is the perfect combination of cozy comfort, colorful handmade texture, and relaxed everyday fashion. With its roomy silhouette, beautiful granny square patterns, and bold color combinations, this cardigan turns a simple outfit into something special.
The design features rich emerald-green crochet panels decorated with deep purple and golden-yellow accents. Large geometric motifs create a striking patchwork effect, while wide ribbed cuffs, a matching hem, and an open front give the cardigan a comfortable, finished appearance.
One of the best things about this style is how easily you can customize it. You can make the sleeves extra roomy, adjust the length, or experiment with your favorite yarn colors. Whether you’re creating a cozy layer for cooler weather or adding a handmade statement piece to your wardrobe, this oversized cardigan is a wonderful project to explore.
What Makes This Oversized Crochet Cardigan Special?
This cardigan combines traditional crochet techniques with a modern, relaxed shape.
The oversized fit allows the fabric to drape comfortably over a T-shirt, tank top, or lightweight sweater. Its dropped shoulders and generously shaped sleeves create an easygoing silhouette that works beautifully with jeans and other casual clothing.
The colorful geometric panels are the main attraction.
Emerald-green yarn forms the dominant background, while purple outlines and golden-yellow details add depth and contrast. The repeated square motifs give the cardigan a vintage-inspired look without feeling outdated.
The ribbed cuffs, hem, and front edging help balance the loose shape and make the finished garment feel more structured.
Materials and Supplies
Before starting, gather the following supplies.
- Emerald-green yarn: Worsted-weight yarn for the main panels, joining, and ribbed edges.
- Purple yarn: For the geometric motifs and decorative borders.
- Golden-yellow yarn: For small accent rows and contrasting details.
- Crochet hook: A 5 mm (H/8) hook is a reasonable starting point for worsted-weight yarn, but follow your gauge.
- Smaller crochet hook: Approximately 4–4.5 mm for firmer ribbing, if needed.
- Yarn needle: For joining pieces and weaving in ends.
- Stitch markers: To mark corners, shoulder seams, and sleeve positions.
- Measuring tape: Essential for creating the oversized fit.
- Scissors: For trimming yarn.
- Blocking mats: Optional, but useful for shaping the geometric panels.
Choose a soft yarn with enough flexibility to create a comfortable drape. Acrylic, wool blends, and cotton-acrylic blends can work well.
The amount of yarn needed depends on your measurements, motif size, and desired length. Making a sample square and estimating its yarn consumption will help you plan your total quantity.
How to Crochet an Oversized Cardigan Step by Step
This cardigan can be constructed using individual crochet squares joined into larger panels.
The following method explains how to plan and assemble a cardigan inspired by the pictured design. Since individual gauge and body measurements vary, treat it as a customizable construction guide rather than a fixed-size stitch-by-stitch pattern.
Step 1: Choose Your Cardigan Measurements
Start by deciding how oversized you want your cardigan to feel.
Measure your bust, preferred cardigan length, upper arm, and desired sleeve length.
For a relaxed fit, aim for approximately 6–10 inches of positive ease around the bust.
For example, if your bust measures 42 inches, you might choose a finished cardigan circumference of approximately 50 inches.
This allows enough room for layering without making the garment unnecessarily bulky.
For a cardigan with an open front, plan the combined width of the back and both front panels around your chosen finished circumference.
You can compare these measurements with a cardigan you already own and enjoy wearing.
Step 2: Crochet a Colorful Granny Square Sample
Create a sample motif using emerald-green, purple, and golden-yellow yarn.
A traditional granny square is a practical starting point for this design.
Begin with a magic ring or a small chain ring.
Work groups of three double crochet stitches, separated by chain spaces, to form the first round.
For each additional round, work a corner group of three double crochets, chain two, and three more double crochets in each corner space. Add three-double-crochet groups in the side spaces between corners.
Change colors between rounds to create geometric bands.
Try a green center, purple surrounding rounds, and small golden-yellow accents.
Continue until your sample square measures approximately 6–8 inches across.
The finished image includes additional textured details, which you can introduce using contrasting stitch rounds once you’re comfortable with the basic square.
Measure your finished motif after blocking, as this will determine how many squares you’ll need.
Step 3: Plan the Back and Front Panels
Lay your sample square on a flat surface and calculate how many motifs will fit across your desired cardigan width.
For example, if your finished squares measure 7 inches, four squares across will create a panel approximately 28 inches wide before joining adjustments.
Create a back panel wide enough to provide your desired fit.
Then plan two narrower front panels, leaving the center open.
Arrange your finished squares on the floor before joining them.
Alternate the color placement so the purple and yellow accents create an interesting geometric pattern.
This is also a good opportunity to decide whether you want a symmetrical design or a more playful patchwork arrangement.
Step 4: Join the Crochet Squares
Once you’ve crocheted enough motifs for the body panels, block them to consistent dimensions.
Arrange the squares with their right sides facing upward.
Use a yarn needle and matching green yarn to join them with mattress stitch, or work a slip stitch seam using your crochet hook.
For a flatter finish, mattress stitch is a good choice.
Join the squares into the back panel first, then assemble the two front panels.
Check that the motifs remain aligned and that the fabric lies smoothly.
Avoid pulling the joining yarn too tightly, which can cause the panels to bunch together.
Step 5: Create the Oversized Body Shape
Place the front panels over the back panel with right sides facing.
Join the shoulder seams, leaving enough space for a comfortable neckline.
Next, join the side seams from the lower hem upward, leaving openings for the sleeves.
The armhole depth should accommodate your upper arm comfortably, including the loose sleeve shape.
For an oversized cardigan, the dropped shoulder seam typically sits slightly beyond the natural shoulder line.
Try the assembled body on before attaching the sleeves.
This is the easiest time to adjust the overall width or shoulder placement.
Step 6: Crochet the Roomy Sleeves
The pictured cardigan features generously sized sleeves with colorful horizontal patterns.
You can recreate this look with crochet rectangles worked in rows or with joined granny square motifs.
Measure the armhole opening and plan a sleeve wide enough to fit it without stretching.
For a rectangle-style sleeve, crochet a panel to your required length, incorporating green, purple, and yellow stripes.
Fold the rectangle lengthwise and seam it into a tube, leaving the upper opening sized to match the armhole.
Attach the sleeve to the cardigan with the right sides facing, distributing the fabric evenly around the armhole.
Repeat for the second sleeve.
Keep both sleeves the same length and width.
Step 7: Add the Ribbed Cuffs and Hem
The ribbing is an important detail because it gives the oversized cardigan a more tailored appearance.
Use emerald-green yarn for a cohesive finish.
A simple single crochet ribbing technique works well.
Chain enough stitches to create your preferred cuff depth, approximately 2–3 inches.
Work single crochet stitches across the chain, then turn and work through the back loops only on subsequent rows.
This creates a flexible, ridged texture.
Continue until the ribbed strip fits comfortably around the wrist, then join its short edges and sew it to the sleeve opening.
Repeat for the second cuff.
Use the same technique to create a matching band along the bottom hem.
Step 8: Finish the Open Front
The wide green front edging gives this cardigan its clean, recognizable silhouette.
Work a ribbed strip long enough to travel from one lower front corner, around the neckline, and down the opposite front edge.
Alternatively, work several rows of single crochet directly along the opening for a simpler finish.
Attach the ribbed edging evenly without stretching the cardigan fabric.
Weave in all loose yarn ends.
Finally, block the completed garment according to your yarn’s care instructions and allow it to dry completely.
Your oversized crochet cardigan is ready to wear.
Three Tips for a Beautiful Oversized Crochet Cardigan
Choose Yarn That Drapes Naturally
A soft yarn helps oversized cardigans hang comfortably instead of becoming stiff or bulky.
Very dense stitches can make a large cardigan feel heavy, so test your yarn and hook combination before beginning.
Check Your Gauge Before Making Every Square
Even a small difference in motif size can affect the finished cardigan measurements.
Make one complete square, block it, and measure it carefully before crocheting the remaining pieces.
Try the Cardigan On During Assembly
Oversized doesn’t have to mean shapeless.
Check the body width, sleeve openings, and length before completing all the seams.
Small adjustments during assembly can make a big difference in how comfortable the cardigan feels.
Three Creative Oversized Cardigan Variations
Earthy Boho Granny Square Cardigan
Replace the bright green, purple, and yellow with terracotta, mustard, chocolate brown, and warm cream.
The result is a cozy, vintage-inspired cardigan that pairs beautifully with neutral clothing.
Pastel Oversized Crochet Cardigan
Try lavender, soft pink, mint green, and pale yellow for a gentle springtime color palette.
Keep the same roomy silhouette and ribbed details for a relaxed handmade look.
Minimal Two-Color Crochet Cardigan
Use cream as the main color and charcoal or deep brown for the geometric accents.
This creates a more understated cardigan while preserving the texture and oversized shape of the original design.
Frequently Asked Questions
Is an oversized crochet cardigan suitable for beginners?
A basic oversized cardigan can be beginner-friendly, especially when made using simple granny squares and rectangular panels. However, joining the pieces, shaping the armholes, and attaching ribbing may require some practice.
What yarn is best for an oversized crochet cardigan?
Soft worsted-weight yarn is a versatile choice. Acrylic and wool blends are popular because they can provide warmth without excessive stiffness. Cotton blends can also work well, particularly for lighter cardigans.
How do you make a crochet cardigan oversized?
Choose finished garment measurements larger than your body measurements. Adding approximately 6–10 inches of positive ease around the bust creates a relaxed fit. Roomier sleeves and dropped shoulders also contribute to the oversized appearance.
Create Your Own Oversized Crochet Cardigan Style
An oversized crochet cardigan style is a wonderful way to combine traditional granny square crochet with colorful, modern fashion.
The rich green background, bold purple geometric motifs, golden-yellow accents, and cozy ribbed details make this design a beautiful statement piece for cooler days.
You can customize the fit, experiment with your favorite colors, and create a cardigan that reflects your personal style.
Save this oversized crochet cardigan idea to your Pinterest crochet board and enjoy planning a handmade layer you’ll love wearing.