Meadowflame Crochet Dragon Amigurumi Pattern
Meet Meadowflame, a cheerful baby dragon made with a rich teal body, warm ivory belly, coral wings, and moss-green back spikes. This crochet dragon...
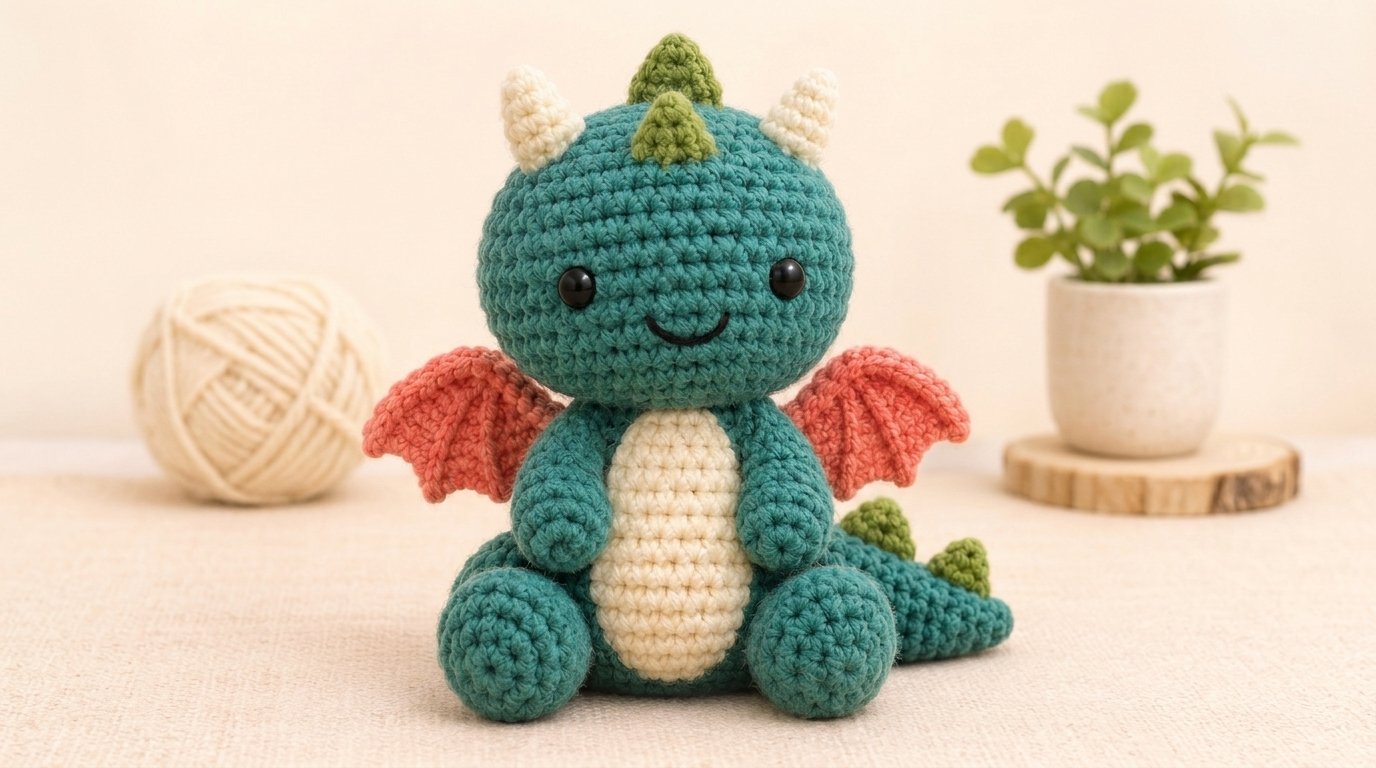
Meet Meadowflame, a cheerful baby dragon made with a rich teal body, warm ivory belly, coral wings, and moss-green back spikes. This crochet dragon pattern uses familiar amigurumi shapes and mostly single crochet, making it an approachable next project for someone who understands basic increases, decreases, and sewing.
The separate head and body create the dragon’s rounded silhouette. Small cone-shaped horns, flat wings, and simple triangular spikes supply the fantasy details without requiring complicated sculptural crochet.
Why You’ll Love This Project
Meadowflame looks detailed while relying on relatively simple components. The head, body, arms, legs, horns, and tail are worked in continuous rounds. The belly, wings, and back spikes are made in short rows.
The project offers several advantages:
- It uses common worsted-weight yarn.
- Most pieces require only single crochet.
- The small color sections are useful for leftover yarn.
- The facial details can be embroidered for a child-safe alternative.
- The colors and expression are easy to personalize.
- The finished dragon makes appealing fantasy-themed decor or a gift.
Because the project includes multiple sewn pieces, it is best described as advanced beginner rather than absolute beginner.
Project Overview
- Project type: Stuffed dragon amigurumi
- Difficulty: Advanced beginner
- Estimated time: 7–10 hours
- Estimated finished size: About 8–9 inches tall when seated
- Yarn weight: Worsted weight, size 4
- Hook: US E-4, 3.5 mm
- Main techniques: Continuous rounds, single crochet, increases, invisible decreases, simple rows, sewing
- Construction: Separate stuffed head and body with attached limbs, tail, wings, horns, belly, and spikes
- Terminology: US crochet terms
Finished size and working time are estimates. Yarn, hook, tension, and stuffing will affect the result.
Materials and Supplies Needed
- Approximately 130 yards teal worsted-weight yarn
- Approximately 30 yards warm ivory worsted-weight yarn
- Approximately 25 yards coral worsted-weight yarn
- Approximately 15 yards moss-green worsted-weight yarn
- Small amount of black yarn for the mouth
- US E-4, 3.5 mm crochet hook
- Two 12 mm safety eyes or black embroidery yarn
- Approximately 2–3 ounces polyester fiberfill
- Locking stitch marker
- Yarn needle
- Scissors
- Straight pins
- Optional row counter
Safety eyes can present a choking hazard. Use securely embroidered eyes when making the dragon for a baby or child under three.
Choosing the Right Yarn and Hook
A smooth acrylic or cotton-blend worsted yarn will make the stitches easy to see and count. Acrylic is lightweight and resilient, while cotton produces more defined stitches and a firmer toy. Avoid fuzzy yarn for a first attempt because it can obscure decreases and make sewing more difficult.
The suggested 3.5 mm hook is smaller than the hook commonly used for worsted yarn. This creates dense fabric that helps conceal the stuffing. If gaps remain between your stitches, try a 3.25 mm hook. If the fabric feels painfully stiff, move up to 3.75 mm.
Use the same yarn weight for every component. A heavier contrast yarn could make the wings, horns, or spikes disproportionately large.
Crochet Stitches and Abbreviations
- MR — magic ring: An adjustable loop used to begin pieces worked in rounds.
- ch — chain: Yarn over and pull through the loop on the hook.
- sl st — slip stitch: Insert the hook, yarn over, and pull through the stitch and working loop.
- sc — single crochet: Insert the hook, yarn over, pull up a loop, yarn over, and pull through both loops.
- hdc — half double crochet: Yarn over, insert the hook, pull up a loop, yarn over, and pull through all three loops.
- dc — double crochet: Yarn over, insert the hook, pull up a loop, yarn over and pull through two loops twice.
- inc — increase: Work two single crochets in the same stitch.
- dec — invisible decrease: Insert the hook through the front loops of the next two stitches, yarn over, pull through both front loops, yarn over, and finish one single crochet.
- st/sts — stitch/stitches
- FO — fasten off
Parentheses indicate a repeated sequence. For example, (3 sc, inc) × 6 means to repeat three single crochets followed by one increase six times.
Before You Start
Work the head, body, limbs, horns, and tail in continuous spirals. Place a marker in the first stitch of every round and move it upward as you work.
A formal gauge swatch is optional, but the fabric must be dense. As a reference, approximately 20 single crochets and 20 rounds should measure about 4 inches. More important than the exact measurement is preventing stuffing from showing.
Stuff gradually and use small pieces of fiberfill. Large clumps can distort the shaping. Leave the arms, tail tip, and wings relatively soft.
Pin every component in position before sewing. Check the dragon from the front, back, and both sides to confirm symmetry.
Step-by-Step Crochet Instructions
Head
Use teal yarn.
- Round 1: Work 6 sc in an MR. (6)
- Round 2: Inc in each st around. (12)
- Round 3:
(sc, inc) × 6. (18) - Round 4:
(2 sc, inc) × 6. (24) - Round 5:
(3 sc, inc) × 6. (30) - Round 6:
(4 sc, inc) × 6. (36) - Rounds 7–13: Sc in each st around. (36)
Insert the eyes between Rounds 10 and 11, approximately eight stitches apart. Embroider the eyes later instead if the dragon is intended for a young child.
- Round 14:
(4 sc, dec) × 6. (30) - Round 15:
(3 sc, dec) × 6. (24) - Round 16:
(2 sc, dec) × 6. (18)
Stuff the head evenly, shaping it into a rounded form.
- Round 17:
(sc, dec) × 6. (12) - Round 18: Dec around. (6)
Fasten off and close the opening through the front loops. Weave in the end.
Body
Use teal yarn.
- Round 1: Work 6 sc in an MR. (6)
- Round 2: Inc around. (12)
- Round 3:
(sc, inc) × 6. (18) - Round 4:
(2 sc, inc) × 6. (24) - Round 5:
(3 sc, inc) × 6. (30) - Rounds 6–10: Sc around. (30)
- Round 11:
(3 sc, dec) × 6. (24) - Rounds 12–14: Sc around. (24)
- Round 15:
(2 sc, dec) × 6. (18) - Round 16: Sc around. (18)
Stuff the lower body firmly and the neck area moderately.
- Round 17:
(sc, dec) × 6. (12)
Fasten off, leaving a long tail for sewing. Add enough stuffing to hold the neck opening round.
Ivory Belly Patch
Use ivory yarn. Work in turned rows.
- Ch 7.
- Row 1: Sc in the second ch from the hook and across. (6)
- Row 2: Ch 1, turn, inc, 4 sc, inc. (8)
- Rows 3–8: Ch 1, turn, sc across. (8)
- Row 9: Ch 1, turn, dec, 4 sc, dec. (6)
- Rows 10–12: Ch 1, turn, sc across. (6)
- Row 13: Ch 1, turn, dec, 2 sc, dec. (4)
Fasten off with a long sewing tail. The narrower end is the top of the patch.
Arms
Make two in teal.
- Round 1: Work 6 sc in an MR. (6)
- Round 2: Inc around. (12)
- Rounds 3–5: Sc around. (12)
- Round 6:
(2 sc, dec) × 3. (9) - Rounds 7–10: Sc around. (9)
Stuff only the hand and lower half. Flatten the opening and work 4 sc through both layers. Fasten off with a sewing tail.
Legs
Make two in teal.
- Round 1: Work 6 sc in an MR. (6)
- Round 2: Inc around. (12)
- Round 3:
(sc, inc) × 6. (18) - Rounds 4–6: Sc around. (18)
- Round 7:
(sc, dec) × 6. (12) - Round 8: Sc around. (12)
Stuff firmly. Flatten the opening and work 6 sc through both layers. Fasten off with a long sewing tail.
Tail
Use teal yarn.
- Round 1: Work 4 sc in an MR. (4)
- Round 2: Inc around. (8)
- Round 3: Sc around. (8)
- Round 4:
(sc, inc) × 4. (12) - Rounds 5–10: Sc around. (12)
Stuff the base moderately and place very little stuffing in the tip. Flatten the open end and work 6 sc through both layers. Leave a long sewing tail. Curve the tail gently during attachment rather than forcing a sharp bend.
Wings
Make two in coral. Work in turned rows.
- Ch 2.
- Row 1: Work 2 sc in the second ch from the hook. (2)
- Row 2: Ch 1, turn, inc in each st. (4)
- Row 3: Ch 1, turn, sc across. (4)
- Row 4: Ch 1, turn, inc, 2 sc, inc. (6)
- Row 5: Ch 1, turn, sc across. (6)
- Row 6: Ch 1, turn, inc, 4 sc, inc. (8)
- Row 7: Ch 1, turn, sc across. (8)
- Row 8: Ch 1, turn; sl st, sc, hdc, dc, dc, hdc, sc, sl st. (8)
Fasten off with a long tail. For a ribbed effect, use coral yarn to embroider two straight lines from the narrow base toward the outer edge.
Horns
Make two in ivory.
- Round 1: Work 4 sc in an MR. (4)
- Round 2: Sc around. (4)
- Round 3: Inc around. (8)
- Round 4: Sc around. (8)
Fasten off with a sewing tail. Add only a tiny amount of stuffing.
Back Spikes
Make five in moss green. Work in rows.
- Ch 2.
- Row 1: Work 2 sc in the second ch from the hook. (2)
- Row 2: Ch 1, turn, inc in each st. (4)
- Row 3: Ch 1, turn, sc across. (4)
- Row 4: Ch 1, turn, inc, 2 sc, inc. (6)
Fasten off with a sewing tail. Make the final two spikes smaller, if desired, by stopping after Row 3.
Face
Using black yarn, embroider a shallow curved mouth between Rounds 12 and 13 of the head. Keep the stitches relaxed so they do not pull the face inward.
Optional tiny nostrils can be added with one short stitch each. Avoid adding too many facial details, which can make the expression look crowded.
Assembly and Finishing
Sew the belly patch vertically to the front of the body before attaching the limbs. Position its narrow end near the neck and its wider section over the lower belly.
Center the head over the body opening. Sew around the neck twice, adding a small amount of stuffing before closing any remaining gap.
Attach the legs low on the body, angled slightly forward so the dragon can sit. Sew the arms to the upper sides of the body with the hands resting near the belly.
Pin the tail to the lower back and curve it toward one side. Sew the flattened base securely to the body.
Attach the wings symmetrically behind the arms. Sew along the narrow inner edge only, allowing the wider portions to stand slightly away from the body.
Position the horns on top of the head. Arrange three large spikes along the center back of the head and upper body, followed by two smaller spikes along the tail. Sew around the base of every spike.
Weave in all remaining ends and gently shape the stuffing with your fingers.
Tips for Best Results
- Count every round before moving the marker.
- Use an invisible decrease to minimize visible gaps.
- Keep the wing tension slightly looser than the body tension.
- Stuff the neck firmly enough to support the head.
- Pin paired components before sewing either one permanently.
- Sew through full stitches rather than splitting yarn strands.
- Rotate the toy while assembling to check balance from every angle.
- Keep the tail flexible so it can support the sitting pose.
Common Mistakes and Troubleshooting
Stuffing Shows Through
Use a smaller hook or reduce your tension slightly. Do not pull each stitch upward before completing it, as this can create elongated gaps.
The Head Tilts
Add stuffing at the neck and reinforce the head-to-body seam. A second pass around the seam usually improves stability.
The Dragon Will Not Sit
Move the legs slightly lower and farther forward. The tail can also touch the surface to provide a third point of support.
Uneven Wings
Confirm that both wings contain the same row counts. Steam should not be applied directly to acrylic yarn; use gentle blocking appropriate for the chosen fiber.
Twisted Spikes
Pin each spike along the centerline before sewing. Attach the two bottom corners first, then secure the center.
A Lumpy Body
Insert stuffing in small pieces and distribute it around the outer walls before filling the center.
Creative Variations
Try royal blue with gold wings for a storybook dragon, raspberry with lavender accents for a playful version, or forest green with rust-colored wings for an autumn palette.
For a smaller dragon, use DK yarn and a 2.75–3 mm hook. For a larger plush, use bulky yarn with a suitably smaller-than-label hook, but expect the proportions and material quantities to change.
You can replace the triangular spikes with small surface-crocheted ridges. Another simple variation is to add embroidered freckles or a tiny contrast-colored heart on the belly. Keep embellishments securely attached if the toy will be handled by children.
How to Use or Style Your Crochet Dragon
Meadowflame can decorate a nursery shelf, fantasy reading corner, craft room, or seasonal display. It also makes a personalized gift for a dragon enthusiast.
This pattern produces a decorative soft toy, not a sleep-safe infant item. Remove safety eyes and securely embroider all features when making it for a young child. Inspect seams and attachments regularly if the dragon will be played with.
For photography, place the dragon at eye level against a clean background. Turn the body slightly so the tail, wings, belly, and face remain visible in one frame.
Care and Maintenance
Follow the care instructions printed on every yarn label. If the fiber permits washing, place the dragon in a mesh laundry bag and use cool water with a gentle cycle. Hand washing is safer for maintaining the shape and sewn details.
Press out water without twisting. Reshape the head, wings, limbs, and tail, then air-dry the dragon completely on a towel. Do not place a damp stuffed toy in storage.
Store it away from direct sunlight to reduce color fading. Check the eyes, wings, horns, and spikes periodically for loose stitching.
Frequently Asked Questions
Is this suitable for a complete beginner?
It is better for an advanced beginner who can work in continuous rounds, count stitches, make decreases, and sew amigurumi components.
Can I embroider the eyes?
Yes. Embroidered eyes are the recommended option for a toy intended for a baby or child under three.
Can I make the body and head in one piece?
A one-piece conversion would require new neck shaping and altered stitch counts. The separate construction is easier to control and assemble.
Why are my stitches leaning?
Single crochet worked continuously in a spiral naturally shifts slightly. Keep the round marker accurate and align decorative pieces visually rather than relying only on row positions.
Can I make larger wings?
Add two more increase rows, alternating an increase row with a plain row. Check that larger wings do not make the seated dragon fall backward.
Does the pattern require gauge?
Exact gauge is not essential, but the fabric must be tight enough to conceal the stuffing. All components should use consistent yarn and tension.
Has this pattern been physically tested?
No. It is an original, mathematically reviewed pattern draft and should be prototyped before commercial publication or representation as a tested pattern.
How can I reduce the amount of sewing?
The spikes may be surface-crocheted directly onto the finished dragon, but that technique is less beginner-friendly. The separate pieces provide easier placement control.
Conclusion
Meadowflame combines familiar amigurumi shapes with colorful fantasy details. Its rounded body, simple flat wings, and small back spikes make the construction manageable while leaving plenty of room for creative color choices.
Work slowly, check your stitch counts, and pin every component before sewing. With a personalized palette and expression, your finished crochet dragon can have a character entirely its own.
Related Crochet Projects
- A miniature dragon egg amigurumi with a textured shell
- A beginner-friendly fantasy castle cushion
- A small winged dinosaur amigurumi
- A set of colorful crochet potion-bottle ornaments