Make This Cute Crochet Dragon Egg Pattern
A crochet dragon egg pattern is a magical handmade project that combines an adorable baby dragon with a colorful, removable eggshell. With its bright...
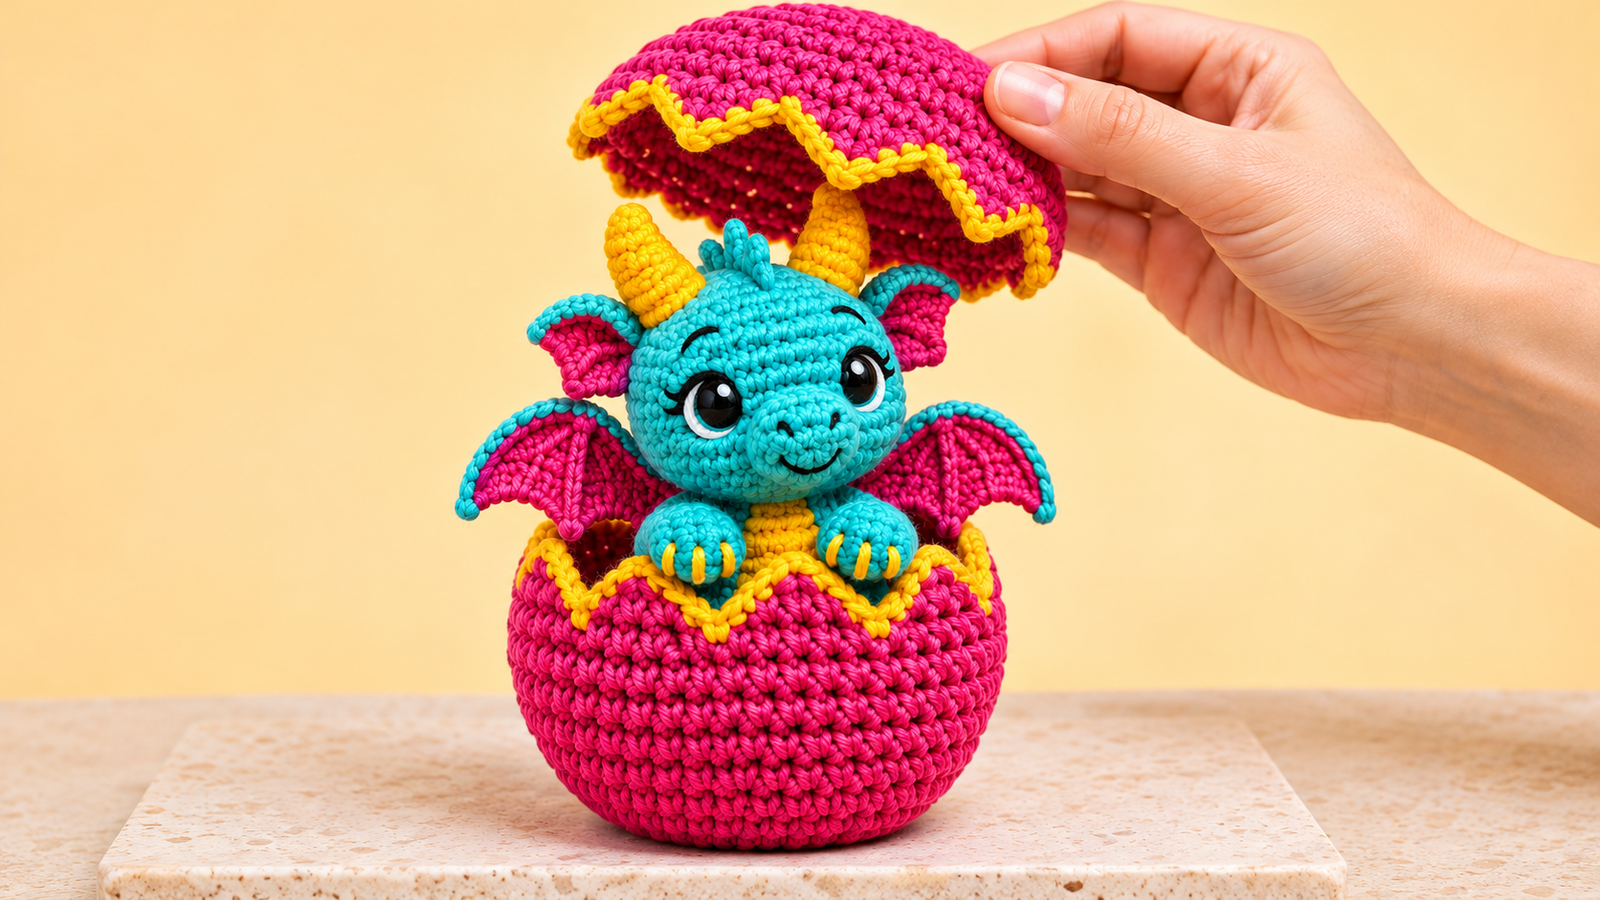
A crochet dragon egg pattern is a magical handmade project that combines an adorable baby dragon with a colorful, removable eggshell. With its bright turquoise body, golden-yellow horns, hot-pink wings, and cheerful raspberry-colored egg, this little fantasy creature looks as though it has just hatched from a magical world.
The design features a sweet baby dragon peeking out of a textured crochet eggshell. Its oversized round head, sparkling eyes, tiny turquoise paws, and golden claws give it an irresistibly playful expression. A pair of pink dragon wings with turquoise edging extends from its back, while two yellow horns complete its fantasy-inspired appearance.
The most exciting detail is the two-piece crochet egg. The bottom half forms a little nest for the dragon, while the removable upper shell has a scalloped, cracked-egg border decorated with bright yellow yarn. Lift the top half, and the adorable dragon appears inside!
This crochet dragon egg makes a charming Easter decoration, a unique handmade birthday gift, or a wonderful addition to an amigurumi collection. It’s also an enjoyable project for crocheters who love colorful fantasy creatures and interactive handmade designs.
What Makes This Crochet Dragon Egg Special?
Unlike a traditional crochet dragon that stands or sits on its own, this design includes a matching eggshell that creates an adorable hatching scene.
The combination of vibrant colors and three-dimensional details makes it particularly eye-catching.
The main design features include:
- Turquoise baby dragon: A bright, rounded body with a large head and tiny paws.
- Golden-yellow horns: Two small pointed horns sit above the dragon’s eyes.
- Pink dragon wings: Decorative wings with turquoise borders extend from the back.
- Large expressive eyes: Rounded black eyes create a sweet, playful expression.
- Raspberry-pink eggshell: Two separate crochet pieces form the decorative dragon egg.
- Yellow zigzag edging: The cracked edges of the shell feature a bright contrasting border.
- Removable egg lid: The upper shell lifts away to reveal the baby dragon inside.
- Tiny golden claws: Yellow stitches decorate the dragon’s front paws.
The finished project works beautifully as a decorative plush figure, collectible crochet animal, or handmade fantasy-themed gift.
Materials and Supplies
Before beginning, gather your yarn and crochet tools.
Yarn
Choose smooth worsted-weight cotton or acrylic yarn in the following colors.
| Yarn Color | Purpose | Estimated Amount |
|---|---|---|
| Turquoise blue | Dragon head, body, muzzle, and paws | 100–140 yards |
| Raspberry pink | Top and bottom eggshell | 130–180 yards |
| Hot pink | Dragon wings and inner ears | 25–35 yards |
| Golden yellow | Horns, egg edging, claws, and decorative accents | 30–45 yards |
| Black | Embroidered mouth and facial details | Small amount |
| White | Optional embroidered eye highlights | Small amount |
These yarn amounts are estimates. The actual quantity depends on your yarn thickness, tension, and finished dimensions.
Crochet Tools
- 3.5 mm (E/4) crochet hook
- 3 mm hook for smaller details, optional
- Yarn needle
- Stitch markers
- Scissors
- Polyester fiberfill stuffing
- Straight pins for positioning pieces
- Measuring tape
- Black embroidery floss
- Optional safety eyes for a decorative figure
- Optional blocking mat
Skill Level and Finished Size
Skill level: Confident beginner to intermediate
Estimated time: 7–10 hours
Approximate finished dimensions:
| Measurement | Size |
|---|---|
| Egg diameter | 4½–5½ inches |
| Bottom eggshell height | 3½–4½ inches |
| Baby dragon height | 4½–5½ inches |
| Complete display height | 7–9 inches |
| Wing width, each | 2–3 inches |
The measurements may vary depending on the yarn, hook size, and stuffing.
Crochet Stitches and Abbreviations
This pattern uses US crochet terminology.
| Abbreviation | Meaning |
|---|---|
| MR | Magic ring |
| ch | Chain |
| sc | Single crochet |
| hdc | Half double crochet |
| dc | Double crochet |
| sl st | Slip stitch |
| inc | Increase: 2 sc in one stitch |
| dec | Invisible single crochet decrease |
| BLO | Back loop only |
| st(s) | Stitch or stitches |
| Rnd | Round |
| RS | Right side |
| FO | Fasten off |
Numbers in parentheses indicate the total stitch count at the end of each round.
Work in continuous spiral rounds unless otherwise stated. Use a stitch marker to identify the beginning of each round.
How to Crochet the Bottom Dragon Eggshell
The bottom half of the egg creates a colorful little nest for the baby dragon.
It’s crocheted in raspberry-pink yarn and finished with a decorative cracked edge.
Step 1: Crochet the Egg Base
Using raspberry-pink yarn and your 3.5 mm crochet hook:
Rnd 1: Work 6 sc into a magic ring. (6)
Rnd 2: Inc in each stitch around. (12)
Rnd 3: Repeat (1 sc, inc) six times. (18)
Rnd 4: Repeat (2 sc, inc) six times. (24)
Rnd 5: Repeat (3 sc, inc) six times. (30)
Rnd 6: Repeat (4 sc, inc) six times. (36)
Rnd 7: Repeat (5 sc, inc) six times. (42)
Rnd 8: Repeat (6 sc, inc) six times. (48)
Rnd 9: Repeat (7 sc, inc) six times. (54)
Rnd 10: Repeat (8 sc, inc) six times. (60)
You should now have a flat circular base.
Step 2: Build the Eggshell Sides
Continue with raspberry-pink yarn.
Rnd 11: Work 1 sc in BLO around. (60)
Rnd 12–19: Work 1 sc in each stitch around. (60)
The back-loop-only round helps establish a defined transition between the bottom and sides.
Your crochet piece should now resemble a small rounded bowl.
Don’t fasten off yet.
Step 3: Create the Cracked Eggshell Points
The jagged edge is what makes the eggshell look as though a dragon has just hatched.
Divide the 60 stitches of the final round into six groups of ten stitches.
Work each triangular point separately.
Row 1: Chain 1, work 1 sc in each of the next 10 stitches. Turn. (10)
Row 2: Chain 1, dec, work 1 sc in each of the next 6 stitches, then dec. Turn. (8)
Row 3: Chain 1, work 1 sc in each stitch across. Turn. (8)
Row 4: Chain 1, dec, work 1 sc in each of the next 4 stitches, then dec. Turn. (6)
Row 5: Chain 1, work 1 sc in each stitch across. Turn. (6)
Row 6: Chain 1, dec, work 1 sc in each of the next 2 stitches, then dec. Turn. (4)
Row 7: Chain 1, work 1 sc in each stitch across. Turn. (4)
Row 8: Chain 1, dec twice. Turn. (2)
Row 9: Chain 1, dec. (1)
Fasten off.
Reattach raspberry yarn at the next group of ten unused rim stitches and repeat.
Continue until you have six triangular points around the shell.
The finished edge should have a playful zigzag appearance.
Step 4: Add the Yellow Eggshell Border
Attach golden-yellow yarn at the base of one triangular point.
Work single crochet stitches evenly along the outside of the jagged edge.
Follow the side of the first point, work three single crochet stitches near its tip, and continue down the opposite side.
Repeat around all six points.
Adjust the stitch placement where necessary to keep the edging flat.
The bright yellow border highlights the cracked shell and creates a beautiful contrast against the raspberry-pink yarn.
Fasten off and weave in the ends.
Your lower eggshell is complete.
How to Crochet the Removable Egg Top
The upper eggshell is a separate decorative piece that can be lifted away to reveal the dragon.
It’s crocheted from the rounded top downward and finished with matching yellow zigzag edging.
Step 5: Crochet the Top Shell
Using raspberry-pink yarn:
Rnd 1: Work 6 sc into a magic ring. (6)
Rnd 2: Inc in each stitch around. (12)
Rnd 3: Repeat (1 sc, inc) six times. (18)
Rnd 4: Repeat (2 sc, inc) six times. (24)
Rnd 5: Repeat (3 sc, inc) six times. (30)
Rnd 6: Repeat (4 sc, inc) six times. (36)
Rnd 7: Repeat (5 sc, inc) six times. (42)
Rnd 8: Repeat (6 sc, inc) six times. (48)
Rnd 9: Repeat (7 sc, inc) six times. (54)
Rnd 10: Repeat (8 sc, inc) six times. (60)
Rnd 11–14: Work 1 sc in each stitch around. (60)
The finished piece should form a gently rounded dome.
Step 6: Add the Cracked Upper Edge
Divide the last round into six sections of ten stitches.
Work the same nine-row triangular point pattern used for the bottom shell.
Repeat until all six points are complete.
For a more natural broken-egg appearance, you can make a few points slightly shorter by reducing the number of even rows.
The irregular edges give the upper shell a playful, magical appearance.
Step 7: Finish With Yellow Edging
Attach golden-yellow yarn.
Work single crochet stitches around the entire zigzag edge, following each triangular point.
Keep the border neat and flexible.
Fasten off and weave in the yarn ends.
Check that the upper shell can be placed above the lower shell without pulling or stretching.
The lid is intended to be a removable decorative cover rather than a tightly fitted closure. If you want it to close neatly, check the dimensions before adding the final edging and adjust the upper shell as needed.
How to Crochet the Turquoise Baby Dragon’s Head
The dragon’s large rounded head is the most recognizable part of its adorable appearance.
Use turquoise yarn for the main head and small muzzle.
Step 8: Crochet the Rounded Head
Using turquoise yarn:
Rnd 1: Work 6 sc into a magic ring. (6)
Rnd 2: Inc in each stitch around. (12)
Rnd 3: Repeat (1 sc, inc) six times. (18)
Rnd 4: Repeat (2 sc, inc) six times. (24)
Rnd 5: Repeat (3 sc, inc) six times. (30)
Rnd 6: Repeat (4 sc, inc) six times. (36)
Rnd 7: Repeat (5 sc, inc) six times. (42)
Rnd 8–14: Work 1 sc in each stitch around. (42)
The head should now be large and rounded.
Step 9: Add the Dragon’s Eyes
Position two eyes on the front of the head, between approximately Rounds 11 and 12.
Leave about seven stitches between them, adjusting the spacing to suit your dragon’s face.
The pictured dragon has large black eyes with bright highlights.
For a decorative amigurumi, suitable safety eyes can create this appearance. If the finished dragon might be handled by young children, embroider the eyes instead; plastic eyes can detach and become choking hazards.
For embroidered eyes, use black floss to make two filled circles and add tiny white highlight stitches near their upper edges.
Step 10: Shape and Close the Head
Continue with turquoise yarn.
Rnd 15: Repeat (5 sc, dec) six times. (36)
Rnd 16: Repeat (4 sc, dec) six times. (30)
Rnd 17: Repeat (3 sc, dec) six times. (24)
Begin stuffing the head.
Rnd 18: Repeat (2 sc, dec) six times. (18)
Rnd 19: Repeat (1 sc, dec) six times. (12)
Add more stuffing as needed.
Rnd 20: Dec six times. (6)
Fasten off, leaving a yarn tail.
Close the remaining opening using a yarn needle.
The finished head should be firm but slightly soft when squeezed.
How to Crochet the Dragon’s Muzzle
The small rounded muzzle creates a gentle, friendly expression.
Step 11: Crochet the Turquoise Snout
Using turquoise yarn:
Rnd 1: Work 6 sc into a magic ring. (6)
Rnd 2: Inc in each stitch around. (12)
Rnd 3: Work 1 sc in each stitch around. (12)
Fasten off, leaving a long yarn tail.
Add a tiny amount of fiberfill.
Position the snout just below the eyes and sew its open edge securely to the head.
Step 12: Embroider the Dragon’s Smile
Using black embroidery floss, create a small curved smile across the lower section of the muzzle.
Work several short stitches following the natural curve.
Add two tiny nostril stitches if desired.
Keep the facial details simple so the dragon retains its cute, cheerful expression.
How to Crochet the Dragon’s Little Horns
The two golden-yellow horns stand upright near the top of the dragon’s head.
Make two matching pieces.
Step 13: Crochet the First Horn
Using golden-yellow yarn:
Rnd 1: Work 4 sc into a magic ring. (4)
Rnd 2: Work 1 sc in each stitch around. (4)
Rnd 3: Repeat (1 sc, inc) twice. (6)
Rnd 4–5: Work 1 sc in each stitch around. (6)
Rnd 6: Repeat (2 sc, inc) twice. (8)
Fasten off, leaving a long yarn tail.
Stuff the horn lightly.
Step 14: Make and Attach the Second Horn
Repeat the same instructions.
Position the horns near the upper sides of the dragon’s head.
Angle them slightly outward.
Sew them securely into place using the long yarn tails.
For additional detail, add two or three small turquoise crochet spikes between the horns.
How to Crochet the Dragon’s Pointed Ears
The small side ears add another adorable fantasy detail.
Make two turquoise pieces.
Step 15: Crochet the Ears
Using turquoise yarn:
Rnd 1: Work 4 sc into a magic ring. (4)
Rnd 2: Repeat (1 sc, inc) twice. (6)
Rnd 3: Repeat (2 sc, inc) twice. (8)
Rnd 4–5: Work 1 sc in each stitch around. (8)
Fasten off, leaving a long tail.
Do not stuff the ears.
Flatten them gently and sew them near the sides of the head.
For the pink inner-ear detail, add a few short stitches using hot-pink yarn.
How to Crochet the Baby Dragon’s Body
The body is smaller than the head, creating the sweet proportions often seen in baby dragon amigurumi.
Step 16: Crochet the Rounded Body
Using turquoise yarn:
Rnd 1: Work 6 sc into a magic ring. (6)
Rnd 2: Inc in each stitch around. (12)
Rnd 3: Repeat (1 sc, inc) six times. (18)
Rnd 4: Repeat (2 sc, inc) six times. (24)
Rnd 5: Repeat (3 sc, inc) six times. (30)
Rnd 6: Repeat (4 sc, inc) six times. (36)
Rnd 7–13: Work 1 sc in each stitch around. (36)
Rnd 14: Repeat (4 sc, dec) six times. (30)
Rnd 15: Repeat (3 sc, dec) six times. (24)
Rnd 16: Repeat (2 sc, dec) six times. (18)
Begin stuffing the body.
Rnd 17: Repeat (1 sc, dec) six times. (12)
Rnd 18: Dec six times. (6)
Fasten off and close the opening.
Step 17: Attach the Head
Position the head on top of the turquoise body.
The head should appear slightly oversized, with the eyes and muzzle facing forward.
Use a yarn needle and matching turquoise yarn to sew the pieces together securely.
Work around the connection several times.
The dragon should now have a cute upright sitting shape.
How to Crochet the Tiny Dragon Paws
The dragon’s two front paws rest over the rim of the eggshell.
Make two matching pieces.
Step 18: Crochet the Front Paws
Using turquoise yarn:
Rnd 1: Work 6 sc into a magic ring. (6)
Rnd 2: Inc in each stitch around. (12)
Rnd 3–6: Work 1 sc in each stitch around. (12)
Rnd 7: Repeat (2 sc, dec) three times. (9)
Fasten off, leaving a long yarn tail.
Stuff the rounded ends lightly.
Flatten the upper openings.
Step 19: Add the Golden Claws
Using golden-yellow yarn and a yarn needle, embroider three short stitches along the front of each paw.
These create tiny decorative claws.
Keep the stitches short and secure.
Step 20: Attach the Paws
Position the paws near the upper front sides of the dragon’s body.
Angle them forward so they can rest near the top of the eggshell.
Sew the upper edges securely to the body.
Check that both paws remain visible when the dragon is placed inside the egg.
How to Crochet the Pink Dragon Wings
The bright pink wings are among the most eye-catching details in the design.
Each wing has a triangular shape, decorative ridges, and a contrasting turquoise border.
Step 21: Crochet the First Wing
Using hot-pink yarn:
Row 1: Chain 3. Work 1 sc in the second chain from the hook and 1 sc in the next chain. Turn. (2)
Row 2: Chain 1, inc in each stitch. Turn. (4)
Row 3: Chain 1, work 1 sc in each stitch across. Turn. (4)
Row 4: Chain 1, inc in the first stitch, work 1 sc in each of the next 2 stitches, then inc in the final stitch. Turn. (6)
Row 5: Chain 1, work 1 sc in each stitch across. Turn. (6)
Row 6: Chain 1, inc in the first stitch, work 1 sc in each of the next 4 stitches, then inc in the final stitch. Turn. (8)
Row 7: Chain 1, work 1 sc in each stitch across. Turn. (8)
Row 8: Chain 1, inc in the first stitch, work 1 sc in each of the next 6 stitches, then inc in the final stitch. Turn. (10)
Row 9: Chain 1, work 1 sc in each stitch across. Turn. (10)
Row 10: Chain 1, inc in the first stitch, work 1 sc in each of the next 8 stitches, then inc in the final stitch. Turn. (12)
Row 11: Chain 1, work 1 sc in each stitch across. (12)
Fasten off.
The finished piece should resemble a small triangular wing.
Step 22: Make the Second Wing
Repeat the instructions to create a matching wing.
Lay both pieces flat and gently shape them.
Step 23: Add the Turquoise Wing Border
Attach turquoise yarn at one lower corner.
Work single crochet stitches evenly around the outside edges.
Place extra stitches at the outer corners as needed to prevent curling.
For a slightly scalloped edge, work small groups of three half double crochet stitches along the widest outer section.
Fasten off and weave in the yarn.
Step 24: Add Decorative Wing Ridges
Using hot-pink yarn and a yarn needle, embroider three or four lines radiating from the narrow base toward the outer edge of each wing.
These lines create the appearance of wing membranes.
Keep the embroidery stitches relaxed.
Step 25: Attach the Wings to the Dragon
Position the wings on the upper back of the dragon.
Place the narrow ends near the shoulders.
Angle the wider sections outward so the wings remain visible on either side of the head.
Sew the bases securely to the body.
Avoid attaching the wings too close to the eyes or ears.
How to Assemble the Dragon Inside the Egg
This is the most exciting part of the project.
You’ll combine the colorful dragon with its matching raspberry-pink eggshell to create the adorable hatching display.
Step 26: Place the Dragon Inside the Lower Shell
Set the lower eggshell on a flat table.
Position the finished dragon inside.
The dragon’s head should rise above the jagged rim, while its body remains nestled inside.
Allow the two front paws to rest near the upper edge.
Check the height and adjust the position if necessary.
Step 27: Secure the Dragon to the Egg
For a permanently assembled decoration, use turquoise or raspberry-colored yarn to sew the bottom of the dragon’s body to the inside base of the eggshell.
Work several strong attachment stitches.
Keep the attachment points hidden beneath the dragon.
This prevents the dragon from falling out when the egg is moved.
If you prefer a removable dragon, leave the figure unattached and treat the project as a display set rather than a toy.
Step 28: Add the Upper Eggshell
Place the finished upper shell above the dragon.
The lid should be loose enough to lift off without pulling on the horns, wings, or ears.
For display, position the lid slightly above or behind the dragon to create the appearance of a newly hatched egg.
You can also set the lid beside the lower shell.
The two separate egg pieces make the finished design more interactive and visually interesting.
Three Tips for a Beautiful Crochet Dragon Egg
Keep Your Amigurumi Stitches Firm
The dragon’s head and body look best when the stitches are tight enough to keep the fiberfill hidden.
If you notice large gaps, try using a slightly smaller crochet hook.
Consistent tension helps the individual pieces maintain their shape.
Shape the Eggshell Carefully
The pink shell should hold a rounded bowl shape without collapsing.
Smooth cotton yarn works particularly well for structured crochet pieces.
If your yarn is very soft, try using a smaller hook or placing a removable support inside the bottom shell for decorative display.
Make the Cracked Edges Irregular
A broken eggshell naturally has uneven points.
The six triangular sections create a recognizable cracked appearance, but you can vary their heights slightly to make the opening look less symmetrical.
Keep the yellow border consistent so the individual points remain clearly defined.
Three Creative Crochet Dragon Egg Variations
Pastel Baby Dragon Egg
Use lavender yarn for the baby dragon and pale pink for the eggshell.
Make the wings soft mint green and the horns creamy yellow.
The gentle pastel colors create a sweet fantasy-inspired decoration.
Forest Dragon With a Golden Egg
Crochet the dragon in deep emerald green with olive-colored wings.
Use mustard-yellow yarn for the eggshell and cream for the decorative border.
This rich color combination creates a woodland-inspired dragon egg.
Mini Crochet Dragon Egg
Use lightweight cotton yarn with a smaller crochet hook.
Make a miniature version of the dragon and shell, keeping the same overall construction.
This variation is lovely for a fantasy-themed shelf display or handmade collectible.
Frequently Asked Questions About Crochet Dragon Eggs
Is this crochet dragon egg pattern suitable for beginners?
Confident beginners can make the basic egg and dragon pieces using single crochet, increases, and decreases. The jagged eggshell edging, decorative wings, and final assembly require additional patience, making this a good project for crocheters with some previous amigurumi experience.
What yarn works best for a crochet dragon egg?
Worsted-weight cotton or acrylic yarn works well. Cotton produces clear stitches and a firmer eggshell, while acrylic creates a softer dragon. Choose a hook that produces tight, even fabric, especially for the stuffed pieces.
How do you make the crochet egg hold its shape?
Use firm stitches, maintain consistent tension, and avoid using an oversized hook. A tightly crocheted cotton shell generally holds its shape better than a very loose acrylic one. For decorative display, a lightweight internal support can provide additional structure.
Can the baby dragon be removed from the egg?
Yes. The dragon can remain separate from the lower eggshell if you want a removable display figure. For a more stable decoration, sew the dragon to the inside base while keeping the upper shell removable.
How do you make crochet dragon wings stand out?
Use smooth yarn, crochet the wings with firm tension, and add a contrasting border to define their shape. Surface embroidery can create additional texture. Sew the wing bases securely to the dragon’s back and angle the outer sections away from the body.
Is this crochet dragon egg suitable for young children?
The pictured design is best treated as a decorative amigurumi. Small horns, removable shell pieces, plastic eyes, and other details may present hazards if detached. For a child-friendly adaptation, use embroidered eyes, secure all parts, remove detachable accessories, and ensure the construction is appropriate for the child’s age.
Make Your Own Cute Crochet Dragon Egg
This crochet dragon egg pattern is a magical handmade project that combines colorful amigurumi details with a playful hatching design.
The bright turquoise baby dragon, golden-yellow horns, expressive eyes, hot-pink wings, and tiny decorated paws create an adorable little fantasy creature. The raspberry-colored eggshell, complete with its contrasting yellow zigzag border and removable top, makes the finished project even more special.
You can personalize the colors, experiment with different wing shapes, or create several dragon eggs for a colorful handmade fantasy collection.
Whether you’re decorating a craft room, preparing an Easter-themed display, or making a thoughtful gift for someone who loves dragons, this project is a wonderful way to enjoy creative crochet.
Save this cute crochet dragon egg idea to your Pinterest crochet board, gather your favorite colorful yarn, and enjoy bringing a tiny magical dragon to life, one stitch at a time.