Longline Granny Square Cardigan with Vertical Motif Panels
This longline granny square cardigan pairs a solid forest-green body and sleeves with vertical columns of colorful granny squares at the front. A wide...
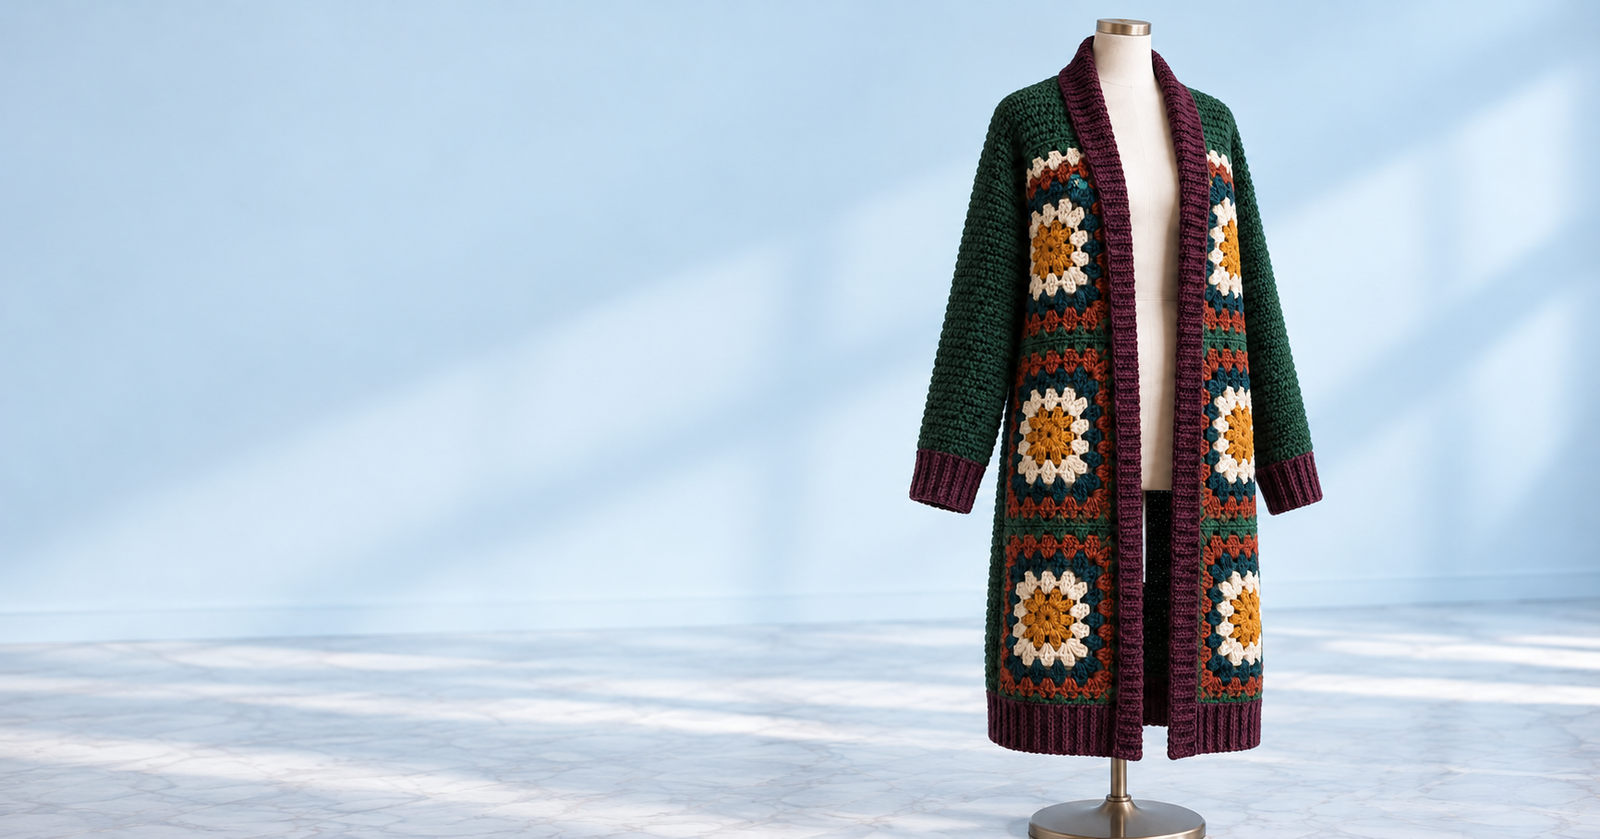
This longline granny square cardigan pairs a solid forest-green body and sleeves with vertical columns of colorful granny squares at the front. A wide plum collar and matching cuffs frame the design, making it a distinctive layer for cool days.
The instructions below are a draft pattern based on the design concept, not a physically tested pattern. The fit and yarn quantities are estimates. Make swatches and check the measurements as you work, especially before joining the shoulders and sleeves.
Why You’ll Love This Project
The cardigan gives granny squares a different role: they create two vertical front panels, while the back and sleeves use a simple solid fabric. That keeps the colorwork focused and reduces the number of motifs to join. The long shape, shawl collar, and open front make it easy to layer over everyday outfits.
Project Overview
- Project type: Open-front longline cardigan
- Difficulty: Confident beginner; includes garment assembly
- Estimated time: About 30–45 hours
- Suggested size: Approximate adult M/L
- Estimated finished measurements: About 42 inches around the body and 29 inches long
- Yarn: Medium-weight yarn
- Hook: 5.5 mm (I/9), adjusted to match gauge
- Main techniques: Granny clusters, half double crochet, ribbing, seaming
- Construction: One back rectangle, six granny squares, two sleeve rectangles, and ribbed edging
- Terminology: US crochet terms
These measurements are estimates. Adjust the panels to your body measurements and preferred ease.
Materials and Supplies Needed
- About 1,400–1,800 yards of medium-weight yarn, depending on size and yarn choice
- Forest green for the back and sleeves
- Golden amber, warm ivory, rust, and deep teal for the granny squares
- Plum for the collar, cuffs, and hem
- 5.5 mm (I/9) crochet hook, or the size needed for gauge
- Stitch markers
- Yarn needle
- Scissors
- Tape measure
Use yarns of similar weight and fiber across the project to help the pieces keep a consistent drape.
Choosing the Right Yarn and Hook
A smooth medium-weight yarn makes the granny clusters and half double crochet fabric easy to see. Acrylic, wool, and wool blends can all work; check the yarn label for care instructions and consider how much drape you want.
For the solid panels, aim for a flexible fabric with an approximate gauge of 14 hdc stitches and 12 rows per 4 inches. Granny squares should be blocked to a consistent size before assembly. If the squares feel stiff, try a larger hook. If the solid fabric looks much looser than the squares, try a smaller hook for the panels.
Crochet Stitches and Abbreviations
- ch — chain
- sl st — slip stitch
- sc — single crochet
- hdc — half double crochet
- dc — double crochet
- st / sts — stitch / stitches
- sp — space
- rep — repeat
- RS / WS — right side / wrong side
A granny cluster is three double crochet stitches worked into the same space. For the ribbing, work stitches into the back loop only to create a ridged texture.
Before You Start
The sample uses six granny squares, each about 8 inches wide. Three squares stacked together form each front panel, for a panel length near 24 inches. The solid back rectangle is approximately 26 inches wide and 27 inches long. Add the hem band to reach the estimated finished length.
Measure your chest and desired cardigan length. Compare the planned panels with a cardigan that fits the way you like. Make one granny square and a solid-fabric swatch, then wash and dry them as you expect to care for the finished garment. Measure again before making all six squares.
Step-by-Step Crochet Instructions
Make the granny squares
Make six squares, each approximately 8 inches across. Use an amber center, then alternate ivory, deep teal, and rust for the surrounding rounds. You can vary the colors while keeping the round order similar so the front panels feel coordinated.
Round 1: Make a magic ring. Ch 3 (counts as dc), work 2 dc into the ring, ch 2. Work 3 dc into the ring, ch 2. Rep from * twice more. Join with a sl st to the top of the beginning ch-3. You should have four 3-dc clusters with a ch-2 space between them.
Round 2: Sl st across to a corner space. Ch 3, 2 dc, ch 2, 3 dc in that corner. Ch 1. In each remaining corner space, work 3 dc, ch 2, 3 dc; ch 1 between corners. Join to the beginning ch-3.
Round 3 and later: Sl st across to the next corner space. In each corner, work 3 dc, ch 2, 3 dc. In each ch-1 space along the sides, work 3 dc, with ch 1 between clusters. Join to the beginning ch-3. Each round adds one cluster along each side.
Continue until each square measures about 8 inches. Fasten off and weave in the ends. Block the squares to the same dimensions.
Crochet the back panel
With forest-green yarn, ch 92. This gives 91 hdc stitches after the turning chain is excluded.
Row 1: Hdc in the second ch from the hook and in each ch across. You should have 91 hdc.
Row 2: Ch 1 and turn. Hdc in each st across.
Repeat Row 2 until the panel measures about 27 inches long. Keep the stitch count even and measure the width. If your gauge differs, adjust the starting chain so the panel is about 26 inches wide.
Arrange the front panels and join the shoulders
Lay three squares in a vertical column for each front. Join the squares with a whip stitch or slip stitch through the back loops. Each completed front panel should measure about 8 inches wide and 24 inches long.
Place the two front panels against the back panel with right sides together. Center them along the back’s top edge and sew each shoulder seam across the full 8-inch width of a front panel. Leave the middle portion of the back edge open for the neckline. Pin the seams first and check that the opening feels comfortable around your neck.
Join the sides and form the armholes
Sew each side seam from the hem upward for about 19 inches, leaving the top 8 inches open for the armhole. Adjust the opening if you prefer a roomier or closer fit.
Try the body on or pin it over a garment that fits well. Make sure the front panels hang evenly and that the armholes allow comfortable movement before attaching the sleeves.
Make and attach the sleeves
Make two forest-green sleeve rectangles. With the 5.5 mm hook, ch 57.
Row 1: Hdc in the second ch from the hook and in each ch across. You should have 56 hdc.
Row 2: Ch 1 and turn. Hdc in each st across.
Repeat Row 2 until the panel measures about 18 inches long. The panel should be close to 16 inches wide; adjust the starting chain if your gauge differs. Make a second matching panel.
Fold each panel lengthwise with right sides together and seam the long edges to create a tube. Match the sleeve seam to the cardigan side seam. Pin the open sleeve edge around the armhole and sew it in place, easing the fabric evenly.
Add the plum hem, cuffs, and shawl collar
Join plum yarn at the lower edge. Work hdc evenly across the hem. For a simple ribbed band, ch 1, turn, and work hdc in the back loop only across. Repeat until the band is about 2 inches deep, then fasten off.
Work the same back-loop hdc ribbing around each sleeve opening, making each cuff about 2 inches deep.
For the collar, join plum yarn at one lower front corner. Work hdc evenly up the front edge, around the back neckline, and down the other front edge. Work back-loop hdc rows across the edging, turning at the end of each row, until the collar is about 3 inches wide. Add extra stitches at the neckline corners if the fabric pulls or curls.
Assembly and Finishing
Check that all seams are secure and the collar lies flat. Weave in the ends on the wrong side, securing them by changing direction a few times. Lay the cardigan flat and shape the front panels and sleeves evenly.
If the yarn permits, wet block the finished garment according to its care label. Shape the cardigan without stretching the square panels or ribbed edges.
Tips for Best Results
- Measure each square after blocking; small differences become noticeable in a vertical column.
- Pin the shoulder seams and sleeve openings before sewing.
- Keep the front panels and back panel aligned at the hem.
- Work the collar loosely enough to drape, but not so loosely that it waves.
- Try the cardigan on before weaving in the final ends so you can adjust the sleeve length or side seams.
Common Mistakes and Troubleshooting
The granny squares are different sizes. Check your tension and hook size. Block the squares to a consistent measurement before joining.
The collar curls inward. Work more stitches around the neckline edge or use a larger hook for the collar rows.
The armhole feels tight. Leave a deeper opening by shortening the side seams, or widen the sleeve panel slightly.
The cardigan is too wide or narrow. Adjust the back panel width or square size before assembly. The front columns contribute about 16 inches to the overall body measurement.
The hem band pulls. Use a larger hook for the ribbing or add stitches evenly across the base row.
Creative Variations
Try a tonal palette with forest, teal, and ivory squares, or use a brighter amber center for every motif. Add a second plum stripe to the cuffs or use forest green for a subtler collar. For a shorter cardigan, make two squares per front panel instead of three and shorten the back rectangle to match.
You can also widen the back panel or add a square column to each front for a roomier fit. Recheck the shoulder and armhole placement whenever you change the panel dimensions.
How to Use or Style Your Crochet Project
Wear the longline cardigan open over a simple top and jeans, or layer it over a lightweight dress. The vertical motif panels draw attention to the front while the solid back and sleeves keep the overall look balanced. This open-front design is best as a warm layering piece.
Care and Maintenance
Follow the care instructions on the yarn label. If machine washing is allowed, place the cardigan in a mesh bag and use a gentle setting. Otherwise, hand wash carefully. Reshape it while damp and dry flat to help prevent the long panels from stretching. Store folded rather than on a hanger.
Frequently Asked Questions
How many granny squares does this cardigan use?
The sample layout uses six squares: three stacked on each front panel.
Is this a beginner crochet cardigan?
The stitches are basic, but assembling garment panels and setting sleeves takes care. It is best for a confident beginner who has made granny squares before.
Can I make the cardigan shorter?
Yes. Use two squares per front panel and shorten the back panel to the same length, then adjust the sleeve openings and hem band to match.
Can I use different yarn weights?
You can, but the finished size and drape will change. Make swatches for both the granny squares and solid panels, and recalculate the measurements before assembly.
How can I make the sleeves wider?
Add stitches to the starting chain until the sleeve panel reaches your preferred width. Check that the sleeve’s top edge still fits the armhole.
Does the cardigan need buttons?
No. It is designed to hang open with a shawl collar. A closure can be added, but reinforce the area where it attaches.
Conclusion
This longline granny square cardigan puts colorful motifs into vertical front panels and keeps the rest of the garment simple. The open shape, solid sleeves, and contrasting collar make it a flexible design to customize. Swatch first, check the fit as you assemble, and adjust the panel measurements to suit your preferred layer.
Related Crochet Projects
- A granny square scarf in matching colors
- A solid crochet beanie with a plum ribbed brim
- A patchwork crochet vest
- A crochet tote using leftover motif yarn