Lilac Cloud Long Dragon Crochet Pattern
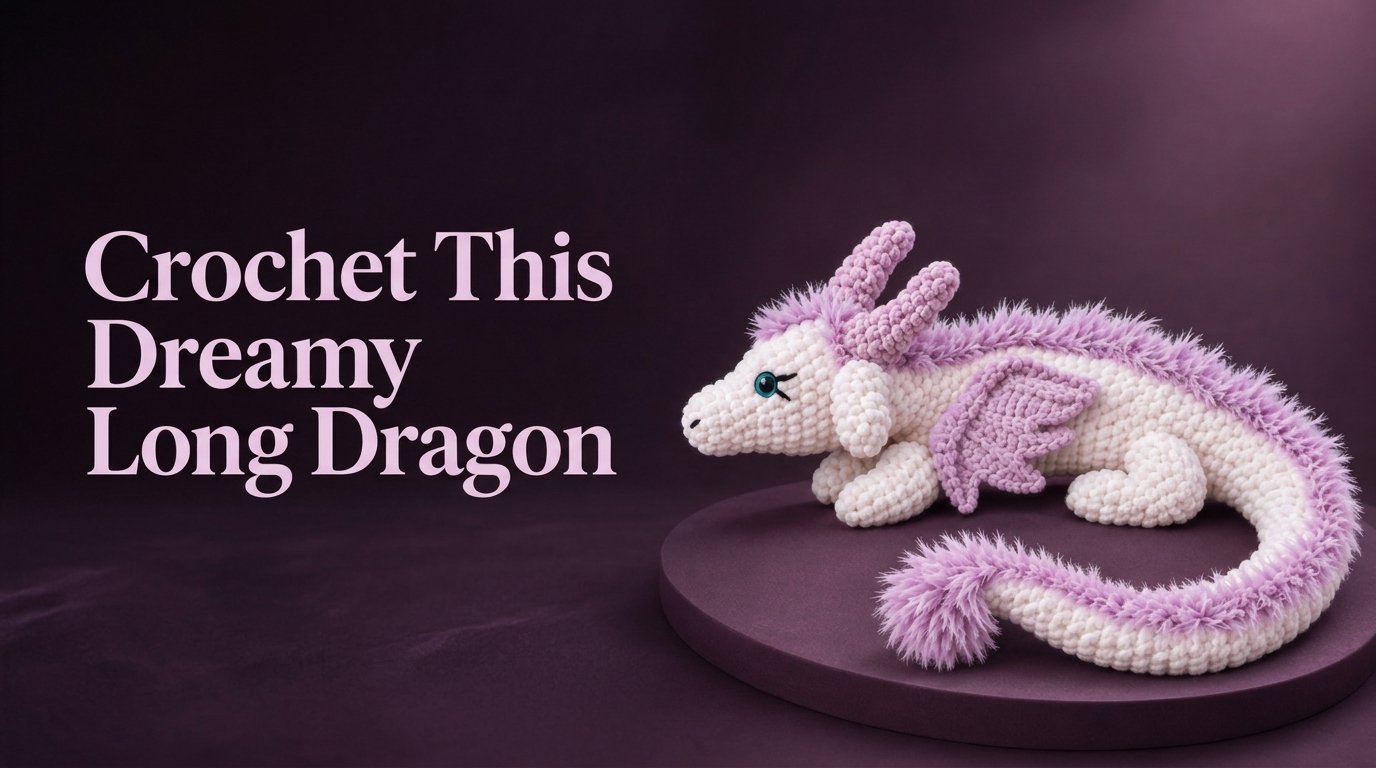
Introduction The Lilac Cloud Dragon is a long, softly curved amigurumi with a white chenille body, lavender horns and wings, a turquoise eye, and...
Introduction
The Lilac Cloud Dragon is a long, softly curved amigurumi with a white chenille body, lavender horns and wings, a turquoise eye, and a fluffy mane extending from its head to the tip of its tail. Its elongated proportions create a graceful fantasy-dragon silhouette while the plush yarn makes it soft and substantial.
This long dragon crochet pattern is intended for intermediate crocheters. Most components use single crochet and basic shaping, but the scale, long tapered tail, specialty yarn, and detailed assembly require patience.
These original draft instructions were developed to reproduce the visible construction of the reference design in a new editorial presentation. The stitch counts have been checked for internal consistency, but the pattern has not been physically tested.
Why You’ll Love This Project
The dragon combines smooth chenille stitches with a contrasting faux-fur ridge. This creates rich texture without requiring complicated decorative stitches.
Its body and tail are constructed from simple tubes with gradual shaping. Separate legs, horns, ears, and wings make the project easier to manage than crocheting every feature into one continuous piece.
The finished dragon makes an impressive fantasy display, decorative plush, or carefully constructed gift for an older recipient.
Project Overview
- Project type: Long plush dragon amigurumi
- Difficulty: Intermediate
- Estimated time: 18–24 hours
- Estimated finished length: 34–38 inches
- Main yarn: Super-bulky chenille
- Hook: 5 mm H-8
- Main techniques: Continuous rounds, increases, decreases, short-row-free shaping, sewing, surface embroidery, and faux-fur crochet
- Construction: Separate head, neck, body, tail, four legs, ears, horns, wings, mane, and tail tuft
- Terminology: US crochet terms
Materials and Supplies Needed
- 450–550 yards of white super-bulky chenille yarn
- 80–100 yards of pale-lavender super-bulky chenille yarn
- 100–130 yards of pale-lavender faux-fur yarn
- Small amount of black yarn for the eyelashes and nostrils
- Small amount of turquoise felt or embroidery yarn for the iris
- Two 20–24 mm safety eyes, or yarn for embroidered eyes
- 5 mm crochet hook
- 6.5 mm crochet hook for the faux-fur strip
- Polyester stuffing
- Locking stitch markers
- Large yarn needle
- Embroidery needle
- Scissors
- Straight pins
Safety eyes and shedding faux-fur fibers are unsuitable for some young children. Use embroidered features and a securely sewn mane when making the dragon for a child.
Choosing the Right Yarn and Hook
Plush chenille produces the rounded stitches and soft body visible in the design. Choose a chenille yarn with a strong center cord because weak yarn can shed or break while sewing.
The hook should create dense fabric that conceals the stuffing. Move down to 4.5 mm if gaps appear. If the fabric becomes stiff or difficult to work, move up to 5.5 mm.
Use faux-fur yarn only for the mane and tail tuft. Place a marker in every round because the stitches can disappear beneath the fibers.
Changing yarn weight will alter the finished dimensions and required yardage. Use the same yarn family for the white and lavender chenille sections so their thickness remains consistent.
Crochet Stitches and Abbreviations
- MR: Magic ring
- ch: Chain
- sl st: Slip stitch
- sc: Single crochet
- hdc: Half double crochet
- inc: Two single crochets in one stitch
- dec: Invisible single-crochet decrease
- sc3tog: Single crochet three stitches together
- st/sts: Stitch/stitches
- rnd/rnds: Round/rounds
- FO: Fasten off
Work the stuffed components in continuous spirals unless directed otherwise.
Before You Start
Aim for approximately 10 single crochets and 10 rounds per 4 inches with the white chenille yarn. Exact gauge is less critical than producing a dense fabric.
Stuff the tail as you crochet because its narrow sections will become difficult to reach. Keep the tail flexible enough to form the large curve shown in the design.
Mark the center top of the head, neck, body, and tail with removable yarn. These reference lines will help you position the mane in one continuous path.
Step-by-Step Crochet Instructions
Shaped Head
Begin at the muzzle with white chenille.
- Rnd 1: 6 sc in MR. (6)
- Rnd 2: (Sc, inc) 3 times. (9)
- Rnd 3: (2 sc, inc) 3 times. (12)
- Rnd 4: (3 sc, inc) 3 times. (15)
- Rnds 5–7: Sc around. (15)
- Rnd 8: (4 sc, inc) 3 times. (18)
- Rnds 9–11: Sc around. (18)
- Rnd 12: (2 sc, inc) 6 times. (24)
- Rnds 13–16: Sc around. (24)
- Rnd 17: (3 sc, inc) 6 times. (30)
- Rnds 18–21: Sc around. (30)
Place the eyes between Rounds 18 and 19, approximately 10 stitches apart. Add turquoise felt circles beneath the safety eyes if desired. Embroider one or two short black eyelashes beside each eye.
- Rnd 22: (3 sc, dec) 6 times. (24)
- Rnd 23: (2 sc, dec) 6 times. (18)
Stuff the muzzle lightly and the back of the head more firmly.
- Rnd 24: (Sc, dec) 6 times. (12)
- Rnd 25: Dec around. (6)
FO and close the opening. Embroider two small nostrils near Rounds 4–5.
Neck
With white chenille, ch 18. Join with a sl st, taking care not to twist the chain.
- Rnds 1–7: Sc around. (18)
- Rnd 8: (2 sc, inc) 6 times. (24)
- Rnds 9–14: Sc around. (24)
Stuff the neck firmly enough to support the head while retaining a gentle curve. FO with a long sewing tail.
Elongated Body
Using white chenille:
- Rnd 1: 6 sc in MR. (6)
- Rnd 2: Inc around. (12)
- Rnd 3: (Sc, inc) around. (18)
- Rnd 4: (2 sc, inc) around. (24)
- Rnd 5: (3 sc, inc) around. (30)
- Rnd 6: (4 sc, inc) around. (36)
- Rnds 7–25: Sc around. (36)
- Rnd 26: (4 sc, dec) around. (30)
- Rnd 27: (3 sc, dec) around. (24)
- Rnds 28–30: Sc around. (24)
Stuff the body evenly, leaving the final rounds slightly softer for attaching the tail. FO with a long tail. Leave the 24-stitch opening unclosed.
Long Tapered Tail
Begin at the tail tip with white chenille.
- Rnd 1: 6 sc in MR. (6)
- Rnds 2–8: Sc around. (6)
- Rnd 9: (2 sc, inc) twice. (8)
- Rnds 10–16: Sc around. (8)
- Rnd 17: (3 sc, inc) twice. (10)
- Rnds 18–24: Sc around. (10)
- Rnd 25: (4 sc, inc) twice. (12)
- Rnds 26–32: Sc around. (12)
- Rnd 33: (5 sc, inc) twice. (14)
- Rnds 34–39: Sc around. (14)
- Rnd 40: (6 sc, inc) twice. (16)
- Rnds 41–46: Sc around. (16)
- Rnd 47: (7 sc, inc) twice. (18)
- Rnds 48–52: Sc around. (18)
- Rnd 53: (8 sc, inc) twice. (20)
- Rnds 54–58: Sc around. (20)
- Rnd 59: (9 sc, inc) twice. (22)
- Rnds 60–64: Sc around. (22)
- Rnd 65: (10 sc, inc) twice. (24)
- Rnds 66–68: Sc around. (24)
Stuff throughout, using smaller portions toward the tip. Keep enough flexibility for a broad curl. FO with a long sewing tail.
Front Legs
Make two with white chenille.
- Rnd 1: 6 sc in MR. (6)
- Rnd 2: Inc around. (12)
- Rnd 3: (Sc, inc) around. (18)
- Rnds 4–7: Sc around. (18)
- Rnd 8: (Sc, dec) around. (12)
- Rnds 9–13: Sc around. (12)
Stuff the paw firmly and the upper section lightly. Flatten the opening and work 6 sc through both layers. FO with a long tail.
Hind Legs
Make two with white chenille.
- Rnd 1: 6 sc in MR. (6)
- Rnd 2: Inc around. (12)
- Rnd 3: (Sc, inc) around. (18)
- Rnd 4: (2 sc, inc) around. (24)
- Rnds 5–8: Sc around. (24)
- Rnd 9: (2 sc, dec) around. (18)
- Rnds 10–14: Sc around. (18)
Stuff until rounded. Flatten the opening and work 9 sc through both layers. FO with a sewing tail.
White Side Ears
Make two with white chenille.
- Rnd 1: 6 sc in MR. (6)
- Rnd 2: Inc around. (12)
- Rnd 3: (Sc, inc) around. (18)
- Rnds 4–6: Sc around. (18)
- Rnd 7: (Sc, dec) around. (12)
- Rnd 8: Sc around. (12)
Do not stuff. Flatten each ear and work 6 sc through both layers. FO with a long tail.
Lavender Horns
Make two with lavender chenille.
- Rnd 1: 6 sc in MR. (6)
- Rnds 2–3: Sc around. (6)
- Rnd 4: (2 sc, inc) twice. (8)
- Rnds 5–6: Sc around. (8)
- Rnd 7: (3 sc, inc) twice. (10)
- Rnds 8–9: Sc around. (10)
- Rnd 10: (4 sc, inc) twice. (12)
- Rnds 11–12: Sc around. (12)
Stuff lightly. FO with a long sewing tail.
Lavender Wings
Make two with lavender chenille.
- Row 1: Ch 16. Starting in the second ch, sc across. (15)
- Row 2: Ch 1, turn; dec, 11 sc, dec. (13)
- Row 3: Ch 1, turn; dec, 9 sc, dec. (11)
- Row 4: Ch 1, turn; dec, 7 sc, dec. (9)
- Row 5: Ch 1, turn; dec, 5 sc, dec. (7)
- Row 6: Ch 1, turn; dec, 3 sc, dec. (5)
- Row 7: Ch 1, turn; dec, sc, dec. (3)
- Row 8: Ch 1, turn; sc3tog. (1)
FO. Rejoin the yarn at one corner of the 15-stitch foundation edge.
Across each group of five stitches, work: sl st, sc, then (hdc, ch 2, sl st in the second ch, hdc) in the next stitch, sc, sl st. Repeat across all three groups to form three pointed wing lobes.
Work evenly spaced sc around the remaining two wing edges. FO with a long sewing tail.
Fluffy Mane Strip
Using the 6.5 mm hook and pale-lavender faux-fur yarn, ch 76 or enough chains to measure approximately 32–34 inches without stretching.
Starting in the second chain, sc across. FO with a long sewing tail.
The strip should extend from the crown, along the neck and body, and down most of the tail. Add or remove foundation chains before completing the row if necessary.
Fluffy Tail Tuft
Using faux-fur yarn:
- Rnd 1: 6 sc in MR. (6)
- Rnd 2: Inc around. (12)
- Rnds 3–5: Sc around. (12)
- Rnd 6: Dec around. (6)
Add a small amount of stuffing. FO and close the opening, leaving a sewing tail.
Assembly and Finishing
- Sew the narrow neck opening to the lower back of the head.
- Curve the neck gently and attach its 24-stitch opening to the narrow front of the body.
- Align the tail’s 24-stitch base with the open rear body edge and sew the two openings together.
- Pin the front legs beneath the shoulders and the larger hind legs near the rear body.
- Attach the white ears behind and slightly below the horns.
- Sew the lavender horns securely to the upper head.
- Pin a wing to each side of the body with the pointed lobes facing backward.
- Center the faux-fur strip along the marked top line. Sew through its foundation edge from the head to the tail.
- Attach the fluffy tuft to the tail tip.
- Curve the dragon into a crescent. Add a few hidden anchoring stitches between adjacent body and tail sections if you want the pose to remain fixed.
- Weave in all ends and redistribute the stuffing to smooth the silhouette.
Tips for Best Results
Count every body and tail round carefully. A missed increase can twist the tail or place its seam off-center.
Use a contrasting thread to mark the center top before sewing the mane. Remove the guide thread after the mane is attached.
Push chenille yarn ends through several internal stitches before trimming them. Chenille can shed when ends are cut too close to a seam.
Pin both wings simultaneously and inspect the dragon from above before sewing.
Common Mistakes and Troubleshooting
The dragon will not hold its curve: Remove a little tail stuffing or add hidden anchoring stitches after posing it.
The neck bends under the head: Add more stuffing at both neck joints and reinforce the seams.
The faux-fur mane looks uneven: Sew through the strip’s foundation edge rather than through the loose fibers.
The wing points curl inward: Lightly dampen the wings, pin them flat, and allow them to dry before attachment.
The chenille stitches are difficult to see: Feel for each stitch and use a marker after every repeat.
The body has visible gaps: Reduce the hook size rather than adding more stuffing.
Creative Variations
Replace lavender with pale blue, soft coral, or silver-gray while keeping the white body. Choose a coordinating faux-fur yarn for the mane.
For a shorter dragon, omit one or two plain-round groups from each tail section while retaining every increase round.
Embroidered eyes can replace safety eyes. A metallic embroidery thread around the iris can create a fantasy effect without changing the construction.
How to Use or Style Your Crochet Dragon
Arrange the dragon in a loose crescent on a bed, reading chair, or fantasy-themed display shelf. Its long silhouette also works well along the back of a bench or daybed.
This design contains sewn components and potentially shedding fibers. It is best treated as decorative plush unless every material and attachment is appropriate for the intended recipient.
Care and Maintenance
Follow the care instructions for both yarn types. Because faux-fur yarn may mat, gentle spot cleaning is the safest default.
For deeper cleaning, hand-wash in cool water without twisting. Support the dragon’s full length when lifting it from the water.
Reshape the body and tail, fluff the mane with your fingers, and air-dry flat. Avoid direct heat, which can damage chenille and synthetic fur fibers.
Frequently Asked Questions
Can a confident beginner make this dragon?
The stitches are approachable, but the project’s size, specialty yarn, long tail, and assembly make it intermediate overall.
Can I omit the faux-fur yarn?
Yes. Crochet the mane strip in lavender chenille or attach individual lavender surface stitches along the back.
How can I make the dragon smaller?
Use thinner yarn and a proportionally smaller hook while keeping the stitch counts unchanged.
Can the body and tail be one piece?
They can, but the separate components make the long sections easier to stuff and handle.
Are safety eyes required?
No. Embroidered eyes are a suitable alternative and remove the rigid plastic components.
How do I keep the tail curled?
Stuff it lightly, shape it before closing, and secure the curve with hidden stitches after assembly.
Has this pattern been physically tested?
No. It is an original draft based on the visible reference construction. Its stitch counts have been checked, but component fit should be evaluated while crocheting.
Conclusion
The Lilac Cloud Dragon combines a long chenille body, shaped wings, tall horns, and a fluffy lavender mane in an expressive fantasy plush. Careful stuffing and patient assembly create its flowing crescent silhouette.
Related Crochet Projects
- Long eastern-style dragon amigurumi
- Chenille sleeping dragon plush
- Fluffy fantasy serpent
- Small winged dragon companion