Layered Sunburst Crochet Square: A Textured Motif in Teal, Cream, and Sage
Introduction This layered sunburst square is a textured motif built around a simple idea: concentric rings of puffy petal clusters gathered around a solid...
Introduction
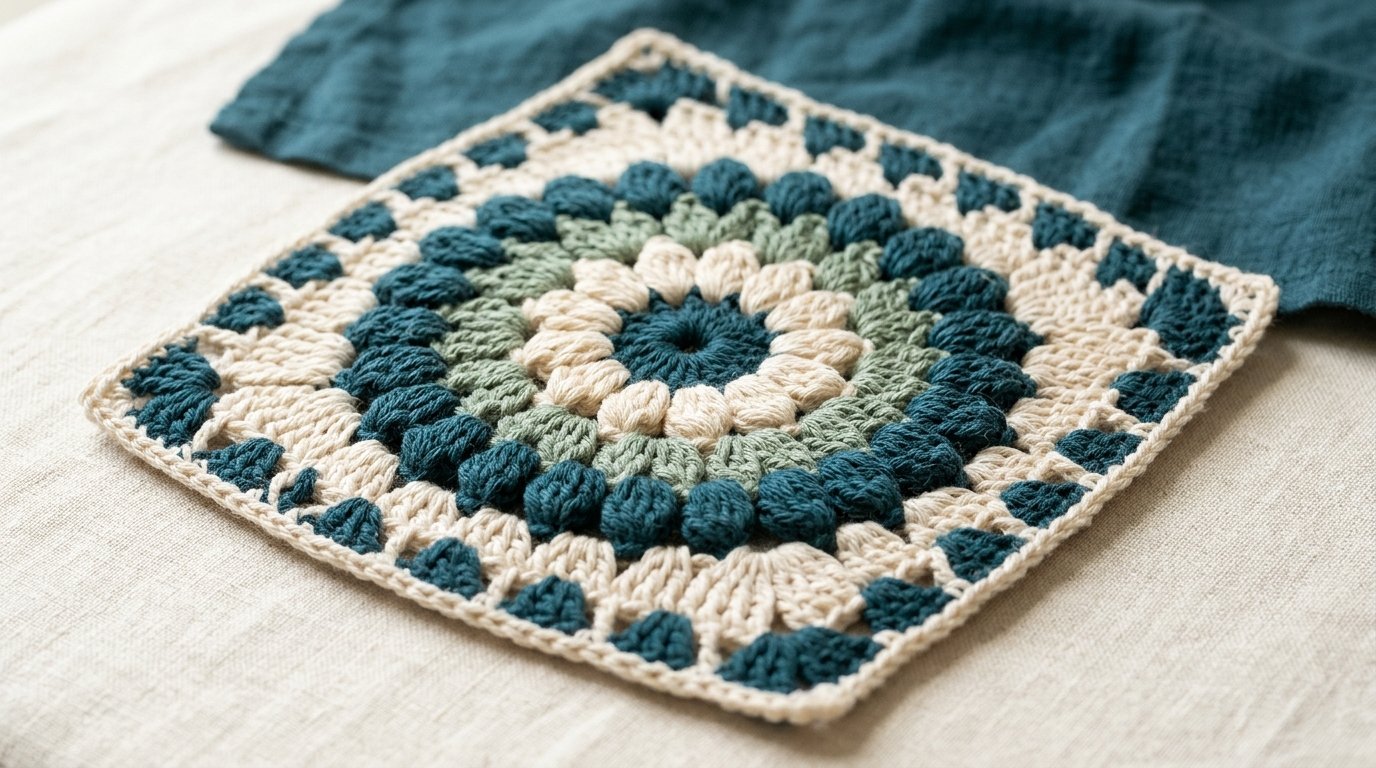
This layered sunburst square is a textured motif built around a simple idea: concentric rings of puffy petal clusters gathered around a solid center, then squared off with a border and finished with a small triangle edging. The result looks rich and dimensional, but every round is a repeat of the same few stitches.
The palette — deep teal, warm cream, and sage green — keeps the motif calm and modern. Because the rounds stack tightly, this square works well for blankets, cushions, bags, and small projects where you want a strong textured focal motif. It is an intermediate pattern: it uses puff or cluster stitches, joined rounds, and shaping to move from a circle to a square.
Why You’ll Love This Project
- Beautiful texture. The puffy petal rounds give real depth, so the square looks impressive with relatively simple stitches.
- A clear color story. Only three colors keep the pattern easy to plan and the result cohesive.
- Modular. Make one square as a coaster or pillow front, or many for a blanket.
- A satisfying challenge. It’s a step up from a basic granny square, but every round is repetitive and predictable once you learn it.
- A flexible border. The final triangle border can be omitted or repeated for a wider edge.
Project Overview
- Project type: Textured crochet motif square
- Difficulty: Intermediate
- Estimated time: About 1½–2 hours per square
- Suggested finished size: About 7 inches (18 cm) square, depending on yarn and hook
- Yarn weight: Worsted (medium, weight 4) cotton or cotton blend
- Crochet hook: 4.5 mm
- Main techniques: Magic ring, puff stitch, cluster stitch, joined rounds, chain spaces, working in the round, squaring a circle, chain-space triangle border
- Construction: Circular motif worked in joined rounds, squared with double-crochet border rounds, finished with a triangular edging
- Terminology: US crochet terms
Sizes and times are estimates and will vary with your yarn, hook, and tension.
Materials and Supplies Needed
- Worsted-weight cotton or cotton-blend yarn in three colors:
- Color A — deep teal for the center ring and final triangle border: about 30 yards
- Color B — warm cream for the petal rounds and squared border: about 70–80 yards
- Color C — sage green for the inner petal rounds: about 25–30 yards
- 4.5 mm crochet hook
- Stitch marker
- Yarn needle
- Scissors
No specialty tools are needed. Any smooth worsted cotton or cotton blend you already own will work.
Choosing the Right Yarn and Hook
Cotton or a cotton blend works best because it holds the puff petals crisply and keeps the square from stretching. Acrylic is softer and faster to work with, but the petals may lose some definition over time.
Use a 4.5 mm hook for worsted-weight yarn. If your puff stitches look loose and undefined, drop to 4.0 mm. If they feel stiff and hard to pull through, go up to 5.0 mm.
There is no strict gauge because this is a decorative motif, but the finished square should measure roughly 7 inches across. A tight, consistent fabric matters more than exact measurements. If your square turns out bigger or smaller, adjust your hook or yarn weight, and adjust the number of squared-border rounds to reach the size you want.
Crochet Stitches and Abbreviations
- ch — chain
- sl st — slip stitch
- sc — single crochet
- dc — double crochet
- st — stitch
- sts — stitches
- sp — space
- puff st — puff stitch
- cl — cluster
- dc2tog / dc3tog — double crochet two or three stitches together
- ch-sp — chain space
Puff stitch (puff st): Yarn over, insert hook into the indicated stitch or space, yarn over, and pull up a loop to the height of the surrounding stitches. Repeat this three times in the same stitch or space (you’ll have several loops on the hook). Yarn over and pull through all loops. Chain 1 to close, unless the pattern says otherwise.
Cluster (cl): Work several partial double crochet stitches in the same stitch or space, each leaving a loop on the hook, then yarn over and pull through all loops together. The pattern specifies how many stitches go into each cluster.
Before You Start
Practice the puff stitch. Before starting the square, work a few puff stitches on a scrap swatch. Puff stitch height and tension vary a lot between hands, so a quick practice round helps you find the right pull-up height.
Plan your color changes. Work the last stitch of a round in the new color by pulling the new color through the final loop of the closing stitch, then join. This avoids visible tails.
Keep the circle flat. Circular rounds can cup if your tension is too tight. If the motif starts to bowl upward, work one more chain between clusters in that round. If it waves, work fewer chains.
Mark the first stitch of each round. Joined rounds make it easy to lose track, so place a marker.
Step-by-Step Crochet Instructions
This square is worked in joined rounds. Each round is joined with a sl st to the first stitch, then the next round begins with a chain that counts as the first stitch unless otherwise noted.
Round 1 — Center Ring (Color A)
Make a magic ring. Ch 2 (counts as the first dc). Work 11 dc into the ring. Join with a sl st to the top of the ch-2. (12 sts)
Pull the magic ring tail tight. Fasten off Color A and join Color B by pulling a loop through the join.
Round 2 — First Petal Round (Color B)
Ch 2 (counts as the first dc). Work 1 dc in the same stitch, then ch 1.
Dc2tog in the next stitch and the one after, ch 1. Repeat from * to * around to close the round. Join with a sl st to the top of the ch-2. (6 clusters)
This round creates a ring of six petal clusters that will be lifted into puff stitches in the next round.
Round 3 — Puff Petal Round (Color B)
Ch 1. Work 1 puff st into each ch-1 space from the previous round, ch 1 between each puff st. Join with a sl st to the top of the first puff. (6 puff sts)
This round builds the first raised ring of petals.
Round 4 — Petal Round (Color C)
Join Color C by pulling a loop through the join. Ch 2 (counts as the first dc). Work 1 dc in the same space. Ch 1.
Work dc2tog into the next ch-1 space, ch 1. Repeat from * to * around. Join with a sl st to the top of the ch-2. (12 clusters)
Round 5 — Puff Petal Round (Color C)
Ch 1. Work 1 puff st into each ch-1 space, ch 1 between each puff st. Join with a sl st to the top of the first puff. (12 puff sts)
Round 6 — Outer Petal Round (Color B)
Join Color B by pulling a loop through the join. Ch 2 (counts as the first dc). Work 1 dc in the same space. Ch 1.
Work dc2tog into the next ch-1 space, ch 1. Repeat from * to * around. Join with a sl st to the top of the ch-2. (24 clusters)
Round 7 — Outer Puff Petal Round (Color B)
Ch 1. Work 1 puff st into each ch-1 space, ch 1 between each puff st. Join with a sl st to the top of the first puff. (24 puff sts)
Fasten off Color C at the end of Round 6 if you prefer to keep Round 7 entirely in Color B. Fasten off Color B at the end of Round 7.
Round 8 — Squaring the Circle (Color B)
This round turns the round motif into a square by placing corner clusters and straight-edge clusters.
Join Color B in any ch-1 space. Ch 3 (counts as the first dc).
*Work 3 dc into the same ch-1 space (the corner cluster). Ch 2. Work 3 dc into the next ch-1 space. Ch 1. Work 3 dc into the next ch-1 space. Ch 1. Work 3 dc into the next ch-1 space. Ch 1. Work 3 dc into the next ch-1 space. Ch 1. Work 3 dc into the next ch-1 space. Ch 1. Work 3 dc into the next ch-1 space. Ch 1. Work 3 dc into the next ch-1 space. Ch 2. Repeat from * three more times, distributing the clusters evenly so the eight ch-1 spaces become the eight straight-edge clusters between four corners. Join with a sl st to the top of the ch-3.
The exact number of straight-edge clusters will depend on your petal round count. The goal is a square shape: four corner ch-2 spaces, and even straight edges between them.
Round 9 — Straight Border (Color B)
Ch 1. Work 1 sc in each stitch around, working 3 sc into each corner ch-2 space so the corners stay square. Join with a sl st. (Count varies by square size.)
Fasten off Color B.
Round 10 — Triangle Border (Color A)
Join Color A in any stitch along the side. Ch 1. Work 1 sc in the first stitch.
Ch 3, skip 2 sts, work 1 sc in the next stitch. Repeat from * to * along each side, working (sc, ch 3, sc) at each corner ch-sp to turn the corner cleanly. Join with a sl st.
To make the triangles solid, work back along the chain spaces: ch 1, then 3 dc into the next ch-3 space, sl st into the next sc. Repeat from * to * around. Join with a sl st. Fasten off Color A.
Size Adjustments
- Larger square: Add another petal-puff pair (Rounds 4–5) before squaring. Then add one more straight-border round.
- Smaller square: Omit Round 9 (the single-crochet round), or skip one petal-puff pair.
- No triangle border: Finish after Round 9 for a clean, simple edge.
- Wider triangle border: Work a second sc-then-ch-3 round before adding the dc triangles.
Assembly and Finishing
If you are making one square (for a pillow, bag, or coaster), weave in all ends on the wrong side. Gently block the square by pinning it to size and misting it with water, then let it dry fully. Blocking is especially helpful with cotton, because it smooths the puff petals and sharpens the corners.
If you are making multiple squares for a blanket, join finished squares along the edges using a flat join (sl st through both layers or a simple whipstitch), keeping the squares lined up corner to corner.
Tips for Best Results
- Keep puff stitches even. Pull each loop to the same height so the petals look uniform.
- Use a stitch marker at the start of each round. Joined rounds are easy to lose track of.
- Change colors cleanly. Pull the new color through the final loop of the closing stitch so no stray tails show on the front.
- Watch the corners. Make sure each corner has a ch-2 space (or 3 sc in a corner for the sc border) so the square doesn’t bow.
- Block at the end. Blocking makes the biggest difference with textured motifs.
Common Mistakes and Troubleshooting
The motif cups into a bowl. Tension is too tight or you used too few chains between clusters. Try one more chain in the round, or loosen your tension.
The motif waves at the edges. Too many stitches or chains. Work fewer chains between clusters in the outer round, or switch to a smaller hook.
The puff stitches look uneven. Pull-up height varies. Aim to keep each loop the same height as the surrounding stitches.
The corners aren’t sharp. Corner ch-spaces may be missing or too small. Check that every corner has a ch-2 space (or 3 sc at the corner in the straight border).
The triangle border pulls the edges inward. The chain spaces along the sides may be too tight. Work a ch-3 and skip 2 sts consistently around, and block the square afterwards.
Creative Variations
- Color swap. Reverse the palette: cream center, teal and sage petals, with a cream triangle border.
- Solid square. Work the entire square in one color for a minimalist version.
- Cushion front. Work two squares and join them into a cushion cover, sewing a small zipper or leaving an opening for a cushion insert.
- Scarf. Join several squares end to end for a scarf.
- Christmas or fall palette. Red, ivory, and forest green for winter, or mustard, cream, and rust for fall.
How to Use or Style Your Crochet Project
A single square makes a lovely coaster, small wall hanging, or decorative insert for a pillow front. Joined squares work well for blankets, cushions, and bags. Because this is a decorative textile, keep it away from open flames and supervise it around pets that chew or tug at yarn.
Care and Maintenance
Hand wash in cool water with a mild soap, or use the gentle cycle in a mesh laundry bag if your yarn is machine washable. Do not wring; press gently in a towel to remove excess water. Reshape the square and lay flat to dry, pinning the corners to keep them sharp. Store flat, folded loosely, to prevent the puff petals from flattening. Always follow your yarn label’s care instructions.
Frequently Asked Questions
Can a beginner make this square?
It’s best treated as an intermediate pattern. If you’re comfortable with double crochet, chain spaces, and simple cluster stitches, you can make it. Practice puff stitches first.
How much yarn does one square use?
Roughly 125–140 yards total across all three colors. For a 48 × 60 inch blanket of 7-inch squares, expect about 8 rows of 7 squares.
Can I make the square bigger without changing the yarn?
Yes. Add another petal-puff pair, then add an extra straight-border round to the squared edge.
Do I need a special puff stitch hook?
No. A standard 4.5 mm hook works.
Can I use acrylic yarn?
Yes, but cotton holds the puff texture more crisply. Acrylic may soften over time.
How do I join multiple squares?
Use a flat join: sl st through both layers along the edge, or a simple whipstitch. Keep the corner stitches aligned so the grid stays square.
Why does my square look lumpy?
Uneven puff stitches or insufficient blocking are the usual causes. Re-block the square once dry.
Conclusion
This layered sunburst square is a small, satisfying project with a lot of visual depth. The concentric petal rounds, the squared cream border, and the small triangle edging give it a finished look, and the teal, cream, and sage palette keeps it modern. Make one square as a coaster or pillow front, or join many for a blanket with real texture.
Related Crochet Projects
If you enjoy this square, you might also like a classic granny square in a teal and cream palette, a floral motif square with rosebud clusters, a textured afghan block with popcorn stitches, or a striped half-double-crochet blanket.