Layered Crochet Carnation Bouquet Pattern
Make a small bouquet of three layered crochet carnations in coral rose, pink, and blush. Each flower has rounded, scalloped petals, a green calyx,...
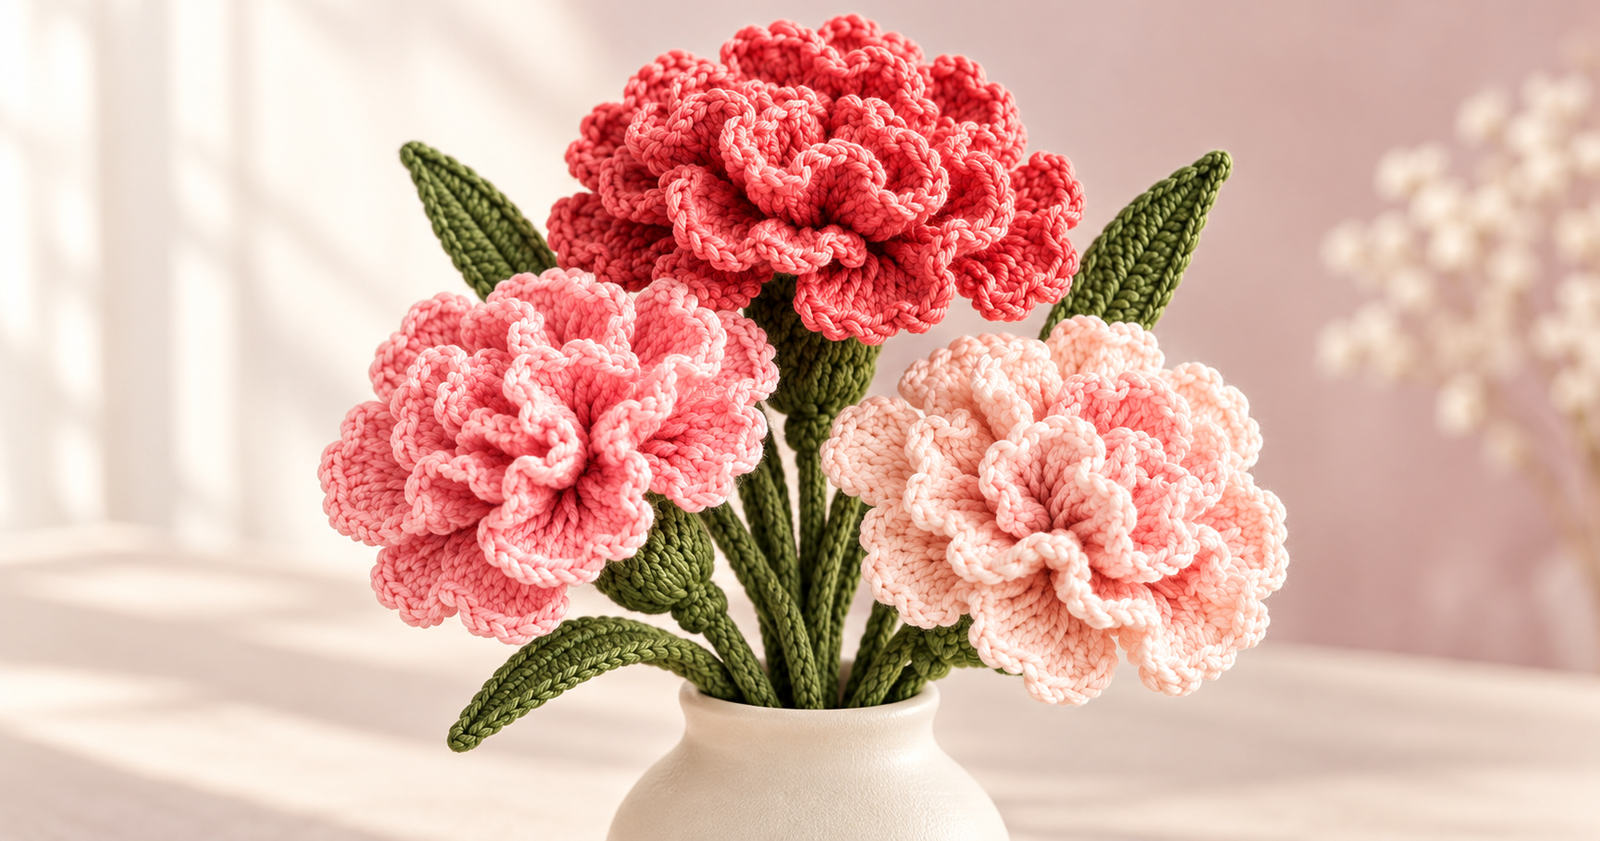
Make a small bouquet of three layered crochet carnations in coral rose, pink, and blush. Each flower has rounded, scalloped petals, a green calyx, a covered stem, and a pair of crochet leaves. The flowers are worked in rounds, with the petals added to exposed front loops for a ruffled, layered look.
This pattern is written for confident beginners. It uses basic stitches, simple increases, and a little assembly. The finished bouquet is decorative; it has not been physically made or tested.
Why You’ll Love This Project
These carnations have lots of texture without requiring complicated lace stitches. The flower centers are small crochet rounds, and the ruffles are built by adding petals around each round.
Make all three flowers in coordinating shades, or use one color for a uniform bouquet. The stems can be arranged in a small vase or tied together as a handmade display.
Project Overview
- Project type: Three-flower crochet bouquet
- Difficulty: Confident beginner
- Estimated time: 6–9 hours
- Finished size: Flowers approximately 3–4 inches wide; stems approximately 9–10 inches long
- Yarn: Medium-weight cotton or cotton blend
- Hook: 4 mm (G-6), or size needed for a firm fabric
- Techniques: Single crochet, half double crochet, double crochet, increases, working in back loops, seaming
- Construction: Three layered flowers, three calyxes, six leaves, and three covered stems
- Terminology: US crochet terms
Sizes and time are estimates. Yarn and tension will affect the finished dimensions.
Materials and Supplies Needed
- Approximately 100–150 yards of medium-weight cotton yarn:
- Rose or coral for one flower
- Medium pink for one flower
- Pale blush for one flower
- Olive or forest green for stems, calyxes, and leaves
- 4 mm crochet hook
- Three pieces of 16-gauge floral wire, approximately 12 inches each
- Wire cutters
- Yarn needle
- Scissors
- Stitch marker
- Floral tape, optional
Use smooth yarn so the petal stitches remain easy to see. Choose wire that can be bent by hand but is firm enough to support the flower heads.
Choosing the Right Yarn and Hook
Cotton or a cotton blend gives the petals clear stitch definition and helps the flowers hold their shape. A medium-weight yarn makes full petals without requiring a large hook.
Use a hook that creates a firm but workable fabric. If the flower centers feel loose or the wire shows through the stems, try a smaller hook. If the petals are stiff and hard to crochet, use a slightly larger hook.
Crochet Stitches and Abbreviations
These instructions use US crochet terms:
- ch — chain
- sl st — slip stitch
- sc — single crochet
- hdc — half double crochet
- dc — double crochet
- st / sts — stitch / stitches
- inc — work 2 sc in the same stitch
- FLO — front loop only
- BLO — back loop only
Petal: Work a sl st, ch 3, 3 dc, ch 3, and sl st into the same front loop.
Before You Start
The flower centers are worked in continuous rounds. Use a stitch marker to mark the first stitch of each round. The petals are worked into the exposed front loops of the center rounds, while later increase rounds are worked into the back loops.
The floral wire is used inside the stems. Bend each wire end into a small loop and cover it securely with yarn or floral tape before assembly. This is a decorative project with wire inside; keep it out of reach of young children and pets.
Step-by-Step Crochet Instructions
Make the Three Flower Centers
Make one center in each flower color.
With flower-color yarn, make an adjustable ring.
Round 1: Work 6 sc into the ring. Do not pull the ring completely closed yet; keep the center opening small but accessible for attaching the calyx later.
Petal layer 1: Work one petal into the FLO of each of the 6 stitches from Round 1. You will have 6 petals.
Round 2: Working behind the petals, work 2 sc in the BLO of each stitch around. (12 sts)
Petal layer 2: Work one petal into the FLO of each stitch from Round 2. You will have 12 petals.
Round 3: Work behind the petals, *sc in the BLO of the next st, 2 sc in the BLO of the next st; repeat from * around. (18 sts)
Petal layer 3: Work one petal into the FLO of each stitch from Round 3. You will have 18 petals.
Fasten off, leaving a long tail to attach the calyx. Shape the petals gently with your fingers so each layer sits slightly forward of the one behind it.
Make the Green Calyx
Make three calyxes in green yarn.
Round 1: Make an adjustable ring and work 6 sc into it. (6 sts)
Round 2: Work 2 sc in each st around. (12 sts)
Round 3: *Sc in the next st, 2 sc in the next st; repeat from * around. (18 sts)
Round 4: Sc in BLO of each st around. (18 sts)
Fasten off, leaving a long sewing tail. The calyx forms a shallow cup that covers the back of the flower center.
Make the Leaves
Make six leaves in green yarn.
Leaf: Ch 11. Starting in the second ch from the hook, work sc in the next ch, hdc in the next ch, dc in the next 5 ch, hdc in the next ch, and sc in the next ch. Work 3 sc in the last ch.
Working along the opposite side of the foundation chain, work sc in the next ch, hdc in the next ch, dc in the next 5 ch, hdc in the next ch, and sc in the final ch. Join with a sl st to the first sc. Fasten off, leaving a long tail for sewing.
The leaf should be long and pointed, with a slight curve. Make two for each stem.
Make the Covered Stems
Make three stems.
Cut a piece of floral wire approximately 12 inches long. Bend a small loop at one end and cover the cut end securely with floral tape.
With green yarn, make an adjustable ring around the looped end of the wire. Work 4 sc into the ring. Tighten the ring around the wire, then continue working 4 sc in continuous rounds around the wire until the crochet covering measures about 9–10 inches. Keep the stitches snug so the wire is hidden. Fasten off, leaving a tail.
Assemble Each Flower
Place the calyx over the back of a flower, with the narrower starting round centered behind the flower. Use the long tail to sew the calyx securely to the flower’s back.
Position the top of the covered stem behind the calyx. Sew it firmly in place, taking several stitches through the calyx and the covered stem. Attach two leaves to each stem at different heights. Arrange the leaves on opposite sides for a natural look.
Repeat for all three flowers.
Assembly and Finishing
Arrange the stems so the flowers sit at slightly different heights. Bend the wire gently to angle the flowers and leaves. If desired, wrap floral tape around the lower ends of the stems to hold the bouquet together.
Check that all wire ends are fully covered and that the flowers and leaves are firmly attached. Weave in any remaining yarn tails.
Tips for Best Results
- Keep the petal stitches loose enough to make the layers curl naturally.
- Use a stitch marker in each center round so the increases stay even.
- Sew through both the calyx and the stem covering when attaching the flower.
- Vary the height and angle of the flowers for a fuller arrangement.
- Test the yarn and hook on a small swatch if your petals feel too stiff.
Common Mistakes and Troubleshooting
The flower center curls inward. Check that each increase round has the correct stitch count. A tight center can also be eased by using a slightly larger hook.
The petals look flat. Loosen the chain-3 portions slightly and shape each petal by hand after the layer is complete.
The calyx does not cover the flower back. Check the stitch count and use a slightly larger hook for the calyx if your flower center is especially dense.
The stem wire shows through. Work the single crochets more closely around the wire, or use a smaller hook for the stem covering.
A flower head droops. Check that the wire is attached securely to the calyx. A second piece of wire can be added inside the stem if extra support is needed.
Creative Variations
Make a single-color bouquet, use two shades of one color, or choose brighter shades for a cheerful display. You can also make the flowers smaller by using lighter yarn and a smaller hook, or larger with bulky yarn and a larger hook.
Add more leaves to each stem or vary their placement. Keep the stems covered and the wire concealed for a neat finish.
How to Use or Style Your Crochet Bouquet
Arrange the carnations in a narrow vase, or tie the stems together with ribbon for a handmade gift. They work well as desk or shelf decor and can be reused as a seasonal display.
Because the stems contain wire, use the bouquet as decoration rather than as a toy or wearable accessory.
Care and Maintenance
Dust the flowers gently with a soft brush or a cool setting on a hair dryer held at a distance. If the yarn label allows washing, remove the wire stems first when possible and hand wash the crochet pieces gently. Reshape the petals and let them dry completely before reassembling.
Store the bouquet away from moisture and direct sunlight to help preserve the yarn colors.
Frequently Asked Questions
Can I make the flowers with acrylic yarn?
Yes. Smooth acrylic yarn can work well, though the petals may feel softer and less structured than cotton.
How many flowers does this pattern make?
The instructions make three flowers, each with its own calyx, stem, and two leaves.
Can I make the bouquet without wire?
Yes, but the stems will be flexible and may not hold a posed shape. You can use the flowers as appliqués or attach them to a wreath or wall hanging instead.
How can I make larger flowers?
Use a larger yarn and hook, or add another increase round and a corresponding petal layer. The flower will use more yarn and may need a larger calyx.
How do I keep the petals layered?
Work each increase round into the back loops, then crochet the petals into the front loops of that same round. This creates separate tiers.
Can I use the flowers as appliqués?
Yes. Leave off the calyx and stem, then sew the flower to a bag, hat, pillow, or other project.
Conclusion
This layered crochet carnation bouquet brings together three ruffled flowers, green leaves, and covered stems for a lasting floral display. Make the flowers in matching shades or mix your favorite pinks, then shape the stems to arrange the bouquet just the way you like.
Related Crochet Projects
- Crochet rose bouquet
- Crochet daisy stems
- Layered crochet flower appliqués
- Crochet leaf garland