Harbor Window Granny Square Crochet Pattern
The Harbor Window Granny Square is a colorful crochet motif made with familiar double-crochet groups and a neat single-crochet frame. Coral, golden mustard, deep...
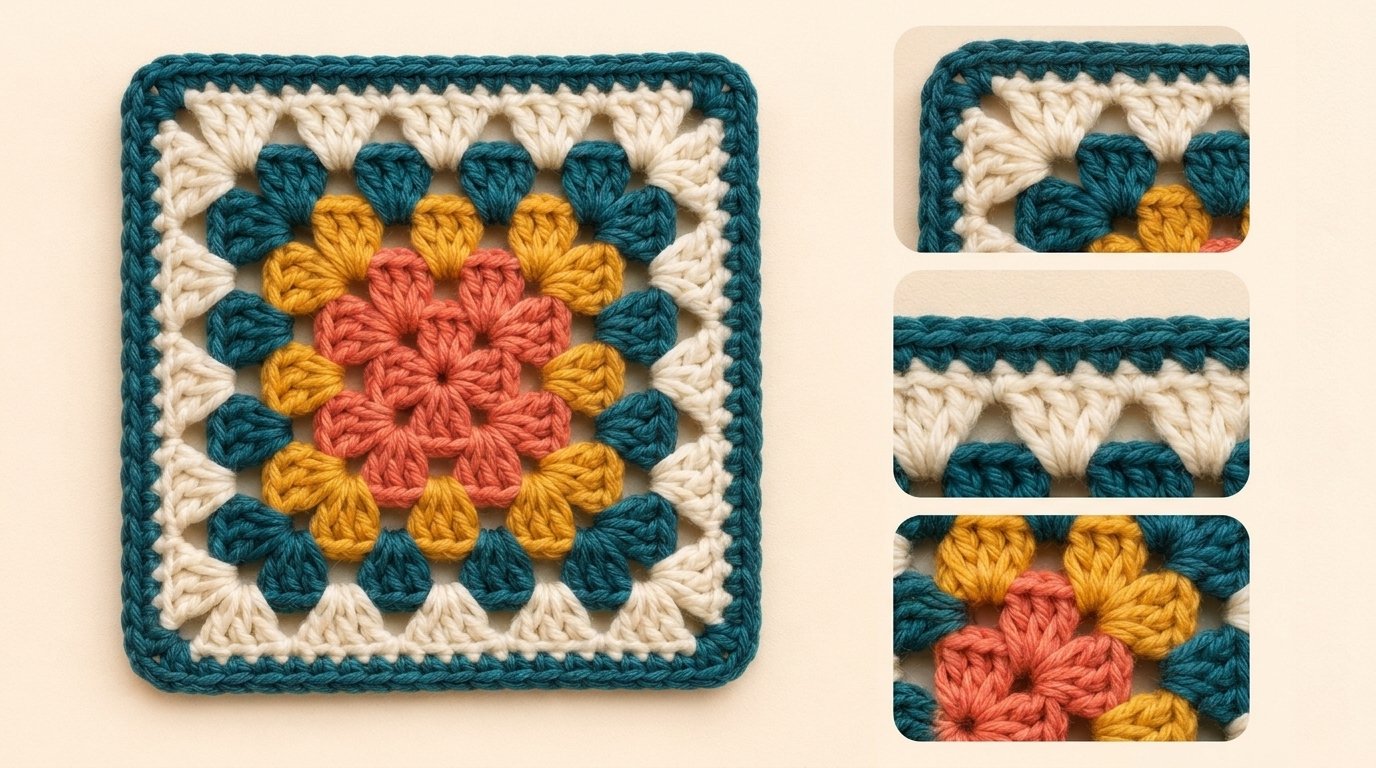
The Harbor Window Granny Square is a colorful crochet motif made with familiar double-crochet groups and a neat single-crochet frame. Coral, golden mustard, deep teal, and warm ivory create concentric bands that draw attention toward the center while giving the finished square a crisp outline.
This beginner-friendly granny square crochet pattern introduces working in joined rounds, crocheting into chain spaces, changing colors, and forming symmetrical corners. One square can become a coaster or decorative patch, while multiple motifs can be joined into pillows, bags, scarves, or blankets.
Why You’ll Love This Project
The square uses a small collection of basic stitches and follows a predictable construction. Once you understand how the corners and side spaces work, every new round follows the same rhythm.
It is also an excellent scrap-yarn project. Each color section requires only a modest amount of worsted-weight yarn, and the palette can easily be adapted to match your décor or another crochet project.
The contrasting outer frame gives the square a finished appearance and creates a convenient edge for joining several motifs.
Project Overview
- Project type: Multicolor granny square motif
- Difficulty: Confident beginner
- Estimated time: 60–90 minutes per square
- Estimated finished size: Approximately 7 inches square
- Yarn weight: Medium weight number 4
- Hook: US H/8, 5 mm
- Main techniques: Chains, slip stitches, single crochet, double crochet, color changes, and joined rounds
- Construction: Center-out square completed with a framed border
- Terminology: US crochet terms
The finished dimensions and working time are estimates. Your yarn, hook, and tension may produce different results.
Materials and Supplies Needed
- Medium weight number 4 yarn
- Approximately 10 yards coral
- Approximately 15 yards golden mustard
- Approximately 35 yards deep teal, including the border
- Approximately 30 yards warm ivory
- US H/8, 5 mm crochet hook
- Four removable stitch markers, optional
- Yarn needle
- Scissors
- Blocking mat or folded towel
- Rust-resistant blocking pins, optional
These quantities allow a small margin for tension differences and weaving in ends.
Choosing the Right Yarn and Hook
A smooth acrylic, cotton, or cotton-blend yarn will make the stitch placement easier to see. Beginners may find a firmly spun yarn easier to handle than fuzzy, brushed, or loosely plied fibers.
Cotton creates a structured square with strong stitch definition. Acrylic generally feels softer and offers more flexibility for blankets and garments. A cotton-acrylic blend provides a useful balance between definition and drape.
The suggested 5 mm hook should produce a flexible but stable fabric with medium-weight yarn. Move up one hook size if the square feels stiff or curls inward. Move down one size if the fabric is floppy and the spaces appear much larger than intended.
Exact gauge is not essential for a single decorative motif. When making several squares for one project, matching gauge is important because every square needs to reach the same dimensions.
Crochet Stitches and Abbreviations
- ch — chain: Yarn over and pull the yarn through the loop on the hook.
- ch-sp — chain space: The opening formed beneath one or more chains.
- sl st — slip stitch: Insert the hook, yarn over, and pull through the stitch and the loop on the hook.
- sc — single crochet: Insert the hook, yarn over, pull up a loop, yarn over, and pull through both loops.
- dc — double crochet: Yarn over, insert the hook, yarn over, and pull up a loop. Yarn over and pull through two loops twice.
- st — stitch
- sts — stitches
- rnd — round
- rep — repeat
- beg — beginning
In this pattern, a granny cluster means three separate double crochets worked into the same chain space. It is not a three-double-crochet-together decrease.
A corner group consists of (3 dc, ch 2, 3 dc) worked into one corner space.
Before You Start
The beginning chain 3 counts as the first double crochet of each round. Join a round to the top of this beginning chain unless the directions say otherwise.
You can begin with an adjustable ring or chain 4 and join the first and last chains with a slip stitch. The chain-ring method is often easier for a new crocheter.
Each round has four ch-2 corner spaces. Placing a stitch marker in each corner can make the pattern easier to follow.
Fasten off after every colored round and join the new color in any ch-2 corner. This keeps the transitions controlled and prevents unused yarn from being carried visibly behind the open spaces.
Step-by-Step Crochet Instructions
Center Round
With coral, make an adjustable ring or ch 4 and join with a sl st to form a ring.
Round 1: Ch 3, work 2 dc into the ring, ch 2. Work (3 dc, ch 2) into the ring three more times. Join with a sl st to the top of the beginning ch 3.
You should have four granny clusters and four ch-2 corner spaces.
Pull the adjustable ring closed, if used.
Expand the Coral Center
Slip stitch across the next two dc and into the first corner space.
Round 2: Ch 3 and work 2 dc into the same corner. Ch 2 and work 3 dc into that corner. Ch 1.
In each of the remaining three corner spaces, work (3 dc, ch 2, 3 dc, ch 1). Join to the top of the beginning ch 3.
You should have eight granny clusters, four side ch-1 spaces, and four corner spaces. Fasten off coral.
Add the Golden-Mustard Round
Join golden mustard in any corner space.
Round 3: Ch 3, 2 dc, ch 2, and 3 dc in the joining corner. Ch 1.
Work 3 dc in the next side ch-1 space and ch 1. In the next corner, work (3 dc, ch 2, 3 dc), then ch 1.
Repeat the side cluster and corner sequence around the square. Join to the beginning ch 3.
You should have 12 granny clusters: three along each side when the two corner portions are included. Fasten off golden mustard.
Add the Deep-Teal Round
Join deep teal in any corner space.
Round 4: Work (ch 3, 2 dc, ch 2, 3 dc) in the joining corner and ch 1.
Work 3 dc in each of the next two side ch-1 spaces, placing ch 1 between the clusters and after the second cluster.
In the next corner, work (3 dc, ch 2, 3 dc), then ch 1.
Repeat around, working two side clusters between each pair of corners. Join to the beginning ch 3.
You should have 16 granny clusters. Fasten off deep teal.
Add the Warm-Ivory Round
Join warm ivory in any corner space.
Round 5: Work (ch 3, 2 dc, ch 2, 3 dc) in the joining corner and ch 1.
Work 3 dc in each of the next three side ch-1 spaces. Place ch 1 after each cluster.
Work (3 dc, ch 2, 3 dc) in the next corner and ch 1.
Repeat around, working three side clusters between consecutive corners. Join to the beginning ch 3.
You should have 20 granny clusters. Fasten off warm ivory.
Crochet the Framed Border
Join deep teal in any ch-2 corner.
Border round: Ch 1, which does not count as a stitch. Work (2 sc, ch 2, 2 sc) in the joining corner.
Work 1 sc in every dc and 1 sc in every ch-1 space across the first side. In the next corner, work (2 sc, ch 2, 2 sc).
Repeat around the remaining sides and corners. Join with a sl st to the first sc.
Fasten off, leaving a tail long enough to weave in securely.
Adjusting the Size
For a larger square, add more granny rounds before crocheting the border. Every additional round adds one new side cluster between consecutive corners.
Continue working a corner group in every ch-2 corner, a granny cluster in every side ch-1 space, and ch 1 between adjacent groups. Use the border instructions after reaching the desired size.
When making several squares, count the same number of rounds and use the same hook throughout the project.
Assembly and Finishing
Weave each yarn tail through the backs of several stitches in the matching color. Change direction once before trimming the excess yarn so that the end is less likely to work loose.
Gently shape the motif into a square. If necessary, lightly block it:
- Dampen the square without soaking it.
- Place it on a blocking mat or folded towel.
- Measure each side and adjust the corners until the dimensions match.
- Pin the corners without overstretching the chain spaces.
- Allow the square to dry completely before removing the pins.
If you are making a multi-square project, block every motif to the same measurement before joining.
Tips for Best Results
Keep the chain stitches relaxed. Tight ch-1 spaces can make it difficult to insert the hook on the following round.
Count the side spaces before beginning each new round. Round 3 has one side space between corners, Round 4 has two, and Round 5 has three.
When joining a new color, leave a tail of approximately 5 inches. A generous tail is easier to weave securely than a very short one.
Rotate the square after each completed side to confirm that all four corners have the same construction. Missing one half of a corner group is easier to correct before the round is finished.
Common Mistakes and Troubleshooting
The square is becoming circular
Check that every corner contains two granny clusters separated by ch 2. A single cluster in a corner does not add enough width to maintain the square shape.
The motif is ruffling
Ruffling usually indicates extra clusters or overly loose chains. Count the side spaces and confirm that each one contains only a single granny cluster.
The center hole is too large
Use an adjustable ring and pull it closed firmly, or begin with ch 3 instead of ch 4 if your tension allows enough room for the first-round stitches.
The square twists to one side
Repeatedly working in the same direction can create a subtle lean. Blocking may correct a small amount of twisting. For future squares, turn the work after each round if you prefer a more balanced appearance, remembering that this will alternate the right and wrong sides.
The border pulls inward
The single-crochet stitches may be too tight. Repeat the border with a larger hook, or work an occasional extra sc into a side chain space if the edge needs more room.
The squares finish at different sizes
Confirm that every motif has the same number of rounds. Differences can also come from tension changes, yarn substitutions, or switching hooks.
Creative Variations
Create a quieter version with one color for all granny rounds and a contrasting frame. This eliminates most color changes while preserving the pattern’s construction.
For a softer palette, combine lavender, butter yellow, ivory, and denim blue. For an autumn version, try rust, golden mustard, forest green, and cream.
A wider frame can be made by adding another single-crochet round. Work one sc in every stitch and (sc, ch 2, sc) in each corner space.
You can also reverse the featured palette by placing deep teal in the center, ivory in the second round, mustard in the third, and coral near the edge.
How to Use or Style Your Crochet Project
One Harbor Window square can serve as an oversized coaster or a decorative patch when made from washable cotton. Add a fabric backing if the motif will be exposed to frequent friction.
Join four squares for a cushion front, six or eight for a small tote panel, or create a larger collection for a colorful throw. The framed edges make it easy to align the motifs before seaming.
For a wall display, arrange several squares in a simple grid and mount them without pulling the corners out of shape.
Care and Maintenance
Follow the washing instructions printed on the yarn label. Fiber content determines whether the finished item can be machine washed, hand washed, or laid flat to dry.
Wash joined projects in cool water with mild detergent. Avoid vigorous agitation, especially when the square contains open chain spaces.
Reshape the motif while damp and dry it flat. Hanging a wet granny-square project may stretch the corners and side spaces.
Store finished squares flat in a clean, dry container until you have enough for the intended project.
Frequently Asked Questions
Is this granny square suitable for a complete beginner?
It is most suitable for a confident beginner who can already make chains and double crochet stitches. The repeating spaces make it a useful first project for learning joined rounds and color changes.
Can I use one color?
Yes. Continue slip stitching to the next corner instead of fastening off, or fasten off and rejoin the same color for cleaner round transitions.
Can I use a different yarn weight?
Yes, but the finished size and fabric thickness will change. Match the hook to the yarn label and make every square with the same yarn weight and hook.
Why does the pattern use a chain-2 corner?
The two chains create enough space for two granny clusters in the next round. They also help the corner form a clear right angle.
How many squares will I need for a blanket?
That depends on the finished square and blanket dimensions. Divide the desired blanket width and length by the blocked size of one square, then round up to whole motifs and allow for seams or joining rounds.
Do I need to block every square?
Blocking is strongly recommended for a joined project because it makes the motifs more consistent. A single decorative square may only need gentle hand shaping.
What is the best joining method?
A whip stitch creates a flat, subtle seam. A slip-stitch or single-crochet join produces a more visible ridge that can become part of the design.
Can I make the center opening smaller?
Yes. Use an adjustable ring and close it tightly after Round 1. Weave the starting tail around the center once more for additional security.
Conclusion
The Harbor Window Granny Square pairs traditional cluster construction with a bold framed palette. Its repeated stitch placement makes the pattern approachable, while the color changes provide useful practice and a distinctive finish.
Try the featured coral, mustard, teal, and ivory combination or build a palette from leftover yarn. Once the first motif is complete, the same pattern can be repeated for a wide range of practical projects.
Related Crochet Projects
- Solid granny square cushion panels
- Color-block crochet tote made from joined motifs
- Continuous granny-stitch baby blanket
- Coordinating striped crochet storage basket