Harbor Ridge Winter Crochet Cardigan Pattern
The Harbor Ridge Cardigan is a warm, open-front crochet sweater with a relaxed drop shoulder, subtle horizontal ridges, wide contrasting trim, tapered sleeves, and...
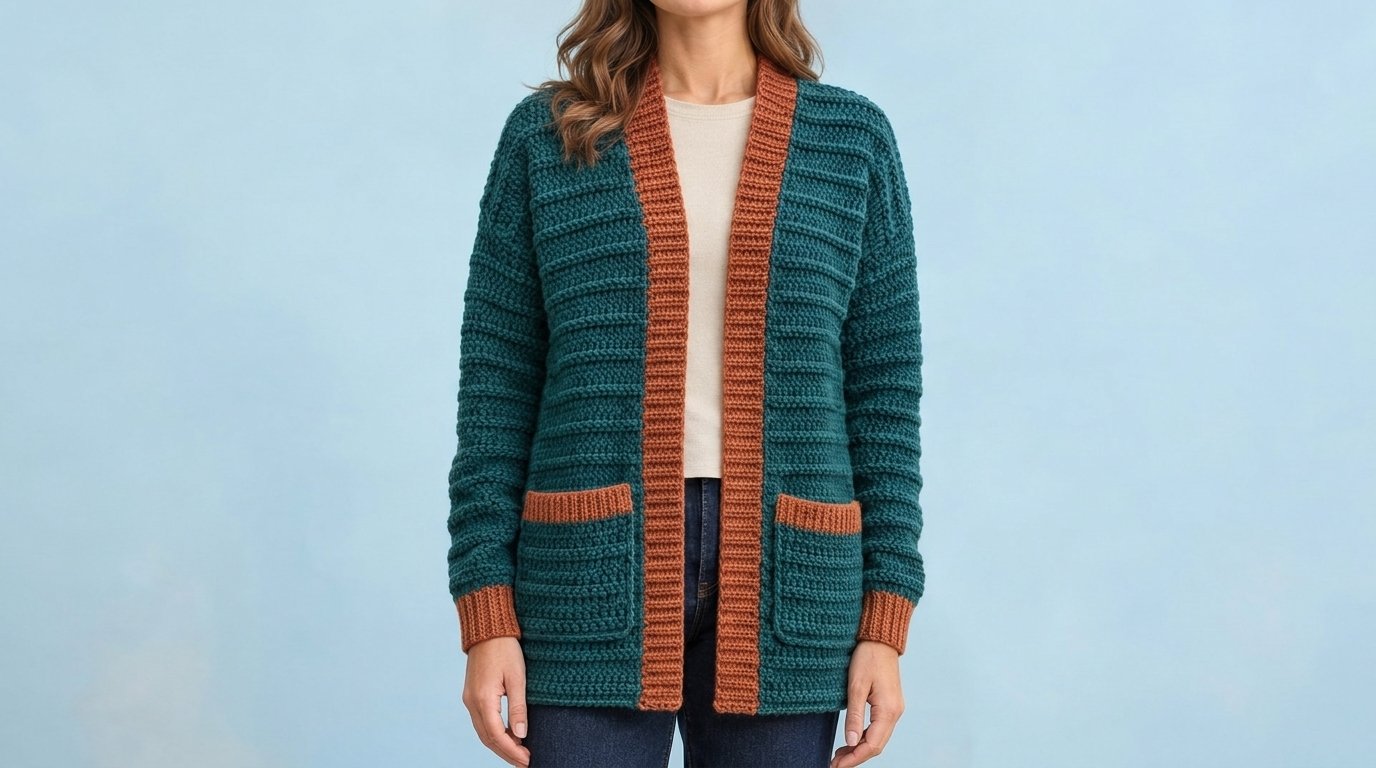
The Harbor Ridge Cardigan is a warm, open-front crochet sweater with a relaxed drop shoulder, subtle horizontal ridges, wide contrasting trim, tapered sleeves, and two practical patch pockets. Deep teal gives the sweater a rich winter color, while terracotta cuffs and front bands highlight its clean construction.
This crochet cardigan pattern for beginners is built from straightforward pieces: one back, two matching fronts, two sleeves, two pockets, and simple ribbed bands. There is no complicated neckline shaping, button placement, or fitted armhole curve.
The pattern includes five grouped sizes, covering XS/S through 5X. It is best for a confident beginner who has already practiced half double crochet, seaming, and working into different stitch loops.
Why You’ll Love This Project
The drop-shoulder construction keeps the shaping manageable. The back and front panels are rectangles, while each sleeve uses evenly spaced increases to move from the cuff to the upper arm.
A four-row texture repeat creates the visible ridges without cables or post stitches. Working selected half double crochet rows into the third loop pushes the unused top loops forward, producing a defined line across the fabric.
The wide ribbed front band gives the cardigan a finished appearance and adds structure around the opening. Contrasting cuffs and pocket tops provide a strong visual detail without requiring intricate colorwork.
Because the design is open at the front, it also offers more fitting flexibility than a close-fitting pullover.
Project Overview
- Project type: Open-front winter cardigan
- Difficulty: Confident beginner
- Sizes: XS/S, M/L, XL/2X, 3X/4X, and 5X
- Estimated time: 18–30 hours, depending on size and experience
- Yarn weight: Bulky, category 5
- Hook size: 8 mm, US L/11
- Main stitches: Half double crochet, third-loop half double crochet, and back-loop single crochet
- Construction: Seamed drop-shoulder panels with tapered sleeves
- Fit: Relaxed, with approximately 4–8 inches of positive ease
- Terminology: US crochet terms
Finished Measurements
Sizes are written as XS/S (M/L, XL/2X, 3X/4X, 5X).
- Suggested body bust: 34–38 (40–46, 48–54, 56–62, 64–70) inches
- Finished cardigan bust: 42 (50, 58, 66, 74) inches
- Finished length: 25 (26, 27, 28, 29) inches
- Armhole depth: 8½ (9, 9½, 10, 10½) inches
- Approximate sleeve length: 20 inches, including the cuff
Measurements are estimates based on the stated gauge. Measure the intended wearer before choosing a size.
Materials and Supplies Needed
Deep Teal Main Color
Approximately:
- XS/S: 850 yards
- M/L: 1,000 yards
- XL/2X: 1,150 yards
- 3X/4X: 1,350 yards
- 5X: 1,550 yards
Terracotta Contrast Color
Approximately:
- XS/S: 150 yards
- M/L: 175 yards
- XL/2X: 200 yards
- 3X/4X: 225 yards
- 5X: 250 yards
You will also need:
- Bulky category 5 yarn with suitable garment drape
- 8 mm crochet hook
- 6.5 or 7 mm hook for ribbing, if needed
- Locking stitch markers
- Flexible measuring tape
- Yarn needle
- Scissors
- Rustproof blocking pins or blocking wires
- Spare yarn for temporarily marking seams
Purchase a little extra yarn if you plan to lengthen the cardigan or sleeves.
Choosing the Right Yarn and Hook
Choose a bulky yarn that feels soft and bends easily when crocheted. A stiff craft or rug yarn will make the cardigan heavy and boxy. Wool blends provide warmth and resilience, while acrylic or acrylic-wool blends can be more accessible and easier to care for.
Smooth yarn will show the raised ridge rows more clearly than fuzzy or heavily textured yarn. Avoid yarn that splits easily because the pattern requires working into the third loop.
The main pattern uses an 8 mm hook. Adjust your hook until the blocked fabric matches the stated gauge. The fabric should feel substantial but should still fold and drape without standing upright.
Substituting a lighter yarn changes the size and yardage significantly. Do not rely on the printed stitch counts unless your blocked gauge matches.
Crochet Stitches and Abbreviations
- ch — chain
- sc — single crochet
- hdc — half double crochet
- TLhdc — third-loop half double crochet
- BLO — back loop only
- st/sts — stitch/stitches
- RS — right side
- WS — wrong side
- inc — increase
- rep — repeat
Half Double Crochet
Yarn over, insert the hook into the stitch, yarn over, and pull up a loop. Yarn over and pull through all three loops.
Third-Loop Half Double Crochet
A half double crochet has a horizontal third loop behind the normal front and back loops. On a designated wrong-side row, insert the hook into this third loop and complete a half double crochet. The two unused top loops move toward the right side and form a ridge.
Half Double Crochet Increase
Work two half double crochet stitches in the same stitch. When an increase falls on a textured row, work two TLhdc in the same third loop.
Before You Start
Make and Block a Gauge Swatch
Using the main color, chain 18 and work at least 14 rows in the ridge pattern described below. Wash or damp-block the swatch as you intend to care for the finished cardigan.
The target blocked gauge is:
- 10 stitches = 4 inches
- 8 rows = 4 inches
Measure the center of the swatch without stretching it. If you have too many stitches per 4 inches, use a larger hook. If you have too few, use a smaller hook.
Ridge Pattern
- Row 1, RS: Hdc across.
- Row 2, WS: Hdc across.
- Row 3, RS: Hdc across.
- Row 4, WS: TLhdc across.
Repeat these four rows. Beginning chains do not count as stitches.
Pattern Status
The sizing and stitch counts have been checked mathematically against the stated gauge, but this generated design has not been physically test-crocheted. Make a gauge swatch, compare the panel measurements with the intended wearer, and pin the garment together before completing permanent seams.
Step-by-Step Crochet Instructions
Counts are written for XS/S (M/L, XL/2X, 3X/4X, 5X).
Back Panel
With deep teal, ch 53 (63, 73, 83, 93).
Row 1, RS: Hdc in the second ch from the hook and in each chain across. Turn. You should have 52 (62, 72, 82, 92) sts.
Continue in the four-row ridge pattern until the panel contains 50 (52, 54, 56, 58) total rows.
The back should measure approximately:
- 21 by 25 inches
- 25 by 26 inches
- 29 by 27 inches
- 33 by 28 inches
- 37 by 29 inches
Fasten off, leaving a long tail for seaming.
First Front Panel
With deep teal, ch 27 (32, 37, 42, 47).
Row 1, RS: Hdc in the second chain and each chain across. Turn. You should have 26 (31, 36, 41, 46) sts.
Continue in the ridge pattern until the panel contains 50 (52, 54, 56, 58) rows.
Fasten off with a long seaming tail.
Second Front Panel
Make a second front panel exactly like the first. Keep both panels oriented so the visible ridge rows will face outward when the cardigan is assembled.
Mark the Shoulder Seams
Lay the back panel flat with the right side facing up. Position one front panel at each upper corner with right sides together.
Beginning at each outer shoulder edge, seam:
- 16 stitches for XS/S
- 20 stitches for M/L
- 24 stitches for XL/2X
- 28 stitches for 3X/4X
- 32 stitches for 5X
This leaves 20 (22, 24, 26, 28) back stitches open at the neck. Each front panel has 10 (11, 12, 13, 14) unseamed stitches beside the opening.
Use a loose mattress stitch or whipstitch. Do not pull the seam tighter than the surrounding fabric.
Mark the Armholes
Align each front panel with the corresponding side of the back. Beginning at the shoulder seam, count down:
- 17 rows for XS/S
- 18 rows for M/L
- 19 rows for XL/2X
- 20 rows for 3X/4X
- 21 rows for 5X
Place a marker through both layers. This marked section remains open for the sleeve.
Starting at the lower hem, seam the front and back together up to the marker. Repeat on the other side.
Try on or pin the body before making the sleeves. The armhole should feel relaxed without falling excessively below the underarm.
Terracotta Sleeve Cuffs
Make two.
With terracotta and the smaller hook if needed, ch 9.
Row 1: Sc in the second chain and each chain across. Turn. (8 sc)
Row 2: Ch 1. Sc BLO across. Turn.
Repeat Row 2 until the cuff has 22 (24, 26, 28, 30) rows. Do not fasten off if you are ready to begin the sleeve.
The cuff should measure approximately 3 inches deep. Its long edge becomes the wrist circumference.
First Sleeve
Change to deep teal and return to the larger hook.
Sleeve Row 1: Working across the long edge of the cuff, place one hdc in the end of each cuff row. Turn. You should have 22 (24, 26, 28, 30) sts.
Continue in the same four-row ridge pattern used for the body.
For XS/S and M/L, increase at both ends of Rows 3, 6, 9, 12, 15, 18, 21, 24, 27, and 30. Work the remaining rows without increases. At the end of Row 34, you should have 42 (44) sts.
For XL/2X, 3X/4X, and 5X, increase at both ends of Rows 3, 6, 9, 12, 15, 18, 21, 24, 27, 30, and 33. At the end of Row 34, you should have 48 (50, 52) sts.
Fasten off with a long seaming tail.
Second Sleeve
Make a second sleeve using the same size and instructions.
Before seaming, place the two sleeves together to confirm that their row counts, upper widths, cuff sizes, and ridge placement match.
Crochet the Pockets
Make two in deep teal.
Ch 19 (21, 23, 25, 27).
Row 1: Hdc in the second chain and each chain across. Turn. You should have 18 (20, 22, 24, 26) sts.
Continue in the ridge pattern for 12 (13, 14, 15, 16) total rows. Fasten off.
The smallest pocket will measure approximately 7¼ inches wide and 6 inches tall before adding its trim.
Add the Pocket-Top Ribbing
With terracotta, ch 5.
Row 1: Sc in the second chain and each chain across. Turn. (4 sc)
Row 2: Ch 1 and sc BLO across. Turn.
Repeat Row 2 until the strip fits across the top of one pocket without stretching. Fasten off and sew the strip to the pocket’s upper edge.
Make and attach a matching strip to the second pocket.
Make the Front and Neck Band
With terracotta and the smaller hook if needed, ch 10.
Row 1: Sc in the second chain and each chain across. Turn. (9 sc)
Row 2: Ch 1 and sc BLO across. Turn.
Repeat Row 2 until the relaxed strip reaches approximately:
- 58 inches for XS/S
- 61 inches for M/L
- 64 inches for XL/2X
- 66½ inches for 3X/4X
- 69½ inches for 5X
The exact required length depends on your blocked row gauge. The strip should fit from one lower front corner, up the front edge, around the back neck, and down the opposite front edge without being stretched more than about 5%.
Leave a long tail for sewing.
Assembly and Finishing
Seam the Sleeves
Fold each sleeve lengthwise with right sides together. Match the cuff corners, ridge rows, and upper edges.
Seam from the cuff to the top using mattress stitch or a loose whipstitch. Turn the sleeves right side out.
Attach the Sleeves
With the cardigan body inside out, place one sleeve inside an armhole so the right sides face each other.
Match the sleeve seam to the underarm seam. Pin the center of the sleeve cap to the shoulder seam. Add markers halfway between these points.
Sew evenly around the opening without gathering the sleeve or stretching the body. Repeat for the second sleeve.
Attach the Front Band
Find the midpoint of the terracotta band and pin it to the center of the back neck. Pin each end at a lower front corner.
Add markers at the shoulder seams and at regular intervals down both front edges. Sew the band in place, distributing it evenly.
Keep the band relaxed around the neck. Pulling it too tightly can make the fronts curve inward.
Position the Pockets
Try on the cardigan or place it on a dress form before positioning the pockets.
As a starting point:
- Place each pocket 2½–4 inches above the lower hem.
- Leave approximately 1½–2 inches between the pocket and front band.
- Confirm that both pocket tops sit on the same ridge row.
Pin each pocket securely. Sew down both sides and across the bottom, leaving the ribbed top open. Reinforce the upper corners with several small stitches.
Block the Cardigan
Weave in all ends securely. Wet-block or steam-block only if appropriate for the yarn fiber.
Lay the cardigan flat at the finished measurements. Straighten the front bands, align the pockets, and shape the cuffs. Allow it to dry completely before wearing.
Tips for Best Results
Make a larger gauge swatch than usual. Bulky crochet fabric can relax noticeably after washing, and even a small gauge change affects a full garment.
Use locking markers at the beginning and end of every ridge row. This helps you align the texture across both front panels.
Count panel rows rather than relying only on length. Matching row counts makes the shoulder, side, and pocket placement more consistent.
Do not make the ribbed band significantly shorter than the opening. Excessive stretching can pull the hem upward and distort the back neck.
Pin or baste the sweater together before permanent seaming. This is the easiest time to adjust the armhole depth or body width.
Common Mistakes and Troubleshooting
The cardigan is wider than expected
Recheck your blocked stitch gauge. If fewer than 10 stitches fit into 4 inches, each panel will be wider than the pattern measurements.
The fronts hang at different lengths
Confirm that both panels contain the same number of rows. Also check that the shoulder seams use the same number of stitches.
The ridges appear on the wrong side
The textured third-loop row must push the unused top loops toward the public side. Practice the repeat on your swatch and mark the right side before starting the panels.
The sleeves do not fit the armholes
Measure the upper sleeve edge and the complete armhole circumference before sewing. Small differences can be eased evenly, but a large difference indicates a gauge or row-count problem.
The cardigan feels too heavy
Bulky crochet garments can become substantial. Choose a light, lofty yarn, keep the pockets empty when storing it, and avoid hanging the cardigan for long periods.
The front band ripples
The band may contain too many ribbing rows. Unpick the affected section and reattach it with slightly fewer rows distributed evenly along the edge.
The pockets sag
Reinforce the upper corners and avoid placing heavy objects inside. A fabric lining can be added if the pockets need more structure.
Creative Variations
Use one color throughout for a quieter wardrobe staple. The ridge texture will remain visible even without contrasting trim.
For a shorter cardigan, remove body rows in complete four-row repeats. Remember to reduce the front-band length by twice the amount removed.
Create a longer coat-style version by adding ridge repeats before the armhole. Purchase extra yarn and consider placing the pockets slightly higher relative to the hem.
You can omit the pockets for a lighter garment. For smaller pockets, remove two foundation stitches and one or two rows while keeping both pieces identical.
A denim-blue body with warm ivory trim offers a softer palette, while burgundy with golden-mustard trim creates a stronger seasonal look.
How to Style Your Winter Cardigan
The open front layers comfortably over a fitted long-sleeve shirt, turtleneck, or lightweight thermal top. Pair the deep-teal and terracotta palette with dark denim, camel trousers, or a simple neutral dress.
Because the cardigan already has visible texture and contrasting trim, uncomplicated clothing underneath will keep the outfit balanced.
The relaxed shape works well for indoor winter layering. It is not designed to replace weatherproof outerwear in rain, snow, or strong wind.
Care and Maintenance
Always follow the care directions on the yarn label. If the fiber allows washing, place the cardigan in a large mesh bag and use cool water with gentle agitation.
Support the garment fully when lifting it from the water. Do not hang it while wet because the weight may lengthen the shoulders and body.
Reshape it to the finished measurements and dry it flat. Smooth the front bands, cuffs, pocket edges, and shoulder seams before leaving it to dry.
Store the cardigan folded rather than on a hanger. This reduces stretching at the shoulders and back neck.
Frequently Asked Questions
Can a beginner make this cardigan?
A confident beginner can make it. The panels use a short stitch repeat, but accurate gauge, even seaming, and garment measurements require patience.
Can I use worsted-weight yarn?
Only if you recalculate the stitch and row counts using your new blocked gauge. Worsted yarn worked at the printed counts will make a smaller cardigan.
How do I choose between two sizes?
Compare the finished bust with a cardigan you already like. Choose the size that provides approximately 4–8 inches of positive ease.
Can I make straight sleeves?
Yes. Begin with enough cuff rows to fit comfortably around the forearm and work without increases. Straight sleeves will be wider at the wrist than the tapered version shown.
Can I add buttons?
The current band is designed for an open front. Buttons require planning buttonholes and checking whether the fronts meet comfortably without pulling.
Why is blocking important?
Blocking settles the stitches, reveals the true gauge, straightens the bands, and makes the two front panels easier to align.
How can I lengthen the sleeves?
Add equal non-increase rows near the upper sleeve or before the final increase sequence. Add the same number to both sleeves and maintain the ridge repeat.
Is this pattern physically tested?
No. The garment design and size calculations are an editorial draft based on the stated gauge. Crochet a swatch and verify each panel measurement before assembly.
Conclusion
The Harbor Ridge Cardigan combines approachable panel construction with useful garment details: warm bulky fabric, understated ridge texture, tapered sleeves, generous pockets, and structured ribbed trim.
Its simple silhouette leaves plenty of room for color and length adjustments. Work carefully from a blocked gauge swatch, check the fit before permanent seaming, and you can turn the basic construction into a personalized winter layer.
Related Crochet Projects
- Bulky-yarn ribbed winter scarf
- Drop-shoulder crochet pullover
- Textured crochet pocket shawl
- Matching ribbed crochet beanie