Harbor Rib Pocket Cardigan Crochet Pattern
Introduction The Harbor Rib Pocket Cardigan is a cozy, open-front crochet jacket built from simple rectangular pieces. Deep teal ribbing gives the garment rich...
Introduction
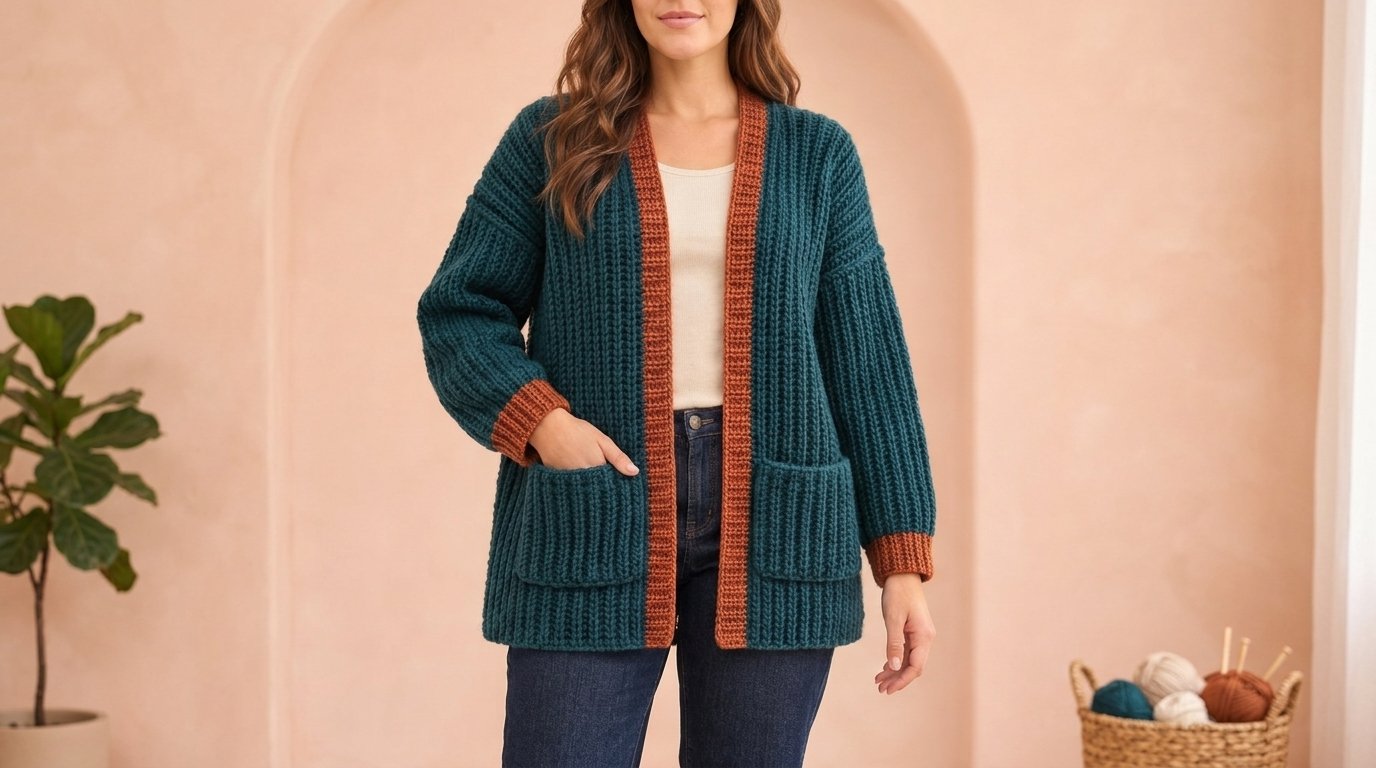
The Harbor Rib Pocket Cardigan is a cozy, open-front crochet jacket built from simple rectangular pieces. Deep teal ribbing gives the garment rich texture, while terracotta cuffs and front bands create a warm, modern contrast.
This beginner crochet cardigan pattern uses half double crochet worked through the back loop. The construction includes a back, two front panels, two rectangular sleeves, two pockets, and separately crocheted trim. You will learn how to size the panels, create drop shoulders, assemble the garment, and add practical patch pockets.
Why You’ll Love This Project
The cardigan’s straightforward construction eliminates complicated neckline shaping and sleeve caps. Each main component is a rectangle, making the project approachable for crocheters who can maintain a consistent stitch count.
The ribbed fabric is comfortable and flexible, and the open front makes the finished jacket easy to layer. Its pockets are roomy enough for small essentials, while the contrasting trim offers an easy opportunity to personalize the color palette.
Project Overview
- Project type: Open-front crochet cardigan
- Difficulty: Confident beginner
- Sizes: S/M (L/XL, 2X/3X)
- Suggested bust fit: 34–38 (42–46, 50–54) inches
- Finished circumference: Approximately 38 (46, 54) inches
- Finished length: Approximately 26 (27, 28) inches
- Estimated time: 25–40 hours
- Yarn weight: Medium weight 4
- Hook: 6 mm US J/10
- Primary technique: Back-loop half double crochet
- Construction: Seamed rectangular panels
- Terminology: US crochet terms
Measurements and completion times are estimates. Check the dimensions against the intended wearer before beginning.
Materials and Supplies Needed
- Medium weight 4 acrylic, wool-blend, or easy-care yarn
- Deep teal yarn: approximately 1,250 (1,470, 1,730) yards
- Terracotta yarn: approximately 150 (180, 220) yards
- 6 mm US J/10 crochet hook
- Locking stitch markers
- Yarn needle
- Scissors
- Flexible measuring tape
- Blocking mats and rust-resistant pins, if available
Purchase a little additional yarn if you plan to lengthen the body or sleeves.
Choosing the Right Yarn and Hook
A smooth worsted-weight yarn makes the rib texture easier to see and helps beginners identify the back loop. Acrylic and washable wool blends provide warmth and resilience. A cotton blend can create a lighter jacket, although it may stretch more vertically.
The suggested 6 mm hook should produce flexible fabric rather than a stiff panel. If your stitches are too dense, try a larger hook. If the fabric is excessively loose or does not hold its shape, move down one hook size.
Changing the yarn weight or gauge will alter every finished measurement. Make a gauge swatch before committing to the full garment.
Crochet Stitches and Abbreviations
- ch: chain
- hdc: half double crochet
- BLO: back loop only
- sl st: slip stitch
- st: stitch
- sts: stitches
To make an hdc, yarn over, insert the hook into the designated stitch, yarn over and pull up a loop, then yarn over and pull through all three loops.
For an hdc BLO, work the hdc beneath only the back loop of the stitch. This creates the raised rib lines used throughout the cardigan.
The turning chain does not count as a stitch.
Before You Start
Gauge
Work a swatch at least 6 inches square in hdc BLO.
After gentle blocking, aim for:
- 14 hdc stitches = 4 inches
- 10 rows = 4 inches
Because the garment is constructed sideways, stitch gauge controls its length and row gauge controls its width or circumference.
Selecting a Size
Choose a finished circumference equal to the wearer’s bust or up to 4 inches larger. The open front provides some flexibility, but it should not be used to compensate for panels that are substantially too small.
Pattern Notes
Every main row begins with ch 1 and a turn. Work the first hdc in the first stitch and maintain the stated stitch count.
The back, fronts, sleeves, and pockets are crocheted in deep teal. The cuffs and front bands are crocheted in terracotta.
Step-by-Step Crochet Instructions
Instructions are written for S/M, with L/XL and 2X/3X figures in parentheses.
Back Panel
With deep teal yarn:
- Ch 92 (96, 99).
- Row 1: Hdc in the second ch from the hook and in every ch across. You will have 91 (95, 98) sts.
- Row 2: Ch 1 and turn. Hdc BLO in every st across.
- Repeat Row 2 until the panel has 55 (65, 75) rows total.
The panel should measure approximately 26 × 22 (27 × 26, 28 × 30) inches. Fasten off.
Front Panels
Make two identical panels with deep teal yarn.
- Ch 92 (96, 99).
- Row 1: Hdc in the second ch from the hook and across. You will have 91 (95, 98) sts.
- Row 2: Ch 1 and turn. Hdc BLO across.
- Repeat Row 2 until the panel has 20 (25, 30) rows total.
Each front should measure approximately 26 × 8 (27 × 10, 28 × 12) inches. Fasten off.
Sleeves
Make two with deep teal yarn.
- Ch 64 (68, 71).
- Row 1: Hdc in the second ch from the hook and across. You will have 63 (67, 70) sts.
- Row 2: Ch 1 and turn. Hdc BLO across.
- Repeat Row 2 until the sleeve has 40 (45, 50) rows total.
Each rectangle should measure approximately 18 × 16 (19 × 18, 20 × 20) inches. Fasten off, leaving a long tail for seaming.
Front Bands
Make two with terracotta yarn.
- Ch 9.
- Row 1: Hdc in the second ch from the hook and across. You will have 8 sts.
- Row 2: Ch 1 and turn. Hdc BLO across.
- Repeat Row 2 until the band has 65 (68, 70) rows.
Each band should be approximately 2¼ inches wide and match the full length of its front panel. Adjust by one or two rows if necessary. Fasten off with a long sewing tail.
Cuffs
Make two with terracotta yarn.
- Ch 12.
- Row 1: Hdc in the second ch from the hook and across. You will have 11 sts.
- Row 2: Ch 1 and turn. Hdc BLO across.
- Repeat Row 2 until the cuff has 20 (23, 25) rows total.
The relaxed cuff circumference should be approximately 8 (9, 10) inches. Bring the first and final rows together and seam them to create a ring.
Patch Pockets
Make two with deep teal yarn.
- Ch 27.
- Row 1: Hdc in the second ch from the hook and across. You will have 26 sts.
- Row 2: Ch 1 and turn. Hdc BLO across.
- Repeat Row 2 until the pocket has 18 rows total.
Each pocket should measure approximately 7¼ inches square. Fasten off with a long sewing tail.
Size Adjustments
To add body length, place additional chains in every back and front foundation chain. At this gauge, seven additional stitches add approximately 2 inches.
To change the body circumference, add or remove rows from the back and both front panels. Keep both fronts identical. Five rows add approximately 2 inches to a panel.
Alter sleeve length by changing the foundation chain. Alter upper-arm circumference by adding or removing sleeve rows.
Assembly and Finishing
Block the panels gently to their intended measurements before assembly.
Join the Shoulders
Lay the back panel flat. Place one front panel at each outer edge with the top edges aligned.
Seam the entire 20 (25, 30)-row top edge of each front to the corresponding outer portion of the back. The unseamed 15-row space at the center of the back forms an approximately 6-inch neckline.
Form the Side Seams
Beginning at the hem, seam each front to the corresponding back edge through 63 stitches. Leave the upper 28 (32, 35) stitches unseamed for an armhole approximately 8 (9, 10) inches deep.
Repeat on the opposite side.
Assemble and Attach the Sleeves
Bring the first and final rows of each sleeve rectangle together. Seam from the wrist edge to the upper edge to form a tube.
Turn the body and sleeves wrong side out. Insert one sleeve into an armhole, aligning the sleeve seam with the underarm seam. Distribute the sleeve’s upper row ends evenly around the armhole and secure them with markers. Sew the sleeve in place without stretching either edge.
Repeat for the second sleeve.
Attach the Cuffs
Place a cuff around each sleeve opening. Match the cuff seam to the sleeve seam and mark the quarter points of both pieces.
Evenly ease the wider sleeve opening around the cuff. Sew the pieces together securely without pulling the cuff out of shape.
Add the Front Bands
Pin one terracotta band along each front opening, matching its ends to the hem and shoulder edges. Sew through the band’s row ends and the cardigan edge with small, even stitches.
Attach the Pockets
Position each pocket approximately 3 inches above the hem and ¾–1 inch inside the side seam. Confirm that both pockets are level.
Sew around the two sides and bottom edge, leaving the top open. Reinforce both upper corners with several additional stitches.
Weave in every remaining end and lightly steam or wet-block the assembled cardigan according to the yarn’s care instructions.
Tips for Best Results
Count the stitches at the end of every few rows. Accidentally missing the final stitch will create a slanted panel and shorten the garment edge.
Keep the row ends relaxed because they form important shoulder, neckline, and pocket edges. Tight turning chains can cause the panels to curl.
Use locking markers when positioning the sleeves, bands, and pockets. Dividing curved or gathered areas into quarters helps distribute the fabric evenly.
Try on the pinned garment before completing the seams. This provides an opportunity to adjust sleeve length or pocket placement.
Common Mistakes and Troubleshooting
The panels are becoming narrower
A stitch is probably being missed at the beginning or end of a row. Count the stitches and place a marker in the first and final stitch.
The ribbing looks uneven
Make sure every hdc is worked beneath only the back loop. Consistent hook placement creates clean, continuous ribs.
The cardigan is too long or short
Length is controlled by the foundation-chain stitch count. If the gauge is correct but the length is wrong, remake the affected panels with a revised chain.
The sleeves pucker around the armholes
Redistribute the sleeve row ends more evenly before sewing. Excessive pulling on the yarn can also create puckers.
The front bands ripple
The bands may contain too many rows or may have been stretched during attachment. Remove a few rows or repin the bands without tension.
The pockets sag
Use firm sewing stitches around the sides and bottom. For heavy pocket use, reinforce the upper corners and avoid carrying weighty objects.
Creative Variations
Replace the terracotta trim with mustard, raspberry, or warm ivory for a different contrast.
For a single-color cardigan, crochet every component in the same yarn. The strong rib texture will still define the design.
Add 10–15 rows to the body panels for a longer jacket, accounting for the extra yarn. You can also omit the pockets for a lighter, more streamlined garment.
A narrow surface-slip-stitch line around each pocket can introduce another accent color without affecting the pocket structure.
How to Style Your Crochet Cardigan
Wear the Harbor cardigan over a fitted T-shirt, turtleneck, or simple dress. Its deep teal body pairs naturally with denim, cream, camel, rust, and other warm neutrals.
The drop shoulders and open front create a casual silhouette suited to everyday layering. Avoid placing heavy objects in the pockets, as their weight can stretch crocheted fabric.
Care and Maintenance
Always follow the washing directions printed on the yarn label. When hand washing is appropriate, use cool water and a mild detergent without twisting or wringing the cardigan.
Support the garment’s weight when lifting it from the water. Lay it flat on a towel, reshape the panels and pockets, and allow it to dry completely.
Store the cardigan folded rather than hanging it for long periods. A hanger can stretch the shoulders and lengthen the ribbed fabric.
Frequently Asked Questions
Can a beginner make this cardigan?
A confident beginner who can work half double crochet, recognize the back loop, and sew simple seams should be able to follow the construction.
Can I make it without the contrast trim?
Yes. Use the main color for the cuffs and front bands without changing their instructions.
Can I add buttons?
The narrow front bands are intended for an open cardigan. Buttons would require reinforced buttonholes and wider front coverage, so they are not included in this construction.
Why is the cardigan worked sideways?
Sideways hdc BLO places the ribs vertically on the finished garment and makes length adjustments easy.
How much positive ease should I choose?
Aim for approximately 0–4 inches of positive ease. Choose the larger size if the intended bust measurement falls between the listed ranges.
Can I use a different yarn weight?
You can, but changing yarn weight requires recalculating every panel from a new gauge swatch. A medium weight 4 yarn is the simplest substitution.
How can I make the sleeves less roomy?
Remove sleeve rows evenly while ensuring the upper circumference still fits around the armhole. Keep enough room for comfortable movement.
Conclusion
The Harbor Rib Pocket Cardigan combines beginner-friendly rectangles with rich vertical texture, practical pockets, and colorful contrast trim. Once you understand the repeating hdc BLO row, the project becomes a manageable sequence of panels that can be adjusted for length, fit, and color.
Related Crochet Projects
- Back-loop half double crochet scarf
- Ribbed rectangular shrug
- Contrast-trim crochet vest
- Coordinating ribbed crochet beanie