Free Crochet Sunflower Pot Pattern – Easy DIY Flower
A little sunflower can make an ordinary corner feel instantly brighter, especially when you’ve made it yourself. This free crochet sunflower pot pattern creates...
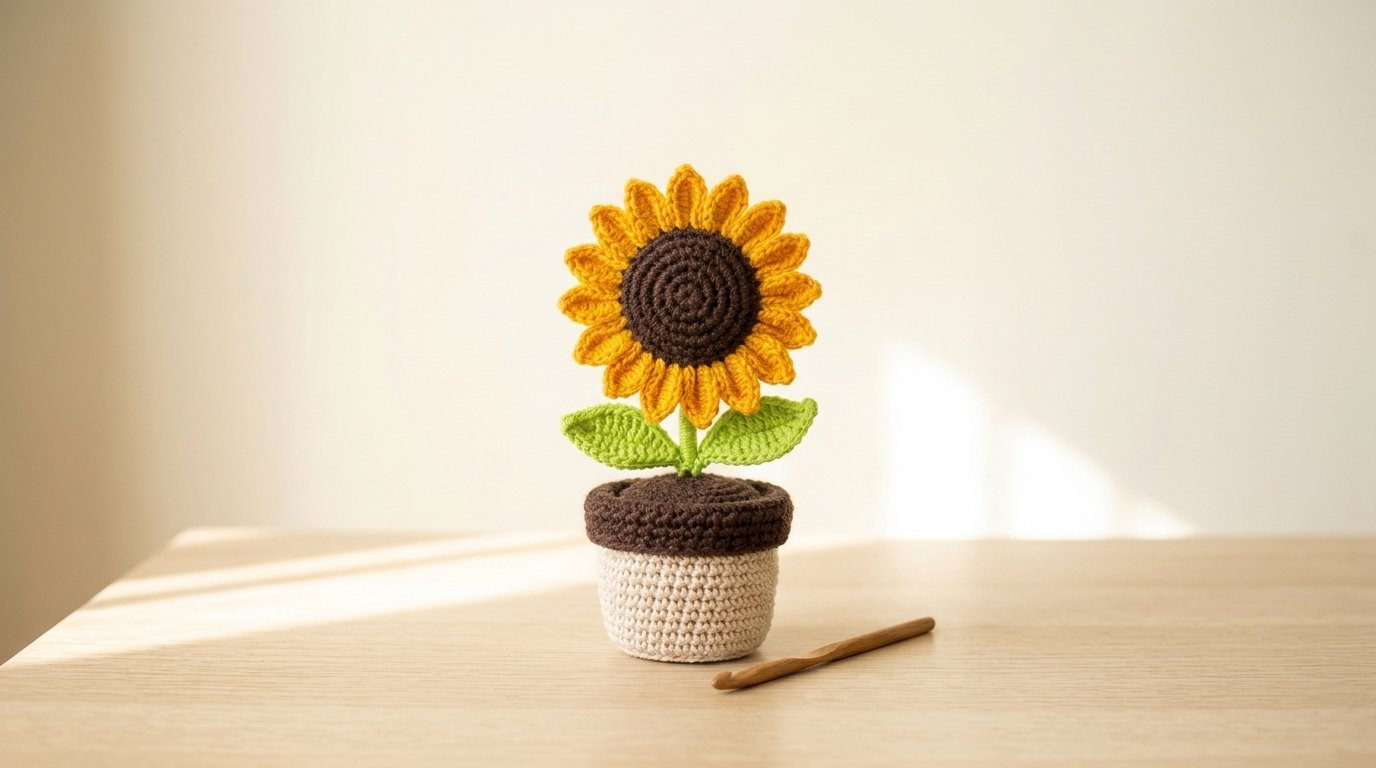
A little sunflower can make an ordinary corner feel instantly brighter, especially when you’ve made it yourself. This free crochet sunflower pot pattern creates a cheerful handmade flower with golden yellow petals, a rich brown center, two fresh green leaves, and a sweet cream-colored pot filled with crocheted soil.
It’s a lovely project for decorating a desk, brightening a shelf, or creating a thoughtful handmade gift. You don’t need to be an expert to enjoy making it, either. We’ll work through each piece slowly, with simple stitches and easy-to-follow instructions.
Set aside approximately 4–6 hours for your first sunflower.
Crochet Sunflower Pot Pattern: Quick Facts
| Detail | Information |
|---|---|
| Skill Level | Confident beginner |
| Estimated Time | 4–6 hours |
| Finished Height | Approximately 8–10 inches |
| Flower Diameter | Approximately 4–5 inches |
| Pot Width | Approximately 3 inches |
| Crochet Terms | US terminology |
| Main Stitches | Chain, slip stitch, single crochet, half double crochet, double crochet |
| Construction | Separate flower, stem, leaves, soil, and pot |
Finished measurements are estimates and depend on your yarn, hook, and tension.
Materials and Tools You’ll Need
This project uses basic crochet supplies and a few small accessories to help the sunflower stand upright.
Yarn Colors
Choose DK weight (#3) cotton yarn for a firm, textured result.
- Golden yellow: Approximately 20–30 g for the sunflower petals.
- Dark chocolate brown: Approximately 25–35 g for the flower center and soil.
- Natural cream: Approximately 20–30 g for the flowerpot.
- Fresh leaf green: Approximately 10–15 g for the stem and leaves.
These quantities are estimates, not verified amounts.
Yarn substitution: You can use worsted-weight cotton with an appropriately larger hook for a bigger sunflower. Acrylic also works, although the flower may be slightly softer.
Tools and Accessories
- 3.0–3.5 mm crochet hook
- Yarn needle
- Stitch markers
- Scissors
- Polyester fiberfill
- One sturdy floral wire or doubled chenille stem for support
- Small piece of cardboard or plastic canvas for the pot base, optional
- Optional fabric-safe craft glue
Substitution tip: If you prefer not to use wire, a sturdy wooden dowel can support the stem. Secure it carefully inside the pot.
The finished item is intended for decoration, not as a children’s toy. Cover sharp wire ends securely.
Crochet Abbreviations and Stitches
This pattern uses US crochet terms throughout.
- ch – Chain: A basic stitch used to start foundations and small crochet pieces.
- sc – Single crochet: Insert your hook, pull up a loop, yarn over, and pull through both loops.
- hdc – Half double crochet: Yarn over, insert the hook, pull up a loop, then yarn over and pull through all three loops.
- dc – Double crochet: Yarn over, insert the hook, pull up a loop, and complete the stitch in two pull-through steps.
- sl st – Slip stitch: Pull yarn through the stitch and the loop already on your hook.
- inc – Increase: Make two single crochet stitches in one stitch.
- sc2tog – Decrease: Work two neighboring single crochet stitches together as one.
- MR – Magic ring: An adjustable loop used to start crocheting in the round.
- BLO – Back loop only: Work into the back loop of a stitch.
- st/sts – Stitch/stitches
- rnd – Round
Turning chains do not count as stitches. Unless otherwise stated, rounds are worked continuously without joining.
Beginner tip: Place a stitch marker in the first stitch of each round to help you keep track of your work.
Step-by-Step Crochet Sunflower Pot Pattern
We’ll begin with the flower head, then make the leaves, stem, and pot.
Working on each part separately makes it easier to adjust the finished shape before assembly.
Step 1: Crochet the Brown Sunflower Center
Using dark chocolate brown yarn, make a magic ring.
Round 1: Work 6 sc into the magic ring. (6 sts)
Round 2: Inc in every stitch. (12 sts)
Round 3: Repeat (sc, inc) six times. (18 sts)
Round 4: Repeat (2 sc, inc) six times. (24 sts)
Round 5: Repeat (3 sc, inc) six times. (30 sts)
Round 6: Repeat (4 sc, inc) six times. (36 sts)
Round 7: Repeat (5 sc, inc) six times. (42 sts)
Round 8: Repeat (6 sc, inc) six times. (48 sts)
Fasten off, leaving a long sewing tail.
You should have a flat brown circle with a visible spiral of stitches.
Gently flatten it with your fingers.
Common mistake: If your circle begins to form a bowl, check that you completed all six increases in each round.
Step 2: Crochet the First Yellow Petal
Using golden yellow yarn, ch 3.
Row 1: Sc in the second chain from the hook and in the next chain. (2 sts)
Row 2: Ch 1, turn, inc in both stitches. (4 sts)
Row 3: Ch 1, turn, inc, sc in the next 2 stitches, inc. (6 sts)
Rows 4–6: Ch 1, turn, sc in every stitch. (6 sts per row)
Row 7: Ch 1, turn, sc2tog, sc in the next 2 stitches, sc2tog. (4 sts)
Row 8: Ch 1, turn, sc2tog twice. (2 sts)
Row 9: Ch 1, turn, sc2tog. (1 st)
Fasten off.
Weave in the tail at the pointed tip, but leave the starting tail to attach the petal to the center.
The petal should have a narrow base, a wider middle, and a gently pointed end.
Beginner tip: Keep your tension consistent so all the petals are approximately the same size.
Step 3: Make the Remaining Sunflower Petals
Repeat Step 2 until you have 16 golden yellow petals.
Lay them in a circle around your brown flower center.
The narrow bases should point inward, while the pointed tips face outward.
You can gently curve the petals with your fingers to create the slightly raised appearance shown in the Pinterest image.
Don’t worry if the petals aren’t perfectly identical. A little natural variation makes handmade flowers charming.
Step 4: Attach the Sunflower Petals
Turn your brown center circle face down.
Arrange the 16 yellow petals evenly around its outer edge. Each petal can occupy approximately three stitches along the 48-stitch round.
Sew the narrow base of each petal to the back of the brown circle using the yellow yarn tails.
Allow neighboring petals to sit close together without bunching.
Once all the petals are attached, turn the flower over and check the arrangement.
If the center looks slightly raised, that’s fine. The visible spiral gives it a lovely sunflower-seed texture.
Crochet the Two Green Sunflower Leaves
The inspiration design features two bright green leaves spreading to either side of the stem.
We’ll crochet them separately using simple stitches that create pointed ends and a fuller middle.
Step 5: Make the First Green Leaf
Using fresh green yarn, ch 15.
Work along the foundation chain:
- Sl st in the second chain from the hook. (1 st)
- Sc in the next 2 chains. (2 sts)
- Hdc in the next 3 chains. (3 sts)
- Dc in the next 4 chains. (4 sts)
- Hdc in the next 3 chains. (3 sts)
- Sl st in the final chain. (1 st)
You have worked 14 stitches along the first side.
Rotate the work to crochet along the unused loops on the opposite side of the foundation chain.
- Sl st into the opposite side of the final chain. (1 st)
- Hdc in the next 3 chain positions. (3 sts)
- Dc in the next 4 chain positions. (4 sts)
- Hdc in the next 3 chain positions. (3 sts)
- Sc in the next 2 chain positions. (2 sts)
- Sl st in the final chain position. (1 st)
You now have 28 stitches around the leaf, including both sides.
Fasten off, leaving a long tail at the base for attaching.
Gently shape the leaf so it has a pointed tip and a slightly rounded body.
Step 6: Crochet the Second Leaf
Repeat Step 5 using the same green yarn.
For a natural appearance, gently curve one leaf upward and the other outward.
You can create a simple leaf-vein detail by using a yarn needle to stitch a line of green yarn along the central foundation chain.
Keep the embroidery loose enough to avoid pulling the leaf out of shape.
Make the Green Sunflower Stem
Step 7: Prepare the Stem Support
Cut or prepare a floral support approximately 6–7 inches long.
If you’re using wire, fold the upper and lower ends into small closed loops with pliers to eliminate exposed sharp points.
Place the upper loop against the back of the brown flower center.
Sew it securely to the flower using several strong stitches.
A small crocheted backing circle can help conceal the attachment.
To make one, work 6 sc in a magic ring, then increase to 12 stitches in the next round. Fasten off and sew it over the attachment area.
Step 8: Wrap the Stem with Green Yarn
Attach green yarn near the back of the sunflower.
Wrap the yarn neatly around the stem support, keeping each wrap close to the previous one.
Continue until the support is completely covered.
Secure the yarn at the bottom using a firm knot and weave in the end where possible.
Common mistake: Loose wrapping may allow the green yarn to slide along the support. Keep the tension even as you work.
Step 9: Attach the Green Leaves
Position the two leaves approximately halfway down the stem.
Arrange one leaf to the left and the other to the right, just like the reference sunflower.
Use the long yarn tails to sew the bases of the leaves around the wrapped stem.
Check that both leaves are secure before weaving in the tails.
Crochet the Cream Flowerpot
The soft cream pot creates a lovely contrast with the warm brown soil and bright sunflower.
Step 10: Make the Pot Base
Using natural cream yarn, begin with a magic ring.
Round 1: 6 sc in the magic ring. (6 sts)
Round 2: Inc around. (12 sts)
Round 3: Repeat (sc, inc) six times. (18 sts)
Round 4: Repeat (2 sc, inc) six times. (24 sts)
Round 5: Repeat (3 sc, inc) six times. (30 sts)
Round 6: Repeat (4 sc, inc) six times. (36 sts)
Round 7: Repeat (5 sc, inc) six times. (42 sts)
You now have a circular base.
Step 11: Build the Pot Sides
Continue with the cream yarn.
Round 8: Sc in BLO around. (42 sts)
Rounds 9–19: Sc in every stitch. (42 sts per round)
Fasten off and weave in the tail.
The back-loop round helps create a defined corner between the pot base and its sides.
If your pot feels too soft, you can place a lightweight reinforcing disc at the bottom before stuffing.
Crochet the Dark Brown Soil
Step 12: Make the Soil Circle
Using dark brown yarn, create another flat circle.
Rounds 1–7: Repeat the same instructions used for the cream pot base, increasing from 6 to 42 stitches.
Round 8: Sc in BLO around. (42 sts)
Rounds 9–10: Sc in each stitch. (42 sts per round)
Fasten off, leaving a long sewing tail.
This produces a round soil insert with a slightly raised brown edge, similar to the thick dark rim in the photo.
Assemble the Crochet Sunflower Pot
Step 13: Secure the Sunflower Stem
Pass the lower end of the stem through the center of the brown soil insert.
Secure the covered wire loop beneath the soil using strong yarn stitches, so it cannot pull through.
Check that the sunflower stands upright.
Place a small amount of fiberfill into the cream pot.
If needed, add a lightweight internal support or additional stuffing around the lower stem.
Step 14: Attach the Soil to the Pot
Place the brown soil piece over the opening of the cream pot.
Align the edges carefully, keeping the brown rim visible above the cream sides.
Use the brown sewing tail to stitch the soil insert to the top of the pot around its circumference.
Make sure the brown circle is firmly attached and the stem doesn’t wobble.
Adjust the stuffing as needed before closing the final section.
Step 15: Shape Your Finished Sunflower
Gently arrange the petals around the center.
Curve some tips slightly outward to create a natural, open bloom.
Adjust the two green leaves so they spread away from the stem.
Finally, place the pot on a level surface and check its balance.
Your cheerful crochet sunflower is ready to display!
Finishing and Styling Ideas
This handmade sunflower looks especially pretty on a light wooden shelf or desk, where its golden petals can stand out.
Try placing it beside a small stack of books, a woven basket, or other handmade crochet decorations.
The warm brown soil, textured cream pot, and bright green leaves suit rustic, cottage-inspired, and minimalist interiors.
For a lovely handmade gift, wrap the pot in tissue paper and add a small message card.
You can also pair it with [Free Crochet Daffodil Pattern → related pattern] for a colorful handmade flower collection.
Three Ways to Customize Your Crochet Sunflower
1. Make a Mini Sunflower Pot
Use finer cotton yarn and a smaller crochet hook.
Keep the same stitch counts to create a smaller version, perfect for a desk or windowsill.
2. Create a Two-Tone Sunflower
Use golden yellow for the petals and add orange embroidery along their centers.
The extra color can give the petals a richer, sun-kissed appearance.
3. Make a Sunflower Gift Set
Crochet several sunflowers in different sizes and place them together on a shelf.
You can combine them with [Easy Crochet Flower Pot Patterns → related collection] for a cheerful arrangement.
How to Care for Your Crochet Sunflower
Your handmade sunflower doesn’t need sunlight or watering, but gentle care will keep it looking beautiful.
- Dust the petals with a soft brush.
- Keep the flower away from prolonged direct sunlight to limit fading.
- Avoid soaking the pot, especially if it contains cardboard or wire.
- Reshape bent petals gently by hand.
- Store the sunflower upright in a dry place.
Avoid machine washing an assembled flower that contains internal supports.
Frequently Asked Questions
Is this crochet sunflower pot pattern suitable for beginners?
Yes, confident beginners can make this project using basic crochet stitches. The separate pieces make it easier to practice each technique before putting everything together.
How many petals does a crochet sunflower need?
This design uses 16 yellow petals for a full, rounded appearance. You can experiment with slightly more or fewer petals, but you’ll need to adjust their spacing around the brown center.
Can I crochet a sunflower without using wire?
Yes, you can make the flower head without a stem for an appliqué or wall decoration. For a standing potted sunflower, a firm support inside the stem is recommended.
What yarn works best for a crochet sunflower in a pot?
DK cotton yarn is a good choice because it creates clear stitch definition and helps the petals retain their shape. Acrylic yarn can work too, particularly if you prefer a softer finished flower.
A Little Handmade Sunshine
Making this free crochet sunflower pot pattern is a wonderful way to bring a little sunshine into your home. From the golden petals to the textured brown center and tiny cream pot, each detail helps create a sweet handmade decoration.
Save this project to your Pinterest crochet board so you can return to the instructions whenever you like. And don’t forget to share your finished sunflower with someone who loves handmade flowers!
Publisher’s note — remove before publishing: Test this pattern before publishing and check the stitch counts. The pattern is drafted from the inspiration image and has not been physically tested. Verify the flower dimensions, petal spacing, yarn quantities, and stem stability.