Free Crochet Pothos Pattern – Colorful Hanging Plant
Imagine a beautiful trailing houseplant that stays colorful all year, never needs watering, and is made entirely by hand. That’s exactly what we’re creating...
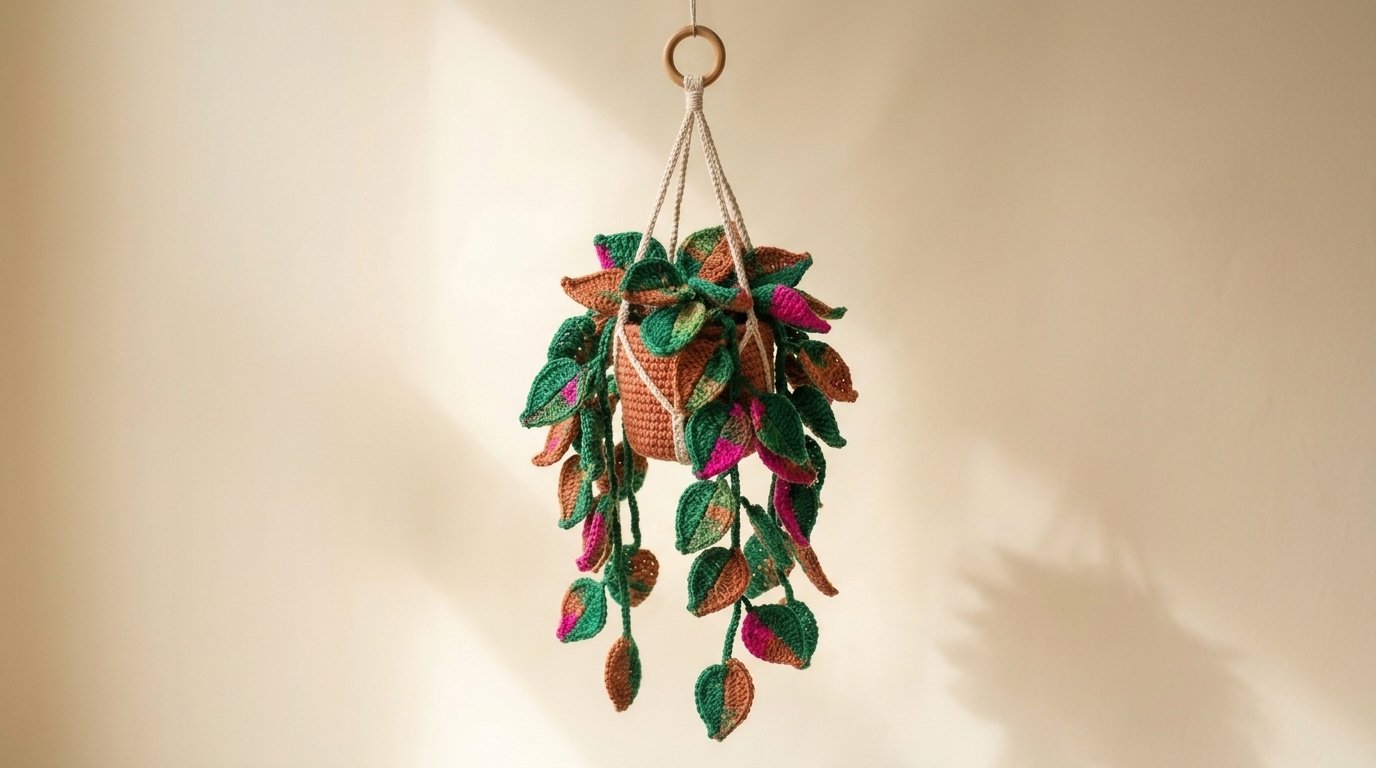
Imagine a beautiful trailing houseplant that stays colorful all year, never needs watering, and is made entirely by hand. That’s exactly what we’re creating with this free crochet pothos pattern!
This cheerful hanging plant features deep green leaves with warm copper, caramel, and bright pink details. Long crocheted vines tumble from a terracotta-colored pot, held by a natural cream hanger and wooden ring.
It’s a wonderful project for anyone who loves plants, crochet, and cozy handmade home decor. Even if you’re still learning, you can build this plant one piece at a time. Allow approximately 5–8 hours for the complete project, depending on how many leaves you make.
Crochet Pothos Pattern: Quick Facts
| Project Detail | Information |
|---|---|
| Skill level | Confident beginner |
| Estimated time | 5–8 hours |
| Finished pot | Approximately 3–4 inches wide |
| Trailing vines | Approximately 6–15 inches |
| Overall hanging length | Approximately 18–28 inches |
| Crochet terminology | US terms |
| Main stitches | Chain, single crochet, slip stitch, increase, decrease |
| Construction | Crocheted pot, variegated leaves, trailing vines, cream hanger |
Measurements and time are estimates. The pattern has not yet been sample-tested.
Materials and Tools You’ll Need
This project is a lovely opportunity to use several beautiful yarn colors without buying large quantities of each one.
Yarn Colors
Choose DK weight (#3) cotton or cotton-blend yarn.
- Emerald green: Approximately 50–70 g for leaves and vines.
- Rust or terracotta orange: Approximately 35–50 g for the hanging pot.
- Copper brown: Approximately 10–15 g for leaf accents.
- Bright magenta pink: Approximately 5–10 g for colorful leaf details.
- Soft moss green: Approximately 10–15 g for additional leaf shading.
- Dark brown: Approximately 15–20 g for the soil circle.
Yarn substitution: Worsted-weight cotton or acrylic can also work. The finished plant will be larger, so adjust the hook size and stuffing accordingly.
Tools and Accessories
- 3.5 mm crochet hook
- Yarn needle
- Scissors
- Stitch markers
- Polyester fiberfill
- One wooden hanging ring, approximately 2 inches wide
- Three lengths of sturdy cream cotton macrame cord, approximately 28 inches each
- Optional small amount of felt or cardboard for reinforcing the pot base
Substitution tips: If you don’t have macrame cord, use sturdy braided cotton yarn. A covered metal ring can replace the wooden ring. For the pot filling, leftover yarn scraps can replace some of the fiberfill.
Keep the finished plant lightweight. Use the hanging cord to support the pot securely, and avoid leaving loose or exposed reinforcement materials.
Crochet Abbreviations and Stitches
All instructions use US crochet terminology.
- ch – Chain: The foundation stitch used to create starting chains and vines.
- sc – Single crochet: Insert the hook, yarn over and pull up a loop, then yarn over and pull through both loops.
- sl st – Slip stitch: Pull the yarn through the stitch and the loop on your hook.
- inc – Increase: Work two single crochet stitches into one stitch.
- sc2tog – Single crochet two together: Join two neighboring stitches into one to decrease the stitch count.
- MR – Magic ring: An adjustable starting loop for crocheting in the round.
- BLO – Back loop only: Crochet through only the back loop of the stitch.
- st/sts – Stitch/stitches
- rnd – Round
Turning chains do not count as stitches. The pot and soil are worked in continuous rounds, so use a marker to identify the beginning of each round.
Step-by-Step Free Crochet Pothos Pattern
We’ll make this project in five main parts: the pot, leaves, trailing vines, soil insert, and hanging cords.
You can spread the work over a few evenings. Making the leaves first is especially relaxing because each one is a small project of its own.
Step 1: Crochet the Terracotta Pot Base
Using terracotta yarn, begin with a magic ring.
Round 1: Work 6 sc into the magic ring. (6 sts)
Round 2: Inc in each stitch. (12 sts)
Round 3: Repeat (sc, inc) six times. (18 sts)
Round 4: Repeat (sc in the next 2 stitches, inc) six times. (24 sts)
Round 5: Repeat (sc in the next 3 stitches, inc) six times. (30 sts)
Round 6: Repeat (sc in the next 4 stitches, inc) six times. (36 sts)
Round 7: Repeat (sc in the next 5 stitches, inc) six times. (42 sts)
Round 8: Repeat (sc in the next 6 stitches, inc) six times. (48 sts)
You should now have a flat circular base.
Beginner tip: Count your stitches after every round. If the circle begins to curl, relax your tension slightly before continuing.
Step 2: Build the Pot Walls
Continue with terracotta yarn.
Round 9: Work 1 sc in the BLO of each stitch. (48 sts)
Rounds 10–20: Work 1 sc in every stitch. (48 sts per round)
Round 21: Repeat (sc in the next 7 stitches, inc) six times. (54 sts)
Rounds 22–23: Sc in each stitch. (54 sts per round)
Finish with a slip stitch in the next stitch.
Fasten off and weave in your tail.
The back-loop round creates a defined bottom edge, while the final increase gives the pot a slightly wider opening.
Common mistake: Accidentally adding increases along the straight sides can make the pot flare too early. Use your marker and count each round.
Step 3: Crochet the Soil Insert
Using dark brown yarn, create a flat circle.
Round 1: 6 sc in a magic ring. (6 sts)
Round 2: Inc around. (12 sts)
Round 3: Repeat (sc, inc) six times. (18 sts)
Round 4: Repeat (2 sc, inc) six times. (24 sts)
Round 5: Repeat (3 sc, inc) six times. (30 sts)
Round 6: Repeat (4 sc, inc) six times. (36 sts)
Round 7: Repeat (5 sc, inc) six times. (42 sts)
Round 8: Repeat (6 sc, inc) six times. (48 sts)
Fasten off, leaving a long tail for sewing.
Set this circle aside. We’ll attach the vines and leaves before securing it inside the pot.
How to Crochet the Pothos Leaves
The colorful leaves are the star of this hanging plant.
Real pothos leaves often have a pointed tip and a gently heart-shaped base. We’ll create that shape using simple increases and two small rounded lobes.
Step 4: Make the Pointed Leaf Body
Using emerald green yarn, ch 2.
Row 1: Work 2 sc in the second chain from the hook. (2 sts)
Row 2: Ch 1, turn, inc in both stitches. (4 sts)
Row 3: Ch 1, turn, inc, sc in the next 2 stitches, inc. (6 sts)
Row 4: Ch 1, turn, inc, sc in the next 4 stitches, inc. (8 sts)
Row 5: Ch 1, turn, inc, sc in the next 6 stitches, inc. (10 sts)
Rows 6–7: Ch 1, turn, sc in every stitch. (10 sts per row)
You now have a pointed leaf with a wider upper section.
Step 5: Shape the Two Leaf Lobes
We’ll divide the final row into two halves to make a subtle heart-shaped notch.
First lobe:
- Ch 1, turn, sc in the first 5 stitches. Leave the remaining 5 stitches unworked. (5 sts)
- Ch 1, turn, sc across. (5 sts)
- Ch 1, turn, sc2tog, sc, sc2tog. (3 sts)
- Fasten off.
Second lobe:
- Join yarn to the first unworked stitch of Row 7.
- Sc across the remaining 5 stitches. (5 sts)
- Ch 1, turn, sc across. (5 sts)
- Ch 1, turn, sc2tog, sc, sc2tog. (3 sts)
- Fasten off.
Gently arrange the two lobes to leave a small notch at the top of your leaf.
This notch is where you’ll attach the leaf to a trailing vine.
Beginner tip: Don’t pull the finishing tails too tightly. A little flexibility helps create a natural leaf shape.
Step 6: Add the Variegated Colors
The inspiration design includes gorgeous patches of copper, rust, moss green, and vivid pink.
To recreate that appearance, thread a yarn needle with one of your accent colors.
- Lay your finished green leaf flat.
- Work short embroidery stitches across a small section of the leaf, following the direction of the crochet rows.
- Add a few neighboring stitches to create an irregular color patch.
- Secure your yarn on the back without pulling the fabric tight.
- Repeat with a second accent color if desired.
Try alternating the colors across your collection:
- Green leaves with copper edges.
- Emerald leaves with bright pink tips.
- Green leaves with caramel-colored patches.
- Moss green leaves with rust details.
- Mostly green leaves with only a little accent color.
The patches don’t need to be perfectly symmetrical. Small differences will make the finished hanging plant much more interesting.
Common mistake: Pulling embroidery stitches too tightly can distort the leaf. Keep your stitches relaxed so the fabric stays flat.
Step 7: Make Enough Leaves for a Full Plant
For a hanging pothos similar to the Pinterest image, aim for approximately 20 leaves.
Make 16 leaves for the trailing vines and another 4 to fill the top of the pot.
You can add more leaves later if the plant looks sparse.
Keep their colors varied, but use emerald green as the dominant shade to maintain a cohesive appearance.
Crochet the Long Trailing Vines
Long, uneven vines help give this crochet pothos the beautiful cascading look of a real hanging houseplant.
Step 8: Make the Green Vines
Using emerald green yarn, make eight vines in four different lengths:
- Two vines: Ch 28.
- Two vines: Ch 40.
- Two vines: Ch 54.
- Two vines: Ch 64.
For each vine:
- After completing the foundation chain, insert the hook into the second chain from the hook.
- Work a slip stitch into each remaining chain to reinforce the vine.
- Fasten off, leaving a sewing tail at both ends.
The shortest vine will have 27 slip stitches, while the longest will have 63.
Beginner tip: If your vine twists too tightly, loosen your slip stitches. A little natural twisting is fine.
Step 9: Attach Leaves to the Vines
Take two completed leaves for each vine.
Attach the heart-shaped base of the first leaf close to the vine tip using a yarn needle.
Attach the second leaf a little farther up the same vine, approximately 8–12 chain positions from the tip.
Angle the leaves in different directions to create a fuller appearance.
Repeat until all eight vines have two leaves.
Don’t worry if the vines look a little uneven. That’s what gives the finished plant its relaxed, organic shape.
Assemble the Hanging Crochet Pothos
Step 10: Attach Vines to the Soil
Lay your brown soil circle flat.
Position the eight trailing vines around its outer edge.
Use the sewing tails to attach them through several stitches of the soil circle, spacing them as evenly as possible.
Secure the tails on the underside with firm knots and weave them into the fabric.
Now attach the remaining four leaves near the center of the soil circle, angled upward and outward to form a leafy crown.
Check the arrangement before sewing everything securely.
Step 11: Insert the Soil into the Pot
Place a small amount of polyester stuffing inside the terracotta pot.
For a flatter base, you may add a lightweight reinforcing disc beneath the stuffing.
Position the soil circle across the top of the pot, slightly below the rim.
Use the long brown sewing tail to stitch its outer edge to the inside of the pot near Round 20. Distribute the stitches evenly so the insert sits flat.
Make sure the vines extend outward over the rim rather than being trapped inside the pot.
Adjust the stuffing until the pot looks rounded but not overfilled.
Make the Cream Hanging Cords
The natural cream hanger and wooden ring give this project its warm, rustic finishing touch.
Step 12: Prepare the Hanger
Take your three lengths of cream cotton cord.
- Fold each cord in half.
- Pass the folded loops through the wooden ring.
- Pull the loose cord ends through their folded loops to secure them to the ring.
- You should have six hanging cord ends extending below the ring.
- Arrange the ends into three pairs.
For an extra decorative detail, wrap a short piece of cream yarn neatly around the cords just beneath the ring and knot it securely.
Step 13: Secure the Pot
Divide the pot’s upper rim into three equal sections, approximately 18 stitches apart.
At each section, take one pair of cords and pass the ends through several adjacent rim stitches.
Tie firm, secure knots so the cord bears the weight of the pot.
Adjust all three pairs until the pot hangs evenly.
Trim excess cord, leaving enough length to secure and hide the knots.
Safety note: This hanger is designed for a lightweight decorative crochet plant. Test the strength of every attachment over a soft surface before hanging it, and never place it above a bed or other area where a falling object could cause injury.
Finishing and Styling Your Crochet Pothos
Once your plant is assembled, spend a few minutes arranging the leaves.
Turn some leaves toward the front and others slightly sideways. Let the longest vines hang freely, while the shorter vines frame the pot.
If a leaf curls, gently reshape it with your fingers.
You can hang your finished crochet pothos:
- Beside a bright window, away from prolonged direct sunlight.
- On a decorative wall hook.
- From a sturdy shelf bracket.
- In a cozy craft room.
- As part of a handmade indoor plant display.
The terracotta pot and cream hanger pair beautifully with natural wood, woven baskets, and neutral-colored walls.
For a collection of handmade greenery, explore [Easy Crochet Hanging Plant Patterns → related pattern collection].
Three Ways to Customize Your Crochet Pothos
1. Create a Classic Golden Pothos
Replace the pink and copper patches with golden yellow and soft cream accents.
Keep the main leaves dark green for a more traditional pothos appearance.
2. Make a Mini Hanging Plant
Use lighter-weight yarn and a smaller hook to create a tiny version.
Reduce the number of leaves and shorten the vines for a compact decoration.
3. Make an Extra-Full Trailing Plant
Add another four to six vines in different lengths.
Attach extra leaves close to the pot rim to give the plant a thicker, more established look.
How to Care for Your Crochet Hanging Plant
Unlike a living pothos, this handmade version needs very little care.
Dust the leaves gently with a soft brush or dry microfiber cloth.
Avoid soaking the finished plant, especially if it contains cardboard reinforcement or a wooden ring.
Keep it away from strong sunlight for long periods to help preserve its colors.
If the vines become tangled, separate them carefully by hand.
Store your crochet plant in a dry place when it isn’t being displayed.
Frequently Asked Questions
Is this free crochet pothos pattern beginner-friendly?
Yes, confident beginners can make this project using basic crochet stitches. The leaves require a little shaping, but the steps are repetitive and easy to practice.
How many leaves do I need for a crochet hanging pothos?
For this version, start with approximately 20 leaves. You can make 25 or more if you want a fuller plant with extra cascading greenery.
Can I make crochet pothos leaves without changing yarn colors?
Absolutely! Solid green leaves create a beautiful classic pothos look. You can also use variegated green yarn if you prefer natural color changes without adding embroidered details.
What yarn is best for a crochet hanging plant?
Cotton or cotton-blend DK yarn is a practical option because it helps the leaves retain their shape. Acrylic yarn is another possibility, although the finished leaves may be softer.
Enjoy Your Handmade Crochet Pothos
This free crochet pothos pattern turns simple yarn into a colorful piece of hanging plant decor. From the warm terracotta pot to the green, copper, and pink trailing leaves, every detail adds handmade charm.
Once you’ve completed your plant, save this pattern to Pinterest and share your creation with other crochet lovers.
For your next project, try a [Crochet String of Pearls Plant Pattern → related pattern] and continue growing your handmade indoor garden!
Publisher’s note — remove before publishing: This pattern was drafted from the Pinterest design and has not been physically tested. Test the leaf shape, pot construction, yarn quantities, cord strength, stitch counts, and finished measurements before publishing.