Free Crochet Otter Amigurumi Pattern – Cute Starfish Otter
Few handmade projects are as charming as a tiny crochet animal with its own personality. This crochet otter amigurumi pattern brings a playful little...
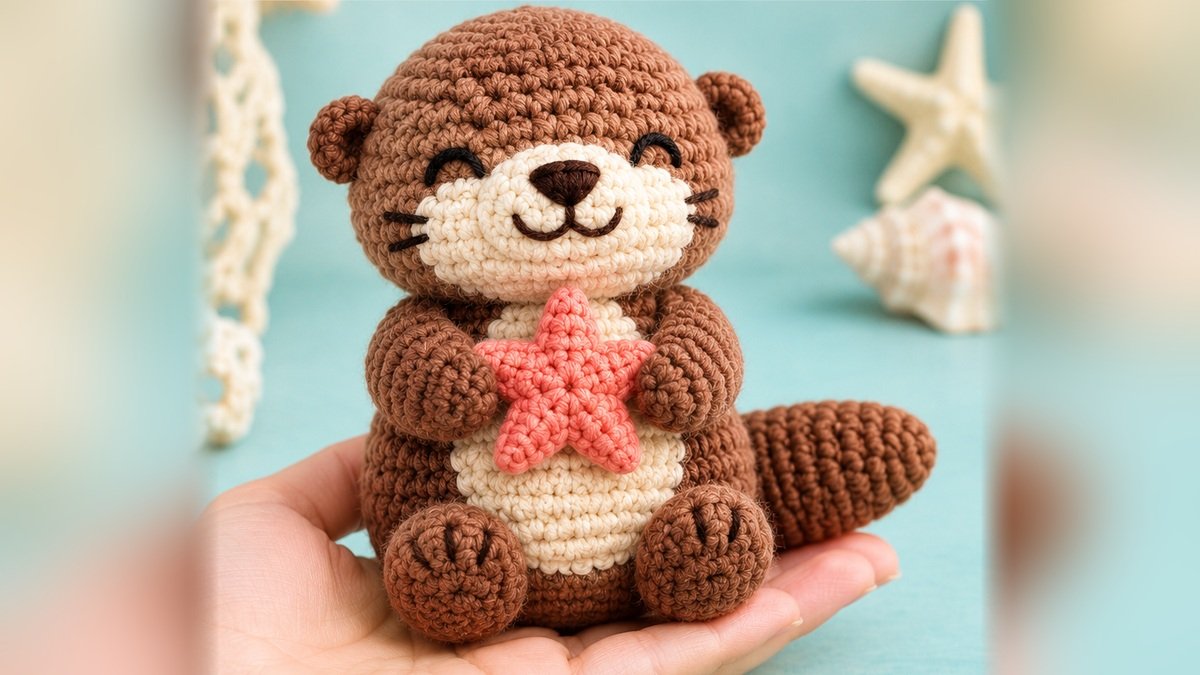
Few handmade projects are as charming as a tiny crochet animal with its own personality. This crochet otter amigurumi pattern brings a playful little sea creature to life with soft brown yarn, an adorable embroidered smile, and a miniature coral starfish held between its paws.
Meet the Cocoa Coast Otter, a rounded, sitting amigurumi with a chestnut-brown head and body, cream-colored muzzle and belly, small circular ears, chubby feet, and a tapered tail. Its five-pointed coral starfish adds a colorful ocean-inspired detail.
This free crochet pattern combines basic single crochet stitches with simple increases, decreases, and sewing techniques. The individual pieces are manageable, making the project a satisfying choice for confident beginners interested in creating handmade animals.
Whether you want to make a cute shelf decoration, a thoughtful handmade gift, or a character for your growing amigurumi collection, this little otter is a delightful project to explore.
Why You’ll Love This Crochet Otter
The Cocoa Coast Otter combines a simple silhouette with several charming details.
- Beginner-friendly stitches: Most pieces use single crochet, increases, and decreases.
- Distinctive character: The embroidered sleeping eyes and small smile give the otter a peaceful expression.
- Adorable accessory: A coral starfish adds a playful ocean theme.
- Compact size: The finished animal fits comfortably in your hands.
- Great for using leftover yarn: The cream and coral details require relatively small amounts.
- Customizable design: Change the colors or facial expression to create different otters.
- Rewarding construction: Practice working in rounds, shaping small pieces, and joining amigurumi components.
The pattern is especially useful for crocheters who are comfortable with basic stitches and want to improve their amigurumi assembly skills.
Project Overview
| Detail | Information |
|---|---|
| Project | Crochet sea otter amigurumi |
| Skill level | Confident beginner |
| Time estimate | 4–7 hours |
| Finished height | About 6–7 inches |
| Yarn | Worsted weight (#4) |
| Crochet hook | 3.5 mm |
| Main stitch | Single crochet |
| Construction | Separate crocheted pieces |
| Terminology | US crochet terms |
The finished measurements are approximate and depend on the yarn, tension, stuffing, and crochet hook.
Materials and Supplies Needed
Gather your materials before beginning.
Yarn
Use a smooth worsted-weight cotton or acrylic blend.
| Yarn Color | Estimated Amount |
|---|---|
| Chestnut brown | 90–120 yards |
| Warm cream | 20–30 yards |
| Coral pink | 15–25 yards |
| Dark brown or black | Small amount |
The chestnut yarn is used for the main body, head, ears, paws, and tail. The cream yarn creates the face and belly, while coral yarn forms the small starfish.
Additional Supplies
- 3.5 mm crochet hook
- Polyester fiberfill stuffing
- Tapestry needle
- Stitch markers
- Scissors
- Straight pins
- Measuring tape
- Embroidery needle
The facial features are embroidered, so plastic safety eyes are not required.
Choosing the Right Yarn and Hook
A smooth yarn is ideal for this project because it helps the crochet stitches remain visible and makes the small pieces easier to shape.
Cotton blends tend to create a structured amigurumi fabric, while acrylic yarn can provide a softer feel.
For the original design, choose a medium chestnut brown rather than a very dark shade. This makes the stitch definition easier to see and contrasts nicely with the cream muzzle.
Recommended hook size
Start with a 3.5 mm hook.
Amigurumi generally works best with fairly close stitches that prevent the stuffing from showing through.
If the fabric looks too loose, try a smaller hook. If the stitches are difficult to work, a slightly larger hook may be more comfortable.
Gauge
Exact gauge is less important for amigurumi than it is for fitted clothing. However, consistent tension matters because it helps the head, body, feet, and arms maintain balanced proportions.
As a starting reference, a dense amigurumi fabric may measure approximately 20–24 single crochet stitches across 4 inches, depending on the yarn and hook.
Crochet Stitches and Abbreviations
This pattern uses US crochet terminology.
| Abbreviation | Meaning |
|---|---|
| MR | Magic ring |
| ch | Chain |
| sc | Single crochet |
| inc | Increase (2 sc in one stitch) |
| dec | Invisible single crochet decrease |
| sl st | Slip stitch |
| st(s) | Stitch(es) |
| rnd | Round |
| rep | Repeat |
How to Make an Invisible Decrease
Insert your hook under the front loops of the next two stitches.
Yarn over and pull through both front loops.
Yarn over again and pull through the two loops on your hook.
An invisible decrease helps keep the surface of the amigurumi smooth.
Working in Continuous Rounds
Most pieces are worked in spirals without joining after each round.
Use a stitch marker to identify the beginning of every round.
Move the marker upward as you crochet.
Before You Start
This otter is assembled from several separately crocheted pieces.
You will make:
- One rounded body.
- One large head.
- Two cream muzzle pieces.
- One cream belly patch.
- Two small ears.
- Two arms.
- Two feet.
- One tapered tail.
- One coral five-pointed starfish.
Prepare the body and head first, followed by the smaller details.
Do not overstuff the pieces. Adding small amounts of fiberfill gradually helps maintain a smooth, rounded shape.
The design uses embroidered facial features and a securely attached starfish. Still, handmade amigurumi with small parts requires careful assessment before being given to young children.
Step-by-Step Crochet Otter Amigurumi Pattern
Step 1: Crochet the Otter’s Body
Using chestnut-brown yarn, create a magic ring.
Round 1: 6 sc in MR. (6)
Round 2: Inc in every stitch. (12)
Round 3: 1 sc, inc six times. (18)
Round 4: 2 sc, inc six times. (24)
Round 5: 3 sc, inc six times. (30)
Round 6: 4 sc, inc six times. (36)
Round 7: 5 sc, inc six times. (42)
Rounds 8–12: Sc in every stitch around. (42)
Round 13: 5 sc, dec six times. (36)
Rounds 14–16: Sc around. (36)
Round 17: 4 sc, dec six times. (30)
Rounds 18–19: Sc around. (30)
Round 20: 3 sc, dec six times. (24)
Round 21: 2 sc, dec six times. (18)
Round 22: 1 sc, dec six times. (12)
Fill the body with polyester stuffing.
Round 23: Dec six times. (6)
Fasten off, leaving a long sewing tail.
Thread the tail through the front loops of the remaining stitches and gently pull the opening closed.
The body should have a rounded bottom with a slightly narrower upper section.
Step 2: Crochet the Large Rounded Head
Using chestnut-brown yarn:
Round 1: 6 sc in MR. (6)
Round 2: Inc around. (12)
Round 3: 1 sc, inc six times. (18)
Round 4: 2 sc, inc six times. (24)
Round 5: 3 sc, inc six times. (30)
Round 6: 4 sc, inc six times. (36)
Round 7: 5 sc, inc six times. (42)
Round 8: 6 sc, inc six times. (48)
Rounds 9–15: Sc around. (48)
Round 16: 6 sc, dec six times. (42)
Round 17: 5 sc, dec six times. (36)
Round 18: 4 sc, dec six times. (30)
Round 19: 3 sc, dec six times. (24)
Round 20: 2 sc, dec six times. (18)
Begin stuffing the head, distributing the filling evenly.
Round 21: 1 sc, dec six times. (12)
Round 22: Dec six times. (6)
Fasten off and close the opening using a tapestry needle.
The head should look soft and rounded, with a wide center suitable for the cream muzzle and embroidered eyes.
Step 3: Make the Two Cream Muzzle Pieces
Make two identical pieces using cream yarn.
Round 1: 6 sc in MR. (6)
Round 2: Inc around. (12)
Round 3: 1 sc, inc six times. (18)
Round 4: Sc around. (18)
Fasten off, leaving a long sewing tail.
Add a tiny amount of stuffing to each piece if you want a slightly raised muzzle.
Position the pieces side by side on the lower front of the head, allowing their inner edges to meet.
Pin them in place before sewing.
Their combined shape should create the broad, rounded cream muzzle shown in the design.
Step 4: Crochet the Small Rounded Ears
Make two ears using chestnut-brown yarn.
Round 1: 6 sc in MR. (6)
Round 2: Inc around. (12)
Round 3: Sc around. (12)
Fasten off, leaving a long sewing tail.
Do not stuff the ears.
Flatten each piece gently between your fingers.
The ears should look like small rounded tabs when attached to the sides of the head.
Step 5: Crochet the Arms
Make two arms using chestnut-brown yarn.
Round 1: 6 sc in MR. (6)
Round 2: Inc around. (12)
Rounds 3–6: Sc around. (12)
Round 7: 2 sc, dec three times. (9)
Rounds 8–9: Sc around. (9)
Lightly stuff the lower part of each arm.
Flatten the upper opening and fasten off, leaving a long tail for sewing.
The arms should be short and slightly rounded so they can rest naturally beside the otter’s belly.
Step 6: Crochet the Two Feet
Using chestnut-brown yarn, make two identical feet.
Round 1: 6 sc in MR. (6)
Round 2: Inc around. (12)
Round 3: 1 sc, inc six times. (18)
Rounds 4–5: Sc around. (18)
Round 6: 1 sc, dec six times. (12)
Round 7: Sc around. (12)
Lightly stuff each foot.
Fasten off, leaving a long sewing tail.
Flatten the open ends slightly.
The feet should have rounded fronts and gently tapered attachment points.
If desired, embroider two or three subtle toe lines using a slightly darker brown yarn.
Step 7: Crochet the Tapered Tail
The long tail helps establish the otter’s silhouette.
Using chestnut-brown yarn:
Round 1: 6 sc in MR. (6)
Round 2: Sc around. (6)
Round 3: 1 sc, inc three times. (9)
Rounds 4–5: Sc around. (9)
Round 6: 2 sc, inc three times. (12)
Rounds 7–8: Sc around. (12)
Round 9: 3 sc, inc three times. (15)
Rounds 10–11: Sc around. (15)
Round 12: 4 sc, inc three times. (18)
Rounds 13–14: Sc around. (18)
Round 15: 5 sc, inc three times. (21)
Rounds 16–18: Sc around. (21)
Add small amounts of stuffing as you work, keeping the pointed end softer than the base.
Leave the wide end open and fasten off with a long sewing tail.
The tail can be positioned to extend gently toward one side of the body.
Step 8: Crochet the Cream Belly Patch
Using cream-colored yarn:
Foundation: Chain 7.
Row 1: Work 1 sc into the second chain from the hook and each remaining chain. (6)
Row 2: Chain 1, turn. Inc in the first stitch, sc in the next 4 stitches, inc in the last stitch. (8)
Row 3: Chain 1, turn. Inc, sc in the next 6 stitches, inc. (10)
Row 4: Chain 1, turn. Inc, sc in the next 8 stitches, inc. (12)
Rows 5–9: Chain 1, turn. Sc in each stitch. (12)
Row 10: Chain 1, turn. Dec, sc in the next 8 stitches, dec. (10)
Row 11: Chain 1, turn. Dec, sc in the next 6 stitches, dec. (8)
Row 12: Chain 1, turn. Dec, sc in the next 4 stitches, dec. (6)
Fasten off with a long sewing tail.
The finished piece should resemble a softly rounded rectangle with tapered ends.
If needed, work a round of single crochet evenly around the edge for a smoother shape.
Position the belly patch on the front of the body, centered beneath the head.
Sew around its perimeter with cream yarn.
Step 9: Make the Coral Starfish
The five-pointed starfish is the otter’s signature accessory.
For a slightly padded starfish, crochet two matching flat star shapes and sew them together.
Using coral yarn:
Round 1: 5 sc in MR. (5)
Round 2: Inc in every stitch. (10)
Round 3: 1 sc, inc five times. (15)
Round 4: 2 sc, inc five times. (20)
Round 5: 3 sc, inc five times. (25)
You now have a circular center with 25 stitches.
Create the five starfish points
Divide the outer round into five groups of five stitches.
Each group forms the base of one point.
For the first point:
Row 1: Sc into each of the next 5 stitches. (5)
Row 2: Chain 1, turn. Dec, sc in the next stitch, dec. (3)
Row 3: Chain 1, turn. Sc across. (3)
Row 4: Chain 1, turn. Dec, sc in the next stitch. (2)
Row 5: Chain 1, turn. Dec. (1)
Fasten off.
For the remaining four points, join the coral yarn to the next unused group of five stitches on Round 5 and repeat the point instructions.
Once all five points are complete, weave in the short ends.
Repeat the entire starfish pattern to make a second matching layer.
Join the starfish
Place both stars together, aligning the five points.
Use coral yarn and a tapestry needle to sew around the outer edge.
Before closing the final section, add a very small amount of stuffing to the center.
Avoid overstuffing the arms.
Close the opening and secure the yarn.
The finished starfish should be lightly padded, with five clearly defined points.
Assembly and Finishing
Arrange all components before making permanent attachments.
Attach the head
Position the head on the narrower upper section of the body.
Use a tapestry needle and matching brown yarn to sew the head securely in place.
Work several passes around the contact area to create a strong connection.
Check that the head is centered and does not tilt excessively.
Embroider the face
Using dark brown or black embroidery thread, create two curved closed eyes slightly above the cream muzzle.
Position them symmetrically.
Embroider a small triangular nose near the upper center of the muzzle.
Add a short curved smile beneath the nose.
Optional short whisker lines can be added on either side of the face.
Keep the stitches secure and avoid leaving loose loops.
Attach the ears
Position the ears near the upper sides of the head.
Pin both ears in place, check their symmetry, and sew them securely.
Attach the feet
Position the feet at the lower front of the body.
Angle them slightly outward for a relaxed sitting pose.
Sew around the attachment edges, keeping the rounded ends facing forward.
Attach the tail
Place the wider end of the tail against the lower back of the otter.
Sew firmly around its base.
Allow the tapered tail to extend toward one side, as shown in the finished design.
Attach the starfish and arms
Center the coral starfish over the cream belly.
Position the arms on either side, with the rounded paws resting against the starfish.
Sew the upper ends of the arms securely to the body.
Use small hidden stitches to connect the paws to the back or sides of the starfish, helping the otter appear to hold it.
Check the character from the front and adjust the placement before securing the final stitches.
Tips for the Best Results
Keep the stuffing even
Use small pieces of fiberfill and distribute them carefully. Large clumps may create uneven shapes.
Maintain consistent tension
Try to keep your stitch size consistent across all pieces, especially the two ears, arms, and feet.
Count every round
Check the stitch count after each increase or decrease round to avoid accidental changes in size.
Use pins before sewing
Pins make it easier to arrange the facial features and accessories symmetrically.
Do not overstuff the starfish
A tiny amount of stuffing is enough to create a soft raised appearance without distorting the points.
Keep seams discreet
Use yarn that matches the crocheted piece and weave sewing ends securely inside the body.
Common Mistakes and Troubleshooting
The head appears uneven
Check that your increases and decreases are distributed correctly. Uneven stuffing can also affect the shape.
Stuffing shows through the stitches
Use a smaller hook or crochet with slightly firmer tension.
The ears are different sizes
Count the stitches carefully and compare the ears before attaching them.
The feet do not sit evenly
Reposition them while they are pinned in place and check the otter from the front.
The starfish points are uneven
Make sure each point begins with exactly five stitches and follows the same decrease sequence.
The otter tips forward
Adjust the feet, tail position, and stuffing distribution. A stable sitting pose depends on balanced proportions.
Creative Variations and Customization Ideas
Once you’ve completed the original design, try experimenting with different yarn colors and details.
Cinnamon otter: Choose a warmer reddish-brown yarn with an ivory belly.
Chocolate otter: Use dark chocolate yarn with caramel-colored facial details.
Pastel otter: Try soft lavender or dusty blue for a whimsical interpretation.
Mini otter: Use lightweight yarn and a smaller hook while keeping the same stitch counts.
Large plush otter: Work with thicker yarn and an appropriately sized hook.
You can also replace the coral starfish with a simple crocheted heart or shell for a different theme.
How to Display or Gift Your Crochet Otter
This little sea otter works beautifully as a decorative handmade character.
Display it on a craft shelf, alongside ocean-themed home accessories, or as part of a collection of crocheted animals.
It also makes a thoughtful gift for otter lovers, ocean enthusiasts, and anyone who appreciates handmade crafts.
For gift presentation, consider placing the otter in a small paper gift box with tissue paper and a handwritten note.
Because the project contains small sewn components, assess attachment security and age suitability carefully before offering it as a child’s toy.
Care and Washing Instructions
Follow the yarn manufacturer’s care instructions.
For many cotton or acrylic yarns, gentle spot cleaning is a practical way to preserve the figure’s shape.
Use a soft damp cloth with a small amount of mild detergent.
Clean the surface carefully without pulling on the embroidered facial features.
Avoid twisting or wringing the crocheted pieces.
If the figure becomes damp, place it in a well-ventilated area and allow it to dry completely.
Reshape the tail, ears, and starfish while drying if necessary.
Frequently Asked Questions
Is this crochet otter suitable for beginners?
It is best suited to confident beginners who already understand magic rings, single crochet, increases, decreases, and basic amigurumi assembly.
How long does it take to make?
Allow approximately 4–7 hours, depending on your experience and the time needed for sewing.
Can I use plush yarn?
Yes, although thicker yarn will create a larger otter and may make some small details less defined.
Do I need safety eyes?
No. This design uses embroidered eyes to create a soft, smiling expression.
Can I make the otter without the starfish?
Yes. Simply omit the starfish and position the arms naturally against the body.
How can I make the otter larger?
Use thicker yarn and an appropriate larger hook, keeping the original stitch counts.
Can I use different colors?
Absolutely. Brown, caramel, cream, gray, and even pastel yarns can work well for this design.
How much stuffing should I use?
Use enough to create firm, rounded shapes without stretching the fabric or creating visible gaps.
Conclusion
The Cocoa Coast Otter is a sweet crochet amigurumi project that brings together simple shaping, cozy colors, and charming character details.
Its round brown head, cream muzzle, tiny ears, chubby paws, and colorful coral starfish give it an instantly recognizable personality.
By working through the individual pieces, you’ll practice important amigurumi techniques while creating a delightful handmade animal.
Choose your favorite yarn colors, enjoy the process, and give your little sea otter a special place in your collection.
Related Crochet Projects to Try Next
If you enjoyed crocheting this little otter, consider exploring a few more animal-themed amigurumi ideas:
- Crochet Baby Seal: A rounded ocean animal with simple flippers.
- Crochet Mini Penguin: A cute upright character with contrasting belly details.
- Crochet Sea Turtle: A colorful creature featuring a textured shell and small flippers.
- Crochet Baby Whale: A beginner-friendly ocean design with a rounded body and tiny tail.
Each project offers another way to practice crochet shaping and build a collection of handmade amigurumi animals.