Free Crochet Forest Dragon Pattern – Cute Mossglow Dragon Amigurumi
Bring a little woodland magic into your crochet collection with this free crochet forest dragon pattern! With its deep moss-green body, bright leafy spines,...
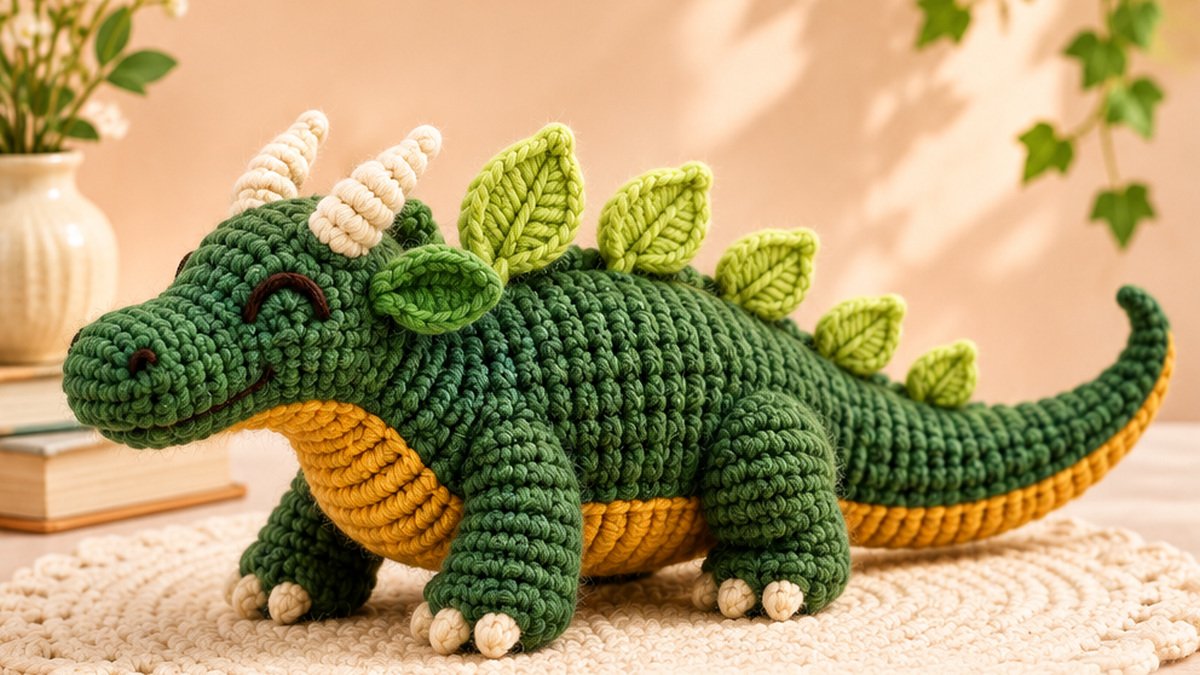
Bring a little woodland magic into your crochet collection with this free crochet forest dragon pattern! With its deep moss-green body, bright leafy spines, golden-yellow belly, ivory horns, and long curved tail, Mossglow is a charming fantasy-inspired amigurumi project.
Unlike a traditional sitting baby dragon, this design features a low, four-legged body, rounded snout, and decorative leaf-shaped scales along its back. The shape gives it the appearance of a friendly little forest creature resting among the plants.
This DIY dragon crochet project is especially suitable for crocheters who already understand basic amigurumi techniques and want to try making something more detailed.
You’ll use simple single crochet stitches, increases, decreases, and flat crochet shapes to create the individual components. Once assembled, these pieces become a beautiful woodland dragon.
The pattern includes instructions for the head, snout, body, four legs, curled tail, horns, ears, golden belly, and leafy back spines.
Why You’ll Love This DIY Dragon Crochet Project
This forest dragon combines adorable character design with a distinctive botanical appearance.
Unique woodland inspiration: The lime-green leaf spines resemble miniature leaves growing along the dragon’s back.
Beautiful natural colors: Forest green, golden yellow, lime, and ivory create a warm, harmonious palette.
Recognizable dragon silhouette: Four sturdy legs, a long tail, tiny horns, and an elongated body give this dragon a different appearance from traditional sitting amigurumi dragons.
Beginner-accessible stitches: Most components use single crochet worked in continuous rounds.
Creative customization: You can experiment with colors, leaf sizes, facial expressions, and tail shaping.
A charming handmade display: The completed dragon looks lovely on a bookshelf, craft desk, or fantasy-themed display.
The project includes several components, making it a satisfying next step for crocheters who have already completed simpler stuffed animals.
Project Overview
| Project Details | Information |
|---|---|
| Pattern name | Mossglow Forest Dragon |
| Category | Dragon amigurumi |
| Skill level | Advanced beginner to intermediate |
| Crochet terminology | US terms |
| Recommended yarn | Bulky #5 |
| Crochet hook | 5 mm (H/8), or size needed |
| Main stitch | Single crochet |
| Construction | Separate pieces, sewn together |
| Estimated finished length | 13–16 inches, including tail |
| Estimated height | 5–7 inches, including horns |
| Estimated time | 9–14 hours |
Measurements and time are approximate. Finished dimensions depend on yarn, hook size, tension, and stuffing.
The dragon is designed as a decorative stuffed figure that rests on four short legs.
Materials and Supplies Needed
Yarn colors
Choose a smooth, soft bulky-weight #5 yarn.
Color A – Deep Forest Green
Approximately 200–300 yards.
This is the main color for the dragon’s body, head, snout, legs, tail, and ears.
Color B – Golden Ochre
Approximately 35–60 yards.
Used for the lower jaw, belly panel, and tail accents.
Color C – Fresh Lime Green
Approximately 25–40 yards.
Used for the leaf-shaped scales along the dragon’s back.
Color D – Warm Ivory
Approximately 15–25 yards.
Used for the two horns and embroidered claws.
You’ll also need small amounts of dark brown yarn for the sleeping eyes, nostrils, and smiling mouth.
Other supplies
- 5 mm crochet hook
- Polyester fiberfill stuffing
- Stitch markers
- Large-eye tapestry needle
- Sharp scissors
- Measuring tape
- Sewing pins or removable stitch markers
- Optional blocking mat
This design uses embroidered facial details instead of plastic safety eyes.
Choosing the Right Yarn and Hook
Yarn selection affects the dragon’s texture, structure, and overall appearance.
A smooth bulky acrylic yarn works well because it gives the dragon a plush appearance while keeping the crochet stitches visible.
An acrylic-cotton blend is another option if you prefer a slightly firmer fabric.
Choose yarn with a consistent thickness. Avoid combining very different yarn weights because this can make the decorative pieces appear disproportionate.
Getting the right tension
Begin with a 5 mm crochet hook.
For stuffed amigurumi, the stitches should be firm enough to prevent stuffing from showing through.
If visible gaps appear between stitches, try a smaller hook.
If your stitches are extremely tight and difficult to work, try increasing your hook size slightly.
The finished body should feel firm but not overly stretched.
Crochet Stitches and Abbreviations
All instructions use US crochet terminology.
MR – Magic ring: Adjustable starting loop for working in the round.
sc – Single crochet: Insert hook into stitch, yarn over, pull up a loop, yarn over, and pull through both loops.
inc – Increase: Work two single crochet stitches into one stitch.
dec – Invisible decrease: Insert hook through the front loops of the next two stitches, yarn over, pull through both front loops, yarn over, and pull through the two loops on your hook.
ch – Chain
sl st – Slip stitch
hdc – Half double crochet
dc – Double crochet
BLO – Back loop only
st / sts – Stitch / stitches
FO – Fasten off
Working in continuous rounds
Most dragon components are crocheted in continuous spiral rounds.
Do not join each round with a slip stitch unless the instructions specifically tell you to.
Use a stitch marker to identify the beginning of every round.
Understanding repeats
When you see:
(sc 2, inc) × 6
Work one single crochet in each of the next two stitches, followed by an increase in the next stitch. Repeat the sequence six times.
The completed round will contain 24 stitches if you began with 18.
Before You Start
Check your gauge
For the reference yarn and hook, aim for approximately:
14 single crochet stitches and 16 rounds = 4 inches
This is a planning gauge, not a requirement for an exact finished toy size.
More important than matching the measurement is producing a dense fabric that holds stuffing securely.
Prepare your workspace
Before beginning, organize your yarn by color and make sure you have enough stuffing for the head, body, legs, and tail.
The dragon consists of:
- One elongated body
- One rounded head
- One protruding snout
- Four short legs
- One long, tapered tail
- Two ivory horns
- Two small green ears
- Five lime-green leaf spines
- One golden belly panel
- One small lower-jaw panel
Work the major pieces first, then move on to decorative components.
Stuffing and shaping
The body and head should be firmly but evenly stuffed.
The legs should have enough stuffing to support their shape.
The tail should remain more flexible, especially toward the pointed end, so it can curve naturally.
Step-by-Step Crochet Forest Dragon Pattern
Part 1: Crochet the Dragon’s Long Body
Use Color A, deep forest green.
The body is worked from the rounded rear toward the front opening where the head will attach.
Round 1: Make 6 sc in a magic ring. (6)
Round 2: Inc in every stitch. (12)
Round 3: (sc 1, inc) × 6. (18)
Round 4: (sc 2, inc) × 6. (24)
Round 5: (sc 3, inc) × 6. (30)
Round 6: (sc 4, inc) × 6. (36)
Round 7: (sc 5, inc) × 6. (42)
Round 8: (sc 6, inc) × 6. (48)
Rounds 9–20: Sc in every stitch around. (48)
This creates the broad central section of the dragon.
Round 21: (sc 6, dec) × 6. (42)
Round 22: (sc 5, dec) × 6. (36)
Rounds 23–24: Sc around. (36)
Round 25: (sc 4, dec) × 6. (30)
Round 26: Sc around. (30)
Round 27: (sc 3, dec) × 6. (24)
Round 28: Sc around. (24)
Stuff the body evenly, creating a slightly elongated oval.
Fasten off, leaving the 24-stitch front opening unclosed and a long tail for attaching the head.
Part 2: Crochet the Rounded Dragon Head
Use forest-green yarn.
Round 1: 6 sc in MR. (6)
Round 2: Inc around. (12)
Round 3: (sc 1, inc) × 6. (18)
Round 4: (sc 2, inc) × 6. (24)
Round 5: (sc 3, inc) × 6. (30)
Round 6: (sc 4, inc) × 6. (36)
Round 7: (sc 5, inc) × 6. (42)
Rounds 8–13: Sc around. (42)
Round 14: (sc 5, dec) × 6. (36)
Round 15: (sc 4, dec) × 6. (30)
Round 16: (sc 3, dec) × 6. (24)
Round 17: (sc 2, dec) × 6. (18)
Begin stuffing.
Round 18: (sc 1, dec) × 6. (12)
Round 19: Dec × 6. (6)
Add any remaining stuffing.
Fasten off and draw the opening closed.
Shape the head into a rounded oval rather than a perfect sphere.
Part 3: Crochet the Dragon’s Snout
Use forest green.
Round 1: Make 6 sc in MR. (6)
Round 2: Inc around. (12)
Round 3: (sc 1, inc) × 6. (18)
Rounds 4–7: Sc around. (18)
Stuff lightly.
Fasten off, leaving the back opening and a long sewing tail.
Sew the open edge to the lower front of the dragon’s head, allowing the rounded end to project forward.
Gently flatten the snout horizontally while sewing to create a broad, friendly dragon face.
Part 4: Crochet the Golden Belly
Use Color B, golden ochre.
The belly is a flat rectangular panel that will be sewn beneath the body.
Foundation: Ch 14.
Row 1: Sc in the second chain from the hook and in every remaining chain. (13)
Rows 2–20: Ch 1, turn, and work one sc in every stitch. (13)
Fasten off, leaving a long sewing tail.
If desired, work a single crochet border around the outside of the piece, adding extra stitches at the corners to help them round naturally.
The finished panel should cover a substantial portion of the dragon’s underside.
Position the golden panel beneath the body so that the edges extend slightly up both lower sides.
Adjust the position before sewing.
Part 5: Crochet the Golden Lower Jaw
Use golden yarn.
Foundation: Ch 7.
Row 1: Sc in the second chain from the hook and across. (6)
Rows 2–4: Ch 1, turn, and sc across. (6)
Fasten off with a long tail.
Sew the piece underneath the green snout, letting the golden edge remain visible beneath the dragon’s face.
Part 6: Crochet the Four Short Legs
Make four identical pieces in forest green.
Round 1: 6 sc in MR. (6)
Round 2: Inc around. (12)
Round 3: (sc 1, inc) × 6. (18)
Rounds 4–5: Sc around. (18)
Round 6: (sc 1, dec) × 6. (12)
Rounds 7–10: Sc around. (12)
Stuff each leg moderately.
Fasten off, leaving a long tail and the upper 12-stitch opening unclosed for sewing.
Repeat until you have four matching legs.
Add the ivory claws
Thread a tapestry needle with warm ivory yarn.
On the rounded front of each foot, make three small raised embroidery stitches.
Place them evenly across the toe area.
Secure the thread inside the foot.
The claws should appear as small cream-colored loops rather than sharp points.
Part 7: Crochet the Long Curved Tail
Use forest-green yarn.
Begin at the pointed tip and work toward the wider base.
Round 1: 4 sc in MR. (4)
Round 2: Sc around. (4)
Round 3: (sc 1, inc) × 2. (6)
Round 4: Sc around. (6)
Round 5: (sc 2, inc) × 2. (8)
Round 6: Sc around. (8)
Round 7: (sc 3, inc) × 2. (10)
Round 8: Sc around. (10)
Round 9: (sc 4, inc) × 2. (12)
Rounds 10–11: Sc around. (12)
Round 12: (sc 5, inc) × 2. (14)
Rounds 13–14: Sc around. (14)
Round 15: (sc 6, inc) × 2. (16)
Rounds 16–17: Sc around. (16)
Round 18: (sc 7, inc) × 2. (18)
Rounds 19–22: Sc around. (18)
Add light stuffing, keeping the pointed end flexible.
Fasten off with a long sewing tail.
Create the curved shape
With a separate length of forest-green yarn, make several small gathering stitches along the inside edge of the tail.
Pull gently to shorten that edge slightly and encourage the tail to curve upward.
Secure the stitches carefully without creating sharp folds.
For the golden underside accent, use ochre yarn to work two parallel lines of surface slip stitches along the lower portion of the tail, from the wider base toward the tip.
Part 8: Crochet the Ivory Horns
Make two with Color D.
Round 1: 4 sc in MR. (4)
Round 2: Sc around. (4)
Round 3: (sc 1, inc) × 2. (6)
Round 4: Sc BLO around. (6)
Round 5: (sc 2, inc) × 2. (8)
Round 6: Sc BLO around. (8)
Round 7: Sc around. (8)
Fasten off, leaving a sewing tail.
Lightly stuff the bases.
The back-loop-only rounds create subtle raised texture around the horns.
Part 9: Crochet the Leaf-Shaped Back Spines
Use fresh lime-green yarn.
You’ll make three larger leaves and two smaller leaves.
Larger leaves – Make three
Foundation: Ch 7.
Starting in the second chain from the hook, work:
- 1 sl st
- 1 sc
- 1 hdc
- 1 dc
- 1 hdc
- 1 sc
Continue around the opposite side of the foundation chain.
Work:
- 1 sc
- 1 hdc
- 1 dc
- 1 hdc
- 1 sc
- 1 sl st
Fasten off with a long sewing tail.
This forms a double-sided leaf with a pointed end.
Smaller leaves – Make two
Ch 5.
Starting in the second chain from the hook, work:
- 1 sl st
- 1 sc
- 1 hdc
- 1 sc
Work along the opposite side:
- 1 sc
- 1 hdc
- 1 sc
- 1 sl st
Fasten off.
Add leaf veins
Use matching lime yarn to embroider one simple line through the center of each leaf.
The embroidery helps emphasize the botanical shape.
Part 10: Crochet the Small Dragon Ears
Make two small leaves using forest-green yarn.
Follow the smaller leaf instructions from Part 9.
These pieces are attached to the sides of the head, with their pointed ends angled slightly outward.
Assembly and Finishing
Assembly is the stage where Mossglow develops its recognizable dragon shape.
Attach the head and body
Position the 24-stitch body opening against the back-lower area of the head.
Use the body sewing tail to stitch around the opening, catching corresponding surface loops on the head.
Adjust the angle so the head faces forward with the snout extending beyond the body.
Sew firmly and make several reinforcing stitches.
Sew the golden belly
Center the golden panel along the underside of the body.
Arrange the edges so that a narrow band of golden yarn remains visible on both sides.
Sew securely using small, even stitches.
Attach the legs
Position two legs near the front and two near the back.
Check that all four feet can touch a flat surface.
Sew the open ends of the legs securely against the lower sides of the body.
The dragon should have a low, sturdy stance.
Attach the tail
Position the wide tail base at the rounded rear of the body.
Sew around the opening securely.
Turn the curved tip upward and slightly to one side.
Position the leafy spines
Arrange the five lime-green leaves along the upper center of the dragon’s back.
Place the three larger leaves toward the front and middle, followed by the two smaller leaves toward the tail.
Attach each leaf along its lower base.
Allow the upper portions to stand free.
Add the horns and ears
Sew the two ivory horns onto the upper front portion of the head.
Position the green ears behind and slightly below the horns.
Keep the two sides symmetrical.
Embroider the face
Using dark brown yarn, embroider a gently curved closed eye on each side of the head.
Add two small nostrils near the rounded end of the snout.
Finish with a small curved smile.
Weave in all remaining ends.
Tips for the Best Results
Keep your stitches firm. A dense fabric prevents stuffing from showing between stitches.
Shape the body gradually. Stuff the center evenly, keeping the body elongated rather than round.
Check the legs before sewing. Temporarily pin them in position and set the dragon on a flat surface to check its balance.
Use consistent leaf tension. Matching leaf shapes create a neat decorative row.
Avoid overstuffing the tail. Too much stuffing makes it harder to create a natural curve.
Secure the horns and claws carefully. Small decorative components should be firmly attached.
Check the head angle. Positioning the head slightly forward gives the dragon its distinctive low woodland pose.
Common Mistakes and Troubleshooting
The dragon tips forward
The head may be too heavy or the front legs may be positioned too far back.
Try adjusting the leg placement and reducing excess stuffing in the snout.
The belly panel looks uneven
The panel may have been sewn too tightly.
Remove a few stitches, reposition the panel, and sew with relaxed tension.
The back leaves fall flat
Reinforce each leaf at its base with a few additional stitches.
You can also attach the first one or two rows of the leaf to the body to improve stability.
The tail doesn’t curve
Try reducing the stuffing and adjusting the gathering stitches along the inner edge.
Do not pull so tightly that the tail becomes sharply folded.
The stitches have visible gaps
Your hook may be too large for the yarn.
Make a sample using a smaller hook before continuing.
Creative Variations and Customization Ideas
The forest dragon can become many different fantasy creatures simply by changing the colors and details.
Autumn Forest Dragon
Use rust-orange yarn for the body, golden leaves, and a warm brown belly.
Enchanted Night Dragon
Choose deep purple for the body, silver-gray for the belly, and lavender for the leafy spines.
Spring Garden Dragon
Use mint green, butter yellow, and soft peach to create a brighter seasonal design.
Mini Forest Dragon
Use DK-weight yarn and a smaller hook to create a miniature version.
Remember that the finished size will change.
Larger Decorative Dragon
Choose a thicker yarn and appropriately sized hook to make a larger character.
Additional stuffing and stronger seams may be necessary.
How to Display or Gift Your Crochet Dragon
Mossglow makes a charming decoration for fantasy-inspired spaces.
Place the dragon on a bookshelf among novels, beside a collection of handmade plants, or on a craft-room display shelf.
The green and golden colors pair beautifully with natural wood, woven textiles, and botanical decorations.
For gifting, wrap the dragon in tissue paper and include a handwritten card with the character’s name.
If making a crochet dragon for a child, use secure stitching and appropriate materials. A handmade plush with embroidered details still needs to meet applicable toy-safety standards before being considered suitable for young children.
Care and Washing Instructions
Always follow the care directions for your chosen yarn.
For regular maintenance, gently remove dust using a soft brush or clean cloth.
If your yarn permits handwashing, wash the dragon carefully in cool water with a small amount of gentle detergent.
Avoid aggressive rubbing or twisting.
Press out excess water using a clean towel.
Reshape the head, body, legs, tail, and leaves while the crochet fabric is damp.
Allow the dragon to dry completely before storing or displaying.
Do not place it in direct heat or hang it while wet.
Frequently Asked Questions
Is this forest dragon suitable for beginners?
The pattern is best for advanced beginners who already understand working in continuous rounds, basic increases and decreases, and simple sewing.
How long does it take to make a crochet dragon?
Allow approximately 9–14 hours for the reference design, depending on your experience and the time spent assembling decorative pieces.
Can I make the dragon without wings?
Yes. This particular design intentionally has no wings. Its leaf-shaped back spines, horns, snout, and long tail establish its woodland dragon appearance.
Can I use plush chenille yarn?
Yes, but chenille yarn can make individual stitches harder to see. You may need to change your hook size and stuffing quantity.
How do I make the dragon’s tail curl?
Use light stuffing and several gathering stitches along the inside edge of the tail. Adjust the stitches gradually until you achieve the desired curve.
Can I make the leaves in different colors?
Absolutely. Mixing two or three green shades can create a more natural botanical effect.
Why does my dragon not stand evenly?
Check that the four legs are the same length and positioned symmetrically. Adjust their attachment points before securing the final stitches.
Conclusion
This free crochet forest dragon pattern is a fun way to explore amigurumi construction while creating a unique woodland-inspired character.
With its four short legs, expressive face, leaf-shaped spines, golden underside, and graceful curled tail, Mossglow offers a distinctive alternative to traditional winged baby dragons.
The pattern combines familiar stitches with creative assembly techniques, making it an appealing project for crocheters ready to build their skills.
Once you’ve completed your first forest dragon, experiment with different natural or fantasy-inspired colors to give your next dragon a personality of its own.
Related Crochet Projects to Try Next
Crochet Baby Dinosaur: Make an adorable dinosaur with a rounded body and decorative back spikes.
Crochet Woodland Mushroom: Create a small mushroom amigurumi to accompany your forest dragon.
Crochet Mini Turtle: Practice making a four-legged amigurumi animal with a textured shell.
Crochet Fantasy Dragon Egg: Design a decorative crochet egg to display beside your woodland dragon.
These projects complement the forest dragon theme and offer new opportunities to explore shaping, colors, and creative crochet details.