Free Crochet Dragon Pattern – Cute Baby Dragon Amigurumi
Bring a little handmade magic into your crochet collection with this adorable DIY dragon crochet project. With its rounded face, soft green body, tiny...
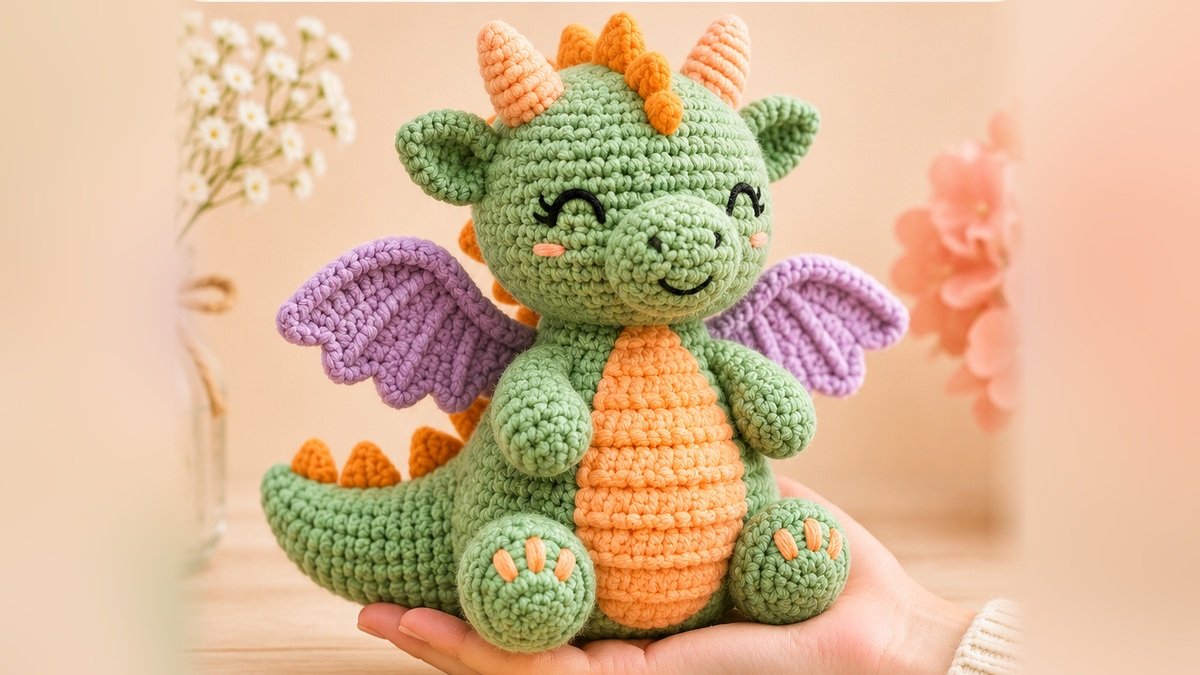
Bring a little handmade magic into your crochet collection with this adorable DIY dragon crochet project. With its rounded face, soft green body, tiny horns, and colorful wings, this little dragon is a charming amigurumi character for anyone who loves fantasy-inspired crafts.
The Jade & Lavender Baby Dragon features a fresh jade-green body, a peach-apricot textured belly, lavender scalloped wings, orange back spikes, and a gently curved tail. Two small horns, rounded feet, and embroidered smiling eyes give the dragon a friendly expression.
This free crochet dragon pattern uses basic stitches, simple increases and decreases, and several separately crocheted pieces that are sewn together. The result is a detailed character that looks impressive while remaining approachable for crocheters with some amigurumi experience.
Whether you’re making a decorative dragon for your craft shelf, creating a fantasy-themed handmade gift, or practicing three-dimensional crochet, this project offers plenty of opportunities to develop your skills.
Why You’ll Love This DIY Crochet Dragon
This baby dragon combines colorful details with straightforward crochet techniques.
Reasons to try this project include:
- Adorable character design: A round head, smiling expression, and small horns create a playful look.
- Colorful details: Lavender wings and a peach belly contrast beautifully with the green body.
- Basic crochet stitches: Most components use single crochet.
- Interesting construction: Learn how to make rounded shapes, tapered pieces, and flat scalloped wings.
- Customizable appearance: Change the colors or expressions to create different fantasy dragons.
- Handmade gift potential: A completed dragon makes a lovely decorative present.
- Manageable materials: The project uses modest quantities of worsted-weight yarn.
Because the dragon is assembled from multiple pieces, it is best suited to confident beginners who already understand amigurumi basics.
Project Overview
| Project Detail | Information |
|---|---|
| Project | Baby dragon amigurumi |
| Skill level | Confident beginner |
| Estimated time | 6–9 hours |
| Finished height | Approximately 8–10 inches |
| Yarn weight | Worsted weight (#4) |
| Hook size | 3.5 mm |
| Main stitch | Single crochet |
| Construction | Separate pieces, sewn together |
| Terminology | US crochet terms |
The finished size is an estimate. Your dragon may be larger or smaller depending on yarn thickness, crochet tension, stuffing, and hook size.
Materials and Supplies Needed
Yarn Colors
Choose soft worsted-weight yarn in the following colors:
| Color | Purpose | Estimated Yardage |
|---|---|---|
| Jade green | Head, body, legs, arms, tail, ears | 120–160 yd |
| Peach-apricot | Belly, horns, facial accents | 20–30 yd |
| Lavender | Wings | 25–40 yd |
| Burnt orange | Back and tail spikes | 15–25 yd |
| Black | Embroidered eyes and smile | Small amount |
These quantities are approximate.
Crochet Tools
- 3.5 mm crochet hook
- Polyester fiberfill stuffing
- Tapestry needle
- Stitch markers
- Sharp scissors
- Sewing pins
- Measuring tape
A smaller hook can help prevent stuffing from showing through the stitches.
For a decorative figure, embroidered eyes are an attractive alternative to plastic safety eyes.
Choosing the Right Yarn and Hook
Yarn selection affects both the appearance and durability of your crochet dragon.
Recommended yarn
Soft cotton-acrylic blends or smooth acrylic yarns work well for detailed amigurumi.
Choose yarn that produces clearly defined stitches without excessive fuzz.
Cotton blends can create a more structured shape, while acrylic yarn often feels softer and lighter.
Crochet hook
Begin with a 3.5 mm hook and adjust according to your yarn and tension.
Amigurumi fabric should be relatively dense, with stitches close enough together to prevent visible gaps.
If stuffing appears between the stitches, consider using a smaller hook.
Avoid crocheting so tightly that inserting the hook becomes uncomfortable.
Gauge
Exact gauge is less important for amigurumi than for fitted clothing.
However, consistent stitch size helps the different components maintain balanced proportions.
A useful starting point is approximately 20–22 single crochet stitches per 4 inches.
Crochet Stitches and Abbreviations
This pattern uses US crochet terminology.
| Abbreviation | Meaning |
|---|---|
| MR | Magic ring |
| ch | Chain |
| sc | Single crochet |
| dc | Double crochet |
| sl st | Slip stitch |
| inc | Increase: 2 sc in one stitch |
| dec | Invisible single crochet decrease |
| BLO | Back loop only |
| st(s) | Stitch(es) |
| rnd | Round |
| rep | Repeat |
Invisible Decrease
Insert the hook through the front loops of the next two stitches.
Yarn over and pull through both front loops.
Yarn over again and pull through the remaining two loops.
This technique helps keep decrease stitches neat and less noticeable.
Working in Continuous Rounds
Most pieces are crocheted in a spiral without joining at the end of each round.
Place a stitch marker in the first stitch of each round and move it upward as you work.
The stitch count shown in parentheses indicates the total number of stitches after completing the round.
Before You Start
Prepare your yarn and materials, then read through the construction steps.
This dragon is made from:
- One body.
- One head.
- One rounded muzzle.
- Two arms.
- Two feet.
- Two ears.
- Two horns.
- One curved tail.
- Two lavender wings.
- One peach belly patch.
- Nine small orange back spikes.
The back spikes are distributed along the head, back, and tail.
Make all pieces before final assembly so you can position them carefully.
Stuffing tip: Add fiberfill gradually rather than packing large clumps into the pieces. Even stuffing helps the dragon maintain a smooth shape.
For projects intended for children, embroidery and secure stitching are preferable to small detachable decorations. Handmade toys still require careful safety assessment, particularly for children under three.
Step-by-Step DIY Crochet Dragon Pattern
Step 1: Crochet the Green Body
Using jade-green yarn, begin with a magic ring.
Round 1: 6 sc in MR. (6)
Round 2: Inc in every stitch. (12)
Round 3: 1 sc, inc six times. (18)
Round 4: 2 sc, inc six times. (24)
Round 5: 3 sc, inc six times. (30)
Round 6: 4 sc, inc six times. (36)
Round 7: 5 sc, inc six times. (42)
Rounds 8–13: Sc in every stitch. (42)
Round 14: 5 sc, dec six times. (36)
Rounds 15–17: Sc around. (36)
Round 18: 4 sc, dec six times. (30)
Rounds 19–21: Sc around. (30)
Round 22: 3 sc, dec six times. (24)
Rounds 23–24: Sc around. (24)
Round 25: 2 sc, dec six times. (18)
Round 26: 1 sc, dec six times. (12)
Stuff the body firmly enough to hold its shape, leaving the top opening accessible.
Fasten off with a long tail for attaching the head.
The body should have a rounded base and a narrower upper section.
Step 2: Crochet the Dragon’s Head
With jade-green yarn:
Round 1: 6 sc in MR. (6)
Round 2: Inc around. (12)
Round 3: 1 sc, inc six times. (18)
Round 4: 2 sc, inc six times. (24)
Round 5: 3 sc, inc six times. (30)
Round 6: 4 sc, inc six times. (36)
Round 7: 5 sc, inc six times. (42)
Round 8: 6 sc, inc six times. (48)
Rounds 9–16: Sc around. (48)
Round 17: 6 sc, dec six times. (42)
Round 18: 5 sc, dec six times. (36)
Round 19: 4 sc, dec six times. (30)
Round 20: 3 sc, dec six times. (24)
Round 21: 2 sc, dec six times. (18)
Round 22: 1 sc, dec six times. (12)
Add stuffing gradually, keeping the face smooth.
Fasten off, leaving the 12-stitch bottom opening and a long sewing tail.
The head should be rounded and noticeably wider than the upper body.
Step 3: Make the Rounded Muzzle
Using jade-green yarn:
Round 1: 6 sc in MR. (6)
Round 2: Inc around. (12)
Round 3: 1 sc, inc six times. (18)
Rounds 4–6: Sc around. (18)
Round 7: 2 sc, inc six times. (24)
Round 8: Sc around. (24)
Fasten off, leaving a long sewing tail.
Lightly stuff the muzzle.
Position the wider opening against the lower front of the head and sew around its edge.
The rounded closed end should project forward to create a short, friendly dragon snout.
Step 4: Crochet the Two Arms
Make two identical arms with jade-green yarn.
Round 1: 6 sc in MR. (6)
Round 2: Inc around. (12)
Rounds 3–6: Sc around. (12)
Round 7: 2 sc, dec three times. (9)
Rounds 8–9: Sc around. (9)
Lightly stuff the lower half.
Flatten the open top and fasten off, leaving a long yarn tail.
The arms should be short and gently rounded.
Step 5: Crochet the Feet
Make two green feet.
Round 1: 6 sc in MR. (6)
Round 2: Inc around. (12)
Round 3: 1 sc, inc six times. (18)
Rounds 4–6: Sc around. (18)
Round 7: 1 sc, dec six times. (12)
Rounds 8–9: Sc around. (12)
Stuff each foot lightly.
Flatten the open end and fasten off with a long sewing tail.
Using peach-apricot yarn, embroider three short toe marks on the rounded front of each foot.
Keep the toe details evenly spaced.
Step 6: Make the Curved Tail
The long tail gives the dragon its playful silhouette.
Using jade-green yarn:
Round 1: 6 sc in MR. (6)
Round 2: Sc around. (6)
Round 3: 1 sc, inc three times. (9)
Rounds 4–5: Sc around. (9)
Round 6: 2 sc, inc three times. (12)
Rounds 7–8: Sc around. (12)
Round 9: 3 sc, inc three times. (15)
Rounds 10–11: Sc around. (15)
Round 12: 4 sc, inc three times. (18)
Rounds 13–14: Sc around. (18)
Round 15: 5 sc, inc three times. (21)
Rounds 16–18: Sc around. (21)
Round 19: 6 sc, inc three times. (24)
Rounds 20–22: Sc around. (24)
Stuff the tail lightly as you work.
Leave the wider end open.
To create a soft curve, bend the stuffed tail into position and use a few discreet internal-facing stitches along the inside of the curve to hold it.
Do not insert wire into the tail.
Step 7: Crochet the Apricot Belly Patch
The textured belly patch adds warmth and contrast to the green body.
Using peach-apricot yarn:
Row 1: Chain 7. Work 1 sc in the second chain from the hook and each remaining chain. (6)
Row 2: Chain 1, turn. Inc in the first stitch, sc in the next 4 stitches, inc in the last stitch. (8)
Row 3: Chain 1, turn. Inc, sc in the next 6 stitches, inc. (10)
Row 4: Chain 1, turn. Inc, sc in the next 8 stitches, inc. (12)
Rows 5–10: Chain 1, turn. Work 1 sc BLO in every stitch. (12)
Row 11: Chain 1, turn. Dec, sc in the next 8 stitches, dec. (10)
Row 12: Chain 1, turn. Dec, sc in the next 6 stitches, dec. (8)
Row 13: Chain 1, turn. Dec, sc in the next 4 stitches, dec. (6)
Fasten off, leaving a long tail.
The patch should have a gently rounded rectangular shape with narrower ends and visible horizontal texture.
If desired, work one round of single crochet evenly around the outside to smooth the edges before sewing.
Step 8: Crochet the Lavender Dragon Wings
Make two identical wings.
These flat, gently expanding pieces have a scalloped outer edge.
Using lavender yarn:
Row 1: Chain 4. Work 1 sc in the second chain from the hook and each remaining chain. (3)
Row 2: Chain 1, turn. Inc in the first stitch, sc in the next stitch, inc in the last stitch. (5)
Row 3: Chain 1, turn. Inc, sc in the next 3 stitches, inc. (7)
Row 4: Inc at each end, with 1 sc in every stitch between. (9)
Row 5: Repeat the same increase method. (11)
Row 6: Repeat. (13)
Row 7: Repeat. (15)
Row 8: Repeat. (17)
Row 9: Repeat. (19)
Row 10: Repeat. (21)
Turn the wing and create a decorative scalloped edge.
Row 11: Chain 1, then repeat sc in the next stitch, skip 1 stitch, 5 dc in the next stitch, skip 1 stitch five times. Work 1 sc in the final stitch.
Fasten off, leaving a long sewing tail at the narrow attachment end.
The broad edge should have five rounded scallops.
You can add subtle decorative surface slip stitches following the direction of the wing to suggest the lines of a dragon’s wing membrane.
Repeat for the second wing.
When attaching them, mirror their orientations so both scalloped edges face outward.
Step 9: Crochet the Small Horns
Make two horns using peach-apricot yarn.
Round 1: 4 sc in MR. (4)
Round 2: Sc around. (4)
Round 3: 1 sc, inc twice. (6)
Round 4: Sc around. (6)
Round 5: 2 sc, inc twice. (8)
Round 6: Sc around. (8)
Round 7: 3 sc, inc twice. (10)
Rounds 8–9: Sc around. (10)
Fasten off with a sewing tail.
Stuff very lightly to keep the horns upright.
Step 10: Crochet the Green Ears
Make two small pointed-looking ears.
Round 1: 4 sc in MR. (4)
Round 2: Inc around. (8)
Round 3: 1 sc, inc four times. (12)
Round 4: 2 sc, inc four times. (16)
Rounds 5–6: Sc around. (16)
Do not stuff the ears.
Flatten each piece and pinch the ends slightly to create a gentle point.
Fasten off with a long tail.
Step 11: Make the Orange Back Spikes
Create nine small triangular spikes using burnt-orange yarn.
For each spike:
Round 1: 4 sc in MR. (4)
Round 2: Sc around. (4)
Round 3: 1 sc, inc twice. (6)
Round 4: Sc around. (6)
Round 5: 2 sc, inc twice. (8)
Round 6: Sc around. (8)
Fasten off with a sewing tail.
Leave the spikes unstuffed or add only a tiny amount of fiberfill.
Flatten their bases slightly so they can be sewn securely along the dragon’s back.
For a balanced arrangement, plan to place three spikes along the top of the head, three down the upper back, and three along the tail.
Assembly and Finishing
Once all the crocheted pieces are ready, arrange them before sewing.
Attach the head
Align the 12-stitch opening of the head with the 12-stitch opening at the top of the body.
Use the long sewing tail to whipstitch the two openings together, matching each stitch.
Keep the seam secure and centered.
Attach the facial features
Use black embroidery yarn to create two gently curved closed eyes above the muzzle.
Embroider two tiny nostrils and a small curved smile on the snout.
Add short peach-colored blush marks beneath the eyes if desired.
Attach the ears and horns
Position the ears on opposite sides of the head.
Place the horns near the upper outer corners of the head, keeping them symmetrical.
Sew the open bases firmly to the head.
Attach the arms and feet
Sew the arms to the upper sides of the body.
Position the feet toward the lower front, angled slightly outward to create the seated pose.
Attach the belly
Center the apricot belly patch on the front of the body.
Pin it into position and sew carefully around its edge.
Keep the patch smooth without pulling the surrounding green stitches inward.
Attach the wings and tail
Position the lavender wings on the upper back, one on each side.
Sew their narrow ends securely to the body, allowing the scalloped outer edges to extend outward.
Attach the wider end of the tail to the lower back, curving the narrow tip gently toward one side.
Finally, sew the orange spikes from the top of the head down the back and tail.
Weave in all remaining yarn tails.
Tips for the Best Results
Keep your stitch counts accurate
A stitch marker is especially useful when working in continuous rounds. Count the stitches after each increase or decrease round.
Use consistent stuffing
Fill the head and body evenly, but avoid overstretching the fabric.
The tail, horns, and arms should remain flexible.
Pin before sewing
Use pins to position the horns, ears, wings, and feet before permanently attaching them.
Match the wing positions
Check the dragon from the front and back to ensure both wings are balanced.
Use secure embroidery
Make small, even stitches for the eyes, mouth, and nostrils.
Avoid loose yarn loops that may catch on surrounding objects.
Common Mistakes and Troubleshooting
Stuffing shows through the stitches
The fabric may be too loose.
Use a smaller crochet hook or adjust your tension to create denser stitches.
The head tilts forward
The neck connection may be too loose or the head may be overstuffed.
Reinforce the seam around the head and body and check the stuffing distribution.
The wings droop
Make sure the narrow attachment ends are sewn securely to the upper back.
For a more structured decorative display, use firmer yarn or a slightly smaller hook.
The feet look uneven
Check that both feet have the same number of rounds and equal amounts of stuffing.
The dragon cannot sit upright
Adjust the placement of the feet and tail so they help support the body.
A slightly flattened body base can also improve stability.
Creative Variations and Customization Ideas
Once you’ve completed the original dragon, try experimenting with new color combinations and small design changes.
Forest dragon: Use deep green yarn with golden horns and moss-colored wings.
Moonlight dragon: Choose midnight blue for the body, silver-gray for the belly, and pale lavender for the wings.
Sunset dragon: Combine terracotta, coral, and warm yellow.
Tiny dragon: Use lightweight yarn and a smaller hook while retaining the stitch counts.
Large plush dragon: Choose a thicker yarn and an appropriate larger hook, remembering that stuffing requirements and finished dimensions will change.
You can also embroider sleepy eyes, open eyes, or a small curious expression to give each dragon its own personality.
How to Display or Gift Your Crochet Dragon
A colorful crochet dragon works beautifully as a handmade decorative accent.
Place it on a craft-room shelf, inside a fantasy-themed display, or alongside a collection of other amigurumi creatures.
The dragon can also be included in a handmade birthday gift or a themed craft collection.
If you’re gifting the project, consider adding a small handmade name tag or matching crochet accessory.
For children, carefully consider age suitability and the security of all sewn components. Decorative amigurumi should not automatically be treated as safety-certified toys.
Care and Washing Instructions
Follow the care instructions for the yarn used in your dragon.
For many cotton-acrylic blends, gentle spot cleaning is a practical option.
Use a soft cloth dampened with mild soapy water to clean the surface.
Avoid soaking the dragon unnecessarily, especially if it contains dense stuffing.
If washing is appropriate for your yarn and construction, press out excess water gently and allow the figure to dry completely in a well-ventilated area.
Do not wring or twist the wings, tail, or horns.
Reshape the components while damp and allow them to dry naturally.
Frequently Asked Questions
Is this DIY crochet dragon suitable for beginners?
It is most suitable for confident beginners who already know how to make a magic ring, single crochet, increase, decrease, and sew amigurumi pieces together.
How much yarn do I need?
Plan for approximately 120–160 yards of main green yarn, plus smaller amounts of the three accent colors.
Can I use plush yarn?
Yes, but the dragon will become larger and some details may be less defined. Adjust your hook size and stuffing accordingly.
Can I make the wings bigger?
Yes. Add more increase rows before creating the scalloped edge, then adapt the edging to the new stitch count.
Do I need plastic safety eyes?
No. This pattern uses embroidered eyes, which create the friendly closed-eye expression.
How do I make the dragon stand upright?
Use balanced stuffing, a stable body base, and carefully positioned feet and tail.
Can I crochet this dragon in one color?
Yes. The entire dragon can be made in a single color, although contrasting belly and wing colors help emphasize the details.
How long does the pattern take?
Allow approximately 6–9 hours, depending on experience, yarn, and the time needed to sew all the pieces together.
Conclusion
This DIY dragon crochet project is a creative way to bring a playful fantasy character to life using yarn and simple crochet techniques.
From the rounded green body and peach belly to the lavender wings, tiny horns, and cheerful embroidered face, every detail adds personality to the finished amigurumi.
The individual components also offer opportunities to practice shaping, increases, decreases, textured edging, and neat assembly.
With a little patience and your favorite yarn colors, you can create a charming dragon that deserves a special place in your handmade collection.
Related Crochet Projects to Try Next
If you enjoy fantasy-inspired amigurumi, consider adding these projects to your crochet plans:
- Crochet Baby Unicorn: A colorful mythical creature with a small horn and soft mane.
- Crochet Mini Dinosaur: A fun beginner-friendly animal with a long tail and back spikes.
- Crochet Fantasy Mushroom House: A whimsical decorative project for a miniature fantasy display.
- Crochet Baby Phoenix: A colorful bird amigurumi featuring bright wings and decorative feathers.
These related ideas provide more opportunities to practice amigurumi shaping and create your own collection of imaginative crochet characters.