Free Crochet Daffodil Pattern – Easy Spring Flower with Stem
There is something lovely about bringing a little spring sunshine indoors, especially when it comes from a flower you’ve made yourself. This free crochet...
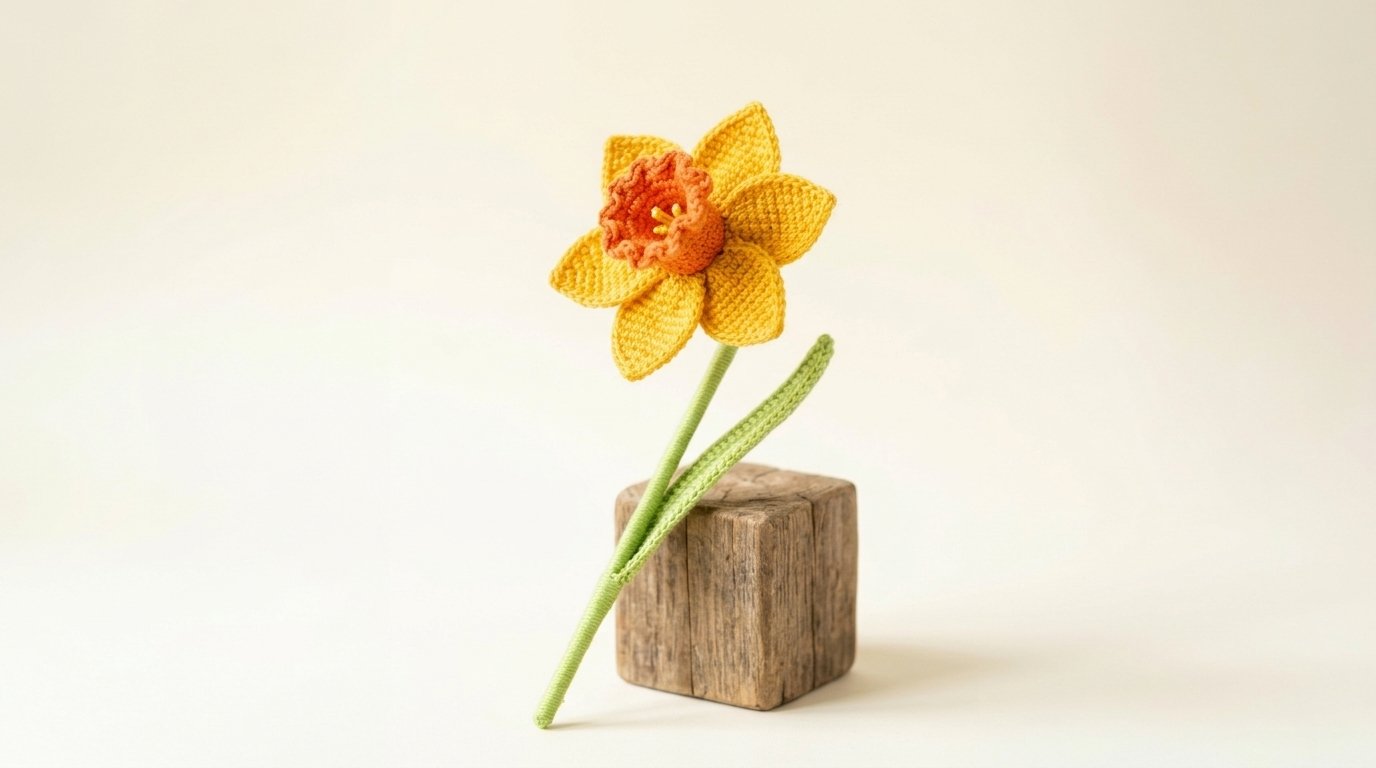
There is something lovely about bringing a little spring sunshine indoors, especially when it comes from a flower you’ve made yourself. This free crochet daffodil pattern shows you how to create a cheerful yellow bloom with a bright orange ruffled center, a slender green leaf, and a wrapped stem.
The finished flower makes a sweet decoration for a shelf, a handmade spring bouquet, or a thoughtful little gift. If you’re fairly new to crochet, you’re welcome here! We’ll take each part slowly, from shaping the six petals to putting the flower together.
Allow about two to three hours for your first daffodil, depending on your experience.
Crochet Daffodil Pattern: Quick Facts
- Skill level: Confident beginner
- Estimated time: 2–3 hours
- Finished flower: Approximately 4–5 inches across
- Stem length: Approximately 10–12 inches
- Main stitches: Chain, slip stitch, single crochet, half double crochet
- Construction: Six petals, one backing circle, one trumpet center, three stamens, one leaf, and one stem
- Crochet terminology: US terms throughout
The finished dimensions are estimates. Your yarn choice, hook size, and tension will affect the result.
Materials and Tools You’ll Need
You won’t need a large amount of yarn for this project. It’s a useful way to turn leftover yarn into something beautiful.
Yarn
Choose DK weight (#3) cotton or a cotton blend for a flower that holds its shape.
- Golden yellow: Approximately 12–18 g for the six petals and backing circle.
- Warm tangerine orange: Approximately 6–10 g for the trumpet-shaped center.
- Light spring green: Approximately 8–12 g for the leaf and wrapped stem.
- Small amount of yellow: For the stamens inside the flower.
These yarn quantities are estimates rather than tested requirements.
Yarn substitution: You can use DK acrylic yarn instead of cotton. Acrylic may create softer petals, so use a slightly smaller hook if needed.
Other supplies
- 3.0 mm crochet hook
- Yarn needle for sewing pieces together
- Stitch marker
- Sharp scissors
- One 10–12-inch piece of 18–20-gauge floral stem wire
- Small pliers for shaping the wire
- Optional green floral tape
- Optional small amount of craft glue to secure the yarn wrapping
Hook substitution: Try a 3.25 mm hook if your stitches feel too tight, or a 2.75 mm hook if the petals are too floppy.
Stem substitution: A sturdy chenille stem can replace floral wire, although the finished stem may bend more easily.
You won’t need stuffing for this version.
Safety note: Cover and secure both ends of the wire. This project is intended as decoration, not as a toy for small children.
Crochet Abbreviations and Basic Stitches
All instructions use US crochet terms.
- ch – Chain: The basic foundation stitch used to begin a crochet piece.
- sc – Single crochet: Insert your hook, pull up a loop, yarn over, and pull through both loops.
- hdc – Half double crochet: Yarn over before inserting the hook, pull up a loop, then pull through all three loops.
- sl st – Slip stitch: Pull the yarn through the stitch and the loop already on your hook.
- inc – Increase: Work two single crochet stitches into the same stitch.
- sc2tog – Single crochet two together: Work across two stitches, pulling up one loop from each, then yarn over and pull through all three loops to decrease by one stitch.
- MR – Magic ring: An adjustable starting loop that can be pulled closed.
- BLO – Back loop only: Work into only the back loop of a stitch.
- st/sts – Stitch/stitches
- rnd – Round
A turning chain does not count as a stitch in this pattern.
Beginner tip: Keep a stitch marker nearby when working in continuous rounds. It will help you find the beginning without guessing.
Step-by-Step Free Crochet Daffodil Pattern
We will make the flower in separate pieces and assemble them at the end.
Start with the petals, then make the center and the leaf.
Step 1: Crochet the First Yellow Petal
Using golden yellow yarn, chain 3.
Work the following rows:
Row 1: Sc in the second chain from your hook and in the next chain. (2 sts)
Row 2: Ch 1, turn. Work 2 sc in each stitch. (4 sts)
Row 3: Ch 1, turn. Inc in the first stitch, sc in the next 2 stitches, inc in the final stitch. (6 sts)
Row 4: Ch 1, turn. Inc in the first stitch, sc in the next 4 stitches, inc in the final stitch. (8 sts)
Rows 5–7: Ch 1, turn. Sc in every stitch. (8 sts per row)
Your petal should now have a narrow base and a wider middle.
Step 2: Shape the Pointed Petal Tip
We will gradually decrease the stitches to create the pointed end of the daffodil petal.
Row 8: Ch 1, turn. Sc2tog, sc in the next 4 stitches, sc2tog. (6 sts)
Row 9: Ch 1, turn. Sc2tog, sc in the next 2 stitches, sc2tog. (4 sts)
Row 10: Ch 1, turn. Sc2tog twice. (2 sts)
Row 11: Ch 1, turn. Sc2tog. (1 st)
Fasten off and weave in the tail at the pointed tip. Leave the starting tail available for assembly.
Gently flatten your petal with your fingers.
Beginner tip: If the point looks rounded, gently pinch the final stitch rather than pulling it too tightly.
Common mistake: Accidentally adding a stitch at the beginning of a row can make one side wider. Count the stitches after every row.
Step 3: Make Five More Petals
Repeat Steps 1 and 2 until you have six golden yellow petals.
Lay them on your table in a circle, with their narrow bases pointing inward and their tips pointing outward.
Try arranging the petals with slight overlaps. This will give the flower the natural, layered appearance shown in the Pinterest image.
Don’t sew them together yet.
Step 4: Make the Yellow Flower Backing
Using yellow yarn, start with a magic ring.
Work in continuous rounds.
Round 1: Work 6 sc into the magic ring. Pull the ring closed. (6 sts)
Round 2: Inc in every stitch. (12 sts)
Round 3: Repeat (sc in the next stitch, inc) six times. (18 sts)
Round 4: Repeat (sc in the next 2 stitches, inc) six times. (24 sts)
Fasten off, leaving a long tail.
This small circle will support the six petals and give you a secure place to attach the flower center.
Step 5: Attach the Six Yellow Petals
Place the backing circle flat on your work surface.
Arrange the six petals evenly around its edge. Their narrow starting ends should sit on the backing circle.
Use the yarn tails and a yarn needle to secure each petal base to the circle. Space them around the 24-stitch outer round, approximately four stitches apart.
Allow neighboring petals to overlap slightly.
Check the flower from the front before securing your final stitches.
Beginner tip: Pin the petals temporarily or hold them in place before sewing. It is much easier to adjust their positions at this stage.
Crochet the Orange Daffodil Trumpet
The orange trumpet is the most recognizable part of this daffodil.
We will crochet a small cup and then add an expanded outer edge to create the pretty ruffles.
Step 6: Make the Orange Cup
Using tangerine orange yarn, begin with a magic ring.
Work in continuous rounds.
Round 1: 6 sc in the magic ring. (6 sts)
Round 2: Inc in every stitch. (12 sts)
Round 3: Repeat (sc, inc) six times. (18 sts)
Round 4: Sc in the back loop only of every stitch. (18 sts)
Round 5: Sc in every stitch. (18 sts)
Round 6: Repeat (sc in the next 2 stitches, inc) six times. (24 sts)
Round 7: Sc in every stitch. (24 sts)
Round 8: Repeat (sc in the next 3 stitches, inc) six times. (30 sts)
Round 9: Sc in every stitch. (30 sts)
The back-loop round creates a turning point that helps the trumpet stand away from its base.
Your piece should now resemble a small orange cup.
Common mistake: Increasing too many stitches in the straight sections can cause the cup to flatten. Count carefully and work only the stated increases.
Step 7: Create the Ruffled Orange Edge
Continue with the same orange yarn.
Round 10: Work 2 sc in every stitch around. (60 sts)
Round 11: Work 1 sc in every stitch around. (60 sts)
Fasten off, leaving a tail for sewing.
The sudden increase from 30 to 60 stitches creates extra fabric around the rim. This encourages the edge to ripple naturally.
Gently spread the ruffles with your fingertips.
If you want a softer shape, slightly roll the edge outward.
You should now have a rounded orange trumpet with a frilled opening.
Step 8: Add the Yellow Stamens
The tiny yellow details inside the trumpet help the flower look more lifelike.
Using a short piece of yellow yarn:
- Ch 5.
- Sl st into the second chain from the hook.
- Sl st into each of the remaining 3 chains. (4 sl sts)
- Fasten off, leaving tails for attaching.
Make three stamens in total.
Thread the tails through the center of the orange cup and secure them on the underside.
Position them upright, slightly separated from one another.
You can add a small yellow yarn knot to the tip of each stamen if you prefer a more pronounced center.
Beginner tip: Keep these tiny pieces short. If they are too long, they may droop over the edge of the trumpet.
Step 9: Attach the Orange Trumpet
Place the finished orange trumpet in the middle of your yellow flower.
Make sure all six petals remain visible around it.
Using the orange sewing tail, stitch the bottom of the trumpet securely onto the yellow backing circle.
Work carefully around the base so your stitches remain hidden.
Give the orange cup a gentle squeeze to shape it outward.
At this point, your crochet daffodil should look like a complete flower head.
Crochet the Long Green Leaf
The reference flower has one narrow, gently curved green leaf growing alongside the stem.
We’ll make a simple elongated leaf with a pointed tip.
Step 10: Crochet the Leaf
Using light green yarn, ch 29.
First side:
- Sl st in the second chain from the hook. (1 st)
- Sc in the next 5 chains. (5 sts)
- Hdc in the next 16 chains. (16 sts)
- Sc in the next 5 chains. (5 sts)
- Sl st in the final chain. (1 st)
You have worked 28 stitches along the first side.
Second side:
Rotate the leaf to work into the unused loops on the opposite side of the foundation chain.
- Sl st in the chain at the base. (1 st)
- Sc in the next 5 chain positions. (5 sts)
- Hdc in the next 16 chain positions. (16 sts)
- Sc in the next 5 chain positions. (5 sts)
- Sl st in the final chain position at the tip. (1 st)
You should have 28 stitches along the second side, or 56 in total.
Fasten off and weave in the tail at the tip.
The finished leaf should be slim, with a slightly wider middle.
Gently stretch and shape it between your fingers.
Beginner tip: If your leaf curls sharply, try loosening your tension or lightly dampening it and allowing it to dry flat.
Make the Green Flower Backing and Stem
Step 11: Crochet a Small Green Backing
Use green yarn and make a magic ring.
Round 1: 6 sc into the ring. (6 sts)
Round 2: Inc in every stitch. (12 sts)
Round 3: Repeat (sc, inc) six times. (18 sts)
Fasten off, leaving a long sewing tail.
This piece will cover the attachment point on the back of the flower.
Step 12: Attach the Stem Support
Take your floral wire and bend approximately half an inch at one end into a small, closed loop using pliers.
Position the loop against the back of the yellow flower circle.
Secure the wire loop firmly with green yarn and several sewing stitches.
Place your green backing circle over the wire loop and sew it around the outer edge, keeping the wire extending downward.
Check that the flower head is securely attached and that no sharp wire tip is exposed.
Step 13: Wrap the Green Stem
Attach a strand of light green yarn just beneath the flower head.
Wrap it evenly around the wire, working downward.
Keep each wrap close to the previous one so the wire remains completely covered.
You can secure the first few wraps with a small amount of floral tape or craft glue if necessary.
Continue to the bottom of the wire.
Fold or cover the lower wire tip safely, then secure the yarn wrapping firmly.
Try to maintain a smooth, slender stem rather than making it too thick.
Step 14: Attach the Leaf
Position the green leaf against the stem, beginning approximately one-third of the way down from the flower head.
The pointed end should angle upward beside the flower, as shown in the pin.
Sew the base of the leaf to the wrapped stem using matching green yarn.
You can add one or two discreet securing stitches farther up the leaf if you want it to stand closer to the stem.
Gently bend the wire to give the finished daffodil a natural-looking tilt.
Finishing and Styling Your Crochet Daffodil
Your flower is almost ready to display!
Take a moment to check the small finishing details.
Make sure the orange trumpet is centered and the petals are evenly arranged.
Use your fingers to curve the yellow petal tips slightly backward. This helps create the open shape of a real daffodil.
Weave in any visible yarn tails and check that all sewn pieces are secure.
For a rustic spring display, place your flower beside a natural wooden block, just like the inspiration image. The warm wood tones look beautiful beside the golden yellow petals.
You could also arrange several stems in a small ceramic vase or add them to a handmade spring bouquet.
If you enjoy making flowers, try another design next: [Easy Crochet Tulip Pattern → related pattern].
Make Your Crochet Daffodil Your Own
One of the best things about handmade flowers is how easily you can personalize them.
1. Try Different Flower Colors
Use ivory yarn for the petals and a soft apricot orange center for a delicate spring look.
You could also make an all-yellow daffodil for a classic sunny flower.
2. Make a Mini Crochet Daffodil
Try fingering-weight yarn with a smaller hook.
Keep the same stitch counts, but expect a smaller finished flower.
3. Create a Spring Flower Bouquet
Make three to five daffodils with slightly different stem lengths.
Mix them with other crocheted flowers for a fuller arrangement.
A [Crochet Daisy Flower Pattern → related pattern] would be a lovely addition.
How to Care for Crochet Flowers
Crochet flowers don’t need watering, but a little care will keep them looking their best.
- Dust gently with a soft brush.
- Keep away from prolonged direct sunlight to reduce fading.
- Avoid crushing the trumpet or folding the petals when storing.
- Spot-clean with a lightly damp cloth if necessary.
- Allow the flower to air-dry completely before displaying it again.
Because this design contains wire, avoid machine washing.
Store your finished daffodil somewhere dry, with enough room to protect its shape.
Frequently Asked Questions
Is this crochet daffodil pattern suitable for beginners?
Yes, it is suitable for confident beginners who already know basic crochet stitches. The petals use simple increases and decreases, while the trumpet introduces working in continuous rounds and shaping a ruffled edge.
What is the best yarn for a crochet daffodil flower?
DK cotton yarn is a good choice because it gives the petals some structure. Acrylic can also work, but you may need a slightly smaller hook to help your flower hold its shape.
Can I make a crochet daffodil without wire?
Yes. You can make just the flower head and attach it to a wreath, spring garland, or decorative project. For a standing flower, a secure internal stem support gives the best result.
How do I stop my crochet flower petals from curling?
Check your stitch counts and try working with a relaxed, even tension. Light blocking can also help the petals lie flatter, while gentle shaping can create a natural curve.
A Little Spring Sunshine to Keep
This free crochet daffodil pattern is a lovely way to welcome spring into your home with something handmade. From its bright yellow petals to its cheerful orange center, every part adds a little personality to the finished flower.
Save this project to your Pinterest crochet board so you can find it again, and share your finished daffodil with someone who loves spring flowers.
For your next project, explore [Easy Crochet Flower Patterns → related pattern collection].
Publisher’s note (remove before publishing): Test this pattern before publishing and check the stitch counts. Confirm the finished measurements, yarn amounts, stem attachment, and leaf shaping with a physical sample.