Easy Granny Square Coasters to Crochet – Free Pattern
A colorful little crochet project can make your morning coffee feel even more special. These granny square coasters bring together bright turquoise, rich royal...
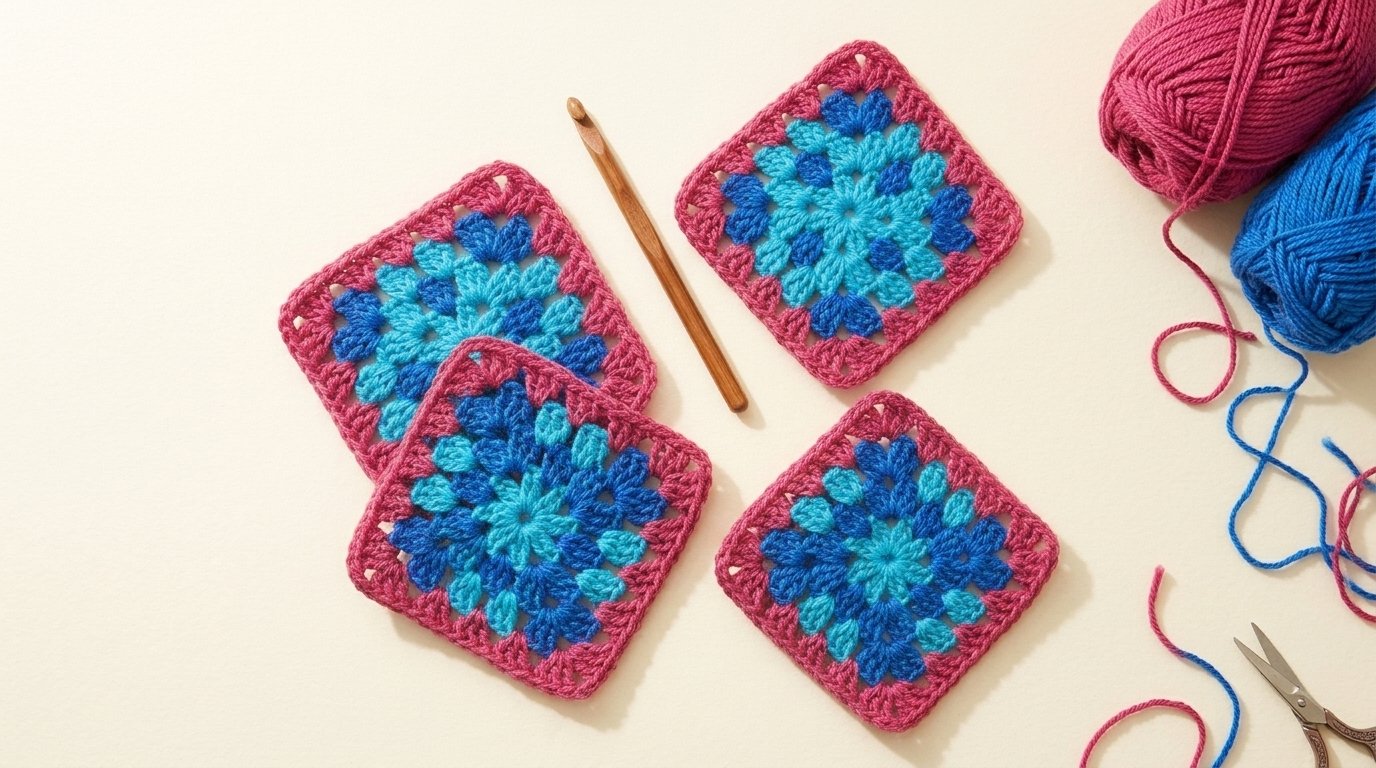
A colorful little crochet project can make your morning coffee feel even more special. These granny square coasters bring together bright turquoise, rich royal blue, and raspberry pink in a cheerful floral design that’s perfect for your coffee table.
If you’ve been looking for an easy crochet coaster pattern, this is a lovely place to start. Each square begins with a textured flower center, grows into colorful clusters, and finishes with a pretty pink border.
You can make one in approximately 30–45 minutes once you’re familiar with the stitches. Create a matching set of four for your home, or bundle them with a favorite mug for a thoughtful handmade gift.
Granny Square Coasters: Quick Pattern Facts
| Project Detail | Information |
|---|---|
| Skill Level | Confident beginner |
| Estimated Time | 30–45 minutes per coaster |
| Finished Size | Approximately 4–4.5 inches square |
| Yarn Weight | Medium (#4) cotton |
| Hook Size | 4.0 mm (G/6) |
| Main Stitches | Chain, slip stitch, double crochet, puff stitch |
| Construction | Four rounds, worked from center outward |
| Terminology | US crochet terms |
The finished size and making time are estimates. This original written pattern still needs sample testing.
Materials and Tools You’ll Need
One of the best things about this project is that you can use small amounts of yarn in your favorite colors.
Yarn Colors
For the same bright combination shown in the Pinterest image, choose:
- Light turquoise: For the textured flower center and the third round.
- Royal blue: For the rich blue flower clusters surrounding the center.
- Raspberry pink: For the square-shaped outer border.
I recommend 100% cotton yarn for functional coasters because it absorbs moisture and generally holds its shape well.
For a set of four, allow approximately 60–100 g of yarn in total, divided among the three colors. This is an estimate rather than a tested quantity.
Yarn substitution: You can use DK-weight cotton with a smaller hook for more delicate squares. The finished coasters will likely be smaller.
Additional Supplies
- 4.0 mm crochet hook
- Yarn needle for weaving in ends
- Small scissors
- Stitch markers, optional
- Measuring tape
- Blocking mat and rust-resistant pins, optional
Hook substitution: A 3.5 mm hook may create firmer stitches, while a 4.5 mm hook may produce a softer, more open square. Check that the finished fabric remains practical for supporting a cup.
Crochet Abbreviations and Stitches
All instructions use US crochet terminology.
- ch – Chain: A foundation stitch made by pulling yarn through the loop on your hook.
- sl st – Slip stitch: Insert the hook, yarn over, and pull through the stitch and the loop on your hook.
- sc – Single crochet: Insert your hook, pull up a loop, yarn over, and pull through both loops.
- dc – Double crochet: Yarn over, insert your hook, pull up a loop, then complete the stitch with two pull-through steps.
- MR – Magic ring: An adjustable loop that can be tightened to close the center.
- sp – Space: A gap created by one or more chain stitches.
- st/sts – Stitch/stitches
- rnd – Round
How to Make a Puff Stitch
The puff stitch creates the raised, petal-like texture in the center.
- Yarn over and insert your hook into the indicated space.
- Yarn over and pull up a long loop.
- Repeat the yarn-over and pull-up action two more times in the same space.
- You should now have seven loops on your hook.
- Yarn over and pull through all seven loops.
- Ch 1 to secure the puff.
The final securing chain belongs to the puff stitch. Any additional chain specified in the pattern creates a separate chain space.
Beginner tip: Pull each loop to approximately the same height. This helps your puff stitches look full and even.
Step-by-Step Granny Square Coaster Pattern
We’ll work the coasters in four colorful rounds.
The first round forms the turquoise flower center. The next two rounds build the surrounding floral motif, while the final raspberry-pink round creates the square border.
Step 1: Make the Turquoise Flower Center
Using light turquoise yarn, create a magic ring.
Round 1:
- Work one puff stitch into the magic ring.
- Ch 1 to create a space between petals.
- Repeat the puff stitch and ch-1 sequence seven more times.
- You should now have eight puff stitches.
- Pull the magic ring closed.
- Join with a slip stitch into the top of the first puff stitch, keeping the eight chain spaces accessible.
Round 1 stitch count: 8 puff stitches and 8 ch-1 spaces.
Fasten off the turquoise yarn.
Your center should look like a small, textured flower with eight plump petals.
Beginner tip: If the center looks too open, gently tighten the magic ring after finishing the round.
Common mistake: Forgetting the chain between puffs can make the next round difficult. Check that you have eight usable spaces before changing colors.
Step 2: Add the Royal-Blue Flower Round
Join royal-blue yarn into any chain-1 space from Round 1.
Round 2:
- Ch 3. This counts as your first dc.
- Work 2 more dc into the same space.
- Ch 1.
- Work 3 dc into the next chain-1 space.
- Ch 1.
- Continue working a group of 3 dc followed by ch 1 in each remaining space.
- Join with a slip stitch into the top of the beginning ch-3.
Round 2 stitch count: 24 dc arranged in 8 groups, with 8 ch-1 spaces.
Fasten off the blue yarn.
You should now have a round floral motif with the turquoise puff stitches visible in the middle and royal-blue clusters surrounding them.
Beginner tip: Work into the chain spaces rather than trying to insert your hook between individual puff-stitch loops.
Step 3: Turn the Flower into a Square
This is where the round flower begins transforming into a granny square.
Join turquoise yarn into any chain-1 space from Round 2.
Round 3:
- Ch 3 and work 2 dc into the same space. This makes your first 3-dc side cluster.
- Ch 1.
- In the next chain-1 space, work (3 dc, ch 2, 3 dc). This makes the first corner.
- Ch 1.
- Work 3 dc into the next chain-1 space.
- Ch 1.
- Work (3 dc, ch 2, 3 dc) into the next chain-1 space.
- Continue alternating one 3-dc side cluster and one corner cluster in the remaining four spaces, placing ch 1 between each neighboring cluster or corner group.
- After the fourth corner, ch 1 and join to the beginning ch-3.
Round 3 stitch count: 36 dc, 8 ch-1 spaces, and 4 ch-2 corner spaces.
Fasten off the turquoise yarn.
Your crochet piece should now have four recognizable corners.
The turquoise clusters add another layer of color around the blue flower.
Common mistake: If you accidentally create a fifth corner, the square will become distorted. Count your four corner spaces before moving to the border.
Step 4: Crochet the Raspberry-Pink Border
The final round gives the coaster its bright pink frame and clearly defined square shape.
Join raspberry-pink yarn into any corner chain-2 space.
Round 4:
- Ch 3 and work 2 dc into the same corner space.
- Ch 2, then work 3 more dc into that corner space.
- Ch 1.
- Work 3 dc into the next chain-1 space.
- Ch 1.
- Work 3 dc into the next chain-1 space.
- Ch 1.
- In the next corner, work (3 dc, ch 2, 3 dc).
- Repeat the same sequence around all four sides, working two 3-dc groups between neighboring corners, with ch 1 between groups.
- After the final side group, ch 1 and join to the top of the beginning ch-3.
Round 4 stitch count: 48 dc, 12 ch-1 spaces, and 4 ch-2 corner spaces.
Fasten off and leave a tail for weaving in.
You should now have a cheerful four-round granny square with a turquoise-and-blue floral center and a raspberry-pink outer border.
Beginner tip: Give each corner a gentle outward pull to help the square settle into shape.
Make a Matching Set of Four Coasters
Repeat the same four rounds until you have four completed granny square coasters.
For a coordinated set, keep the colors in the same order:
- Light turquoise flower center.
- Royal-blue clusters.
- Turquoise square-forming round.
- Raspberry-pink border.
The Pinterest design features four matching squares with slightly different orientations, creating a colorful, handmade arrangement.
You can also experiment with alternating the blue and turquoise rounds, while keeping the pink border consistent.
How to Weave In Your Yarn Ends
Turn the coaster over so the back is facing you.
Thread a yarn tail through a yarn needle and weave it through several stitches of the same color.
Change direction once or twice to help secure the tail.
Trim the excess yarn close to the fabric without cutting into your stitches.
Repeat until all color-change tails are neatly hidden.
Take your time here. Well-secured ends help the coasters last longer through everyday use.
How to Block Granny Square Coasters
Blocking is especially helpful if your squares look slightly uneven after crocheting.
Simple Wet Blocking Method
- Check your yarn label to confirm that gentle wet blocking is suitable.
- Dampen each coaster lightly with cool water.
- Press out excess moisture without twisting the fabric.
- Place the coaster flat on a blocking mat.
- Gently shape it into a square.
- Pin the four corners if necessary.
- Allow it to dry completely before removing the pins.
Measure the sides while blocking so all four coasters are approximately the same size.
Beginner tip: Avoid stretching too aggressively. The goal is to straighten the edges, not enlarge the coaster.
Styling Your Handmade Granny Square Coasters
These colorful crochet coasters are perfect for brightening a coffee table, kitchen counter, or craft-room desk.
The combination of turquoise, blue, and raspberry pink works especially well with simple white mugs, pale wooden furniture, and neutral table settings.
Stack the finished squares beside your coffee machine or arrange them individually around a table.
They also make lovely handmade gifts.
Tie a set of four together with cotton twine and add a small card with washing instructions.
For another practical crochet project, try [Easy Crochet Mug Rug Pattern → related pattern].
Three Ways to Customize Your Coasters
1. Try a Soft Pastel Palette
Replace the bright colors with pale aqua, lavender blue, and dusty rose.
This creates a softer look for a bedroom, tea corner, or spring table setting.
2. Make a Bold Retro Set
Use mustard yellow, burnt orange, teal, and chocolate brown for a cheerful retro-inspired color palette.
Keep the same stitch counts and construction.
3. Turn the Squares into a Larger Project
Make several additional squares and join them to create a decorative table runner or placemat.
You could also use them as the starting point for a small patchwork pouch.
For more ideas, explore [Beginner Granny Square Crochet Patterns → related collection].
How to Care for Crochet Coasters
Cotton coasters are practical, but they still benefit from gentle care.
- Check the yarn label before washing.
- Hand wash or use a gentle machine cycle when the yarn permits.
- Lay flat to dry to help retain the square shape.
- Avoid harsh bleach that may fade bright yarn colors.
- Reshape the corners while the coaster is damp.
- Keep them away from open flames and direct contact with extremely hot cookware.
These are drink coasters, not heat-resistant trivets. Do not use them beneath hot pans or dishes straight from the oven.
Frequently Asked Questions
Are granny square coasters good for beginners?
Yes! Granny square coasters are a great way to practice crochet stitches, color changes, and working in rounds. This particular design is best for confident beginners because it includes puff stitches and corner shaping.
What yarn is best for crochet coasters?
100% cotton yarn is a popular choice for functional crochet coasters because it absorbs moisture and is available in many colors. Medium-weight cotton also creates a sturdy fabric with visible stitch texture.
How big should a crochet granny square coaster be?
Many crochet coasters measure around 4–5 inches across. A square in that range usually provides enough room for an ordinary mug, although you can adjust your yarn and hook to change the finished size.
How do I stop my granny square coasters from curling?
Start by checking that every round has the correct number of stitches and chain spaces. Uneven tension can also cause curling, and gentle blocking may help the finished square lie flatter.
Add a Little Color to Your Coffee Table
These granny square coasters are a cheerful way to practice crochet while making something useful for your home. The textured turquoise centers, bright blue clusters, and pretty pink borders create a lovely little set that you’ll enjoy using.
Save this easy coaster pattern to your Pinterest crochet board so you can return to it whenever you’re ready for another colorful project.
And don’t forget to share your finished squares with fellow crochet lovers!