Easy Crochet Sweater Scarf Pattern – Beautiful Scarf Cardigan with Sleeves
Looking for a cozy crochet project that combines the elegance of a scarf with the comfort of a cardigan? This easy crochet sweater scarf...
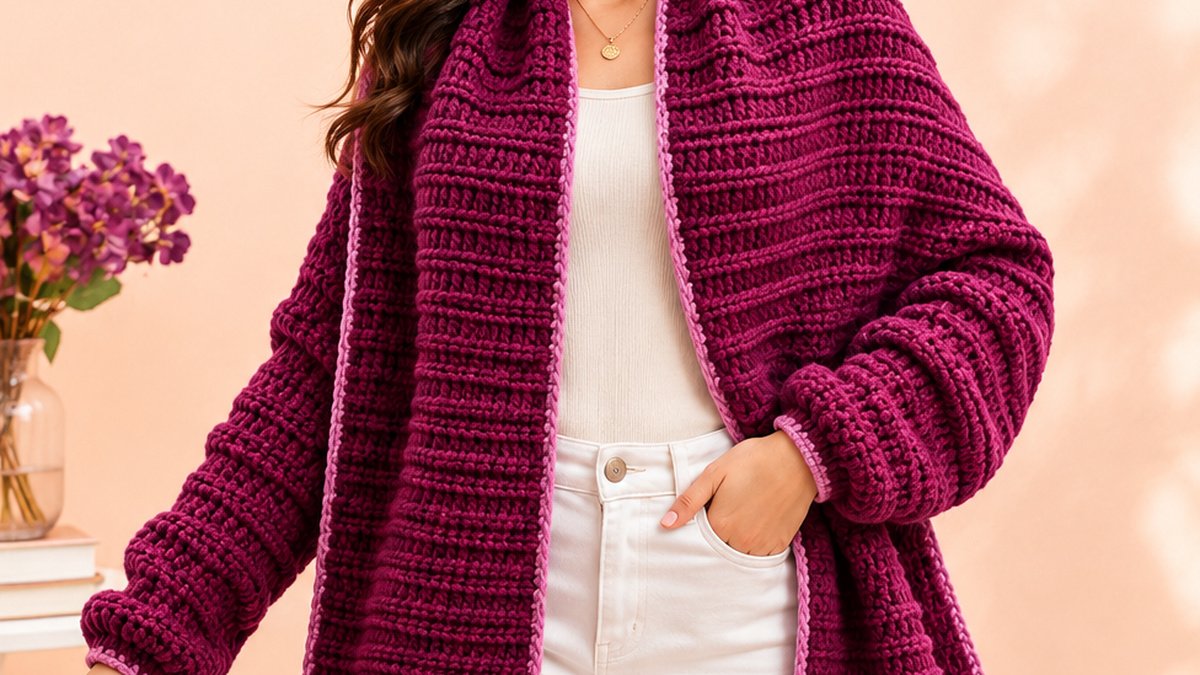
Looking for a cozy crochet project that combines the elegance of a scarf with the comfort of a cardigan? This easy crochet sweater scarf pattern is a creative way to make a versatile, wearable accessory using simple stitches and beautiful textured yarn.
Featuring a rich mulberry color, soft rose-pink edging, and comfortable sleeves, this scarf cardigan is designed to provide warmth without the structure of a traditional sweater. Its long, flowing fabric creates a relaxed wrap that can be styled in several ways.
The best part is its straightforward construction. Instead of making complicated garment panels, you’ll crochet one long rectangular piece and transform the ends into sleeves with a few simple seams.
This pattern is particularly suitable for confident beginners who know how to make a half double crochet stitch and want to explore their first wearable crochet garment.
Why You’ll Love This Crochet Sweater Scarf
There are plenty of reasons to add a sweater scarf to your next crochet project list.
Versatile styling: Wear it as a scarf with sleeves, a cozy shoulder wrap, or a relaxed cardigan-style accessory.
Simple construction: The basic pattern consists of one large rectangle, making it approachable for beginners.
Beautiful textured stitches: Half double crochet worked through the back loop creates soft horizontal ridges.
No complicated shaping: You won’t need to work increases or decreases to create the main garment.
Comfortable layering: The long scarf section drapes over your shoulders while the sleeves keep the fabric in position.
Easy personalization: Change the length, width, yarn colors, or edging to create your own version.
The combination of practical construction and attractive fabric makes this project useful for building confidence in crochet clothing.
Project Overview
This crochet sweater scarf is designed with a relaxed, flexible fit.
| Project Details | Information |
|---|---|
| Pattern name | Mulberry Ribbed Sweater Scarf |
| Skill level | Confident beginner |
| Crochet terminology | US terms |
| Yarn weight | Bulky #5 |
| Recommended hook | 8 mm (L/11) |
| Main stitches | Half double crochet, single crochet |
| Construction | One rectangle with sleeve seams |
| Estimated time | 18–28 hours |
| Reference width | 16 inches |
| Reference total length | 104 inches |
| Sleeve seam length | Approximately 17 inches each |
| Style | Open-front scarf cardigan |
These measurements are estimates based on the gauge below.
The reference version is intended as a relaxed adult wrap. Since shoulder width, arm length, and preferred drape vary, check the measurements before beginning.
Materials and Supplies Needed
Gather your materials before starting.
Yarn
Choose a soft bulky-weight #5 yarn suitable for clothing.
Main Color A: Deep Mulberry
Approximately 850–1,200 yards, depending on your tension and yarn characteristics.
This beautiful berry-purple shade creates the dominant textured fabric.
Accent Color B: Soft Rose Pink
Approximately 60–100 yards.
The lighter pink yarn is used to add a narrow finishing border around the exposed wrap edges and sleeve openings.
Additional supplies
- 8 mm crochet hook, or size needed to obtain gauge
- Large-eye yarn needle
- Scissors
- Flexible measuring tape
- Locking stitch markers
- Optional blocking mats
- Optional rustproof pins for blocking
You won’t need buttons, zippers, or complicated fasteners.
Choosing the Right Yarn and Hook
Yarn choice plays an important role in making a comfortable sweater scarf.
A soft acrylic blend is a practical option for beginners because it is commonly available and usually provides consistent stitch definition.
Wool-blend yarn is another attractive choice, particularly if you want a warmer wrap for colder weather.
For a softer drape, choose yarn that feels flexible when crocheted rather than stiff or overly dense.
The featured design uses a rich mulberry shade with a delicate pink border. This combination highlights the crochet texture while giving the garment a coordinated finish.
Selecting the hook
Start with an 8 mm crochet hook.
The finished stitches should feel soft enough to fold and drape comfortably.
If your fabric is very stiff, try a slightly larger hook. If the stitches are excessively loose, experiment with a smaller hook.
Always make a gauge swatch before committing to the complete project.
Crochet Stitches and Abbreviations
This pattern uses US crochet terminology.
ch — Chain: Yarn over and pull the yarn through the loop on your hook.
hdc — Half double crochet: Yarn over, insert the hook into the stitch, yarn over, pull up a loop, yarn over, and pull through all three loops.
BLO — Back loop only: Insert your hook through the back loop of the stitch instead of working beneath both top loops.
sc — Single crochet: Insert your hook into the stitch, yarn over, pull up a loop, yarn over, and pull through both loops.
sl st — Slip stitch: Insert your hook into the stitch, yarn over, and pull the yarn through both the stitch and the loop on your hook.
st — Stitch
sts — Stitches
Special technique: Ribbed half double crochet
The main fabric uses half double crochet worked through the back loop only.
This technique creates subtle horizontal ridges that add depth and flexibility to the fabric.
When beginning a new row, chain one and turn. The turning chain does not count as a stitch.
Always work into the first available stitch to preserve the stitch count.
Before You Start: Gauge and Measurements
Before crocheting your sweater scarf, make a sample using the recommended yarn and hook.
Gauge
The target gauge is approximately:
9 hdc stitches × 7 rows = 4 × 4 inches (10 × 10 cm)
Measure a larger swatch made in the back-loop-only stitch pattern so that the edges do not distort your measurements.
If your gauge differs, change your hook size or recalculate the foundation stitch and row counts.
Understanding the finished shape
The project begins as one rectangular piece approximately:
- 16 inches wide
- 104 inches long
The two ends are folded and seamed to form sleeves.
Approximately 17 inches at each end becomes a sleeve, leaving about 70 inches of unseamed central fabric to arrange around your shoulders and upper body.
This creates a scarf with sleeves rather than a fitted cardigan with separate body panels.
Customizing your measurements
For a longer scarf, add more rows to the central section.
For a wider wrap, increase the foundation chain count while maintaining your preferred stitch gauge.
For longer sleeves, increase the length of the seamed sections and add corresponding rows to the total rectangle.
Use your own measurements rather than assuming one length will suit everyone.
Step-by-Step Crochet Sweater Scarf Pattern
Step 1: Crochet the Foundation Chain
Using Color A (deep mulberry), make a foundation chain of 37 stitches.
This will form the width of your sweater scarf.
Row 1: Work one hdc in the second chain from the hook and one hdc in each remaining chain.
You should have 36 hdc stitches.
At the reference gauge, the fabric should be approximately 16 inches wide.
Step 2: Begin the Textured Ribbed Pattern
Row 2:
Chain 1 and turn.
Work one hdc in the back loop only of the first stitch.
Continue working one hdc BLO into every stitch across.
Total: 36 hdc.
Row 3:
Chain 1 and turn.
Work one hdc BLO into each stitch across.
Total: 36 hdc.
Repeat this simple row pattern throughout the project.
The raised ridges become more visible as the fabric grows.
Step 3: Continue Crocheting the Main Rectangle
Repeat the ribbed half double crochet row until you have completed 182 total rows, including the foundation row.
Rows 4–182: Chain 1, turn, and work one hdc BLO into each of the 36 stitches across.
Count regularly to ensure that you maintain exactly 36 stitches in every row.
At the reference gauge, 182 rows measure approximately 104 inches.
Your finished panel should be a long, soft rectangle with consistent horizontal ribbing.
If your actual row gauge produces a different measurement, adjust the row count to reach your intended length.
Step 4: Prepare the Sleeve Sections
Lay the completed rectangle flat on a large, clean surface.
Measure approximately 17 inches inward from both short ends.
At the reference gauge, this corresponds to about 30 rows on each end.
Place a stitch marker at each sleeve’s inner endpoint.
The center section between these markers remains unseamed.
You should have approximately:
- First sleeve section: Rows 1–30
- Open center section: Rows 31–152
- Second sleeve section: Rows 153–182
Fasten off the main yarn, leaving a long tail for sewing.
Step 5: Fold the First Sleeve
Starting at one short end of the rectangle, fold the fabric in half across its width.
Bring the two long edges together, with the right sides facing inward.
The folded fabric forms a tube with the short end as the cuff opening.
Align the edges carefully from the short end to the stitch marker at Row 30.
Use additional stitch markers to hold the layers in place.
Step 6: Sew the First Sleeve Seam
Thread the yarn needle with mulberry yarn.
Starting at the cuff end, sew the two aligned long edges together using a mattress stitch or whipstitch.
Continue for approximately 30 row-ends, stopping at the marker.
Leave the central section of the rectangle open.
Secure the seam and weave in the yarn tail.
Turn the finished sleeve right side out.
The sleeve tube should measure approximately 17 inches long before additional finishing.
Step 7: Form the Second Sleeve
Repeat the same folding process at the opposite end of the rectangle.
Fold Rows 153–182 across the width, align their long edges, and sew approximately 30 row-ends together.
Check that both sleeves have the same seam length.
Turn the sleeve right side out.
At this stage, your project should resemble a very long scarf with a tubular sleeve at each end.
Step 8: Crochet the Pink Sleeve Edging
Attach Color B (soft rose pink) to the opening of the first sleeve.
Work a round of single crochet around the cuff opening.
For a softly gathered finish, distribute approximately 27 sc evenly around the 36 foundation-edge stitch positions, working about three sc for every four positions.
Join the round with a slip stitch.
Try the cuff on before fastening off. It should sit comfortably at the wrist without feeling restrictive.
If you prefer a looser cuff, use more stitches.
Repeat around the other sleeve opening, keeping both cuffs the same size.
The pink edging should form a narrow accent rather than a wide contrasting band.
Step 9: Add the Scarf Border
With the sweater scarf lying flat, identify the exposed edges of the central unseamed section.
Attach the rose-pink yarn to one of these edges.
Work single crochet stitches evenly along the row-ends.
As a starting guideline, distribute approximately four sc for every three row-ends. Adjust as necessary to keep the border flat.
Continue across the exposed edges of the wrap.
At any corner, work additional stitches if needed to prevent the fabric from pulling.
Join and fasten off neatly.
This narrow pink border emphasizes the flowing shape of the garment and gives the edges a polished appearance.
Assembly and Finishing
Once the sleeves and edging are complete, check the entire garment.
Make sure both sleeve seams are secure and approximately the same length.
Inspect the pink border for areas where it pulls or waves.
Weave in the yarn ends using a tapestry needle. When possible, weave each tail through several stitches and change direction for a secure finish.
Blocking
Light blocking can improve the scarf’s drape and help even out the stitches.
Follow the care instructions for your chosen yarn.
For fibers suitable for wet blocking, gently dampen the garment, remove excess moisture, and lay it flat.
Arrange the rectangle and sleeves into their intended dimensions without overstretching.
Allow the fabric to dry completely before wearing.
Tips for the Best Results
Keep your tension consistent
Because this pattern contains a long rectangular section, differences in tension may create irregular edges.
Work at a comfortable pace and check the width periodically.
Use stitch markers
Mark the beginning and end of each sleeve seam before sewing.
Markers help keep both sleeves symmetrical.
Measure the scarf as you go
The suggested row count assumes that your gauge matches the pattern.
If your row height differs, you may need fewer or more rows.
Choose soft yarn
A sweater scarf needs enough flexibility to drape around your shoulders.
Very stiff yarn can make the project feel bulky and uncomfortable.
Avoid overly tight seams
The sleeves should have enough room for comfortable movement.
Pulling the seam too tightly may distort the fabric or restrict arm movement.
Common Mistakes and Troubleshooting
The rectangle becomes wider or narrower
You may be accidentally adding or skipping stitches at the row edges.
Count the stitches regularly and remember that the turning chain does not count as a stitch.
The ribbing looks uneven
Make sure you consistently work into the back loop only.
Alternating between both loops and the back loop will create a different texture.
One sleeve is longer than the other
Check that both sleeve seams cover the same number of rows.
If necessary, remove the longer seam and sew it again.
The pink edging curls
Too few stitches can pull the border inward.
Try adding more single crochet stitches along the affected edge.
If the border becomes wavy, you may have added too many stitches.
The scarf feels too heavy
Bulky yarns vary considerably in density.
Choose a lighter-weight bulky yarn with a soft drape, or recalculate the pattern for a lighter yarn.
Creative Variations and Customization Ideas
This sweater scarf offers several opportunities for personalization.
Experiment with different colors
Mulberry and rose pink create a romantic, colorful combination.
Other possibilities include:
- Rich burgundy with warm ivory
- Mustard yellow with chocolate brown
- Deep teal with golden cream
- Black with bright coral edging
Use colors that complement your wardrobe.
Make a longer wrap
Add approximately seven rows to increase the total length by four inches at the reference gauge.
This provides extra fabric for wrapping and draping.
Create a wider scarf
Increase the foundation chain count to produce a wider rectangle.
Remember that a wider panel also creates a larger sleeve circumference when folded.
Use a different stitch texture
Once you’re comfortable with the construction, try a half double crochet stitch worked through both loops for a smoother appearance.
Recalculate the gauge before beginning.
Add a decorative border
Replace the basic single crochet edging with a subtle shell or picot border.
Keep the edging lightweight so it doesn’t distort the drape.
How to Wear or Style Your Crochet Sweater Scarf
One of the most appealing aspects of a sweater scarf is its versatility.
Cardigan-style wrap
Slip your arms into the sleeves, arrange the unseamed middle section across your upper back and shoulders, and let the remaining fabric drape naturally at the front.
Adjust the folds until the wrap feels balanced and comfortable.
Cozy shoulder wrap
Position the central fabric higher around your shoulders for added warmth.
This creates a soft, shawl-like effect.
Casual everyday outfit
Wear the mulberry sweater scarf over a white T-shirt with jeans or tailored pants.
The colorful crochet fabric becomes the focal point of the outfit.
Fall and winter layering
Pair the wrap with fitted long-sleeve tops, leggings, or straight-leg denim.
Because the scarf is already textured and voluminous, simple clothing underneath helps create a balanced silhouette.
Care and Washing Instructions
Crochet garments require appropriate care to preserve their shape.
Always follow the manufacturer’s instructions for your chosen yarn.
If handwashing is recommended, use cool water and a gentle detergent.
Avoid aggressive rubbing or twisting.
After washing, gently press excess water from the fabric using a clean towel.
Lay the sweater scarf flat on a dry towel or suitable drying surface.
Reshape the sleeves and central scarf section while the fabric is damp.
Do not hang the garment while wet because its length and weight may cause stretching.
Store your finished scarf folded in a clean, dry location.
Frequently Asked Questions
Is a crochet sweater scarf the same as a cardigan?
Not exactly. A sweater scarf combines features of a scarf, shawl, and cardigan.
It has sleeves, but the body consists of a draped wrap rather than conventional fitted front and back panels.
Can beginners make this sweater scarf?
Yes. Confident beginners who understand half double crochet and simple seams can follow this pattern.
The main rectangle doesn’t require complex shaping.
How much yarn do I need?
For the suggested reference size, allow approximately 850–1,200 yards of bulky yarn for the main fabric, plus a smaller quantity for the edging.
Your actual usage may vary considerably depending on gauge and fiber.
Can I make a sweater scarf without sewing?
A seamless construction would require a different technique.
This pattern uses two simple seams to create the sleeves from the rectangle.
Can I make the scarf longer?
Yes. Add more rows to the central unseamed section to create additional drape.
Maintain the same width unless you also want a wider garment.
How do I make the sleeves longer?
Increase the number of rows used for the sleeve sections and add the corresponding number of rows to the overall rectangle.
Make sure the center wrap remains long enough to drape comfortably.
What is the best yarn for a sweater scarf?
A soft acrylic blend, wool blend, or flexible bulky yarn is a good starting point.
Choose a yarn that produces a comfortable fabric rather than one that is excessively stiff.
Can I wear this over a winter coat?
You can, provided the sleeve openings and overall fit are large enough.
For layering over bulky clothing, consider making a larger version.
Conclusion
This easy crochet sweater scarf pattern offers a creative way to make a comfortable and stylish layering piece with basic crochet techniques.
The combination of rich mulberry yarn, soft ribbed texture, simple sleeves, and delicate pink edging creates a distinctive accessory that works beautifully with casual outfits.
With one long rectangle and two sleeve seams, the construction remains approachable while producing a wearable project with plenty of styling possibilities.
Take your time with the gauge, choose yarn that drapes comfortably, and enjoy creating your own crochet scarf cardigan.
Related Crochet Projects to Try Next
If you enjoy this sweater scarf, consider trying these related projects:
Oversized Crochet Pocket Shawl: A cozy wrap with generous pockets and a straightforward rectangular construction.
Easy Crochet Shrug: A beginner-friendly garment that introduces simple sleeve and body construction.
Ribbed Crochet Cardigan: A full-length cardigan featuring textured stitches and an open front.
Chunky Crochet Infinity Scarf: A smaller accessory project that uses cozy yarn and repetitive stitches.
These projects provide opportunities to experiment with texture, shape, and color while continuing to develop your crochet skills.