Easy Crochet Sleeve Scarf Cardigan Pattern – Cozy Ribbed Wrap with Sleeves
Looking for a cozy layering project that combines the comfort of a scarf with the practicality of a cardigan? This crochet sleeve scarf cardigan...
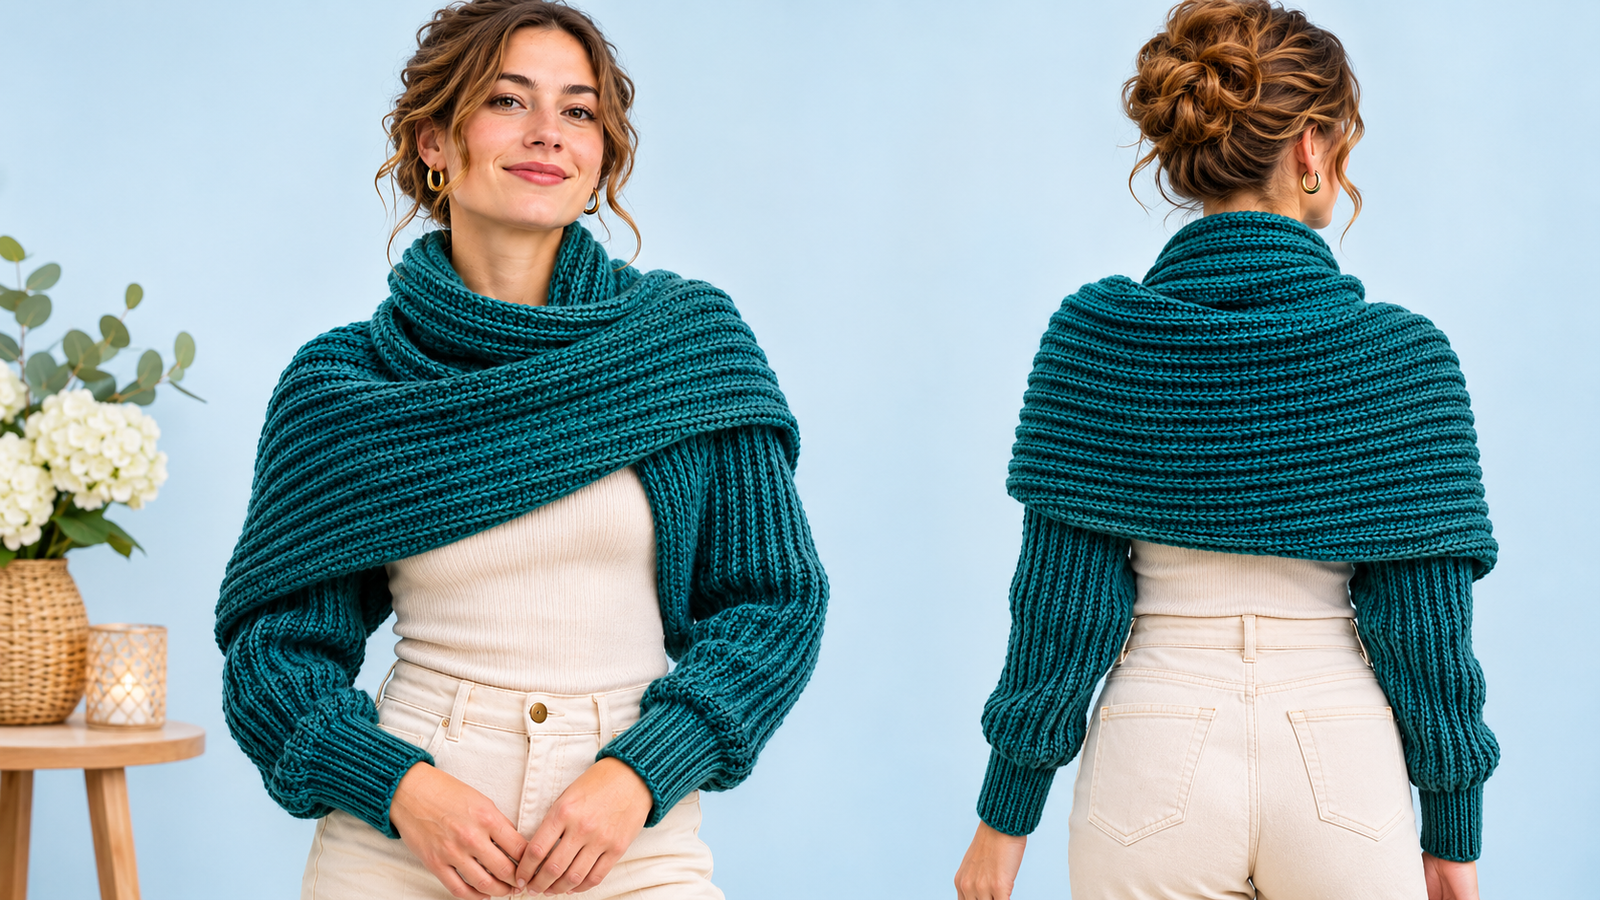
Looking for a cozy layering project that combines the comfort of a scarf with the practicality of a cardigan? This crochet sleeve scarf cardigan is a stylish way to enjoy both.
Featuring a deep teal color, soft ribbed texture, and comfortable long sleeves, this crochet wrap is designed to feel warm without the complicated construction of a traditional sweater.
The main piece starts as one long rectangle. By folding and seaming the ends, you create sleeves while leaving the center open to drape naturally around your shoulders. Two ribbed cuffs give the garment a more finished, cardigan-inspired appearance.
This project is ideal for confident beginners who know basic crochet stitches and want to try making wearable clothing.
In this tutorial, you’ll learn how to crochet the textured rectangle, form the sleeves, create fitted cuffs, and customize the measurements for a comfortable fit.
Why You’ll Love This Crochet Sleeve Scarf Cardigan
One of the best features of this design is its straightforward construction. Instead of following complicated garment shaping instructions, you’ll work with a large rectangle and simple seams.
Here’s what makes this project appealing:
- Simple construction: The main garment is made from one rectangular piece.
- Beautiful ribbed texture: Back-loop half double crochet stitches create attractive raised lines.
- Versatile styling: Wear the center section across your shoulders or arrange it like a cozy wrap.
- Comfortable sleeves: The tubular ends provide arm coverage without needing separate sleeve panels.
- Customizable fit: Adjust the rectangle to suit your arm length and preferred amount of drape.
- Minimal assembly: Only a few seams and two small cuffs are needed.
The rich teal color gives the finished cardigan a sophisticated appearance, making it suitable for everyday outfits and cooler weather.
Project Overview
Before beginning, review the suggested materials, measurements, and construction method.
| Project Detail | Description |
|---|---|
| Project | Crochet sleeve scarf cardigan |
| Skill level | Confident beginner |
| Estimated time | 12–18 hours |
| Yarn weight | Bulky weight (Category 5) |
| Main hook | 6.5 mm (K/10.5) |
| Cuff hook | 5.5 mm (I/9) |
| Main stitches | Chain, half double crochet, single crochet |
| Construction | One rectangle with seamed sleeve ends and separate cuffs |
| Suggested rectangle size | 80 × 18 inches |
| Estimated sleeve length | 18 inches plus 3-inch cuff |
| Estimated center section | 44 inches |
| Crochet terminology | US terms |
All sizes, yarn quantities, and time estimates are approximate.
Pattern note: This is an original draft pattern developed from a visual design concept. It has not been physically sample-tested. Make a gauge swatch and check the fit as you work, especially before permanently sewing the sleeves.
Materials and Supplies Needed
Gather the following supplies before starting your crochet scarf cardigan.
Yarn
- Approximately 1,000–1,300 yards of Category 5 bulky yarn
- Main color: deep teal
- Suggested fiber: soft acrylic, wool blend, or another flexible sweater-friendly yarn
Your exact yardage will depend on your gauge, yarn characteristics, and finished measurements.
Crochet Tools
- 6.5 mm crochet hook for the main rectangle
- 5.5 mm crochet hook for the cuffs
- Yarn needle with a large eye
- Sharp scissors
- Measuring tape
- Stitch markers
- Optional blocking mats
Choose yarn with enough softness and flexibility to drape comfortably around the shoulders.
A very stiff yarn can make the scarf section bulky, while an extremely loose yarn may stretch too much when worn.
Choosing the Right Yarn and Hook
The yarn you choose has a major influence on how your finished sleeve scarf cardigan looks and feels.
For the deep teal design, bulky yarn provides visible stitch definition and a cozy texture.
Recommended Yarn Fiber
A soft acrylic and wool blend is a practical option for this project. It can provide warmth while maintaining the flexibility needed for a comfortable garment.
Acrylic yarn is often affordable and available in many rich colors. Wool blends can add warmth and resilience, although washing requirements vary.
Avoid stiff cotton cords and rigid fibers that prevent the center section from folding naturally.
Hook Selection
The main rectangle uses a 6.5 mm crochet hook.
This hook size is intended to produce a textured fabric that still has enough flexibility to drape around the body.
For the cuffs, use a slightly smaller 5.5 mm hook to create a firmer ribbed fabric.
Always prioritize the fabric you achieve over the hook size printed on the yarn label.
Crochet Stitches and Abbreviations
This pattern uses US crochet terminology.
- ch: Chain
- sc: Single crochet
- hdc: Half double crochet
- BLO: Back loop only
- sl st: Slip stitch
- st: Stitch
- sts: Stitches
- RS: Right side
- WS: Wrong side
Half Double Crochet
Yarn over and insert your hook into the designated stitch.
Yarn over and pull up a loop. You should now have three loops on your hook.
Yarn over and pull through all three loops.
Half Double Crochet in the Back Loop Only
Look at the top of a crochet stitch. You will see two loops forming a small V.
Insert the hook through the back loop only, then complete a normal half double crochet.
Repeating this technique creates horizontal ridges across the fabric.
Single Crochet in the Back Loop Only
Insert your hook through the back loop of the next stitch.
Yarn over and pull up a loop, then yarn over and pull through both loops.
This technique creates the flexible ribbed texture used for the cuffs.
Before You Start
A little preparation will make the entire project easier.
Check Your Gauge
Create a swatch using your main hook and chosen bulky yarn.
Work approximately 15 half double crochet stitches across and continue in back-loop-only rows until your swatch is at least 6 inches square.
Measure the center of the relaxed swatch.
The suggested working gauge is:
9 hdc stitches × 7 rows = 4 × 4 inches.
This gauge is a planning target, not a physically verified measurement.
If your swatch has too many stitches within 4 inches, try a larger hook. If it has too few, try a smaller hook.
Understand the Rectangle Construction
The main rectangle is designed to measure approximately:
- Length: 80 inches
- Width: 18 inches
The first 18 inches at each end will be folded and sewn into sleeves.
The remaining 44-inch center section stays open and acts as the scarf or shoulder wrap.
Remember that the finished dimensions may change after wearing, washing, or blocking.
Measure for Comfort
Before starting, measure your desired arm coverage, upper-arm circumference, and preferred center-wrap length.
The 18-inch width becomes the approximate circumference of each sleeve before cuffs are added.
It is best to keep some ease around your upper arms so the garment remains comfortable.
Step-by-Step Crochet Instructions
Now you’re ready to begin making your crochet sleeve scarf cardigan.
Step 1: Make the Foundation Chain
Using your 6.5 mm crochet hook and deep teal yarn:
Foundation: Ch 182.
This produces a foundation for approximately 180 half double crochet stitches.
Try not to pull the chains too tightly.
A loose, even foundation will help the long rectangle lie flat.
Step 2: Crochet the First Row
Row 1 (WS): Work 1 hdc in the third chain from the hook.
Continue working 1 hdc in each remaining chain.
You should have:
180 hdc stitches.
Turn your work.
The first two skipped chains are not counted as a stitch.
At the suggested gauge, this row establishes a length of approximately 80 inches.
Step 3: Create the Ribbed Texture
Row 2 (RS):
Ch 1. This turning chain does not count as a stitch.
Work 1 hdc in the back loop only of each stitch across.
You should still have 180 hdc stitches.
Turn your work.
Row 3:
Ch 1.
Work 1 hdc BLO in every stitch across.
Turn.
Continue repeating the same row.
Rows 4–32: Repeat Row 3.
Every row should contain 180 stitches.
At the suggested gauge, 32 total rows should produce a width of approximately 18 inches.
If your fabric has not reached the desired width, add or remove complete rows as needed.
Step 4: Check the Finished Rectangle
Lay your crochet rectangle on a clean, flat surface.
Check that:
- Both long edges are reasonably straight.
- The stitch count remains consistent.
- The fabric stretches comfortably.
- The ribbed texture looks even.
- The rectangle measures close to your intended dimensions.
The finished piece should resemble a long, wide scarf.
Fasten off, leaving enough yarn for weaving in.
You have now completed the main fabric of the cardigan.
Step 5: Mark the Sleeve Sections
Place the rectangle flat with the long edges running horizontally.
Measure 18 inches inward from the left short end and place a marker on both long edges.
Repeat at the right end.
You should now have three areas:
- Left sleeve section: 18 inches
- Open center scarf section: 44 inches
- Right sleeve section: 18 inches
These marks indicate where the sleeve seams will stop.
Step 6: Form the First Sleeve
At one end of the rectangle, fold the fabric lengthwise so its two long edges meet.
The 18-inch-wide fabric is now folded into a 9-inch-wide flat tube.
Align the edges carefully.
Using a yarn needle and matching yarn, sew the long edges together from the short end toward the first 18-inch marker.
Use a flexible mattress stitch or whipstitch.
Stop at the marker and secure the yarn.
This creates the first sleeve tube.
The short end remains open for the wrist.
Step 7: Form the Second Sleeve
Repeat the same process at the opposite end of the rectangle.
Fold the fabric lengthwise, align the long edges, and sew toward the center for approximately 18 inches.
Keep the center section unseamed.
Once both sleeves are complete, the project should resemble a long scarf with a tubular sleeve at either end.
Turn the sleeve seams toward the inside of the garment.
Step 8: Try On the Cardigan
Carefully slide one arm through each sleeve.
Position the unseamed center section around your upper back and shoulders.
Arrange the loose fabric across your chest, allowing it to fold naturally.
This is an important fitting stage.
Check the sleeve length, upper-arm comfort, shoulder coverage, and overall drape.
If the sleeves feel too short, you may need to extend the main rectangle in a future version or add longer cuffs.
If the sleeve openings feel tight, undo a small section of the seams to increase underarm room.
Only proceed with the cuffs once you are satisfied with the basic fit.
Step 9: Crochet the Ribbed Cuffs
The reference design features longer, fitted cuffs that contrast beautifully with the fuller sleeves.
Using your 5.5 mm hook:
Foundation: Ch 12.
Row 1: Sc in the second chain from the hook and in each remaining chain.
You should have 11 sc stitches.
Row 2: Ch 1, turn. Work 1 sc BLO in each stitch across.
Row 3: Repeat Row 2.
Continue repeating Row 2 until the ribbed strip measures approximately 8.5–9 inches along its longer edge, or enough to fit comfortably around your wrist and hand.
The 11-stitch width forms a cuff roughly 3 inches deep, depending on gauge.
Before joining, wrap the strip around your wrist and confirm that it stretches enough to pass over your hand.
Bring the short ends together and sew them to create a continuous ribbed band.
Repeat these instructions to make a second matching cuff.
Step 10: Attach the Cuffs
Turn one sleeve inside out.
Place its matching cuff against the sleeve opening with the edges aligned and the right sides facing.
The cuff will be smaller in circumference than the sleeve opening.
Divide both the sleeve opening and the cuff edge into four equal sections using stitch markers.
Match the corresponding markers.
Carefully distribute the extra sleeve fabric between the markers, creating gentle gathers.
Sew the cuff to the sleeve using small, flexible stitches.
Avoid pulling the yarn too tightly.
Repeat for the second sleeve.
Turn both sleeves right side out.
The finished cuffs should create a gentle gathered shape while remaining comfortable around your wrists.
Assembly and Finishing
Your crochet sleeve scarf cardigan is almost complete.
Check all seams for weak or uneven areas.
Use your yarn needle to weave in loose ends securely through several stitches on the wrong side of the fabric.
Trim the excess yarn carefully.
If the main rectangle has curled or become uneven, consider lightly blocking it according to the yarn manufacturer’s instructions.
Avoid stretching the cuffs excessively during blocking because they need to retain their shape.
Lay the cardigan flat and allow it to dry completely before wearing.
Finally, try on the finished garment and arrange the center fabric so it falls naturally around your shoulders.
Tips for Best Results
These simple techniques can improve the finished appearance of your crochet scarf cardigan.
Maintain an even tension. Consistent tension helps the long ribbed rows appear smooth and prevents uneven edges.
Use stitch markers on long rows. Because each main row contains 180 stitches, markers placed every 30 stitches can make counting easier.
Check the rectangle width regularly. Measuring every few rows will help you reach the correct dimensions without unnecessary unraveling.
Avoid stiff seams. Sleeve seams need to move with your arms, so avoid pulling the sewing yarn too tightly.
Make matching cuffs. Count the ribbing rows or measure both strips before joining to ensure the cuffs are the same size.
Try the garment on before finishing. Small fit adjustments are easier before the cuffs are attached.
Common Mistakes and Troubleshooting
The Rectangle Is Becoming Narrower
This usually happens when stitches are accidentally skipped at the ends of rows.
Count your stitches regularly and make sure every row contains 180 hdc stitches.
The Fabric Feels Too Stiff
Your hook may be too small for the selected yarn.
Try a larger hook or switch to a softer yarn that drapes more easily.
The Sleeves Feel Too Tight
The rectangle may be too narrow, or the sleeve seams may extend too far into the center section.
Check the upper-arm circumference before sewing. For a future version, add rows to increase the rectangle width.
The Cuffs Are Too Small
If a cuff will not comfortably pass over your hand, add more ribbing rows before joining its ends.
Never force a cuff that feels uncomfortably tight.
The Center Section Does Not Drape Well
The fabric may be too short, too heavy, or too rigid.
Try arranging the center section differently. For another version, use a softer yarn or increase the overall rectangle length.
Creative Variations
Once you understand the basic construction, you can personalize this crochet sleeve scarf cardigan in several ways.
Classic Burgundy Wrap
Use rich burgundy yarn for a sophisticated winter accessory that pairs beautifully with neutral clothing.
Soft Ivory Cardigan
Choose warm ivory or natural cream yarn for a versatile layering piece.
Be aware that lighter yarn may require more careful washing and maintenance.
Oversized Sleeve Scarf
Increase the rectangle width for fuller sleeves and a wider shoulder wrap.
Make sure the longer cuffs still gather the sleeve fabric comfortably.
Two-Tone Design
Use one color for the main rectangle and a contrasting shade for the cuffs.
Deep teal with warm camel or cream cuffs can create an attractive modern finish.
Lightweight Version
Use a thinner yarn and adjust the foundation chain, row count, and hook size based on your new gauge.
This can create a more flexible wrap for transitional weather.
How to Use or Style Your Crochet Project
The finished crochet sleeve scarf cardigan is a versatile layering accessory.
For a casual everyday look, wear it over a fitted long-sleeve shirt with jeans and ankle boots.
For a more polished outfit, pair the deep teal crochet wrap with cream trousers and simple gold jewelry.
You can also style it over a plain dress when you want extra coverage around your shoulders and arms.
The center scarf section can be arranged across the chest, draped around the neck, or allowed to fall softly across the shoulders.
Because the garment does not have a conventional front opening or structured cardigan body, take a moment to adjust the fabric whenever you put it on.
Avoid wrapping it so tightly that it restricts comfortable arm or neck movement.
Care and Maintenance
Proper care will help preserve the texture and shape of your crochet sleeve scarf cardigan.
Always check the care instructions provided with your yarn.
For delicate wool blends or fibers that require handwashing, use cool water and a gentle detergent.
Avoid twisting or wringing the wet garment.
Instead, press out excess moisture with a clean towel and lay the cardigan flat to dry.
Reshape the sleeves and cuffs while the fabric is damp.
Do not hang the garment while wet, as the weight of the yarn may stretch the center section and sleeves.
Store the finished cardigan folded in a clean, dry place.
Frequently Asked Questions
Is this crochet sleeve scarf cardigan suitable for beginners?
Yes, confident beginners can make this project. You should already understand chains, half double crochet, single crochet, and basic sewing.
Can I make this cardigan with worsted weight yarn?
Yes. However, you will need to recalculate the foundation chain and row count using your new gauge. The finished garment may also have a lighter drape.
How much yarn do I need?
The estimated amount is 1,000–1,300 yards of bulky yarn for the suggested dimensions. Your actual requirement may be higher or lower depending on size, gauge, and stitch tension.
Can I make the sleeves longer?
Yes. When planning your rectangle, allocate additional length to each sleeve section. Remember to increase the total rectangle length if you want to preserve the same center-wrap measurement.
How do I make the cardigan larger?
Increase the rectangle length for more shoulder coverage and sleeve length. Increase its width if you need a larger upper-arm circumference or a wider drape.
Why does the pattern use back-loop-only stitches?
Working in the back loops creates raised ridges that resemble knitted ribbing. It also gives the fabric greater flexibility than a flat fabric worked through both loops.
Do I need to block the finished cardigan?
Blocking is optional, but it may help even out the rectangle and improve its drape. Follow the recommendations for your specific yarn.
Can I wear this as a regular cardigan?
This design functions more like a scarf-and-sleeve hybrid or shrug than a conventional button-front cardigan. It offers arm coverage and a draped shoulder wrap without a full structured body.
Conclusion
This easy crochet sleeve scarf cardigan is a creative way to turn a simple rectangular crochet project into a cozy wearable accessory.
The textured ribbing, flowing center wrap, and comfortable cuffs create a stylish garment without requiring complicated increases, decreases, or traditional sweater construction.
Whether you choose deep teal, burgundy, ivory, or another favorite shade, the design offers plenty of opportunities to make something personal.
Take time to check your measurements, work at a comfortable pace, and enjoy transforming a long crochet rectangle into a practical layering piece.
Related Crochet Projects to Try Next
If you enjoyed this project, consider trying these related crochet ideas:
- Beginner Crochet Shrug Pattern: A simple rectangular shrug with an open front and comfortable arm coverage.
- Oversized Ribbed Crochet Scarf: A textured winter scarf using back-loop half double crochet stitches.
- Easy Crochet Cocoon Cardigan: A loose-fitting cardigan made by folding and sewing a large rectangle.
- Chunky Crochet Cowl Pattern: A cozy neck accessory featuring soft ribbed stitches and simple construction.
These projects are great next steps for practicing crochet texture, creating wearable accessories, and building confidence with basic garment assembly.