Easy Crochet Cosmos Flower Bouquet Pattern
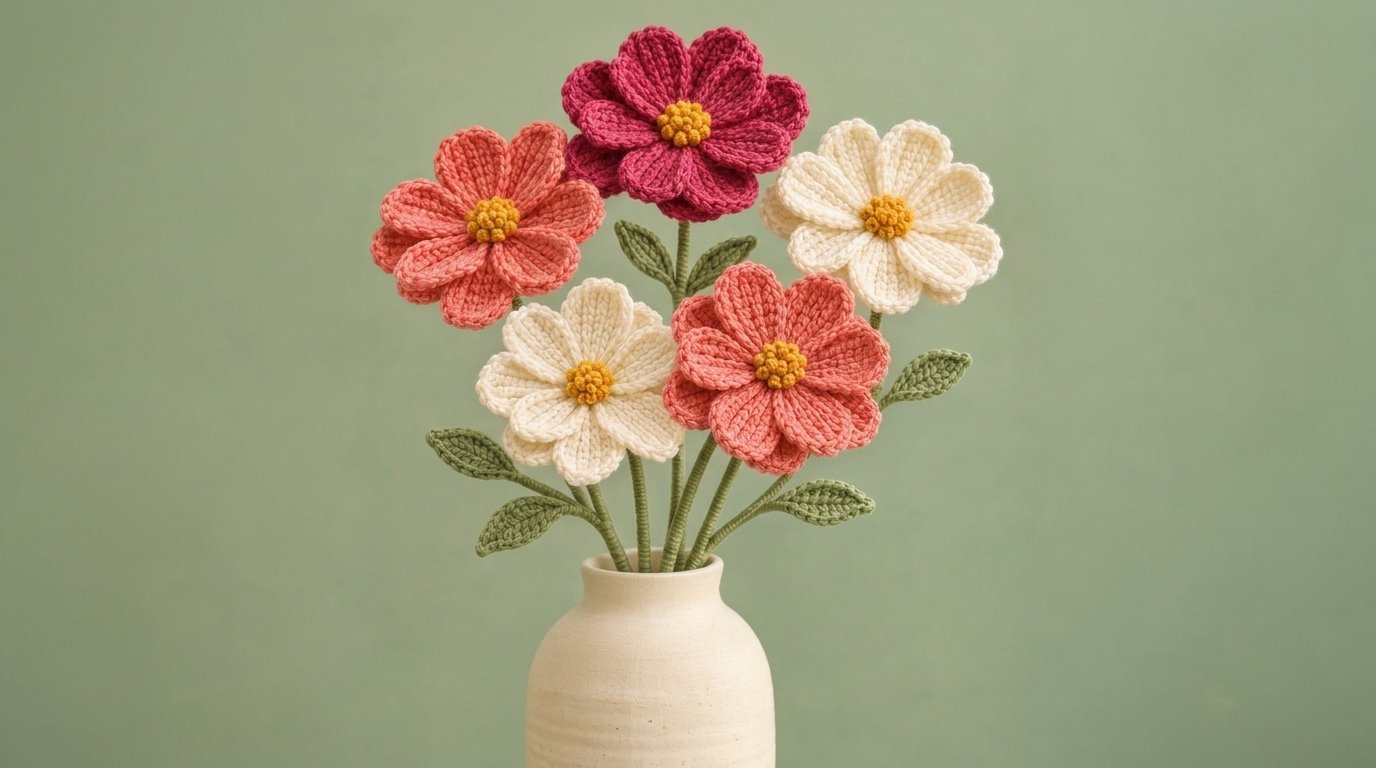
Introduction This crochet flower bouquet pattern creates five dimensional cosmos blooms in coral, raspberry, and warm ivory. Golden textured centers, layered petals, sage leaves,...
Introduction
This crochet flower bouquet pattern creates five dimensional cosmos blooms in coral, raspberry, and warm ivory. Golden textured centers, layered petals, sage leaves, and yarn-wrapped stems give the bouquet a cheerful botanical appearance.
The project is suitable for confident beginners who are comfortable working in the round and placing several stitches into one chain. You will learn how to construct two-layer flowers, crochet simple leaves, and assemble the pieces into decorative stems.
Unlike fresh flowers, this bouquet can decorate a desk, mantel, guest room, or craft space throughout the year. It also makes a thoughtful housewarming or springtime gift.
Why You’ll Love This Project
Each flower begins with only eight single crochet stitches. Both petal layers are worked directly into the loops of that small foundation, so you will not need to sew 16 separate petals onto every flower.
The design is easy to personalize with leftover DK-weight yarn. Make all five blooms in one color, follow the coral-and-raspberry palette, or use small quantities from your yarn collection.
Other helpful features include:
- A portable, small-scale construction
- Repetitive petals that become easier after the first flower
- No gauge-dependent garment sizing
- Adjustable stem lengths
- A bouquet that works as permanent home decor
- Only basic crochet stitches and straightforward assembly
Project Overview
- Project type: Five-stem crochet cosmos bouquet
- Difficulty: Confident beginner
- Estimated time: Approximately 5–7 hours
- Estimated finished bloom diameter: 3½–4 inches
- Estimated bouquet height: 11–13 inches
- Yarn weight: DK or light worsted, weight 3
- Hook: 3.25 mm crochet hook
- Main techniques: Working in the round, using front and back loops, crocheting around both sides of a chain, and simple sewing
- Construction: Five layered flowers, five centers, seven leaves, and five wrapped wire stems
- Terminology: US crochet terms
The measurements and completion time are estimates. Your yarn, hook, tension, and stem arrangement may change the finished dimensions.
Materials and Supplies Needed
- DK-weight cotton or cotton-blend yarn
- Approximately 30 yards of coral yarn
- Approximately 15 yards of raspberry yarn
- Approximately 30 yards of warm ivory yarn
- Approximately 15 yards of golden mustard yarn
- Approximately 50 yards of sage-green yarn
- 3.25 mm crochet hook
- Five pieces of 18-gauge floral wire, 14 inches long
- Green florist tape
- Seven stitch markers, optional
- Yarn needle
- Sharp scissors
- Small jewelry pliers or sturdy craft pliers
- A small amount of clear-drying craft glue, optional
- A ceramic vase or other stable display container
Floral wire may have sharp ends. Handle it with pliers, turn every exposed end into a closed loop, and keep the finished bouquet away from babies and young children.
Choosing the Right Yarn and Hook
Smooth DK-weight cotton produces well-defined stitches and petals that hold their shape. A cotton-acrylic blend is another beginner-friendly choice because it can be slightly softer and easier on the hands.
Avoid very fuzzy yarn for your first bouquet. Fuzz can hide the insertion points around the flower foundation and make the small center stitches harder to count.
A 3.25 mm hook should create a firm fabric without making the stitches uncomfortable to work. If your petals feel stiff or difficult to bend, try a 3.5 mm hook. If they appear loose and floppy, move down to a 3 mm hook.
Exact gauge is not essential, but all five flowers should use the same yarn weight and hook size. A completed large petal should measure approximately 1½ inches from the center to its tip.
Crochet Stitches and Abbreviations
- ch — chain: Yarn over and pull the yarn through the loop on the hook.
- sl st — slip stitch: Insert the hook into the indicated stitch, yarn over, and pull through the stitch and the loop on the hook.
- sc — single crochet: Insert the hook, yarn over and pull up a loop, yarn over again, and pull through both loops.
- hdc — half double crochet: Yarn over, insert the hook, yarn over and pull up a loop, then yarn over and pull through all three loops.
- dc — double crochet: Yarn over, insert the hook, yarn over and pull up a loop, yarn over and pull through two loops twice.
- inc — increase: Work two single crochet stitches in the same stitch.
- FLO — front loop only: Work beneath only the front loop of the indicated stitch.
- BLO — back loop only: Work beneath only the back loop of the indicated stitch.
- st — stitch
- sts — stitches
- MR — magic ring
When working along both sides of a chain, crochet into the unused loops on the opposite side after rotating the piece. This creates an oval rather than a narrow strip.
Before You Start
The flower foundation contains eight stitches. Place a marker in the first stitch so you can identify all eight front and back loops.
The petals are worked individually. Each petal starts and finishes in the same foundation stitch. Count eight finished petals before moving to the second layer.
Leave 8-inch yarn tails on the flower centers and leaves. These tails can be used during assembly and reduce the number of separate strands that need to be woven in.
Prepare five wire pieces measuring about 14 inches. Different finished stem heights will be created during assembly. Use pliers to bend the upper ½ inch of every wire into a tightly closed loop.
Step-by-Step Crochet Instructions
Color Plan
Make five flowers:
- Two coral flowers
- One raspberry flower
- Two warm ivory flowers
- Five golden-mustard centers
- Seven sage-green leaves
Flower Foundation
Using the chosen petal color:
- Make an MR.
- Ch 1. Work 8 sc into the ring.
- Pull the ring closed, but do not crush the stitches together.
- Join with a sl st to the first sc. Do not turn. You should have 8 sts.
The back loops will hold the larger rear petals. The front loops will hold the slightly smaller front petals.
Large Back Petal
Work the following sequence in the BLO of the next foundation stitch:
- Sl st into the BLO.
- Ch 6.
- Beginning in the second ch from the hook, work sc, hdc, dc, dc.
- Work 5 dc in the final chain.
- Rotate the chain so you can work along its opposite side.
- Work dc, dc, hdc, and sc along the unused chain loops.
- Sl st into the same foundation loop where the petal began.
One large petal is complete.
Repeat the sequence in each remaining back loop. You will have eight large petals.
The five double crochets at the chain tip turn the work around the end and create the petal’s rounded outer edge.
Smaller Front Petal
Join the same petal color to the FLO of any foundation stitch.
For each front petal:
- Sl st into the FLO.
- Ch 5.
- Beginning in the second ch from the hook, work sc, hdc, and dc.
- Work 5 dc in the final chain.
- Rotate the chain.
- Work dc, hdc, and sc along the opposite side.
- Sl st into the same foundation loop.
Repeat in all eight front loops. You should have eight smaller front petals positioned above eight larger petals.
Fasten off and weave the ending tail through the back of the flower. Use your fingers to separate and arrange the two petal layers.
Repeat the flower instructions until you have five blooms.
Textured Flower Center
Using golden-mustard yarn:
- Make an MR.
- Round 1: Ch 1 and work 6 sc into the ring. Join with a sl st. (6 sts)
- Round 2: Ch 1 and work 2 sc in every st around. Join. (12 sts)
- Textured edge: In each of the 12 sts, ch 2 and sl st into the same st.
Fasten off, leaving an 8-inch sewing tail. The small chain loops create a clustered, pollen-like texture.
Make five centers.
Place one center over the hole in each flower. Sew through the center base and flower foundation, keeping the stitches behind the petals. Secure the tail on the back.
Simple Crochet Leaves
Using sage-green yarn:
- Ch 9.
- Beginning in the second ch from the hook, work sc, hdc, dc, dc, dc, hdc, and sc.
- Work 3 sc in the final chain.
- Rotate the foundation chain to work along its opposite side.
- Work sc, hdc, dc, dc, dc, hdc, and sc.
- Join with a sl st to the first sc.
Fasten off with an 8-inch tail. The three stitches at the tip form the curve that lets you work back along the chain.
Make seven leaves.
Optional Leaf Vein
For a subtle central vein, thread a length of sage yarn onto the yarn needle. Make a line of small running stitches along the foundation chain, working from the leaf base toward its tip and back again. Keep the stitches relaxed so the leaf remains flat.
Adjusting the Size
For a smaller flower, use the front-petal instructions for both layers.
For a larger flower, add one chain to every petal and place an additional double crochet along each straight side. Keep eight petals in each layer so the arrangement remains balanced.
Changing the number of foundation stitches changes the number and spacing of the petals. Beginners will get the most predictable result by retaining the eight-stitch foundation.
Assembly and Finishing
Attach the Flowers
Position a closed wire loop against the back of one flower. The loop should lie flat behind the foundation without showing between the petals.
Thread the remaining petal-color tail onto a yarn needle. Sew around the wire loop several times, passing through the flower foundation rather than through the petals. Knot securely.
Cover the connection with a short piece of florist tape.
Wrap the Stems
Starting beneath the flower, stretch the florist tape slightly and spiral it down the wire. Overlap each turn so the wire is fully covered.
Attach sage-green yarn at the top. Wrap it closely around the taped stem, keeping the wraps beside one another. A tiny amount of clear-drying craft glue can secure the yarn at the top and bottom.
Do not leave exposed wire at either end.
Add the Leaves
Arrange seven leaves across the five stems. Place two leaves on each of the two tallest stems and one leaf on three shorter stems.
Hold the narrow end of a leaf against its stem. Use the long green tail to sew around both the leaf base and the wrapped stem. Make several firm passes, knot the yarn, and weave the tail beneath the stem wrapping.
Angle some leaves upward and others outward for a natural arrangement.
Arrange the Bouquet
Trim or bend the stems to create the following approximate finished heights:
- Raspberry center flower: 13 inches
- Coral flower: 12 inches
- Ivory flower: 12 inches
- Coral flower: 11 inches
- Ivory flower: 11 inches
Arrange the tallest flower near the back center and distribute the colors around it. Gently overlap the petals without sharply folding them.
Tips for Best Results
Use a stitch marker to identify the first foundation stitch. Once the petals cover the center, it can be difficult to see where a round began.
Keep your chains relaxed. Tight chains make it difficult to crochet along both sides and may cause the petals to curl excessively.
Rotate each petal before beginning the next one. This prevents the finished petals from twisting around the foundation.
When sewing on the center, take shallow stitches through the petal foundation. Deep stitches may pull the front petals inward.
Wrap the stems from top to bottom in one continuous direction. Consistent wrapping creates a smoother surface and helps the leaves sit neatly.
Common Mistakes and Troubleshooting
The Petals Are Curling
The chains may be too tight or the hook may be too small. Gently block the finished flower or remake it with a hook one size larger.
A slight curve is desirable because it gives the bloom dimension.
The Flower Has Uneven Gaps
Check that every foundation stitch holds one back petal and one front petal. Missing a loop creates an obvious opening.
The Center Looks Too Large
Use a 3 mm hook for the center or omit the textured chain loops from every second stitch.
The Leaves Twist Around the Stem
Sew the leaf base to the stem at two points instead of wrapping only around its yarn tail. This keeps the leaf facing forward.
The Flower Droops
Make sure the wire’s closed loop is sewn firmly to the foundation. Additional stitches around the loop will stabilize the flower without affecting its appearance.
The Stem Wrapping Slides
Stretch the florist tape as you wrap it and overlap each pass. Secure the yarn wrapping with a small amount of clear-drying craft glue if necessary.
Creative Variations
Create a meadow-inspired bouquet by combining lavender, white, pink, and burgundy blooms with golden centers.
For a monochromatic arrangement, make all five flowers in shades of coral and raspberry. Use the same center and leaf colors to unify the bouquet.
A single flower can become a gift topper when made without wire. Sew the flat bloom directly onto reusable fabric wrapping or a crochet gift bag.
You can also make a shorter arrangement for a small vase. Reduce each wire to 8–10 inches before wrapping it, but retain the closed loops at both ends.
For an autumn interpretation, use terracotta, cream, burgundy, and muted gold with forest-green leaves.
How to Use or Style Your Crochet Bouquet
Display the bouquet in a stable ceramic vase on a mantel, bookshelf, desk, or entryway table. A narrow opening helps support the stems and maintain the arrangement.
The flowers can complement spring decorating, wedding-shower tables, craft-room shelves, or a colorful guest room. They can also be presented as a housewarming or Mother’s Day gift.
Because the stems contain wire, the bouquet is decorative rather than a toy. Keep it out of reach of young children and pets.
Care and Maintenance
Remove dust with a cool hair dryer on its lowest setting or a clean, soft brush. Support the petals with your hand while cleaning them.
Avoid soaking the assembled bouquet because moisture can affect florist tape, craft glue, and metal wire. If one flower becomes soiled, spot-clean it carefully with cool water and a small amount of mild detergent.
Blot rather than rub the yarn. Reshape the petals and allow the flower to air-dry completely.
Store the bouquet upright or in a shallow box where the petals will not be crushed. Keep it away from prolonged direct sunlight, which may fade richly colored yarn.
Always follow the care instructions supplied with your chosen yarn.
Frequently Asked Questions
Can a complete beginner make this bouquet?
A new crocheter who can make chains, single crochet, half double crochet, and double crochet can attempt it. Practice one flower before cutting all the wire.
Can I make the flowers without wire?
Yes. Omit the stems and use the flat flowers as appliqués, gift decorations, or bag embellishments.
Why are the petals worked in two different loops?
Using the back loops for the large petals and the front loops for the smaller petals places both layers on one foundation without sewing each petal separately.
Can I use worsted-weight yarn?
Yes, but the flowers will be larger and heavier. Try a 4–4.5 mm hook and use stronger floral wire.
How many flowers should I make for a fuller bouquet?
Seven or nine flowers create a fuller display. Use an odd number and vary the stem heights for a balanced arrangement.
Do I need to block the flowers?
Blocking is optional. If the petals curl more than desired, lightly dampen them, arrange them on a towel, and let them dry before attaching the stems.
Can I use wooden stems?
Thin dowels or bamboo skewers can replace wire for a straighter arrangement. Blunt both ends and wrap them completely before use.
How can I make the center flatter?
Skip the chain-loop texture and finish after Round 2. Sew the resulting flat disc directly over the flower foundation.
Conclusion
This crochet cosmos bouquet combines repetitive beginner-friendly stitches with colorful dimensional details. The two petal layers create full blooms, while the textured centers and simple leaves complete the botanical look.
Choose colors that suit your decor, adjust the stem heights, and make as many flowers as your vase requires. Once you have completed the first cosmos, the repeating construction makes the remaining bouquet enjoyable to assemble.
Related Crochet Projects
- A coordinating crochet leaf garland
- Miniature daisies for gift wrapping
- A flat flower appliqué tote bag
- A small crochet plant in a decorative pot