Easy Crochet Cardigan Pattern with Pockets – Free Written Guide
A cozy crochet cardigan is one of those handmade wardrobe pieces you can reach for again and again. Whether you’re dressing for a cool...
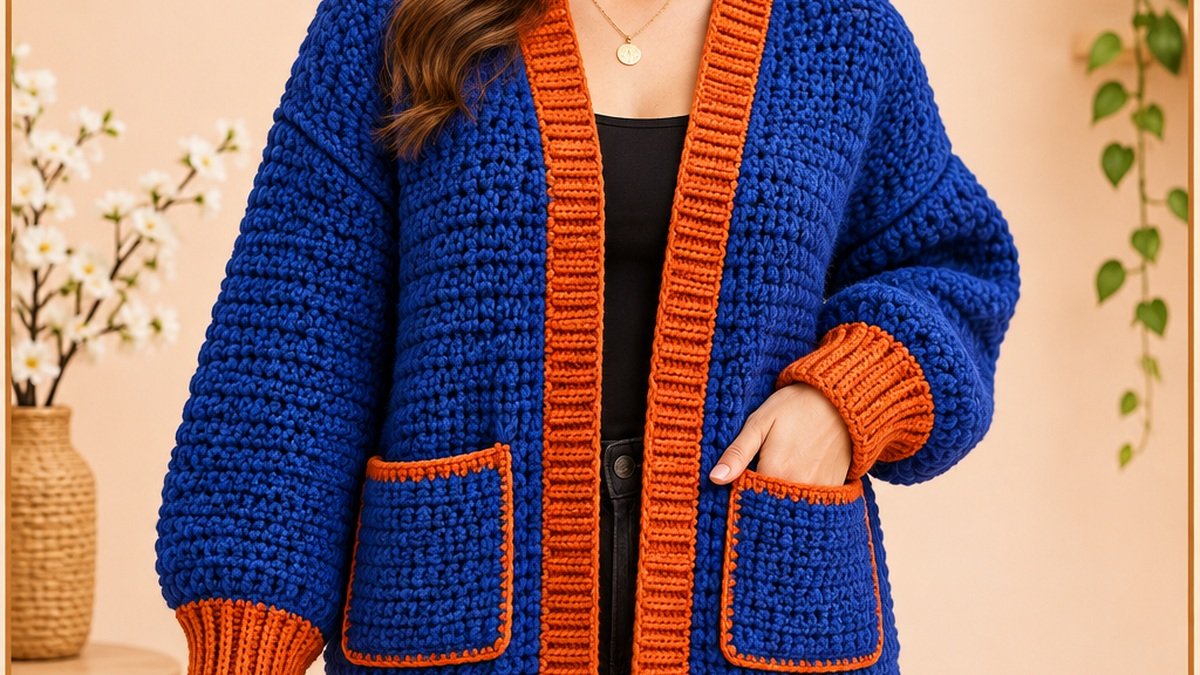
A cozy crochet cardigan is one of those handmade wardrobe pieces you can reach for again and again. Whether you’re dressing for a cool morning, layering over a simple T-shirt, or adding a little color to your everyday outfits, this easy crochet cardigan pattern combines comfort and personality with straightforward construction.
The Cobalt & Copper Pocket Cardigan features a rich cobalt-blue body, contrasting burnt-orange ribbed cuffs, a matching orange front band, and two practical patch pockets. Its relaxed drop shoulders and slightly gathered sleeves give it a modern, comfortable silhouette without requiring complicated garment shaping.
This design uses simple crocheted panels, half double crochet stitches, and back-loop ribbing. The bright orange details create a striking contrast with the textured blue fabric, while the open-front style makes it easy to wear.
In this free written crochet cardigan pattern, you’ll learn how to create the front and back panels, construct the sleeves, add ribbed edging, assemble the cardigan, and finish it with matching pockets.
Why You’ll Love This Crochet Cardigan
This handmade cardigan offers a balance of simplicity, texture, and practical styling.
Here’s what makes the project special:
- Simple panel construction: The cardigan uses five main crocheted rectangles.
- Beginner-friendly stitches: Most of the garment is made with half double crochet.
- Bold contrasting colors: Cobalt blue and burnt orange create a fresh, modern look.
- Comfortable relaxed fit: Drop shoulders provide extra room for layering.
- Useful patch pockets: Two generous front pockets add everyday functionality.
- Textured details: Back-loop stitches create subtle raised ridges.
- Customizable length: You can make the body shorter or longer by changing the number of rows.
The design is particularly suitable for confident beginners who want to try their first wearable crochet garment.
Project Overview
| Detail | Information |
|---|---|
| Project | Open-front crochet cardigan |
| Skill level | Confident beginner |
| Sizes | S/M, L/XL, 2XL/3XL |
| Yarn | Bulky weight (#5) |
| Main hook | 7 mm |
| Techniques | HDC, SC, BLO, seaming |
| Construction | Five panels and ribbed edging |
| Estimated time | 15–25 hours |
| Crochet terms | US terminology |
The finished cardigan has a relaxed, slightly oversized fit with dropped shoulders, roomy sleeves, and hip-length styling.
Finished Size Guide
The measurements below are approximate and depend on achieving the stated gauge.
| Size | Approx. Circumference* | Length |
|---|---|---|
| S/M | 41 in | 22.5 in |
| L/XL | 48 in | 24.5 in |
| 2XL/3XL | 54 in | 26.5 in |
Circumference assumes the cardigan fronts meet at the center without overlapping. The garment has no fastening.
Choose a size that provides approximately 4–8 inches of positive ease over your actual bust measurement, depending on your preferred fit.
Materials and Supplies Needed
Gather all your materials before starting the cardigan.
Yarn
Choose a soft bulky-weight (#5) yarn with enough flexibility to create comfortable, wearable fabric.
For the sample color combination:
- Main Color A: Rich cobalt blue.
- Contrast Color B: Burnt orange or copper.
Estimated total yarn requirements:
| Size | Approximate Yardage |
|---|---|
| S/M | 1,100–1,350 yd |
| L/XL | 1,350–1,600 yd |
| 2XL/3XL | 1,600–1,900 yd |
Allow roughly 80–85% of the total yardage for cobalt blue and 15–20% for the orange trim and cuffs.
These quantities are estimates. Purchase additional yarn if you plan to lengthen the cardigan or sleeves.
Additional Supplies
- 7 mm crochet hook
- 6 mm crochet hook, optional for firmer ribbing
- Stitch markers
- Tapestry needle
- Scissors
- Measuring tape
- Blocking mat, optional
No buttons or zipper are needed for this open-front cardigan.
Choosing the Right Yarn and Hook
Selecting the right yarn is important when crocheting garments.
For this cardigan, look for a bulky-weight acrylic blend, wool blend, or another soft yarn appropriate for clothing.
A good cardigan yarn should offer:
- Comfortable softness against the skin.
- Enough structure to support the pockets and ribbing.
- Reasonable flexibility for movement.
- Consistent thickness throughout the skein.
- Care instructions suitable for everyday garments.
Avoid unusually stiff yarn because it can make the shoulders and sleeves feel bulky.
Recommended hook size
Start with a 7 mm hook.
The goal is a fabric that feels textured but still bends and drapes naturally.
If your fabric becomes too dense, try a slightly larger hook. If it feels loose and unstable, try a smaller hook.
Always make a gauge swatch before committing to your final size.
Crochet Stitches and Abbreviations
All instructions use US crochet terminology.
| Abbreviation | Meaning |
|---|---|
| ch | Chain |
| sc | Single crochet |
| hdc | Half double crochet |
| sl st | Slip stitch |
| BLO | Back loop only |
| st(s) | Stitch(es) |
| rep | Repeat |
| RS | Right side |
| WS | Wrong side |
Half Double Crochet
Yarn over, insert the hook into the designated stitch, yarn over, and pull up a loop. Yarn over again and pull through all three loops.
Half Double Crochet Back Loop Only
Work a regular half double crochet stitch, but insert the hook beneath the back loop only.
This creates a subtle horizontal ridge that adds texture to the fabric.
Single Crochet Back Loop Only
Insert the hook into the back loop of the stitch, yarn over, pull up a loop, yarn over, and pull through both loops.
Repeating this technique across several rows creates flexible vertical ribbing.
Pattern Stitch
The main panels use a simple two-row texture:
Row A: Half double crochet across, working through both loops.
Row B: Half double crochet through the back loop only.
Alternating these rows creates the raised texture of the cardigan.
Before You Start
A few preparation steps will make assembling your cardigan much easier.
Check your gauge
The target gauge is approximately:
10 hdc stitches and 8 rows = 4 inches (10 cm).
Make a swatch at least 6 inches wide using the main pattern stitch.
Measure the center of the swatch after gently relaxing the fabric.
If your stitches are larger than the target gauge, use a smaller hook.
If your stitches are smaller, use a larger hook.
Understand the construction
The cardigan uses five main pieces:
- One back panel.
- Two front panels.
- Two sleeves.
You’ll join the shoulder seams first, close the side seams while leaving openings for the sleeves, and attach the sleeves around those openings.
Next, you’ll add the orange ribbed cuffs, blue bottom ribbing, orange front band, and two decorative-edged pockets.
The straight-panel construction allows you to make the garment without complicated neckline or armhole decreases.
Step-by-Step Crochet Cardigan Pattern
The instructions below include three sizes.
Numbers are written in this order:
S/M (L/XL, 2XL/3XL)
For example, 52 (60, 68) means use 52 stitches for S/M, 60 for L/XL, and 68 for 2XL/3XL.
Step 1: Crochet the Back Panel
Using Main Color A and the 7 mm hook:
Foundation: Chain 54 (62, 70).
Row 1: Work 1 hdc into the third chain from the hook and into each remaining chain.
You should have 52 (60, 68) hdc stitches.
Row 2: Chain 2, turn. Work 1 hdc BLO in every stitch across.
Row 3: Chain 2, turn. Work 1 regular hdc in every stitch across.
Row 4: Repeat Row 2.
Continue alternating Rows 2 and 3 until you have completed:
- S/M: 42 total rows.
- L/XL: 46 total rows.
- 2XL/3XL: 50 total rows.
The turning chain does not count as a stitch.
Keep the stitch count consistent throughout the panel.
Your back panel should measure approximately 20.8 (24, 27.2) inches wide.
Fasten off, leaving a long tail for assembly.
Step 2: Make the First Front Panel
Using Main Color A:
Foundation: Chain 25 (29, 33).
Row 1: Work 1 hdc into the third chain from the hook and each remaining chain.
You should have 23 (27, 31) stitches.
Row 2: Chain 2, turn. Work 1 hdc BLO across.
Row 3: Chain 2, turn. Work 1 regular hdc across.
Continue alternating these two rows until the panel matches the back panel in length.
Complete 42 (46, 50) rows.
Fasten off.
Step 3: Crochet the Second Front Panel
Repeat Step 2 to make an identical front panel.
Check that both pieces have exactly the same dimensions.
This is particularly important because uneven front panels can make the cardigan hang crookedly.
Place the three body panels next to each other, with the front panels positioned on either side of the back panel.
Step 4: Make the First Sleeve
The sleeves use the same textured stitch pattern as the cardigan body.
Each sleeve is worked as a flat rectangle, then joined into a tube.
Using Main Color A:
Foundation: Chain 47 (52, 57).
Row 1: Work 1 hdc into the third chain from the hook and each remaining chain.
You should have 45 (50, 55) stitches.
Row 2: Chain 2, turn. Work 1 hdc BLO across.
Row 3: Chain 2, turn. Work 1 regular hdc across.
Continue repeating these two rows until you have completed:
- S/M: 28 rows.
- L/XL: 30 rows.
- 2XL/3XL: 32 rows.
The wider edge will attach to the armhole, while the opposite edge will be gathered into a narrower ribbed cuff.
The sleeve length before adding the cuff is approximately 14 (15, 16) inches.
This produces the relaxed, slightly gathered sleeve silhouette shown in the design.
Step 5: Make the Second Sleeve
Repeat the first sleeve instructions.
Make sure the number of rows and the final measurements match.
Leave a long yarn tail for joining the underarm seam.
Step 6: Make the Blue Hem Ribbing
The sample cardigan has a narrow cobalt-blue ribbed hem.
You will make one strip for the back and one for each front.
Using Main Color A:
Foundation: Chain 7.
Row 1: Work 1 sc in the second chain from the hook and each remaining chain. (6 sts)
Row 2: Chain 1, turn. Work 1 sc BLO across. (6 sts)
Repeat Row 2 until the ribbed strip stretches gently to match the width of its corresponding body panel.
Make three strips:
- One to match the back panel.
- One for the first front panel.
- One for the second front panel.
Sew each strip along the bottom edge of its panel using a flexible mattress stitch or whipstitch.
Stretch the ribbing slightly as needed, distributing the attachment evenly.
Avoid pulling the seam tight.
Step 7: Join the Shoulder Seams
Lay the back panel flat with the right side facing upward.
Place the front panels on top, right sides together, with the outer edges aligned.
Using a yarn needle, join the shoulder seams from the outer edges toward the neckline.
Sew the outer:
- 20 stitches for S/M.
- 24 stitches for L/XL.
- 27 stitches for 2XL/3XL.
Repeat on the second shoulder.
Leave the center 12 (12, 14) stitches of the back panel unseamed for the neckline.
The remaining inner stitches of the front panels stay free at the neck edge.
Turn the joined body right side out to inspect the shoulder placement.
Step 8: Join the Side Seams
Fold the cardigan so that the front panels lie over the back panel, with right sides together.
Align the bottom ribbing and side edges.
Beginning at the bottom hem, sew upward along each side seam.
Stop before the top of the garment, leaving:
- 18 rows unseamed for S/M.
- 20 rows unseamed for L/XL.
- 22 rows unseamed for 2XL/3XL.
These openings create the armholes.
Repeat on the other side.
Make sure both openings are the same height.
Step 9: Attach the Sleeves
Take the first sleeve panel and fold it lengthwise so that its side edges meet.
Sew the long underarm seam to create a sleeve tube.
Repeat for the second sleeve.
With the cardigan turned inside out, position the upper edge of the sleeve inside the armhole opening, right sides together.
Align the sleeve underarm seam with the cardigan side seam.
Distribute the sleeve stitches evenly around the armhole.
Use stitch markers at the shoulder, underarm, and halfway points to prevent uneven attachment.
Sew the sleeve into place.
Repeat for the second sleeve.
Turn the cardigan right side out and check that both sleeves hang evenly.
Step 10: Crochet the Orange Ribbed Cuffs
The orange cuffs provide a comfortable finish and create the bold contrast shown in the photograph.
Using Contrast Color B:
Foundation: Chain 9.
Row 1: Work 1 sc in the second chain from the hook and each remaining chain. (8 sc)
Row 2: Chain 1, turn. Work 1 sc BLO across. (8 sc)
Continue repeating Row 2 until the strip fits comfortably around the wrist with gentle stretch.
Suggested cuff circumferences are approximately:
- S/M: 8.5 inches.
- L/XL: 9.5 inches.
- 2XL/3XL: 10.5 inches.
These are starting measurements; adjust for your wrist size.
Join the short ends of the ribbed strip to form a ring.
Place the cuff inside the sleeve opening, right sides together.
Match the cuff and sleeve seam positions.
Gather the wider sleeve edge evenly to fit the smaller cuff circumference, using several stitch markers to distribute the fabric.
Sew the cuff to the sleeve with a flexible seam.
Repeat for the second cuff.
Step 11: Make the Orange Front Band
The front band is one of the cardigan’s main design features.
It travels up one front edge, around the back neckline, and down the opposite front edge.
Using Contrast Color B:
Foundation: Chain 7.
Row 1: Work 1 sc into the second chain from the hook and every remaining chain. (6 sc)
Row 2: Chain 1, turn. Work 1 sc BLO across.
Repeat Row 2 until the strip is long enough to follow the entire front opening and back neckline.
Before fastening off, pin the strip loosely into position.
The front band should lie flat without puckering the cardigan body.
Adjust the length if necessary.
Sew the band along the opening using a flexible mattress stitch.
At the back neckline, distribute the stitches evenly so that the band follows the curve smoothly.
Fasten off and weave in the ends.
Step 12: Crochet the Two Front Pockets
The cardigan includes two square cobalt-blue patch pockets with orange edging.
Using Main Color A:
Foundation: Chain 18.
Row 1: Work 1 hdc into the third chain from the hook and each remaining chain. (16 hdc)
Row 2: Chain 2, turn. Work 1 hdc BLO across.
Row 3: Chain 2, turn. Work 1 regular hdc across.
Continue alternating these rows until you have completed 12 rows.
Fasten off the blue yarn.
Join Contrast Color B at an upper corner.
Work single crochet evenly around all four sides of the pocket, working two single crochets into each corner to help the border turn neatly.
Join with a slip stitch and fasten off.
Repeat to make the second pocket.
Step 13: Attach the Pockets
Lay the cardigan flat with the right side facing upward.
Position the pockets symmetrically on the lower front panels.
A useful starting placement is approximately:
- 2–3 inches above the bottom hem.
- Centered across each front panel.
- Clear of the orange front band.
Pin both pockets into position.
Use matching yarn to sew along the left edge, bottom edge, and right edge of each pocket.
Leave the upper edge open so the pockets remain functional.
Secure the top corners carefully, as these areas receive the most pulling when hands are placed inside the pockets.
Assembly and Finishing
Once all the pieces are attached, turn the cardigan inside out and inspect every seam.
Check the shoulder joins, side seams, sleeve attachments, front band, and pockets.
Weave in all remaining yarn tails using a tapestry needle.
Work each yarn tail through several stitches in different directions to keep it secure.
Avoid tying large knots because they can feel uncomfortable inside the garment.
Gently reshape the cardigan and place it flat on a clean surface.
If the yarn label permits blocking, lightly dampen the garment and arrange it to the intended measurements.
Allow it to dry completely before wearing or storing.
Tips for the Best Results
Check your gauge early
The finished width of a garment depends on your stitch gauge. A difference of even one stitch per inch can noticeably change the cardigan’s fit.
Keep the front panels identical
Count the rows of both front panels before assembling. Their lengths should match exactly.
Use markers during assembly
Markers are especially helpful when setting the sleeves into the armholes and positioning the pockets.
Avoid tight seams
A seam that is too tight may prevent the cardigan from draping comfortably. Keep your sewing stitches flexible.
Measure before adding ribbing
The length of the front band, hem ribbing, and sleeve cuffs should be based on the actual crocheted fabric rather than an assumed measurement.
Check the pocket placement
Try on the cardigan before permanently sewing the pockets in place. This helps you position them at a comfortable height.
Common Mistakes and Troubleshooting
The cardigan feels too stiff
The yarn or hook may be creating fabric that is too dense.
Try a larger hook and make another gauge swatch.
The front edges curl
Uneven tension or an overly tight front band can pull the edges out of shape.
Check the band length and seam tension before fastening everything permanently.
The sleeves feel too bulky
The sleeve rectangles may be wider than needed for your preferred fit.
Measure around your upper arm and compare that measurement with the finished sleeve width before assembly.
The cuffs are too tight
Add additional back-loop ribbing rows until the cuff fits comfortably. Make sure the attachment seam also stretches.
The pockets pull the fabric downward
Large pockets can distort a cardigan if the fabric is too loose.
Use a slightly firmer hook tension for the pockets and reinforce the upper corners.
The cardigan is shorter than expected
Check the vertical row gauge.
If necessary, add rows to the front and back panels before attaching the bottom ribbing.
Creative Variations and Customization Ideas
This design provides plenty of opportunities for personalization.
Make a monochrome cardigan
Use a single yarn color for the entire garment, including the cuffs and front band, for a more understated look.
Try different contrasting colors
Beautiful alternatives include:
- Emerald green and golden mustard.
- Burgundy and warm ivory.
- Deep purple and coral.
- Denim blue and caramel.
- Chocolate brown and turquoise.
Create a longer cardigan
Add equal numbers of rows to the front and back panels before adding the hem.
Remember that the front band must also be lengthened to match.
Remove the pockets
For a clean, minimalist style, simply leave off both patch pockets.
Make a cropped cardigan
Shorten the front and back panels while keeping the neckline and shoulder construction unchanged.
Add buttons
For an optional button closure, adjust the front bands so that they overlap and create properly sized buttonholes before attaching buttons.
How to Style Your Crochet Cardigan
The strong cobalt-blue and orange combination makes this cardigan a statement piece without requiring complicated styling.
For everyday wear, pair it with a black or white top, straight-leg jeans, and simple sneakers.
For a cozy autumn outfit, wear it over a fitted turtleneck with dark trousers and ankle boots.
The open-front design also works well with casual dresses and skirts.
Because the cardigan is relatively chunky, lightweight layers underneath help maintain a balanced silhouette.
For accessories, choose simple neutral colors that allow the crochet texture and contrasting trim to stand out.
Care and Washing Instructions
Always follow the care instructions on your chosen yarn label.
For many bulky wool blends, gentle handwashing is a suitable option.
Fill a basin with cool water and add a small amount of mild wool-safe detergent.
Submerge the cardigan and move it gently through the water without rubbing or twisting.
Rinse carefully and press out excess water.
Lay the cardigan on a clean towel, roll it gently to absorb moisture, and then arrange it flat to dry.
Avoid hanging the cardigan while wet because the weight of the yarn can stretch the shoulders and sleeves.
Store the finished garment folded rather than hanging for long periods, especially if the yarn is heavy.
Frequently Asked Questions
Is this crochet cardigan beginner-friendly?
Yes, it is suitable for confident beginners who know basic stitches, can maintain straight edges, and are comfortable sewing crocheted pieces together.
What is the easiest way to crochet a cardigan?
Working separate rectangular panels is one of the most approachable construction methods because it minimizes shaping and allows you to check the dimensions before assembly.
Can I use worsted-weight yarn instead of bulky yarn?
Yes, but you will need to recalculate stitch counts and rows based on your new gauge. Simply substituting a thinner yarn without adjustments will produce a smaller cardigan.
How do I make the cardigan oversized?
Choose a finished circumference that provides additional positive ease over your bust measurement. You can also increase the width of the body panels, provided the shoulder and sleeve proportions remain suitable.
Can I crochet this cardigan without pockets?
Absolutely. The pockets are decorative and functional additions, not structural components.
How long does it take to crochet a cardigan?
This design is estimated to take approximately 15–25 hours, depending on size, yarn, experience, and the amount of time needed for assembly.
Can I make the sleeves shorter?
Yes. Reduce the number of sleeve panel rows before attaching the ribbed cuffs. Check the desired sleeve length against your arm measurements.
What is the best way to prevent the cardigan from stretching?
Use a yarn with good recovery, avoid loose and unstable stitching, keep seams secure, and dry the cardigan flat.
Conclusion
The Cobalt & Copper Pocket Cardigan brings together comfortable construction, eye-catching color, and practical everyday details.
Its textured cobalt-blue panels, warm orange ribbed cuffs, contrasting front band, and matching patch pockets create a distinctive handmade garment that can be styled throughout the cooler months.
The straightforward construction also makes it a rewarding project for crocheters who want to move beyond small accessories and begin creating wearable clothing.
Once you’ve completed this version, experiment with different yarn colors, lengths, and pocket styles to make the pattern your own.
Related Crochet Projects to Try Next
If you enjoyed this cardigan pattern, you may also like these complementary projects:
- Oversized Crochet Sweater: Practice making comfortable garments with simple panels.
- Crochet Ribbed Scarf: Create a coordinating accessory using back-loop stitches.
- Easy Crochet Beanie: Make a colorful hat that matches your cardigan.
- Crochet Fingerless Gloves: Use the same cobalt-blue and orange palette for a practical cold-weather accessory.
These projects provide additional opportunities to practice garment construction, textured stitches, and colorful handmade accessories.