Daisy Granny Square Crochet Pattern with Raised Flower Petals
A daisy granny square crochet pattern is a lovely way to add color, texture, and handmade charm to your crochet projects. This decorative square...
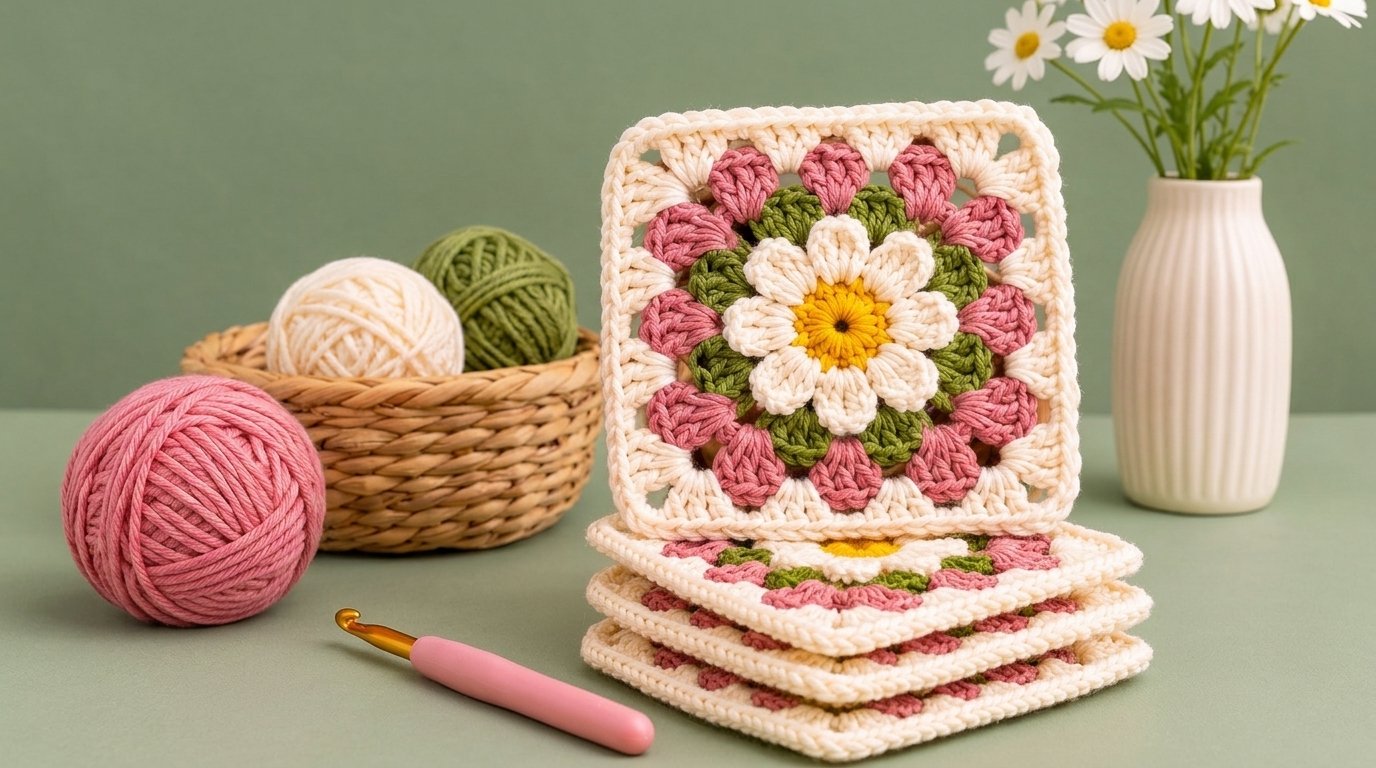
A daisy granny square crochet pattern is a lovely way to add color, texture, and handmade charm to your crochet projects. This decorative square features a golden-yellow flower center, raised cream petals, olive-green details, dusty-pink clusters, and a contrasting ivory border.
Unlike a traditional granny square made entirely from flat stitch clusters, this design combines dimensional puff stitches with familiar granny-square construction.
The finished motif can be used for crochet blankets, tote bags, cushions, table decorations, and other creative projects.
This tutorial explains how to crochet the flower center, make raised petals, form the square corners, and finish the border using US crochet terminology.
Why You’ll Love This Project
This flower granny square offers several advantages for crocheters interested in textured motifs.
- Raised flower petals: Puff stitches create an attractive three-dimensional center.
- Colorful design: Five complementary yarn colors provide beautiful contrast.
- Small project: Each square requires relatively little yarn.
- Customizable: Change the flower colors or add more border rounds.
- Versatile: Join multiple squares to create bags, cushions, or larger projects.
- Skill-building: Practice working in rounds, changing colors, and forming corners.
The design is best suited to confident beginners familiar with basic crochet stitches.
Project Overview
| Project detail | Suggested specification |
|---|---|
| Skill level | Confident beginner |
| Estimated time | 60–120 minutes per square |
| Finished size | Approximately 5–6 inches |
| Yarn weight | Medium #4 worsted |
| Crochet hook | 5 mm (H/8) |
| Construction | Center-out joined rounds |
| Main stitches | Sc, dc, puff stitch |
| Number of rounds | 6 |
| Terminology | US crochet terms |
The finished dimensions will vary depending on yarn, hook size, and tension.
Materials and Supplies Needed
You will need medium-weight yarn in five colors:
- Golden yellow: Flower center.
- Warm ivory: Raised daisy petals.
- Olive green: First background round.
- Dusty pink: Decorative square clusters.
- Cream: Outer border.
Approximately 30–45 yards of yarn in total is a reasonable starting estimate for one square.
Additional supplies include a 5 mm crochet hook, yarn needle, scissors, and optional stitch markers.
Choose similar yarn weights across all five colors to maintain even stitch height and texture.
Choosing the Right Yarn and Hook
Worsted-weight cotton yarn is a practical choice for decorative granny squares because it provides clear stitch definition and a relatively structured finish.
A soft acrylic yarn also works well, especially when making blankets or lightweight household accessories.
Begin with a 5 mm crochet hook. If your fabric feels unusually tight, try a slightly larger hook.
For pronounced petals, use consistent tension when making puff stitches. A tightly closed puff can look smaller than the surrounding petals.
When making multiple squares, use the same yarn weight and hook size throughout the project.
Crochet Stitches and Abbreviations
This pattern uses the following US crochet abbreviations:
| Abbreviation | Meaning |
|---|---|
| ch | Chain |
| sc | Single crochet |
| dc | Double crochet |
| sl st | Slip stitch |
| st / sts | Stitch / stitches |
| sp | Space |
| rnd | Round |
| rep | Repeat |
Special Stitch: Four-Hdc Puff
Yarn over, insert your hook into the indicated stitch, yarn over, and pull up a loop.
Repeat this action three more times in the same stitch, pulling each loop to a similar height.
You should have nine loops on your hook.
Yarn over and pull through all nine loops.
Chain 1 to secure the puff. This closing chain is part of the puff and is not the separate chain space mentioned afterward.
Before You Start
This granny square is worked from the center outward without turning your work.
Start with a magic ring or a small chain ring.
Each round introduces another color and builds on the stitches or spaces from the previous round.
Use a stitch marker to identify the beginning of each round if needed.
The pattern includes four corner spaces. Keeping these corners consistent is essential for producing a reasonably square shape.
Because the flower petals are raised, your motif may not lie perfectly flat until the surrounding rounds are complete.
Step-by-Step Crochet Instructions
Make the Yellow Flower Center
Using golden-yellow yarn, create a magic ring.
Round 1: Chain 1, work 8 sc into the ring.
Pull the starting tail to close the center.
Join with a slip stitch to the first sc. (8 sc)
Fasten off.
Your flower center should be compact and circular.
Crochet the Raised Cream Petals
Join cream yarn in any sc from Round 1.
Round 2:
- Work one four-hdc puff in the first sc.
- Chain 2 after the puff’s closing chain.
- Work one four-hdc puff in the next sc.
- Chain 2.
- Repeat around, making one puff in each remaining sc.
Join with a slip stitch into the top of the first puff.
You should have 8 raised petals and 8 chain-2 spaces.
Fasten off.
Keep the puff stitches approximately equal in height so the petals appear balanced.
Add the Olive-Green Background
Join olive-green yarn in any chain-2 space between the petals.
Round 3:
Chain 3, which counts as the first dc.
Work 2 additional dc into the same space, then chain 1.
In each remaining chain-2 space, work 3 dc followed by chain 1.
Join with a slip stitch to the top of the starting chain 3.
You should have 8 groups of 3 dc and 8 chain-1 spaces.
Fasten off.
The green groups begin framing the raised flower without covering its center.
Form the Pink Granny Square Corners
Join dusty-pink yarn in any chain-1 space.
Round 4:
In the first space, work:
- Chain 3, counting as the first dc.
- 2 additional dc.
- Chain 2.
- 3 dc.
- Chain 1.
In the next chain-1 space, work 3 dc, chain 1.
Repeat this sequence around, making a corner group of (3 dc, ch 2, 3 dc) in every alternate chain-1 space and a single 3-dc group in the spaces between.
Join to the starting chain.
You should have 4 corners, 4 side groups, and 8 chain-1 side spaces.
Fasten off.
The circular flower motif should now have four defined corners.
Crochet the Cream Outer Border
Join cream yarn in any corner chain-2 space.
Round 5:
Work (3 dc, ch 2, 3 dc) into the first corner.
Chain 1, work 3 dc in the next chain-1 space.
Chain 1, work 3 dc in the following chain-1 space.
Chain 1, then repeat the same sequence around the remaining three sides.
Join with a slip stitch.
You should have four corners and two side clusters between each pair of corners.
Round 6:
Chain 1 and work sc into every dc, plus one sc into each chain-1 space.
In every corner chain-2 space, work 3 sc.
Join with a slip stitch and fasten off.
This final round creates a firmer edge that is convenient for joining multiple squares.
Assembly and Finishing
Weave in the loose yarn ends using a yarn needle.
Pay particular attention to the flower center and color-change areas, where unsecured ends may become visible.
Lay the square on a flat surface and gently straighten its edges.
If your yarn permits blocking, lightly dampen the motif and pin the corners into a neat square.
Avoid pressing the raised petals completely flat.
Allow the square to dry before using it in another project.
Tips for Best Results
A few small adjustments can improve your finished square.
Keep the petals consistent. Pull each puff stitch to approximately the same height.
Count your spaces. The eight spaces around the flower provide the foundation for the square.
Identify the corners. Place stitch markers in the four corner spaces if you have difficulty following the shaping round.
Avoid excessive tension. Tight corner chains can cause the square to curl.
Check each round. Correcting an incorrect stitch count early is easier than unraveling several completed rounds.
Common Mistakes and Troubleshooting
The square curls inward
Your tension may be too tight, particularly around the petals or corners.
Try loosening your stitches or using a slightly larger hook.
The corners are uneven
Check that each corner contains two groups of three double crochet stitches separated by two chains.
The petals look different sizes
Make sure each puff contains the same number of partial stitches and that you pull the loops to a consistent height.
The square looks too rounded
Check the placement of your four corners. They must be evenly spaced around the motif.
Gentle blocking may help refine the finished shape.
Creative Variations
This granny square pattern offers plenty of opportunities for customization.
For a bright summer design, combine coral petals, a golden center, and turquoise borders.
For a more dramatic appearance, use burgundy petals with cream and forest-green accents.
You can also make a two-color version by using one color for the flower and another for all surrounding rounds.
To create a larger square, continue adding traditional granny-square rounds, maintaining four corners and increasing the number of side clusters evenly.
How to Use Your Crochet Granny Squares
A finished flower granny square can become part of many handmade projects.
Join several squares to create a decorative pillow cover or crochet tote bag.
For a blanket, make enough identical squares to reach your preferred dimensions before adding a continuous outer border.
Individual squares can also be used as decorative appliqués, small table accents, or components in patchwork accessories.
If making an item that will experience frequent handling, reinforce the joins and choose durable yarn.
Care and Maintenance
Always follow the care instructions on your yarn label.
Cotton and acrylic yarns may have different washing and drying requirements.
For delicate raised flowers, gentle handwashing may help maintain their shape.
Avoid twisting the fabric or pulling the puff stitches.
Lay the square flat to dry and reshape the corners while damp.
Store completed squares flat until you are ready to assemble them into a larger project.
Frequently Asked Questions
Is this granny square suitable for beginners?
Confident beginners can make this design after learning double crochet, slip stitch, and puff stitches. The corner-shaping round requires careful counting.
How many colors do I need?
The illustrated version uses five colors, but you can simplify the design to two or three.
How large is the finished square?
The estimated size is approximately 5–6 inches when made with worsted-weight yarn and a 5 mm hook.
Can I make this granny square with cotton yarn?
Yes. Cotton yarn provides clear stitch definition and works particularly well for bags and decorative household projects.
How do I make the square larger?
Add traditional granny-square rounds around the outer border, working increases at all four corners.
Can I use these squares for a blanket?
Yes. Make multiple squares with matching outer dimensions and join them using your preferred crochet joining method.
Why do my puff stitches look flat?
You may be pulling the loops too tightly. Try lifting each loop to an even height before closing the puff.
Conclusion
This daisy granny square crochet pattern combines dimensional flower petals with classic granny-square shaping.
The colorful center, textured stitches, and contrasting border create a decorative motif suitable for many crochet projects.
Experiment with different yarn combinations, practice the raised petals, and make several matching squares to build a larger handmade creation.
Related Crochet Projects
If you enjoy making decorative granny squares, consider these related projects:
- Classic Solid Granny Square: A simple square with clean, continuous stitches.
- Sunburst Granny Square: A circular center surrounded by colorful crochet rounds.
- Geometric Granny Square: A modern motif featuring strong angles and contrasting colors.
- Granny Square Tote Bag: A practical accessory made by joining individual crochet squares.