Cute Crochet Horse Amigurumi With Floral Saddle
A crochet horse amigurumi is a charming handmade project that brings together soft yarn textures, adorable animal details, and a playful touch of color....
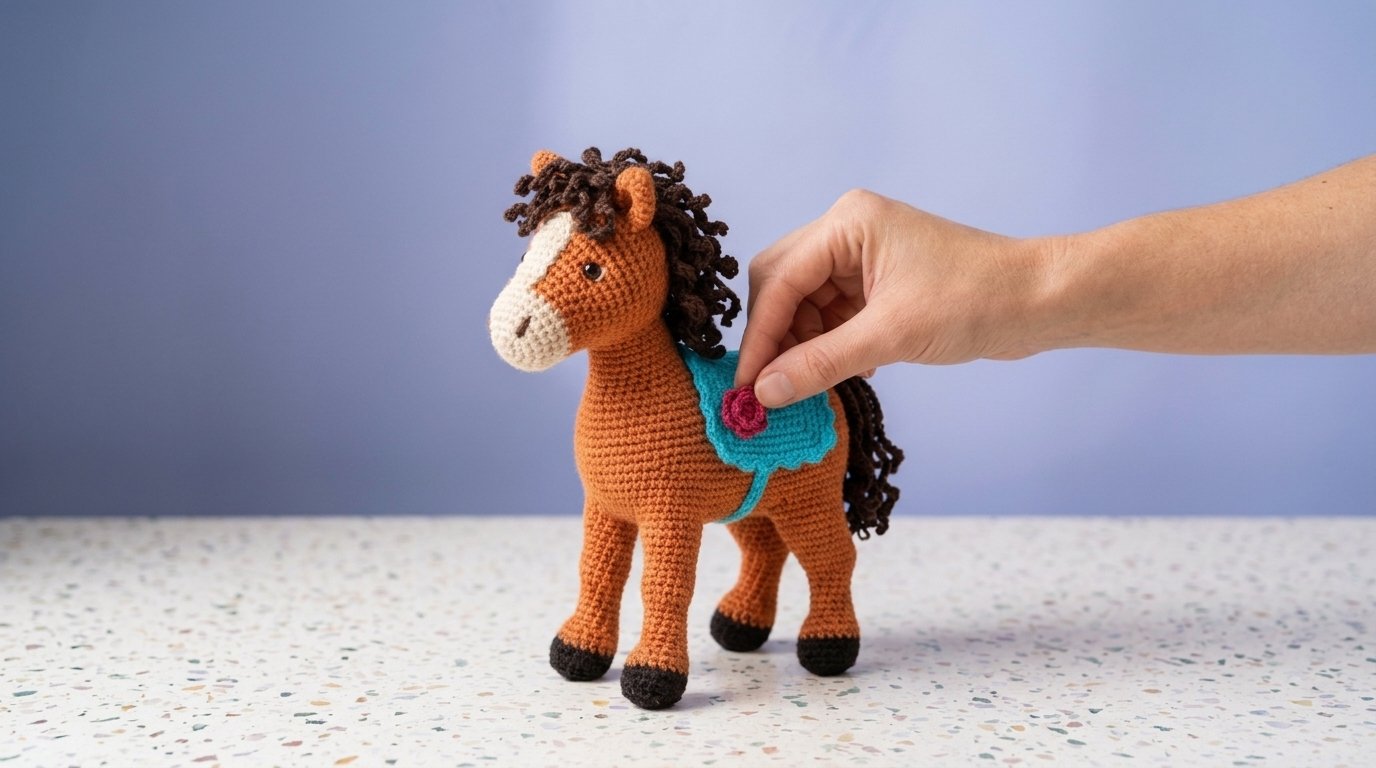
A crochet horse amigurumi is a charming handmade project that brings together soft yarn textures, adorable animal details, and a playful touch of color. With its warm chestnut-brown body, cream-colored muzzle, curly dark-brown mane, and tiny black hooves, this little crochet horse looks ready for a countryside adventure.
The design features a standing horse with four slender legs, a gently curved neck, rounded ears, and a beautiful turquoise saddle decorated with a small raspberry-pink flower. Its curly mane and flowing tail give it extra personality, making the finished amigurumi especially appealing.
This crochet horse is a lovely project for anyone who enjoys making handmade animals, farmhouse-inspired decorations, or unique gifts. You can display it on a nursery shelf, add it to an amigurumi collection, or create a whole stable of colorful crochet horses.
The pattern uses familiar crochet techniques, including single crochet, increases, decreases, and basic sewing. The individual pieces are made separately and assembled to create the finished standing horse.
What You Need for This Crochet Horse Amigurumi
Before starting, gather your yarn and crochet supplies. Using the same yarn weight throughout the project will help keep the proportions consistent.
Materials and Supplies
- Chestnut-brown yarn: Approximately 150–200 yards of worsted-weight yarn for the body, head, neck, and legs.
- Dark chocolate-brown yarn: Approximately 30–40 yards for the mane, tail, and hooves.
- Cream yarn: A small amount for the muzzle and white facial marking.
- Turquoise yarn: Approximately 25–35 yards for the decorative saddle.
- Raspberry-pink yarn: A small amount for the flower embellishment.
- Golden-yellow yarn: A little yarn for the flower center.
- Crochet hook: 3.5 mm (E/4), or a hook that creates firm, closely spaced stitches.
- Fiberfill stuffing: For shaping the body and head.
- Yarn needle: For assembling the horse and adding decorative details.
- Stitch markers: For identifying the beginning of rounds.
- Scissors: For cutting yarn and trimming loose ends.
- Black embroidery floss: For creating the eyes and nostrils.
- Straight pins: Optional, for positioning pieces before sewing.
Skill Level and Finished Size
Skill level: Intermediate, or confident beginner with amigurumi experience.
Estimated time: 7–10 hours, depending on your crochet speed and assembly experience.
Approximate finished height: 9–11 inches.
Approximate finished length: 7–9 inches.
The measurements are estimates and will vary depending on yarn, hook size, stuffing, and tension.
This horse is designed as a decorative amigurumi. The separate legs, yarn mane, and small accessories require careful attachment, especially if the finished project will be handled frequently.
Crochet Stitches and Abbreviations
This pattern uses US crochet terminology.
| Abbreviation | Meaning |
|---|---|
| MR | Magic ring |
| ch | Chain |
| sc | Single crochet |
| sl st | Slip stitch |
| hdc | Half double crochet |
| dc | Double crochet |
| inc | Increase: 2 sc in one stitch |
| dec | Invisible single crochet decrease |
| BLO | Back loop only |
| st(s) | Stitch or stitches |
| Rnd | Round |
| FO | Fasten off |
Numbers in parentheses indicate the total number of stitches after completing a round.
Unless otherwise stated, work in continuous spiral rounds. Place a stitch marker in the first stitch of each round and move it upward as you work.
How to Crochet the Horse’s Body
The body is an elongated oval that forms the main foundation for the horse.
Use chestnut-brown yarn and your 3.5 mm crochet hook.
Step 1: Begin the Rounded Body
Rnd 1: Work 6 sc into a magic ring. (6)
Rnd 2: Inc in each stitch around. (12)
Rnd 3: Repeat (1 sc, inc) six times. (18)
Rnd 4: Repeat (2 sc, inc) six times. (24)
Rnd 5: Repeat (3 sc, inc) six times. (30)
Rnd 6: Repeat (4 sc, inc) six times. (36)
Rnd 7: Repeat (5 sc, inc) six times. (42)
Rnd 8: Repeat (6 sc, inc) six times. (48)
Rnd 9–23: Work 1 sc in each stitch around. (48)
The additional even rounds create an elongated body rather than a simple sphere.
Step 2: Shape and Close the Body
Rnd 24: Repeat (6 sc, dec) six times. (42)
Rnd 25: Repeat (5 sc, dec) six times. (36)
Rnd 26: Repeat (4 sc, dec) six times. (30)
Rnd 27: Repeat (3 sc, dec) six times. (24)
Begin stuffing the body with fiberfill.
Rnd 28: Repeat (2 sc, dec) six times. (18)
Rnd 29: Repeat (1 sc, dec) six times. (12)
Add more stuffing, keeping the body firm and evenly rounded.
Rnd 30: Dec six times. (6)
Fasten off, leaving a yarn tail.
Thread the tail through the front loops of the remaining six stitches, pull gently to close the opening, and weave in the end.
Use your hands to shape the body into a slightly horizontal oval.
How to Crochet the Horse’s Long Neck
The raised neck gives the horse its recognizable standing silhouette.
You’ll crochet a tapered cylindrical piece, then attach it near the front of the body.
Step 3: Crochet the Neck
Using chestnut-brown yarn:
Rnd 1: Work 6 sc into a magic ring. (6)
Rnd 2: Inc in each stitch around. (12)
Rnd 3: Repeat (1 sc, inc) six times. (18)
Rnd 4–8: Work 1 sc in each stitch around. (18)
Rnd 9: Repeat (2 sc, inc) six times. (24)
Rnd 10–14: Work 1 sc in each stitch around. (24)
Rnd 15: Repeat (3 sc, inc) six times. (30)
Rnd 16–18: Work 1 sc in each stitch around. (30)
Fasten off, leaving a long tail for sewing.
Keep the wider end open.
Step 4: Stuff and Attach the Neck
Add fiberfill to the neck, keeping the upper section firm enough to support the head.
Position the wide opening on the upper front portion of the horse’s body.
Angle the neck slightly forward so the finished horse has a natural posture.
Use straight pins to hold it in position.
Sew around the open edge with a yarn needle and matching chestnut yarn.
Take several secure stitches through both the neck and body.
The neck should stand upright without wobbling excessively.
How to Crochet the Horse’s Head
The horse’s head is rounded with a slightly elongated appearance.
The cream muzzle will be added separately to create the distinctive face shown in the design.
Step 5: Crochet the Head
Using chestnut-brown yarn:
Rnd 1: Work 6 sc into a magic ring. (6)
Rnd 2: Inc in each stitch around. (12)
Rnd 3: Repeat (1 sc, inc) six times. (18)
Rnd 4: Repeat (2 sc, inc) six times. (24)
Rnd 5: Repeat (3 sc, inc) six times. (30)
Rnd 6: Repeat (4 sc, inc) six times. (36)
Rnd 7–13: Work 1 sc in each stitch around. (36)
Rnd 14: Repeat (4 sc, dec) six times. (30)
Rnd 15: Repeat (3 sc, dec) six times. (24)
Rnd 16: Repeat (2 sc, dec) six times. (18)
Begin stuffing the head.
Rnd 17: Repeat (1 sc, dec) six times. (12)
Rnd 18: Dec six times. (6)
Fasten off and close the opening.
Shape the head gently with your hands.
Step 6: Attach the Head to the Neck
Position the head over the narrow upper end of the neck.
Tilt it slightly forward.
Use a yarn needle and matching brown yarn to sew the head securely to the top of the neck.
Work around the connection several times.
Check the shape from the front and sides.
The horse should have a gently curved profile, with its head extending forward from the neck.
How to Crochet the Cream-Colored Muzzle
The cream muzzle is one of the most important facial details.
It creates a soft contrast against the chestnut-brown head and helps make the horse instantly recognizable.
Step 7: Make the Rounded Muzzle
Using cream yarn:
Rnd 1: Work 6 sc into a magic ring. (6)
Rnd 2: Inc in each stitch around. (12)
Rnd 3: Repeat (1 sc, inc) six times. (18)
Rnd 4: Repeat (2 sc, inc) six times. (24)
Rnd 5–7: Work 1 sc in each stitch around. (24)
Fasten off, leaving a long tail.
Lightly stuff the muzzle.
Position it on the lower front of the horse’s head and sew the open edge into place.
The muzzle should extend slightly forward.
Step 8: Add the Cream Facial Marking
The pictured horse has a narrow cream marking extending upward from its muzzle.
Using cream yarn:
Foundation: Chain 5.
Row 1: Work 1 sc in the second chain from the hook and in each remaining chain. Turn. (4)
Rows 2–8: Chain 1, work 1 sc in each stitch across. Turn. (4)
Fasten off, leaving a long tail.
Position the narrow strip vertically above the muzzle.
Sew it neatly onto the front of the head.
The marking should look like a soft stripe between the eyes and down toward the nose.
How to Crochet the Horse’s Ears
The small pointed ears give the horse its alert, friendly appearance.
Make two matching ears.
Step 9: Crochet the Rounded Ears
Using chestnut-brown yarn:
Rnd 1: Work 4 sc into a magic ring. (4)
Rnd 2: Repeat (1 sc, inc) twice. (6)
Rnd 3: Repeat (1 sc, inc) three times. (9)
Rnd 4–6: Work 1 sc in each stitch around. (9)
Fasten off, leaving a long tail.
Do not stuff the ears.
Flatten them gently and shape the tips with your fingers.
Sew one ear to each side of the upper head, leaving enough space between them for the mane.
How to Embroider the Horse’s Face
The pictured horse has a gentle expression with small dark eyes and a simple nose.
Step 10: Embroider the Eyes
Thread your yarn needle with black or dark-brown embroidery floss.
Position one eye on each side of the head, just above the muzzle.
Create a small rounded eye using several short embroidery stitches.
Add a tiny white highlight stitch if you want a brighter expression.
Repeat on the opposite side.
Step 11: Add the Nostrils
Using dark-brown embroidery floss, make two small stitches near the front of the cream muzzle.
Keep the nostrils small and evenly spaced.
Avoid adding too many facial details.
The simple eyes and tiny nostrils are enough to create the horse’s sweet, friendly appearance.
How to Crochet the Four Horse Legs
The horse has four slender brown legs with dark chocolate-colored hooves.
Crochet each leg separately before attaching them to the body.
Step 12: Crochet the Dark Hoof
Using dark-brown yarn:
Rnd 1: Work 6 sc into a magic ring. (6)
Rnd 2: Inc in each stitch around. (12)
Rnd 3: Repeat (1 sc, inc) six times. (18)
Rnd 4: Work 1 sc in BLO around. (18)
Rnd 5: Work 1 sc in each stitch around. (18)
Change to chestnut-brown yarn.
Step 13: Continue the Leg
Rnd 6: Repeat (4 sc, dec) three times. (15)
Rnd 7–17: Work 1 sc in each stitch around. (15)
Rnd 18: Repeat (3 sc, dec) three times. (12)
Rnd 19–20: Work 1 sc in each stitch around. (12)
Fasten off, leaving a long tail.
Stuff the hoof firmly and the upper leg moderately.
Keep the top opening accessible for attachment.
Repeat these instructions until you have four matching legs.
Step 14: Attach the Legs to the Body
Lay the horse’s body horizontally on your worktable.
Position two legs near the front and two near the back.
The legs should be evenly spaced so the horse can balance on all four hooves.
Use stitch markers or pins to hold the legs in place.
Sew each open leg top firmly to the underside of the body.
Check the horse’s standing position before completing the final seams.
Adjust the angle of the legs if necessary.
A soft crocheted horse may not stand perfectly on every surface. Firm hoof stuffing, even leg placement, and a wide stance improve stability.
For a child-friendly version, avoid inserting sharp craft wire into the legs.
How to Crochet the Curly Dark-Brown Mane
The curly mane gives this horse much of its personality.
Instead of using loose yarn strands, you can crochet small spiral curls that create a textured, slightly tousled appearance.
Step 15: Crochet One Curly Mane Strand
Using dark chocolate-brown yarn:
- Chain 16.
- Work 2 sc in the second chain from the hook.
- Continue working 2 sc into each remaining chain.
- Fasten off, leaving a long yarn tail.
The extra stitches cause the strand to curl naturally into a loose spiral.
Gently twist the strand with your fingers to emphasize the curl.
Step 16: Make Additional Curls
Repeat the process to create approximately 12–16 curly strands.
Vary the starting chain length slightly.
Some curls can begin with 12 chains, while others may use 18–20 chains.
The different lengths give the mane a natural, slightly uneven appearance.
Step 17: Attach the Mane
Begin at the top of the horse’s forehead.
Use your yarn needle to attach the curls along the center of the head.
Continue down the back of the neck.
Keep the curls close enough to create a full mane without covering the entire face.
Allow a few shorter curls to fall naturally near the ears.
Secure every strand firmly at its base.
For a decorative horse, the curls can remain soft and loose. If the amigurumi will be handled frequently, stitch the curls down at additional points to reduce snagging.
How to Crochet the Horse’s Tail
The flowing dark-brown tail coordinates with the curly mane.
Step 18: Make the Tail Strands
Using dark-brown yarn, create approximately 10–12 crochet curls.
For each strand:
- Chain 20.
- Work 2 sc in each chain, beginning in the second chain from the hook.
- Fasten off, leaving a tail for sewing.
Vary the lengths slightly to create a full, natural-looking tail.
Step 19: Attach the Tail
Gather the curled strands together at one end.
Sew them securely into a small bundle.
Position the bundle at the back of the horse’s body.
Use your yarn needle and dark-brown yarn to attach the tail firmly.
Allow the curls to hang downward.
The finished tail should extend toward the back legs without touching the ground excessively.
How to Crochet the Turquoise Saddle
The bright turquoise saddle adds a beautiful contrast to the horse’s warm brown body.
The pictured design features a small decorative saddle with a softly scalloped lower edge and a pink floral accent.
Step 20: Crochet the Saddle Base
Using turquoise yarn:
Foundation: Chain 16.
Row 1: Work 1 sc in the second chain from the hook and in each remaining chain. Turn. (15)
Rows 2–12: Chain 1, work 1 sc in each stitch across. Turn. (15)
Fasten off.
The resulting rectangle forms the main saddle blanket.
Step 21: Add the Decorative Border
Attach turquoise yarn to one corner of the rectangle.
Work single crochet stitches evenly around the outer edges.
At the lower edge, add a simple scalloped border.
For each scallop, work 3 hdc into one stitch, skip the next stitch, and slip stitch into the following stitch.
Repeat as space allows.
Keep the border small so it doesn’t overpower the saddle.
Fasten off and weave in the yarn ends.
Step 22: Make the Saddle Strap
Using turquoise yarn, crochet a chain long enough to pass gently beneath the horse’s belly.
The exact length depends on the finished body circumference.
Work one row of single crochet back along the chain to create a stronger strap.
Attach one end to the underside of the saddle.
Position the saddle across the horse’s back and bring the strap underneath the body.
Sew the opposite end securely to the other side of the saddle.
The strap should be snug enough to hold the saddle in place without distorting the stuffed body.
For a decorative figure, you can also sew the saddle directly onto the horse.
How to Crochet the Pink Flower Decoration
The little raspberry-pink flower makes the turquoise saddle especially charming.
Step 23: Crochet the Flower Center
Using golden-yellow yarn:
Rnd 1: Work 5 sc into a magic ring. (5)
Join with a slip stitch.
Fasten off.
Step 24: Add the Pink Petals
Join raspberry-pink yarn to the flower center.
For each petal:
- Chain 2.
- Work 2 hdc into the same stitch.
- Chain 2.
- Slip stitch into the same stitch.
Repeat around the five center stitches to create five small petals.
Fasten off, leaving a long yarn tail.
Gently spread the petals outward.
Step 25: Attach the Flower to the Saddle
Position the pink flower near the upper outer edge of the turquoise saddle.
Sew it securely through the center and petal bases.
Keep the flower slightly raised for a three-dimensional appearance.
The finished saddle should look colorful and playful without becoming too bulky.
Final Assembly and Finishing Details
Once the horse, mane, tail, and saddle are complete, inspect the entire amigurumi.
Check that the head and neck are firmly attached.
Make sure the four legs are evenly positioned and the hooves sit as flat as possible.
Adjust the dark-brown curls around the forehead and neck.
Arrange the tail so it hangs naturally behind the horse.
Check that the turquoise saddle is centered and the pink flower remains visible.
Use a yarn needle to weave any remaining yarn tails into the body.
Gently shape the horse with your hands to create a balanced standing posture.
Your handmade crochet horse is now ready to display.
Three Tips for a Beautiful Crochet Horse Amigurumi
1. Keep Your Crochet Tension Consistent
Amigurumi looks best when the stitches are close together.
If the fabric has visible gaps, try using a slightly smaller hook.
Consistent tension helps the head, body, and legs maintain their intended shapes.
2. Position the Legs Before Sewing
The legs have a major effect on the finished horse’s appearance.
Pin all four legs in place and check the balance before sewing.
Small adjustments can make the horse look more natural and improve its stability.
3. Vary the Mane Curls
A mane made from identical strands may look too uniform.
Mix short and long crochet curls to create a fuller, more realistic appearance.
Attach the shortest strands near the forehead and longer strands toward the back of the neck.
Three Creative Crochet Horse Variations
Cream Pony With a Pink Saddle
Use soft cream yarn for the body and warm caramel yarn for the mane and tail.
Replace the turquoise saddle with pastel pink and add a small lavender flower.
This gentle color combination creates a sweet, nursery-inspired pony.
Black Horse With a Red Saddle
Make the horse using deep charcoal or black yarn.
Use dark gray for the muzzle and a rich red shade for the saddle.
Add a small golden-yellow flower for contrast.
This creates a bold, elegant amigurumi horse.
Miniature Crochet Farm Horse
Use lightweight cotton yarn and a smaller crochet hook to create a miniature version.
Keep the same basic construction while reducing the finished size through your yarn and hook choice.
A tiny crochet horse makes a charming decorative collectible or small handmade gift.
Frequently Asked Questions About Crochet Horse Amigurumi
Is this crochet horse suitable for beginners?
Confident beginners who understand magic rings, single crochet, increases, decreases, and basic amigurumi assembly can follow the individual pieces. However, attaching four standing legs, shaping the neck, and creating the curly mane require additional patience, making it a good intermediate project.
What yarn works best for a crochet horse amigurumi?
Worsted-weight cotton or acrylic yarn works well. Cotton provides clear stitch definition and a firmer shape, while acrylic produces a softer finished toy. Choose a hook that creates tight stitches so the stuffing doesn’t show through.
How do you make a crochet horse stand upright?
Stuff the lower legs and hooves firmly, position all four legs evenly beneath the body, and check their alignment before sewing. Keep the head centered over the front of the body to reduce imbalance. A soft amigurumi may still need gentle adjustment or a display stand to remain upright.
How do you make curly crochet horse hair?
Crochet a foundation chain, then work two single crochet stitches into each chain as you return along it. The extra stitches make the strand spiral naturally. Create several curls in different lengths and sew them securely onto the head, neck, or tail area.
Can I make this crochet horse for a young child?
This design is best treated as a decorative amigurumi unless adapted for the intended child’s age. Use embroidered eyes instead of plastic eyes, eliminate detachable accessories and long loose strands, and securely sew every piece. Small decorative elements and loose loops may create choking or snagging hazards.
Make Your Own Cute Crochet Horse Amigurumi
A crochet horse amigurumi is a rewarding handmade project that combines classic crochet techniques with charming animal details.
The warm chestnut-brown body, cream muzzle, tiny ears, dark curly mane, four little hooves, and flowing tail create a lovable horse with plenty of personality.
The bright turquoise saddle and raspberry-pink flower add a colorful finishing touch, making this design feel especially cheerful and unique.
You can personalize the horse with different yarn colors, create a matching saddle, or make several horses for a handmade farm animal collection.
Whether you’re decorating a shelf, building your amigurumi collection, or making a thoughtful gift, this crochet horse is a lovely project to enjoy from the first stitch to the final detail.
Save this cute crochet horse amigurumi idea to your Pinterest crochet board, gather your favorite yarn colors, and enjoy creating a little handmade horse full of character and charm.