Cute Crochet Dragon Pattern – Adorable Amigurumi Dragon with Purple Wings
If you’ve ever wanted to crochet your own little magical creature, this cute crochet dragon pattern is a wonderful place to start! With its...
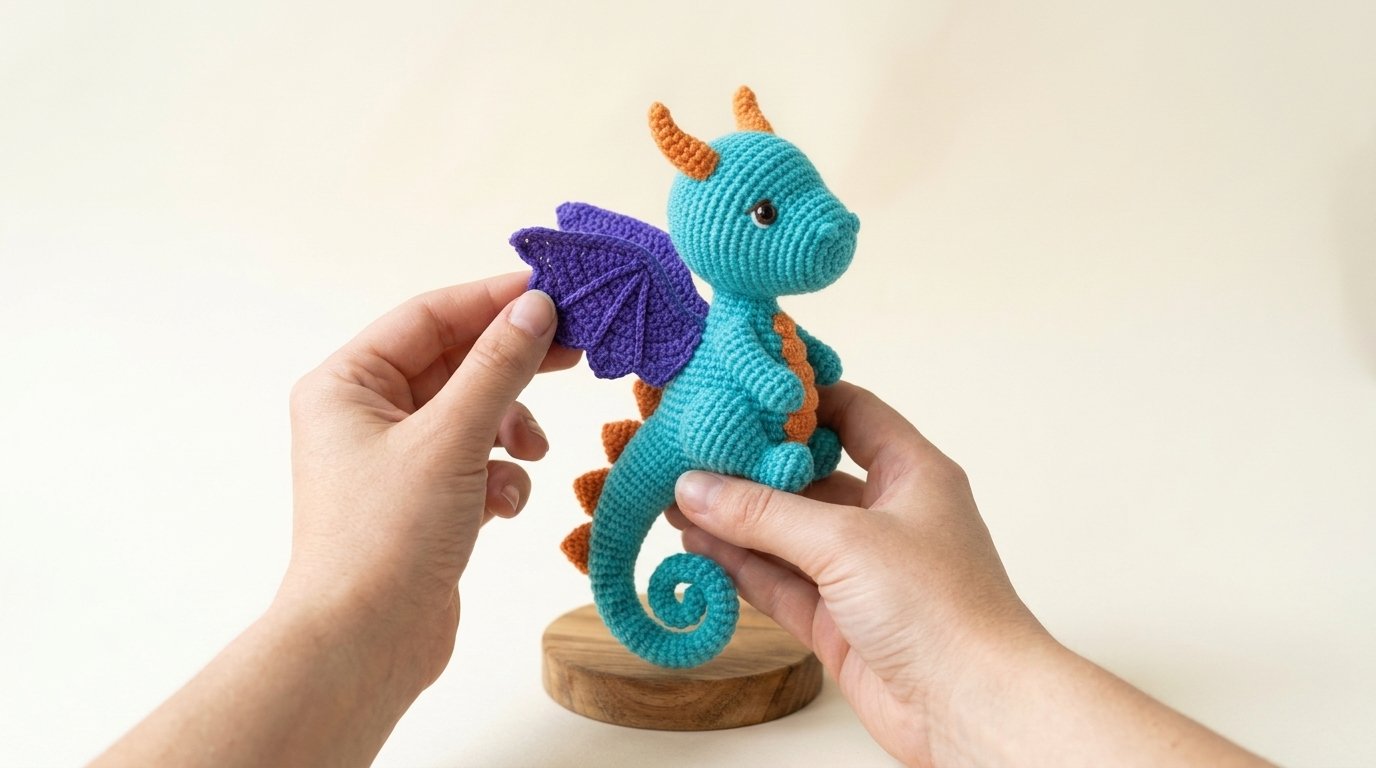
If you’ve ever wanted to crochet your own little magical creature, this cute crochet dragon pattern is a wonderful place to start! With its bright turquoise body, oversized purple wings, tiny orange horns, and adorable curled tail, this handmade dragon is full of personality.
The design combines a round, friendly face with small arms, chubby feet, and colorful details that make it especially charming. Its expressive eyes and soft, rounded features give it a playful appearance that’s perfect for an amigurumi collection.
This project is best for adventurous beginners who already know basic crochet stitches. We’ll make the dragon one piece at a time, starting with the head and body before adding the wings, horns, tail, and decorative scales.
Whether you’re creating a handmade gift, decorating a nursery shelf, or adding another adorable creature to your collection, this little dragon is sure to become a favorite.
Quick Pattern Details
| Detail | Information |
|---|---|
| Skill level | Adventurous beginner to intermediate |
| Project type | Crochet amigurumi dragon |
| Finished height | Approximately 8–10 inches |
| Estimated time | 7–10 hours |
| Yarn weight | Medium weight #4 |
| Crochet hook | 3.5 mm (E/4) |
| Main stitches | Single crochet, increases, decreases |
| Construction | Separate pieces sewn together |
| Terminology | US crochet terms |
The finished size depends on your yarn, hook, and crochet tension.
Materials and Supplies
One of the prettiest features of this dragon is its cheerful color combination.
Yarn Colors
Turquoise Blue – Main Color
Choose a bright turquoise or aqua-blue yarn for the head, body, arms, legs, and curled tail.
Estimated amount: 130–180 yards.
Deep Purple – Wing Color
Use a rich violet or royal purple yarn for the dragon’s large decorative wings.
Estimated amount: 40–60 yards.
Warm Orange – Accent Color
Choose a golden-orange shade for the horns, belly scales, and small spikes along the dragon’s back and tail.
Estimated amount: 30–45 yards.
Additional Supplies
- 3.5 mm crochet hook
- Polyester fiberfill stuffing
- Yarn needle
- Scissors
- Stitch markers
- Two 9 mm safety eyes or black embroidery yarn
- Small amount of brown yarn for optional eye details
- Sewing pins
Yarn substitution tip: Cotton yarn gives amigurumi a firm, defined shape, while acrylic creates a softer texture. Choose yarns of similar thickness to keep the dragon’s proportions balanced.
If you’re making this dragon for a baby or child under three, embroider the eyes rather than using plastic safety eyes. Avoid detachable decorations and make sure every piece is securely attached.
Crochet Abbreviations
This pattern uses US crochet terminology.
| Abbreviation | Meaning |
|---|---|
| MR | Magic ring |
| ch | Chain |
| sc | Single crochet |
| hdc | Half double crochet |
| dc | Double crochet |
| sl st | Slip stitch |
| inc | Increase: 2 sc in one stitch |
| dec | Invisible decrease over 2 stitches |
| BLO | Back loop only |
| st(s) | Stitch or stitches |
| rnd | Round |
| rep | Repeat |
Magic ring: Create an adjustable loop, crochet your starting stitches into it, and pull the yarn tail to close the opening.
Invisible decrease: Insert your hook through the front loops of the next two stitches, yarn over, pull through both loops, yarn over again, and pull through the remaining loops.
Unless otherwise stated, work in continuous spiral rounds without joining.
Place a stitch marker in the first stitch of each round.
Cute Crochet Dragon Pattern: Step-by-Step Instructions
We’ll make the dragon in several sections:
- Crochet the rounded head.
- Create the turquoise body.
- Make the arms and feet.
- Crochet the long curled tail.
- Create the purple wings.
- Add the orange horns and spikes.
- Assemble and decorate your dragon.
Take your time and enjoy watching your little dragon come together.
Step 1: Crochet the Dragon’s Head
The dragon has a large, rounded head with a friendly face and a slightly protruding snout.
Using turquoise yarn and your 3.5 mm hook:
Round 1: Make a magic ring and work 6 sc into it. (6 stitches)
Round 2: Work 2 sc in every stitch. (12 stitches)
Round 3: Repeat 1 sc, inc six times. (18 stitches)
Round 4: Repeat 2 sc, inc six times. (24 stitches)
Round 5: Repeat 3 sc, inc six times. (30 stitches)
Round 6: Repeat 4 sc, inc six times. (36 stitches)
Round 7: Repeat 5 sc, inc six times. (42 stitches)
Round 8: Repeat 6 sc, inc six times. (48 stitches)
Rounds 9–15: Work 1 sc in every stitch. (48 stitches per round)
The head should now resemble a rounded bowl.
Add the Dragon’s Eyes
If you’re using safety eyes, position them between Rounds 11 and 12, approximately 9–10 stitches apart.
Check that the eyes sit evenly on either side of the area where the snout will be attached.
Secure the backs before closing the head.
For embroidered eyes, wait until the head is stuffed and shaped.
Finish the Head
Round 16: Repeat 6 sc, dec six times. (42 stitches)
Round 17: Repeat 5 sc, dec six times. (36 stitches)
Round 18: Repeat 4 sc, dec six times. (30 stitches)
Round 19: Repeat 3 sc, dec six times. (24 stitches)
Begin stuffing the head firmly.
Round 20: Repeat 2 sc, dec six times. (18 stitches)
Round 21: Repeat 1 sc, dec six times. (12 stitches)
Fasten off, leaving a long tail.
Add any remaining stuffing, then sew through the front loops of the final 12 stitches and pull closed.
Beginner tip: Add stuffing gradually rather than pushing in one large handful. This helps keep the head smooth and rounded.
Step 2: Crochet the Dragon’s Snout
The short rounded snout gives this dragon its sweet, recognizable face.
Using turquoise yarn:
Round 1: Work 6 sc into a magic ring. (6 stitches)
Round 2: Increase in every stitch. (12 stitches)
Round 3: Repeat 1 sc, inc six times. (18 stitches)
Round 4: Repeat 2 sc, inc six times. (24 stitches)
Rounds 5–7: Work 1 sc into every stitch. (24 stitches per round)
Fasten off, leaving a long sewing tail.
Stuff the snout lightly and position it on the front of the head, just below the eyes.
Sew around its open edge, adding a little more stuffing if needed before closing the seam.
Gently shape the snout with your fingers.
For extra detail, embroider two tiny nostrils with darker turquoise yarn.
Step 3: Crochet the Dragon’s Body
The body is slightly rounded at the bottom and narrows toward the neck.
Using turquoise yarn:
Round 1: Make a magic ring with 6 sc. (6 stitches)
Round 2: Increase in every stitch. (12 stitches)
Round 3: Repeat 1 sc, inc six times. (18 stitches)
Round 4: Repeat 2 sc, inc six times. (24 stitches)
Round 5: Repeat 3 sc, inc six times. (30 stitches)
Round 6: Repeat 4 sc, inc six times. (36 stitches)
Rounds 7–13: Work 1 sc in every stitch. (36 stitches per round)
Round 14: Repeat 4 sc, dec six times. (30 stitches)
Rounds 15–17: Work evenly. (30 stitches per round)
Round 18: Repeat 3 sc, dec six times. (24 stitches)
Rounds 19–21: Work evenly. (24 stitches per round)
Round 22: Repeat 2 sc, dec six times. (18 stitches)
Rounds 23–24: Work evenly. (18 stitches per round)
Fasten off, leaving a long tail.
Stuff the body firmly, keeping the top slightly flexible for attaching the head.
The wider bottom helps give the dragon a cute seated appearance.
Step 4: Crochet the Small Dragon Arms
The reference dragon has two short turquoise arms resting near its belly.
Make two identical arms.
Round 1: Work 6 sc into a magic ring. (6 stitches)
Round 2: Increase in every stitch. (12 stitches)
Rounds 3–7: Work 1 sc in every stitch. (12 stitches per round)
Round 8: Repeat 2 sc, dec three times. (9 stitches)
Rounds 9–13: Work evenly. (9 stitches per round)
Fasten off with a long sewing tail.
Stuff the lower half of each arm lightly.
Leave the upper portion relatively flat so it can sit naturally against the body.
Repeat for the second arm.
Step 5: Crochet the Dragon’s Feet
The dragon has small rounded feet that extend forward when it sits.
Make two feet using turquoise yarn.
Round 1: Work 6 sc into a magic ring. (6 stitches)
Round 2: Increase in every stitch. (12 stitches)
Round 3: Repeat 1 sc, inc six times. (18 stitches)
Rounds 4–7: Work evenly. (18 stitches per round)
Round 8: Repeat 1 sc, dec six times. (12 stitches)
Rounds 9–10: Work evenly. (12 stitches per round)
Fasten off with a long tail.
Stuff each foot lightly and flatten the opening.
Sew the opening closed before attaching the feet to the lower front of the body.
Beginner tip: Position both feet before sewing. They should point slightly outward for a natural seated appearance.
Step 6: Crochet the Long Curled Dragon Tail
The curled tail is one of the most charming features of this dragon.
We’ll crochet it from the narrow tip toward the wider base, gradually increasing the stitches.
Using turquoise yarn:
Round 1: Work 6 sc into a magic ring. (6 stitches)
Rounds 2–7: Work evenly. (6 stitches per round)
Round 8: Repeat 2 sc, inc twice. (8 stitches)
Rounds 9–13: Work evenly. (8 stitches per round)
Round 14: Repeat 3 sc, inc twice. (10 stitches)
Rounds 15–19: Work evenly. (10 stitches per round)
Round 20: Repeat 4 sc, inc twice. (12 stitches)
Rounds 21–24: Work evenly. (12 stitches per round)
Round 25: Repeat 2 sc, inc four times. (16 stitches)
Rounds 26–29: Work evenly. (16 stitches per round)
Round 30: Repeat 3 sc, inc four times. (20 stitches)
Rounds 31–34: Work evenly. (20 stitches per round)
Round 35: Repeat 4 sc, inc four times. (24 stitches)
Rounds 36–38: Work evenly. (24 stitches per round)
Fasten off with a long sewing tail.
Stuff the wider portion firmly and the narrow tip very lightly.
Shape the Curled Tail
To create the signature spiral:
- Hold the tail in a gentle curve.
- Thread turquoise yarn through your needle.
- Pass the needle through the inside curve of the tail, catching small sections of crocheted fabric.
- Pull gently to bring the narrow end inward.
- Secure the shape with several hidden stitches.
Continue shaping until the tip forms a small spiral.
Avoid pulling too tightly, which can distort the stitches.
The finished tail should look like a graceful curling dragon tail.
Step 7: Crochet the Purple Dragon Wings
The large purple wings give the dragon its magical appearance.
We’ll make two flat, tapered wing panels and add decorative curved edges.
Make the First Wing
Using deep purple yarn:
- Chain 13.
- Row 1: Work 1 sc into the second chain from your hook and across. (12 stitches)
- Row 2: Chain 1, turn, and work 12 sc. (12 stitches)
- Row 3: Chain 1, turn, and work 10 sc. (10 stitches)
- Row 4: Chain 1, turn, and work 10 sc. (10 stitches)
- Row 5: Chain 1, turn, and work 8 sc. (8 stitches)
- Row 6: Chain 1, turn, and work 8 sc. (8 stitches)
- Row 7: Chain 1, turn, and work 6 sc. (6 stitches)
- Row 8: Chain 1, turn, and work 6 sc. (6 stitches)
- Row 9: Chain 1, turn, and work 4 sc. (4 stitches)
- Row 10: Chain 1, turn, and work 4 sc. (4 stitches)
Fasten off.
The panel should have a stepped, tapered shape.
Create the Scalloped Wing Edge
Join purple yarn along the stepped outer edge.
At three evenly spaced edge points, work the following decorative shell:
1 sc, 1 hdc, 2 dc, 1 hdc, 1 sc into the same edge space.
Use slip stitches between the shells to connect them.
This creates rounded sections that resemble a small bat wing.
Fasten off, leaving a long sewing tail.
Make a second wing with the scalloped edge positioned on the opposite side so the finished pair is mirrored.
Add Wing Veins
Using a yarn needle and purple yarn, embroider three slightly raised lines from the narrow inner side toward the outer scallops.
These decorative lines create the appearance of wing supports and make the wings look more dimensional.
Beginner tip: Lay both wings side by side before attaching them. Adjust their shapes gently so they form a balanced pair.
Step 8: Crochet the Orange Dragon Horns
The little orange horns add a playful finishing touch to the dragon’s head.
Make two horns using orange yarn.
Round 1: Work 4 sc into a magic ring. (4 stitches)
Round 2: Work evenly. (4 stitches)
Round 3: Repeat 1 sc, inc twice. (6 stitches)
Round 4: Work evenly. (6 stitches)
Round 5: Repeat 2 sc, inc twice. (8 stitches)
Round 6: Work evenly. (8 stitches)
Round 7: Repeat 3 sc, inc twice. (10 stitches)
Rounds 8–9: Work evenly. (10 stitches per round)
Fasten off, leaving a long tail.
Stuff each horn lightly.
Gently bend the tip backward to create a soft curved appearance.
Sew the horns onto the top of the dragon’s head, leaving a little space between them.
Step 9: Make the Orange Back Spikes
The orange spikes run from the back of the dragon’s neck down toward the curled tail.
We’ll make several small triangular pieces.
Crochet One Spike
Using orange yarn:
- Chain 6.
- Work 1 sc into the second chain from your hook and across. (5 stitches)
- Chain 1, turn, work sc2tog, then 3 sc. (4 stitches)
- Chain 1, turn, work sc2tog, then 2 sc. (3 stitches)
- Chain 1, turn, work sc2tog, then 1 sc. (2 stitches)
- Chain 1, turn, work sc2tog. (1 stitch)
Fasten off with a sewing tail.
Make approximately 8–10 spikes.
You can vary their sizes slightly by using shorter foundation chains for the smallest spikes.
Arrange the pieces along the center of the back and the upper side of the tail.
Sew each spike securely along its wider foundation edge.
Keep the points facing outward.
Step 10: Crochet the Orange Belly Scales
The inspiration dragon features a small row of raised orange scales down the front of its body.
These create a lovely contrast against the turquoise yarn.
Make six small circular scales.
Using orange yarn:
Round 1: Work 6 sc into a magic ring. (6 stitches)
Round 2: Repeat 1 sc, inc three times. (9 stitches)
Fasten off with a sewing tail.
Flatten each small circle.
Position the scales in a vertical line down the dragon’s chest, overlapping them slightly like little rounded plates.
Sew the upper and side edges of each scale to the body, leaving the lower edge slightly raised.
This creates a textured appearance similar to the reference design.
Step 11: Assemble Your Crochet Dragon
Now it’s time to bring all the pieces together!
Attach the Head
Position the head on top of the narrow body opening.
Make sure the snout faces forward.
Sew the body opening securely to the underside of the head, distributing the 18 neck stitches evenly.
Add extra stuffing to the neck area if needed before finishing the seam.
Attach the Arms and Feet
Sew the arms to either side of the upper body, just below the head.
Angle them slightly forward.
Attach the feet near the bottom front of the body.
Check that the dragon can sit comfortably before securing the final stitches.
Attach the Tail
Position the wide end of the curled tail on the lower back of the body.
Sew around the base using small, firm stitches.
The tail should curve outward and curl toward the front.
Attach the Wings
Position one purple wing on each side of the upper back, below the horns and behind the shoulders.
Use the long yarn tails to sew them securely in place.
Angle the wings slightly upward and outward.
The decorative scalloped edges should remain visible.
Add the Final Details
Attach the orange back spikes and belly scales if you haven’t already done so.
Check the position of the horns and wings.
If desired, embroider tiny curved eyebrows above the eyes using brown yarn.
These small details can give your dragon an especially sweet expression.
Finishing Your Cute Crochet Dragon
Take a moment to inspect your finished amigurumi.
Weave in any remaining yarn tails.
Gently shape the head, body, and tail with your hands.
Straighten the wings and adjust their position so both sides look balanced.
Make sure the horns and spikes are securely attached.
If the dragon has difficulty sitting, gently redistribute the stuffing toward the lower body and adjust the position of the feet and tail.
Your little turquoise dragon is now ready to display!
Make This Crochet Dragon Your Own
One of the best things about amigurumi is how easily you can personalize each project.
1. Pastel Baby Dragon
Use mint green for the body, soft lavender for the wings, and pale peach for the horns.
This creates a gentle, dreamy color combination.
2. Fire Dragon
Choose bright red yarn for the body, golden yellow wings, and deep orange horns and spikes.
The warm colors give your dragon a bold, fiery personality.
3. Midnight Fantasy Dragon
Try dark navy blue for the body, deep plum wings, and silver-gray horns.
Add embroidered stars or small decorative details for a magical nighttime look.
Tips for Beautiful Amigurumi Dragons
Keep your stitches tight. Use a hook slightly smaller than the yarn label recommends to prevent stuffing from showing through.
Stuff gradually. Small amounts of stuffing help you maintain smooth, rounded shapes.
Use stitch markers. Continuous rounds can be difficult to count without a marker.
Pin pieces before sewing. This helps you check proportions and placement.
Shape the tail slowly. Gentle shaping creates a neater spiral than pulling the yarn tightly.
Secure the wings firmly. Multiple attachment stitches help the wings maintain their position.
How to Care for Your Crochet Dragon
Handmade amigurumi creatures can stay beautiful with gentle care.
- Remove dust using a soft brush.
- Spot-clean with a lightly damp cloth when necessary.
- Follow your yarn’s washing instructions.
- Avoid twisting or wringing the stuffed pieces.
- Allow the dragon to air-dry completely.
- Keep it away from prolonged direct sunlight to reduce fading.
- Check the attachments occasionally, especially if the dragon is handled frequently.
Store your dragon in a dry, clean space when not on display.
Frequently Asked Questions
Is this cute crochet dragon pattern beginner-friendly?
Yes, it’s suitable for adventurous beginners who already understand single crochet, increases, and decreases. The wings and curled tail require a little extra attention, but working one piece at a time makes the project manageable.
What yarn is best for a crochet dragon amigurumi?
Medium-weight cotton or acrylic yarn works well for a soft, structured dragon. Cotton provides excellent stitch definition, while acrylic can produce a lighter, softer finish.
How do I make the crochet dragon’s tail curl?
You can shape the tail by gently bending it and using hidden stitches along the inner curve. Keeping the tip lightly stuffed allows the narrow section to bend more easily.
Can I make this crochet dragon smaller?
Absolutely! Use thinner yarn and a smaller crochet hook while following the same stitch counts. The finished dragon will be smaller, although the exact dimensions depend on your yarn and gauge.
Conclusion
This cute crochet dragon pattern is a delightful way to turn simple crochet stitches into a colorful little fantasy creature.
With its turquoise body, purple bat-like wings, orange horns, tiny belly scales, and beautifully curled tail, every detail adds to its adorable personality.
Enjoy creating your dragon one piece at a time, and don’t be afraid to experiment with different colors and expressions.
Whether you keep it on a shelf, add it to your amigurumi collection, or give it as a thoughtful handmade gift, your little dragon is sure to bring a smile.
Save this crochet dragon pattern to your favorite Pinterest crochet board so you can return whenever you’re ready to make another magical friend!