Crochet Trailing Plant with Heart-Shaped Leaves: A No-Watering Houseplant
Introduction A crochet trailing plant brings all the charm of a cascading houseplant without the watering can. Dozens of small heart-shaped leaves hang from...
Introduction
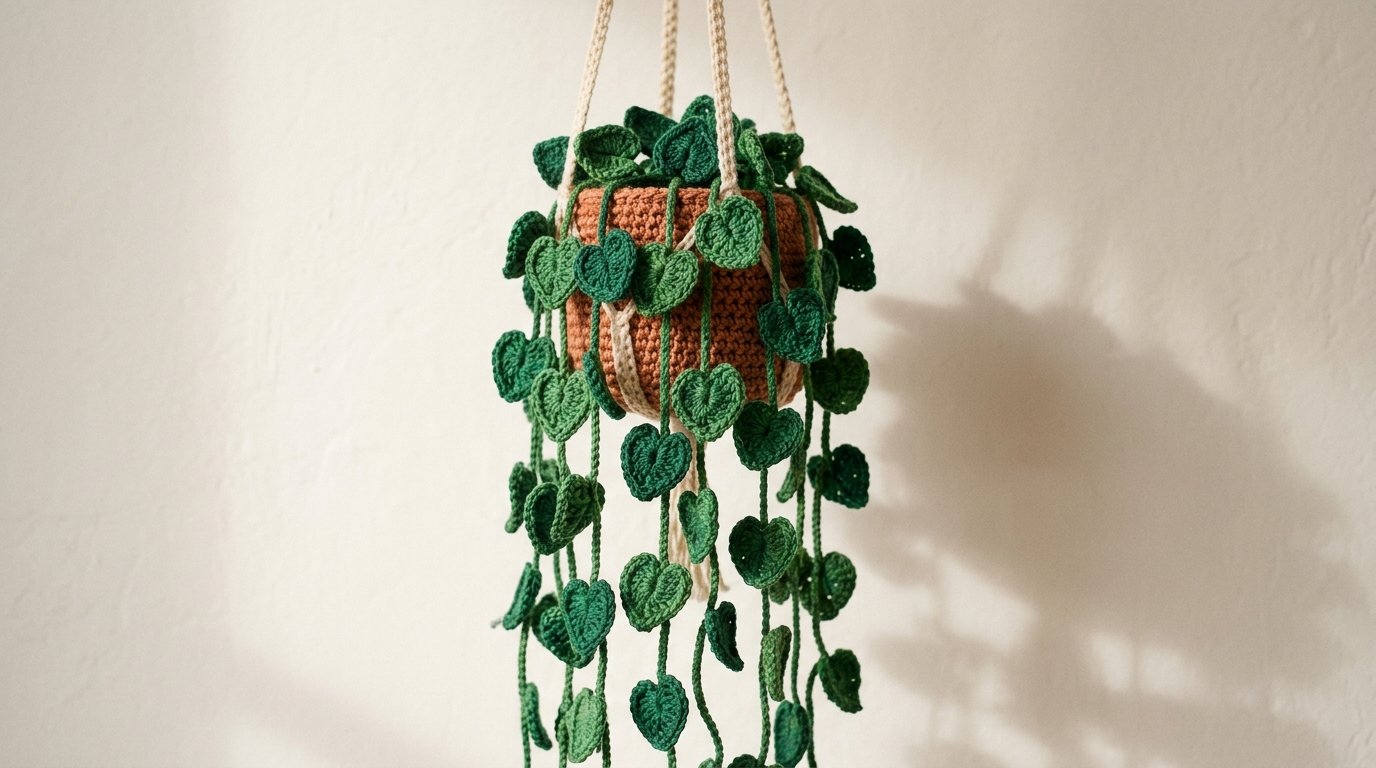
A crochet trailing plant brings all the charm of a cascading houseplant without the watering can. Dozens of small heart-shaped leaves hang from crocheted vines of varying lengths, spilling out of a textured pot cover suspended in a simple hanger. It looks lovely on a bookshelf, in a bathroom, or anywhere real plants struggle.
This pattern is built around one beginner-friendly element: a small single-crochet heart leaf. Once you’ve made one, you’ve made them all, and the project becomes a relaxing rhythm of leaves and vines. You’ll also crochet a simple pot cover and a hanging hanger so the plant can go straight onto a hook or shelf when it’s finished.
Why You’ll Love This Project
- No plant care. It never needs water, sunlight, or repotting.
- One repeating leaf. The whole plant is built from a single small heart motif, so the pattern gets easier with every leaf.
- Works in low-light rooms. Bathrooms, basements, and windowless offices all suit it.
- Great scrap-yarn project. Leaves use only a few yards each, so greens from your stash finally get used.
- Customizable size. Add or remove vines to fit any shelf, hook, or wall.
Project Overview
- Project type: Crochet home decor / faux houseplant
- Difficulty: Beginner
- Estimated time: About 4–6 hours for the full plant, depending on how many vines you make
- Suggested finished size: About 18–24 inches (45–60 cm) from the top of the hanger to the longest leaf tip; width about 8–10 inches (20–25 cm)
- Yarn weight: Worsted (medium, weight 4) cotton or cotton blend
- Crochet hook: 4.0 mm
- Main techniques: Chain, slip stitch, single crochet, half double crochet, working in rounds, simple joining
- Construction: A crocheted pot cover, a crocheted hanger, crocheted vines, and individual heart leaves attached to the vines
- Terminology: US crochet terms
Sizes and times are estimates and will vary with your yarn, hook, and tension.
Materials and Supplies Needed
- Worsted-weight cotton yarn in two or three shades of green for leaves and vines — about 150–200 yards total
- Worsted-weight cotton yarn in terracotta for the pot cover — about 60–80 yards
- Worsted-weight cotton yarn in natural cream for the hanger — about 40–50 yards
- 4.0 mm crochet hook
- Stitch marker
- Yarn needle
- Scissors
- Small amount of fiberfill or fabric scraps (optional, to give the pot cover shape)
- A small plastic or cardboard cylinder (optional, to hold the pot cover’s shape)
Avoid anything expensive or highly specialized. Any smooth worsted cotton or cotton blend you already have will work.
Choosing the Right Yarn and Hook
Cotton is the best choice for this project because it holds the leaf shape, keeps the vines from stretching out of control, and gives crisp stitch definition. Acrylic works but tends to droop and pill over time. A cotton-acrylic blend is a good middle ground.
Use a 4.0 mm hook for worsted-weight yarn. If your leaves look floppy when held up, drop to 3.5 mm to firm up the fabric. If they feel stiff and hard to shape, go up to 4.5 mm.
There’s no strict gauge for this project, since it’s decorative. What matters is a firm, dense fabric that holds the shape. A quick swatch of five single crochet leaves will tell you whether your hook and yarn are a good match.
Crochet Stitches and Abbreviations
- ch — chain
- sl st — slip stitch
- sc — single crochet
- hdc — half double crochet
- dc — double crochet
- st — stitch
- sts — stitches
- inc — increase (two single crochet in the same stitch)
Only these basic stitches are used. No special stitches are required.
Before You Start
Make one test leaf. Crochet a single heart leaf before starting the full plant. Check that it lies flat, has a clear heart shape, and feels firm enough to hang. Adjust your hook if needed.
Plan your vine count. Decide how full you want the plant. Six vines with 8–10 leaves each makes a modest, tidy plant; ten vines with 12–15 leaves each makes a lush, cascading one. Plan before you start so the vine lengths stay balanced.
Decide whether to use a shape holder. A small cylinder inside the pot cover gives the pot a rounded, upright shape. Without one, the pot cover will be soft and may droop.
Keep the greens in a family. Two or three shades of green give the leaves natural variation. Randomly alternating shades as you attach leaves reads as more realistic than a single flat color.
Step-by-Step Crochet Instructions
Heart Leaf (make as many as you need)
Worked in rounds around a starting chain. The leaf is small and shaped like a heart with a pointed bottom.
Round 1: Ch 4. Work all of the following into the first ch: 2 dc, 2 hdc, 1 sc, 1 hdc, then 3 sc in the last ch to turn the corner, then 1 hdc, 1 sc, 2 hdc, 2 dc back up the other side of the starting chain. Join with a sl st to the starting ch. (16 sts around)
Round 2: Ch 1, sl st in each st around, working an extra sl st into the two top center stitches to sharpen the heart’s dip. Join with a sl st. Fasten off, leaving a 6-inch tail for attaching.
The leaf should be about 1½ inches (4 cm) wide and slightly taller than wide, with a soft heart shape and a gently pointed base.
Vine
Vines are simple chains that the leaves are attached to, so they can be as long or short as you like.
Row 1: Ch 15 for a short vine, or ch 20–25 for a longer one.
Fasten off. Set aside. Make a mix of short and long vines so the plant cascades naturally.
Pot Cover
Worked in the round from the bottom up.
Round 1: Make a magic ring. Work 8 sc into the ring. (8 sts)
Round 2: Work 1 inc in each st around. (16 sts)
Round 3: Sc in next st, inc in next st. Repeat from * to * around. (24 sts)
Round 4: Sc in next 2 sts, inc in next st. Repeat from * to * around. (32 sts)
Round 5: Sc in each st around through the back loop only. (32 sts) This creates a clean fold at the base.
Rounds 6–12: Sc in each st around. (32 sts)
Round 13: Sc in each st around. Join with a sl st. Fasten off, leaving a tail for weaving in.
Slip the pot cover over a small plastic or cardboard cylinder, or stuff it lightly with fiberfill, to give it shape.
Hanger
Worked as a long cord with two loops.
Cord: Ch 40. Sl st in the second ch from the hook and in each ch back to the start. Fasten off.
Make two cords of the same length. Cross them to form an X under the pot, then bring the ends up and stitch them to the top edge of the pot cover at four evenly spaced points. Join the four ends at the top with a few sl sts to form a hanging loop, or tie them off.
Alternatively, crochet three long chains, braid them, and sew the braid to the top edge of the pot cover at four points.
Attaching Vines to the Pot Cover
Thread a yarn needle with the tail of a vine. From the inside of the pot cover, stitch the top end of the vine to the top edge, about an inch apart. Work from the inside so the stitched end is hidden.
Attach short vines near the front of the pot and long vines toward the back so the cascade looks full from the front and sides.
Attaching Leaves to Vines
Thread a yarn needle with the leaf tail. Wrap the tail once or twice around the vine, then stitch back through the base of the leaf to secure it. Space leaves 1½–2 inches apart along the vine, alternating shades of green.
Leaves can be attached all on one side of the vine or randomly around it. Random attachment looks more natural.
Size Adjustments
- Shorter plant: Use only short vines (10–12 ch) and fewer leaves per vine.
- Fuller plant: Add more vines, not longer ones, so each vine stays a manageable length.
- Bigger pot: Add one more increase round to the pot base (Round 5 becomes 40 sts), then adjust the straight rounds to match.
- Smaller pot: Stop after Round 4 (32 sts) or work Round 4 with fewer increases.
Assembly and Finishing
Lay all the vines out on a table and arrange them by length before attaching. This makes it easier to distribute them evenly around the pot.
Attach the hanger, then the vines, then the leaves. Weave in all ends on the inside of the pot cover so nothing shows on the outside. If your pot cover is soft, shape it around the cylinder or stuffing before hanging.
Tips for Best Results
- Work leaves in the same tension. Tension variation between leaves will make the heart shapes look uneven.
- Alternate green shades. Random color mixing looks more like a real plant than a single flat green.
- Stitch leaves with a wrap. Wrapping the tail around the vine before stitching gives each leaf a small natural “joint.”
- Attach vines from the inside. Start stitching each vine from inside the pot so the join is hidden.
- Check the balance before hanging. Hold the plant up before finishing so you can adjust vine distribution.
Common Mistakes and Troubleshooting
Leaves curl up. This usually means your stitches are too tight around the edge. Work the second round (the sl st round) a little more loosely.
The pot cover slumps. Use a cylinder inside or stuff the pot firmly. Cotton yarn also holds shape better than acrylic.
Vines pull out of the pot. Anchor each vine tail to more than one stitch at the top edge and finish with a small knot on the inside.
The plant looks lopsided. Redistribute the vines — put more long vines toward the back and more short ones at the front and sides.
Leaves look identical and stiff. Vary the leaf shade and attach some with a slight tilt so they don’t line up perfectly.
Creative Variations
- Single-color minimalist look. All leaves in one shade of deep green for a clean, modern appearance.
- Fall palette. Leaves in rust, mustard, and deep orange for a seasonal arrangement.
- Bright accent. A few leaves in a soft pink or cream tucked among the greens for contrast.
- Shorter wall-hanging version. Use longer vines and a wooden dowel at the top instead of a pot hanger.
- Tabletop version. Skip the hanger and place the pot cover on a shelf so the vines drape over the edge.
How to Use or Style Your Crochet Project
Hang your plant on a wall hook, from a curtain rod, or from a ceiling hook. It works well on a bookshelf, in a bathroom corner, above a desk, or in a kitchen nook. The leaves are decorative only, so keep the plant away from pets that chew yarn and small children who might pull on the vines.
Care and Maintenance
Dust the leaves gently with a soft brush or a cool hairdryer on low. Avoid soaking the plant; if it needs cleaning, spot-clean with a damp cloth and mild soap. Do not wring or twist the vines. Store the plant flat or in a loose box when not in use so the leaves don’t crush. If the pot cover is stuffed, remove the stuffing before washing if the yarn is machine washable. Follow your yarn label’s care instructions.
Frequently Asked Questions
How many leaves do I need for a full plant?
A modest plant needs about 50–60 leaves; a lush plant needs about 100–120. Each leaf uses only a few yards, so it’s easy to build up gradually.
Can I use acrylic yarn?
Yes, but cotton holds the shape better. Acrylic leaves may droop and pill over time.
Do I have to use a cylinder inside the pot?
No. It’s optional. Stuffing the pot with fiberfill works too, though the pot will be slightly softer.
How do I attach the hanger so it doesn’t sag?
Use cotton cord and stitch the ends to the top edge of the pot at four evenly spaced points. Cross the cords underneath for stability.
Can I make this in one evening?
A small plant with five or six vines is possible in an evening. A lush plant takes a few sessions.
Will the leaves stay attached over time?
Yes, if you wrap the tail once around the vine and stitch back through the leaf. Avoid tying only a knot at the base.
How do I keep the vines from tangling when I store it?
Coil each vine loosely and tie with a scrap of yarn, or wrap the whole plant in tissue paper.
Conclusion
A crochet trailing plant is a satisfying project because it grows as you work — one leaf, one vine, one shade of green at a time. The single repeating heart leaf keeps the pattern simple, and the pot cover and hanger give the finished plant a real, placeable shape. Make it lush or make it modest; either version adds warmth to a room that no real plant needs to survive in.
Related Crochet Projects
If you enjoy this kind of decorative crochet, you might also like a crochet pothos vine with pointed leaves, a crochet cactus in a small pot, a crochet wall hanging with layered leaves, or a crochet hanging basket with simple stripes.