Crochet Sunflower Pot Pattern – Easy DIY Sunflower Home Decor Idea
Introduction A crochet sunflower pot is a beautiful way to bring sunshine into your home without worrying about watering, sunlight, or seasonal changes. With...
Introduction
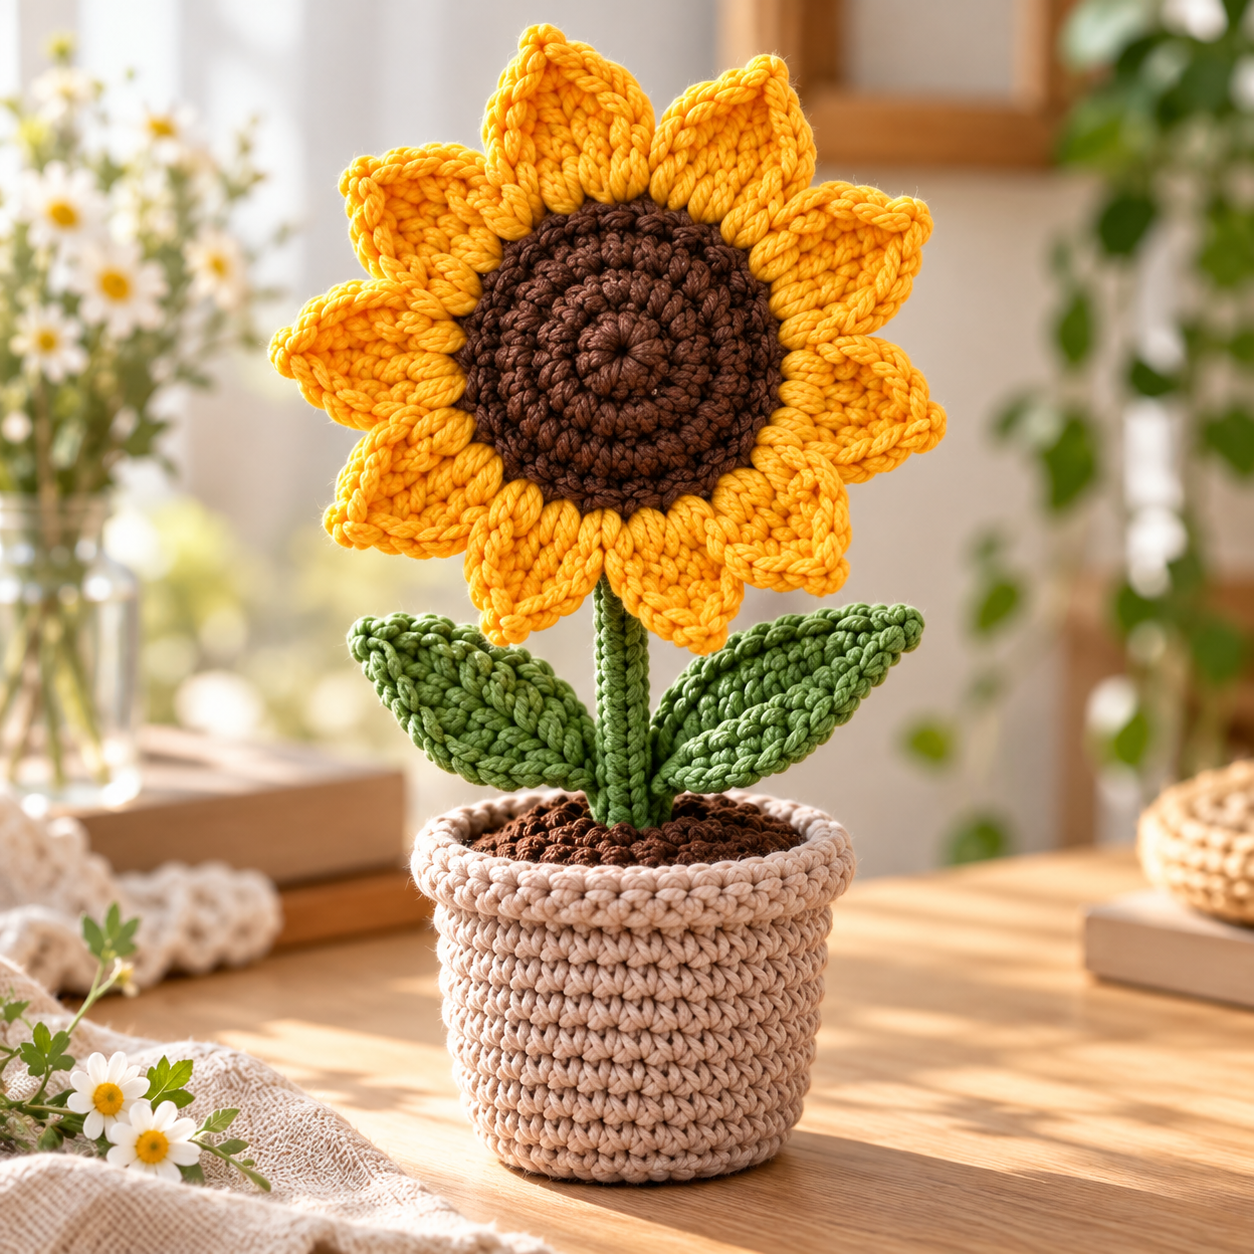
A crochet sunflower pot is a beautiful way to bring sunshine into your home without worrying about watering, sunlight, or seasonal changes. With cheerful golden petals, a rich brown center, soft green leaves, and a cozy handmade planter, this decorative flower captures the warmth of a summer garden.
Unlike fresh flowers, crocheted sunflowers stay beautiful all year. They make thoughtful handmade gifts, brighten workspaces, and add personality to shelves, windowsills, and craft rooms.
This tutorial shows you how to create a sunflower pot using separate crochet components. You’ll make the circular flower center, individual petals, leaves, stem, soil insert, and decorative pot before assembling everything into one charming display.
The pattern below is an original beginner-friendly interpretation inspired by the reference image. It has not been physically tested, so the exact finished appearance and measurements may vary.
Pattern overview
| Detail | Information |
|---|---|
| Skill level | Confident beginner to intermediate |
| Terminology | US crochet terms |
| Estimated time | 4–6 hours |
| Hook | 3.5 mm |
| Yarn | Medium-weight cotton or acrylic |
| Flower petals | 10 |
| Leaves | 2 |
| Construction | Separate pieces, sewn together |
| Finished height | Approximately 20–25 cm, depending on materials |
Materials you’ll need
- Golden yellow yarn for the sunflower petals
- Dark brown yarn for the flower center and soil
- Sage green yarn for the leaves and stem
- Beige or oatmeal yarn for the flower pot
- 3.5 mm crochet hook
- Polyester stuffing
- Yarn needle and stitch markers
- Scissors
- Optional floral wire or a wooden dowel for structural support
- Optional cardboard or plastic circle for the pot base
Choose cotton yarn for crisp stitch definition and firm petals. Acrylic yarn also works, particularly if you prefer a softer finish.
Crochet abbreviations
| Abbreviation | Meaning |
|---|---|
| MR | Magic ring |
| ch | Chain |
| sc | Single crochet |
| hdc | Half double crochet |
| dc | Double crochet |
| tr | Treble crochet |
| sl st | Slip stitch |
| inc | Two sc in one stitch |
| dec | Single crochet decrease |
| BLO | Back loop only |
| st(s) | Stitch(es) |

Step 1: Crochet the sunflower center
Use dark brown yarn to create the textured circular center.
Work in joined rounds or a continuous spiral, marking the first stitch of each round.
- Round 1: Make 6 sc in a magic ring. (6)
- Round 2: Inc in every stitch. (12)
- Round 3: (1 sc, inc) repeat 6 times. (18)
- Round 4: (2 sc, inc) repeat 6 times. (24)
- Round 5: (3 sc, inc) repeat 6 times. (30)
- Round 6: (4 sc, inc) repeat 6 times. (36)
- Round 7: (5 sc, inc) repeat 6 times. (42)
- Round 8: (6 sc, inc) repeat 6 times. (48)
Fasten off, leaving a long tail for assembly.
Make a second brown circle using the same instructions for the back of the flower.
For additional texture, use a yarn needle to embroider small seed-like stitches across the front center.
Step 2: Make the sunflower petals
Switch to golden yellow yarn.
Each petal is worked separately and attached around the outer edge of the flower center.
Petal instructions — make 10
- Chain 11.
- Starting in the second chain from the hook, work: sl st, sc, hdc, dc in each of the next 4 chains, hdc, sc, sl st.
- Chain 1, then work along the opposite side of the foundation chain: sl st, sc, hdc, dc in each of the next 4 stitches, hdc, sc, sl st.
- Fasten off and leave a tail for sewing.
Gently shape the petals with your fingers. For a more pointed appearance, pinch the outer tips while lightly dampening the yarn.
Arrange the petals evenly around the flower center. You can overlap the petal bases slightly to achieve a fuller sunflower.
Step 3: Crochet two green leaves
Use sage green yarn.
Leaf instructions — make 2
- Chain 13.
- Starting in the second chain, work: sl st, sc, hdc, dc in each of the next 6 chains, hdc, sc, sl st, sl st.
- Chain 1 and turn around the end of the foundation chain.
- Work along the opposite side: sl st, sl st, sc, hdc, dc in each of the next 6 stitches, hdc, sc, sl st.
- Fasten off, leaving a long sewing tail.
To give the leaves a more natural appearance, use a tapestry needle to add a central vein with matching or slightly darker green yarn.
The leaves should be firm enough to hold their shape. If they curl excessively, gently block them before assembly.
Step 4: Create the crochet stem
A sunflower needs a stable stem to support the flower head.
For a simple crocheted stem:
- With green yarn, make 6 sc in a magic ring.
- Work 1 sc in each stitch continuously.
- Continue until the tube measures approximately 12–15 cm.
- Fasten off, leaving a long tail.
Insert a smooth wooden dowel or a safely covered floral wire inside the crocheted tube if extra support is needed.
If using wire, bend and fully cover the ends so they cannot poke through the stitches. Avoid exposed wire for decorations intended for young children.
Step 5: Crochet the flower pot
Use beige or oatmeal yarn. Work in continuous rounds.
Pot base
- Round 1: 6 sc in MR. (6)
- Round 2: Inc around. (12)
- Round 3: (1 sc, inc) × 6. (18)
- Round 4: (2 sc, inc) × 6. (24)
- Round 5: (3 sc, inc) × 6. (30)
- Round 6: (4 sc, inc) × 6. (36)
- Round 7: (5 sc, inc) × 6. (42)
Pot walls
- Round 8: Sc BLO around. (42)
- Rounds 9–17: Sc around. (42)
- Round 18: (6 sc, inc) × 6. (48)
- Round 19: Sc around. (48)
- Round 20: Sc BLO around. (48)
- Round 21: Sc around. (48)
Fasten off and weave in the ends.
For a thicker rolled rim, fold the final two rounds outward and stitch them into position.
Place a circular insert at the bottom if you want the pot to sit more firmly.
Step 6: Make the soil insert
Using dark brown yarn, crochet a flat circle:
- Round 1: 6 sc in MR. (6)
- Round 2: Inc around. (12)
- Round 3: (1 sc, inc) × 6. (18)
- Round 4: (2 sc, inc) × 6. (24)
- Round 5: (3 sc, inc) × 6. (30)
- Round 6: (4 sc, inc) × 6. (36)
- Round 7: (5 sc, inc) × 6. (42)
- Round 8: (6 sc, inc) × 6. (48)
The soil circle should fit just inside the upper edge of the pot. Adjust its final round if your yarn tension produces a different diameter.
Step 7: Assemble your crochet sunflower pot
Now bring the individual components together.
- Sew the ten yellow petals around the edge of the front brown center, distributing them evenly.
- Position the second brown circle behind the first and sew the two circles together, leaving a small opening.
- Add a little stuffing to give the flower head dimension, then close the opening.
- Attach the stem securely to the lower back of the flower.
- Sew the green leaves to opposite sides of the stem.
- Fill the pot with stuffing or a stable internal support.
- Position the stem through the center of the soil insert and secure it.
- Sew the soil insert to the inside rim of the pot.
Check that the flower stands upright. If the head tilts, reinforce the stem or adjust the support inside the pot.
Tips for a beautiful finished sunflower
Keep your stitches consistent. A relatively tight tension helps the pot maintain its shape and prevents stuffing from showing through.
Shape the petals before attaching them. Light blocking can make each petal more defined and improve the overall symmetry.
Choose contrasting colors. Bright yellow against deep chocolate brown creates the classic sunflower appearance.
Use a stable base. A cardboard or plastic insert can help the pot stand flat on a desk or shelf.
Secure all joins carefully. The flower head is heavier than the leaves, so the stem-to-flower connection deserves extra reinforcement.
Creative ways to customize your sunflower pot
A handmade sunflower pot can be adapted to suit different spaces and personal styles.
For a rustic farmhouse look, use mustard yellow petals, muted olive leaves, and a warm oatmeal pot. For a brighter spring decoration, combine sunshine yellow with fresh green yarn and a cream planter.
You can also make several sunflowers in different sizes and arrange them together as a crochet flower collection.
For gifting, wrap the finished pot in tissue paper and attach a small handwritten tag. It makes a sweet present for birthdays, Mother’s Day, teacher appreciation, or housewarmings.
Frequently asked questions
Is this crochet sunflower pot beginner-friendly?
It is suitable for confident beginners who understand basic crochet stitches, working in the round, increases, and sewing pieces together.
Can I use acrylic yarn instead of cotton?
Yes. Acrylic yarn works well, although cotton generally gives the petals and pot a firmer structure.
How can I make the sunflower stand upright?
Use a reinforced stem, secure it to the soil insert, and stabilize the inside of the pot with firm stuffing or a suitable weighted base.
Can I make a smaller version?
Yes. Try thinner yarn and a smaller hook. The finished dimensions will decrease, although you may need to adjust the support and stuffing.
Can I wash my crochet sunflower pot?
Spot cleaning is the safest option, particularly when the project contains cardboard, wire, wood, or other internal supports.
Final thoughts
This crochet sunflower pot combines cheerful floral colors with the warmth of handmade home decor. From the textured brown center to the golden petals and cozy beige planter, every component contributes to a charming finished piece.
Whether you display it on your desk, add it to a shelf, or give it as a handmade gift, your sunflower can bring a little sunshine into everyday spaces.
Save this crochet sunflower pot idea on Pinterest so you can return to the tutorial whenever you’re ready to make your own.