Crochet String of Hearts Plant Pattern – Beautiful DIY Plant Decor
Bring a touch of handmade greenery into your home with this beautiful crochet string of hearts plant pattern. Featuring delicate green vines, charming heart-shaped...
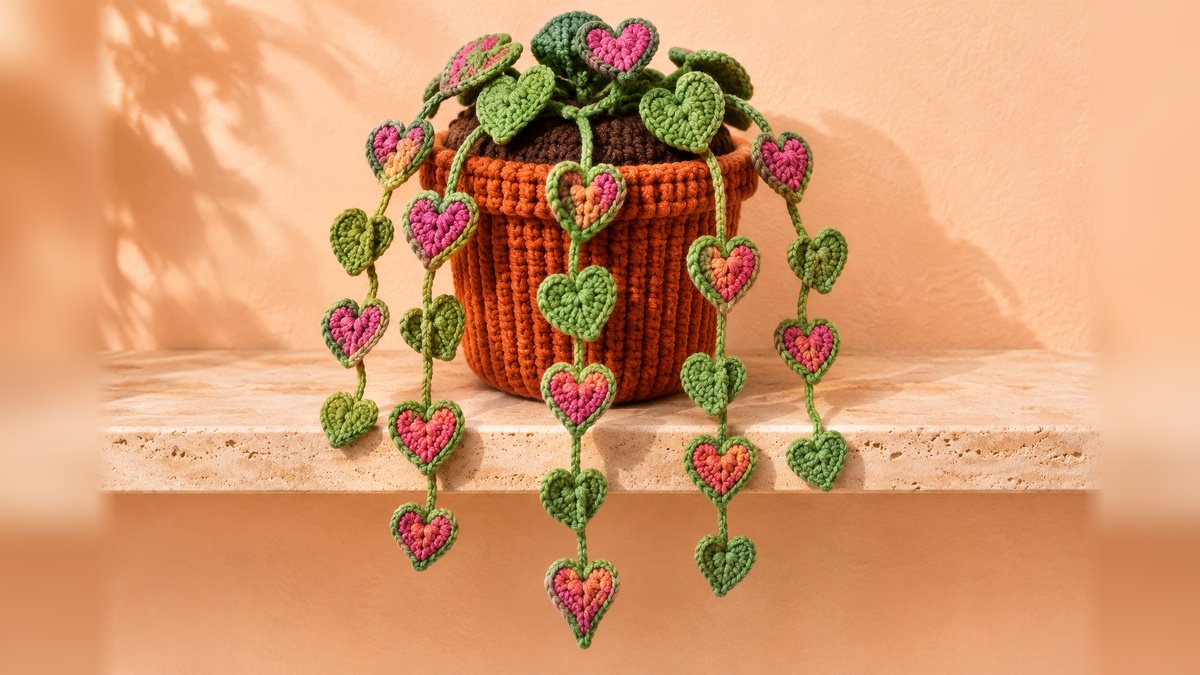
Bring a touch of handmade greenery into your home with this beautiful crochet string of hearts plant pattern. Featuring delicate green vines, charming heart-shaped leaves, and a warm terracotta-colored pot, this crochet project captures the graceful appearance of a trailing houseplant without needing sunlight or watering.
The design is inspired by the real string of hearts plant, known for its cascading stems and distinctive heart-shaped leaves. This crochet version gives the familiar botanical shape a playful twist with textured green leaves, raspberry-pink centers, and subtle coral accents.
What makes this project particularly attractive is the combination of soft, dangling vines and a structured ribbed crochet planter. The heart-shaped leaves hang at different heights, creating a layered display that looks beautiful on a shelf, windowsill, or decorative plant stand.
This tutorial explains how to crochet the pot, dark brown soil insert, individual heart leaves, and five trailing vines before assembling them into one coordinated design.
If you’re comfortable with basic crochet stitches and want to try an original home decor project, this is a lovely way to expand your skills.
Why You’ll Love This Crochet Plant Decor Project
There are plenty of reasons to make a crochet plant for your home.
No plant maintenance: Unlike living houseplants, this decorative crochet plant requires no watering, sunlight, or pruning.
Beautiful trailing design: Five cascading vines create a graceful shape that works well on elevated shelves.
Colorful heart-shaped leaves: The combination of green and raspberry-pink yarn adds personality without overwhelming the design.
Textured crochet planter: The ribbed terracotta-colored pot gives the finished project a coordinated handmade appearance.
Customizable size: You can easily add more vines, change their lengths, or increase the number of leaves.
A thoughtful handmade gift: The finished decoration makes a charming gift for plant lovers and crochet enthusiasts.
The repetitive leaf pattern also makes this a satisfying project to work on gradually.
Project Overview
| Project Detail | Information |
|---|---|
| Project name | Cascading String of Hearts Crochet Plant |
| Category | Crochet Plant Decor |
| Skill level | Advanced beginner |
| Crochet terminology | US |
| Yarn weight | Worsted weight #4 |
| Hook size | 3.75–4 mm |
| Construction | Crochet pot, soil disk, vines, and leaves |
| Number of trailing vines | 5 |
| Approximate number of leaves | 28 |
| Estimated pot diameter | 4–5 inches |
| Estimated trailing length | 8–13 inches |
| Estimated completion time | 8–12 hours |
All measurements, yarn quantities, and completion times are approximate.
The finished size depends on your yarn, crochet tension, and the number of leaves you decide to include.
Materials and Supplies Needed
Choose soft worsted-weight yarn in coordinating colors.
Yarn colors
Color A – Terracotta Orange
Approximately 90–120 yards.
Used for the ribbed plant pot and thick upper rim.
Color B – Dark Chocolate Brown
Approximately 30–45 yards.
Used to create the crocheted soil disk inside the planter.
Color C – Medium Botanical Green
Approximately 110–160 yards.
Used for the trailing vines, leaf edges, and some solid-green leaves.
Color D – Light Leaf Green
Approximately 30–50 yards.
Used for the centers of selected heart-shaped leaves.
Color E – Raspberry Pink
Approximately 35–50 yards.
Used for the contrasting leaf centers.
Optional Color F – Soft Coral
A small amount for decorative highlights on selected pink leaves.
Crochet tools
You’ll also need:
- 3.75 mm or 4 mm crochet hook
- Tapestry needle
- Scissors
- Stitch markers
- Polyester fiberfill
- Measuring tape
- Optional removable sewing clips
A small piece of washable, flexible plastic canvas can be used to reinforce the bottom of the planter if additional stability is needed.
Choosing the Right Yarn and Hook
For this project, a smooth cotton or cotton-acrylic blend works especially well.
Cotton yarn creates defined stitches and helps the heart leaves retain their shape. Acrylic blends can produce a slightly softer fabric and may be easier to find in a wide variety of colors.
Worsted-weight yarn offers a good balance between stitch visibility and finished size.
Creating realistic plant colors
The original design uses two complementary green shades.
A deeper botanical green forms the vines and leaf outlines, while lighter green appears on selected leaves.
Raspberry-pink centers introduce a colorful variegated effect inspired by decorative foliage.
The terracotta pot contrasts with the green leaves and creates a warm, natural appearance.
Selecting your hook
Begin with a 3.75 mm or 4 mm hook.
For the plant pot, aim for firm stitches that help the sides maintain their shape.
For the heart leaves, the fabric should remain flexible enough to lie flat.
If your leaves curl excessively, try relaxing your tension or using a slightly larger hook for that component.
Crochet Stitches and Abbreviations
This pattern uses standard US crochet terminology.
MR – Magic ring: An adjustable loop for beginning circular crochet pieces.
ch – Chain
sl st – Slip stitch
sc – Single crochet
hdc – Half double crochet
dc – Double crochet
tr – Treble crochet
inc – Increase: Work two stitches into one stitch.
BLO – Back loop only
FPdc – Front post double crochet
st / sts – Stitch / stitches
FO – Fasten off
Front post double crochet
To make an FPdc, yarn over, insert your hook from front to back and then to front around the post of the indicated stitch, yarn over, pull up a loop, and complete the double crochet normally.
This technique produces the raised vertical ridges used for the terracotta planter.
Pattern notes
The pot and soil disk are worked in joined rounds. Unless specified otherwise, beginning chains do not count as stitches.
The heart leaves are worked individually, then sewn onto the vines.
Use stitch markers to keep track of the first stitch of each round.
Before You Start
Before crocheting, consider where you want to display the finished plant.
If it will sit on a high bookshelf, longer vines may create an attractive cascading effect.
For a smaller desk decoration, shorter vines will be more practical.
Plan the five vines
The reference design uses five trailing vines with slightly different lengths.
| Vine | Foundation chains | Heart leaves |
|---|---|---|
| Vine 1 | 35 | 4 |
| Vine 2 | 42 | 4 |
| Vine 3 | 49 | 5 |
| Vine 4 | 56 | 5 |
| Vine 5 | 63 | 6 |
| Total | 24 |
Four additional leaves will be used around the top of the plant, bringing the total to approximately 28.
These leaf counts can be adjusted to create a fuller or more minimal display.
Color arrangement
For an attractive balance, alternate between solid-green hearts and raspberry-centered hearts.
Avoid arranging all the pink leaves on one side.
Distributing the colors across the vines creates a more natural and visually balanced plant.
Step-by-Step Crochet String of Hearts Plant Pattern
Part 1: Crochet the Terracotta Pot Base
Using terracotta-orange yarn, begin with a magic ring.
Round 1: Work 6 sc in MR. (6)
Round 2: Inc in every stitch. (12)
Round 3: (sc 1, inc) × 6. (18)
Round 4: (sc 2, inc) × 6. (24)
Round 5: (sc 3, inc) × 6. (30)
Round 6: (sc 4, inc) × 6. (36)
Round 7: (sc 5, inc) × 6. (42)
Round 8: (sc 6, inc) × 6. (48)
Round 9: (sc 7, inc) × 6. (54)
Your finished base should form a flat circular disk.
If it begins to cup significantly, check your stitch count and tension.
Part 2: Build the Pot Sides
Round 10: Work 1 sc BLO in each stitch around. (54)
This creates a turning edge between the pot base and walls.
Round 11: Chain 2, work 1 dc in every stitch, and join with a slip stitch to the first dc. (54)
Do not count the beginning chain as a stitch.
Part 3: Create the Vertical Ribbing
The raised vertical texture is created by front post double crochet stitches.
Round 12:
Chain 2.
Repeat the following sequence around:
- 1 FPdc around the post of the next stitch
- 1 dc in each of the next 2 stitches
Repeat 18 times. (54)
Join with a slip stitch.
Rounds 13–20:
Repeat Round 12, working each FPdc around the raised post directly below it.
Maintain 54 stitches in every round.
As you continue, the raised columns should line up vertically.
These textured ridges give the pot its distinctive ceramic-inspired appearance.
Part 4: Crochet the Upper Pot Rim
Round 21: Work 1 sc in every stitch around. (54)
Round 22: (sc 8, inc) × 6. (60)
Round 23: Work 1 sc in every stitch. (60)
Fasten off and weave in the yarn tail.
The small increase near the upper edge creates a gently flared rim.
Set the pot aside.
Part 5: Crochet the Soil Disk
Using dark brown yarn, make a flat circular piece.
Round 1: 6 sc in MR. (6)
Round 2: Inc around. (12)
Round 3: (sc 1, inc) × 6. (18)
Round 4: (sc 2, inc) × 6. (24)
Round 5: (sc 3, inc) × 6. (30)
Round 6: (sc 4, inc) × 6. (36)
Round 7: (sc 5, inc) × 6. (42)
Round 8: (sc 6, inc) × 6. (48)
Round 9: (sc 7, inc) × 6. (54)
Fasten off, leaving a long sewing tail.
The soil disk should fit inside the pot, just beneath the flared upper rim.
Do not sew it into place yet. You’ll attach the vines first so their yarn tails can be secured underneath the disk.
Part 6: Crochet the Heart-Shaped Leaves
The heart leaves are the focal point of the entire project.
You’ll make approximately 28 hearts using a combination of solid green and pink-centered color arrangements.
Basic crochet heart
Using your chosen leaf-center color, begin with a magic ring.
Work the following sequence into the ring:
- Chain 3.
- Work 3 tr.
- Work 3 dc.
- Chain 1.
- Work 1 tr to create the lower heart point.
- Chain 1.
- Work 3 dc.
- Work 3 tr.
- Chain 3.
- Slip stitch into the magic ring.
Pull the magic ring closed carefully.
Gently shape the two upper lobes and lower point with your fingers.
Fasten off.
This creates one small heart-shaped crochet leaf.
Add the green leaf outline
Join medium-green yarn to an outer edge of the heart.
Work single crochet stitches evenly around the outside.
Place stitches into the accessible tops of the heart stitches and chain spaces, rather than forcing multiple stitches into the center ring.
At the pointed bottom of the heart, work two or three sc as needed to maintain the pointed shape.
Join with a slip stitch and fasten off, leaving a tail for attaching the leaf to its vine.
The finished heart should have a green outline with the center color visible.
Make solid-green leaves
For solid-green leaves, work the main heart using light leaf-green yarn and the outline using medium botanical green.
Make pink-centered leaves
For variegated hearts, use raspberry-pink yarn for the central heart and medium green for the outside border.
You can embroider a few tiny coral stitches onto selected pink hearts to add additional color variation.
Make approximately 12 pink-centered hearts and 12 green hearts for the trailing vines.
Part 7: Crochet the First Trailing Vine
Using medium botanical green yarn, chain 35.
Work one slip stitch in the second chain from the hook and in every remaining chain.
This creates a slightly thicker cord than a simple chain.
Fasten off, leaving a long tail for attaching the vine to the soil disk.
The other end of the cord will form the bottom of the trailing strand.
Part 8: Attach the First Heart Leaves
Take four of your finished crochet hearts.
Position the leaves along the first vine, leaving short sections of green cord visible between them.
Arrange one leaf near the lower end of the vine, with the others spaced evenly above it.
Using the green yarn tails, sew each heart securely to the cord at the notch between its upper lobes.
Allow the point of each heart to hang downward.
For a natural appearance, alternate between pink-centered and solid-green leaves.
Weave in the remaining tails.
Part 9: Crochet the Remaining Four Vines
Use the same slip-stitch cord method to crochet four additional vines.
Make foundation chains of:
- 42 chains
- 49 chains
- 56 chains
- 63 chains
Work back along each chain using slip stitches.
Fasten off, leaving long attachment tails.
Attach the remaining 20 heart leaves, distributing them according to the planned vine lengths.
Space the hearts evenly, but allow slight differences between strands so that the plant doesn’t look overly uniform.
Keep the bottom hearts facing downward for an attractive cascading appearance.
Part 10: Create the Top Foliage
Use the basic heart instructions to make four additional leaves.
Choose primarily green yarn, with one or two pink-centered hearts for contrast.
These leaves will sit close to the soil surface.
Their purpose is to make the top of the planter look fuller and hide some of the vine attachment points.
You can position them upright or allow them to lean slightly over the edge of the pot.
Leave long sewing tails for assembly.
Assembly and Finishing
Attach the vines to the soil disk
Lay the completed brown soil disk flat with the right side facing upward.
Arrange the five vines around its outer half, spreading them across the front and side sections.
The longest vine generally looks attractive near the center, with shorter vines positioned toward the sides.
Use the long green yarn tails to sew the upper ends of the cords securely through the soil disk.
Make several stitches at each attachment point.
Knot the yarn tails discreetly on the underside of the soil disk and weave them through several stitches.
Add the top leaves
Position the four additional heart leaves around the top of the plant.
Sew them close to the vine attachment points.
Angle the leaves slightly upward or outward.
This creates a fuller plant crown and makes the trailing stems appear to emerge naturally from the soil.
Assemble the pot
Place a small amount of polyester fiberfill inside the terracotta pot to support the soil disk.
Keep the stuffing below the rim.
Position the completed soil disk inside the planter, immediately beneath the flared top edge.
Sew the outer 54 stitches of the soil disk to the corresponding inner edge of the pot near Round 21.
Distribute the stitches evenly to prevent puckering.
Make sure the five vines remain free and aren’t accidentally caught inside the seam.
Final shaping
Set the finished plant on a flat surface.
Gently separate the vines and arrange them so that they hang at different lengths.
Adjust the heart leaves to face outward.
Straighten the pot walls and reshape the upper rim if necessary.
Your crochet string of hearts plant is now ready to display.
Tips for the Best Results
Keep the pot stitches firm
A tightly crocheted base and wall help the planter maintain its shape.
If necessary, use a slightly smaller hook for the pot than for the leaves.
Make the leaves consistent
Use the same hook and basic heart instructions for every leaf.
Even when changing colors, maintaining similar dimensions will create a coordinated design.
Mix the leaf colors naturally
Avoid following a strict green-pink-green-pink sequence on every vine.
Instead, distribute the colors while maintaining overall balance.
Vary the vine lengths
Unequal lengths are one of the features that make a trailing plant visually appealing.
Let some leaves hang just below the pot and others extend much farther.
Secure every attachment
Use several sewing stitches to attach the vines and heart leaves.
This helps prevent pieces from becoming loose when the plant is moved or dusted.
Common Mistakes and Troubleshooting
The crochet pot doesn’t stand upright
The base may be uneven or the stuffing may not be distributed properly.
Check the base stitch counts and place the pot on a flat surface while adjusting its shape.
The heart leaves curl too much
Your tension may be too tight, especially around the border.
Try using a slightly larger hook or fewer border stitches where the fabric bunches.
The heart shape isn’t visible
The magic ring may not have been tightened completely, or the central treble crochet stitch may be pulling to one side.
Reshape the leaf gently before attaching it to a vine.
The vines twist together
Separate the cords and reposition their attachment points on the soil disk.
Keeping the longest strands toward the front and center can help reduce tangling.
The top of the plant looks empty
Add a few extra green leaves around the soil surface.
Position them to cover exposed attachment points while maintaining a natural clustered appearance.
Creative Variations and Customization Ideas
This crochet string of hearts plant offers many ways to experiment with color and size.
Burgundy and sage version
Replace raspberry pink with burgundy and choose muted sage-green leaf borders.
This creates a sophisticated botanical color palette.
All-green trailing plant
Use two or three different shades of green for the entire project.
The result is a more traditional foliage-inspired decoration.
Miniature desk plant
Use sport-weight yarn and a smaller hook to create a compact version.
Reduce the number of vines and leaves to suit the smaller pot.
Extra-long trailing vines
Increase the foundation chains and attach additional hearts to create longer cascading strands.
This variation works especially well on high shelves.
Neutral-colored pot
Replace the terracotta yarn with cream, taupe, or soft gray if you prefer more understated decor.
Keep the leaf colors unchanged to make the foliage stand out.
How to Display Your Crochet String of Hearts Plant
The finished plant can be used in several decorative settings.
Bookshelf decoration
Place the pot near the edge of a bookshelf so that the crocheted vines can hang freely.
The colorful heart leaves add softness to the straight lines of books and shelving.
Home office decor
A small crochet plant can brighten a desk or workspace without requiring natural light.
Position it away from drinks and areas where the cords might become tangled.
Decorative plant stand
Display the pot on a raised plant stand beside real or artificial houseplants.
The terracotta color coordinates beautifully with natural wood and woven materials.
Handmade gift idea
A crochet plant makes a thoughtful present for someone who enjoys crafts, botanical decorations, or colorful handmade accessories.
For a finished presentation, attach a small gift tag with the project name and basic care instructions.
Care and Washing Instructions
Crochet plant decorations are relatively easy to maintain.
For routine cleaning, gently remove dust using a soft brush or a clean, dry cloth.
If the yarn manufacturer permits washing, carefully handwash the decoration in cool water with mild detergent.
Avoid pulling or twisting the vines.
Press excess water out gently using a towel.
Reshape the heart leaves and place the plant in a well-ventilated area until completely dry.
If your planter contains a rigid insert that isn’t washable, remove it before washing whenever possible.
Store the decoration away from prolonged direct sunlight to help protect the yarn colors.
The plant is intended for decoration and should be kept out of reach of young children and pets who may pull or chew the dangling pieces.
Frequently Asked Questions
Is this crochet plant suitable for beginners?
The project is best for advanced beginners who know how to crochet in rounds and understand basic stitches, including single crochet, double crochet, and treble crochet.
The heart leaves are repetitive, making them easier after a few attempts.
How much yarn do I need?
The quantities depend on your preferred size, but the reference project uses relatively small amounts of several worsted-weight colors.
Allow extra yarn if you plan to create more leaves or longer vines.
Can I make the pot separately?
Yes. The ribbed crochet planter can be used as an independent decorative container.
However, because it is made from yarn, it isn’t intended to hold water or loose soil.
Can I use a real flowerpot instead?
Absolutely. You can crochet the soil disk and trailing vines, then place the assembly into a suitable lightweight decorative pot.
Measure the opening first so the disk fits securely.
How do I make the vines longer?
Simply add more foundation chains and work additional slip stitches along the cord.
Attach extra heart leaves as desired.
Can I make the leaves without pink yarn?
Yes. You can make every leaf using green yarn, or combine multiple green shades for a botanical appearance.
Do I need to use stuffing?
A small amount of stuffing helps support the crocheted planter and soil disk.
You can also use a lightweight structural insert for additional stability.
Can this crochet plant be hung?
The reference design is intended to sit on a shelf or plant stand.
To create a hanging version, you would need to add a separate, securely constructed hanger that supports the weight of the completed plant.
Conclusion
This crochet string of hearts plant pattern combines beautiful botanical inspiration with practical, approachable crochet techniques.
The terracotta ribbed planter, dark brown soil disk, five trailing vines, and colorful heart-shaped leaves work together to create a distinctive handmade decoration.
By following the instructions for the pot, individual leaves, and vine assembly, you can make a charming plant that adds color and texture to your home.
Whether you keep the original raspberry-and-green color combination or experiment with another palette, this project offers plenty of room for creativity.
Enjoy making your own everlasting crochet plant and finding the perfect place to display it.
Related Crochet Projects to Try Next
If you enjoy crocheting plants, consider exploring these related handmade projects.
Crochet Mini Snake Plant: Create tall, structured green leaves arranged in a small textured pot.
Crochet Hanging Ivy: Make long, flexible vines with pointed leaves for a beautiful cascading display.
Crochet Succulent in a Pot: Practice making thick sculptural leaves and a compact decorative planter.
Crochet String of Pearls Plant: Experiment with rounded crochet beads attached along trailing strands to imitate a distinctive succulent.
Each project offers another opportunity to create colorful, maintenance-free botanical decor using yarn and simple crochet techniques.