Crochet Sock Ideas: Easy and Cozy Handmade Slipper Socks Pattern for Beginners
Discover how to crochet beautiful, cozy socks with soft textured stitches and contrasting ribbed cuffs. This beginner-friendly crochet sock pattern is perfect for relaxing...
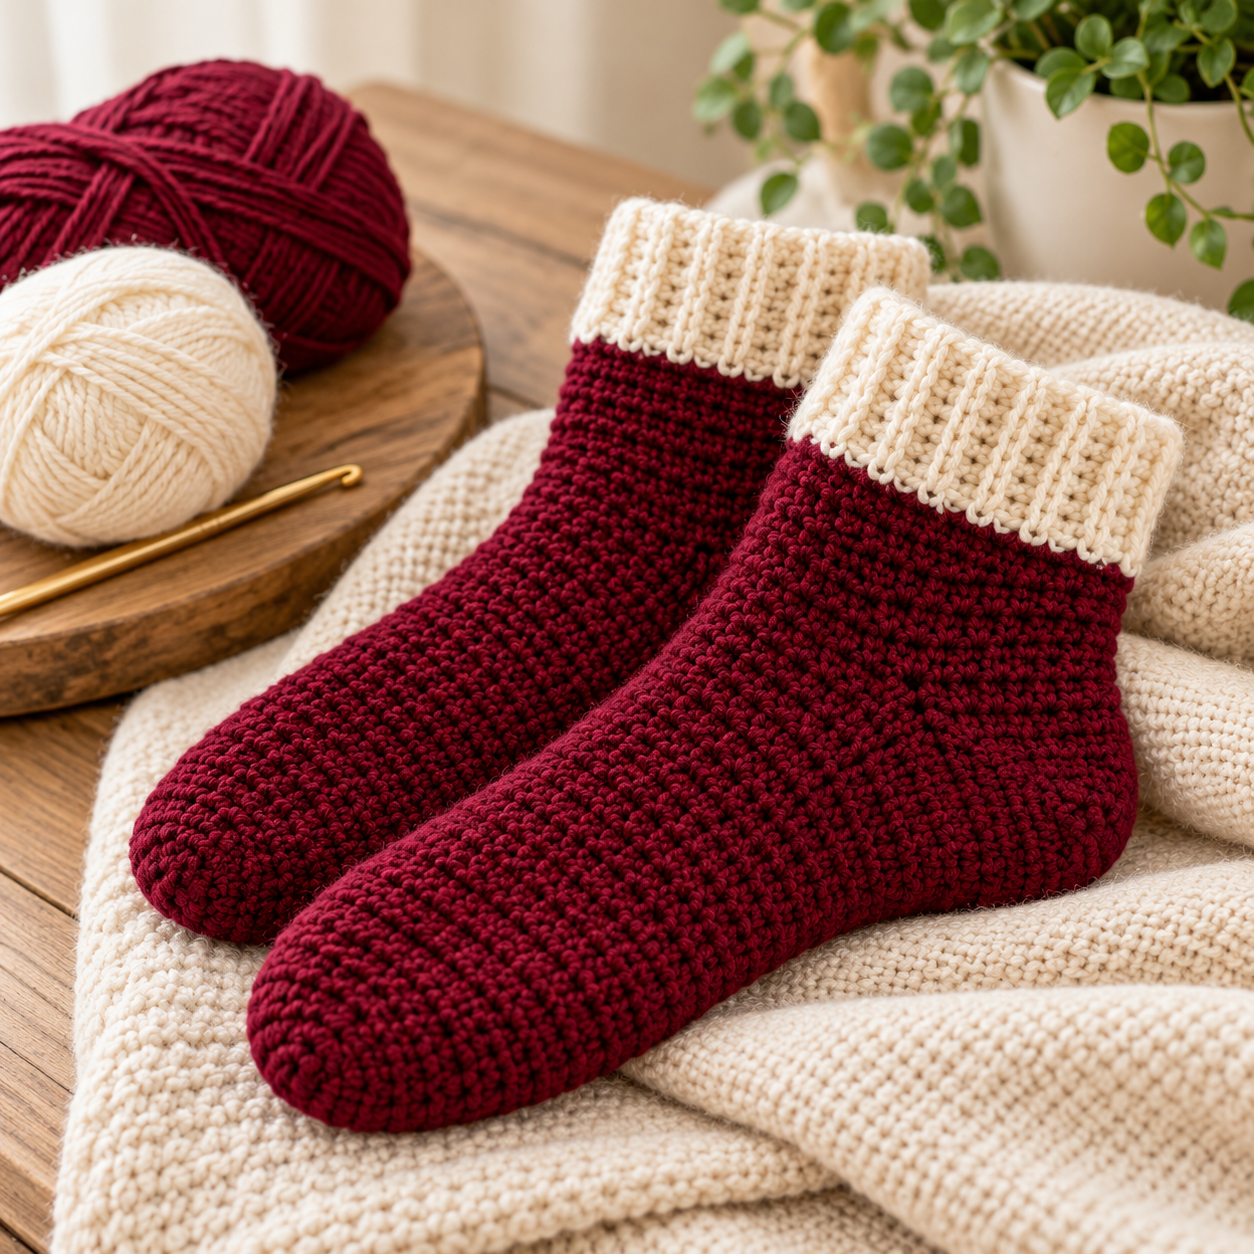
Discover how to crochet beautiful, cozy socks with soft textured stitches and contrasting ribbed cuffs. This beginner-friendly crochet sock pattern is perfect for relaxing at home, keeping your feet warm, and making thoughtful handmade gifts.
Crochet socks are one of the most satisfying projects for anyone who loves creating practical, comfortable accessories with yarn. Whether you’re enjoying a quiet evening at home, preparing handmade Christmas gifts, or looking for a relaxing weekend crochet project, a pair of soft crochet socks is always a wonderful idea.
These beautiful burgundy crochet slipper socks, finished with contrasting cream ribbed cuffs, combine warmth, comfort, and timeless handmade style.
Unlike traditional knitted socks, crochet socks can be created using simple stitches and straightforward construction techniques. This makes them an appealing project for crocheters who want to explore wearable accessories without learning to knit.
In this guide, you’ll discover an original easy crochet slipper socks pattern, along with yarn recommendations, sizing tips, customization ideas, and step-by-step instructions.
We’ll use a toe-up construction, create a comfortable foot section, shape the heel opening, and finish with a soft ribbed cuff.
Pattern note: This is an original, untested crochet slipper sock pattern inspired by the reference photograph. It is designed for indoor wear and may not reproduce the photographed socks exactly. Check fit as you work, especially around the heel and ankle.
Why You’ll Love These Crochet Socks
There are many reasons to add crochet socks to your list of handmade projects.
- Cozy and comfortable: Soft yarn and textured stitches make these socks ideal for lounging.
- Beginner-friendly techniques: The design uses basic stitches and simple shaping.
- Beautiful two-tone design: Burgundy and cream create an elegant, classic color combination.
- Customizable sizing: Adjust the foot length and stitch count to suit different sizes.
- Perfect for gifting: Handmade crochet socks make thoughtful winter and holiday presents.
- Practical project: Create something beautiful that you can actually wear.
These socks are particularly suitable for wearing around the house, relaxing on the sofa, or keeping your feet warm on chilly evenings.
Crochet Slipper Socks Pattern Overview
| Pattern detail | Information |
|---|---|
| Skill level | Confident beginner |
| Crochet terminology | US terms |
| Construction | Toe-up with heel opening |
| Yarn weight | Worsted weight (category 4) |
| Crochet hook | 4.5 mm |
| Main stitch | Half double crochet |
| Cuff stitch | Back-loop single crochet |
| Suggested colors | Burgundy and cream |
| Estimated time | 3–5 hours per pair |
| Finished style | Cozy indoor slipper socks |
This pattern is intended for soft, comfortable indoor socks rather than thin socks designed for wearing inside fitted shoes.
Materials You’ll Need
Before beginning your crochet socks, gather the following supplies.
- Approximately 150–200 g of soft worsted-weight yarn in burgundy
- Approximately 30–50 g of cream-colored yarn for the cuffs
- 4.5 mm crochet hook
- Yarn needle
- Stitch markers
- Scissors
- Measuring tape
- Optional nonslip fabric paint or sock grips for the soles
Choose a yarn that feels comfortable against your skin and has enough flexibility to accommodate foot movement.
Best Yarn for Crochet Socks
Yarn selection plays an important role in how your finished socks feel and fit.
Acrylic yarn is affordable, widely available, and easy to care for. It’s suitable for cozy indoor slipper socks.
Wool-blend yarn offers warmth and natural elasticity. A washable wool blend can be a good option for winter socks.
Cotton-blend yarn feels breathable but may have less stretch than wool or acrylic blends.
For socks that will receive frequent wear, choose a durable yarn with some elasticity. Crochet fabric is generally less stretchy than knitted fabric, so fit and yarn choice matter.
Crochet Abbreviations
| Abbreviation | Meaning |
|---|---|
| ch | Chain |
| sc | Single crochet |
| hdc | Half double crochet |
| sl st | Slip stitch |
| st(s) | Stitch(es) |
| inc | 2 hdc in the same stitch |
| BLO | Back loop only |
| rep | Repeat |
| FO | Fasten off |
All instructions use US crochet terminology.
Understanding the Construction of Crochet Socks
Before starting, it’s helpful to understand how these socks are made.
The design consists of four main sections:
- Toe: A rounded section that covers the front of the foot.
- Foot: A textured tube that extends toward the heel.
- Heel and ankle: A shaped section that allows the sock to fit around the back of the foot.
- Ribbed cuff: A contrasting cream band that helps keep the sock comfortably in place.
We’ll crochet the toe and foot first, create a heel opening, then complete the ankle and cuff.
This method allows you to try the sock on as you work and make adjustments when necessary.
Step 1: Measure Your Foot
Before beginning, measure the length and circumference of your foot.
For the best fit, take three measurements:
- Foot length: From the tip of your longest toe to the back of your heel.
- Foot circumference: Around the widest part of your foot.
- Ankle circumference: Around the area where the cuff will sit.
General foot-size reference
| US women’s shoe size | Approximate foot length |
|---|---|
| 5–6 | 8.5–9 inches |
| 7–8 | 9.25–9.75 inches |
| 9–10 | 10–10.5 inches |
| 11–12 | 10.75–11.25 inches |
These measurements are approximate. Actual sizing varies by individual foot shape and shoe brand.
For the instructions below, we’ll use a sample medium adult size and explain where to adjust.
Step 2: Crochet the Rounded Toe
Using burgundy yarn and a 4.5 mm hook:
Round 1: Make a magic ring. Work 8 hdc into the ring. Pull the ring closed and join with a sl st to the first hdc. (8 stitches)
Round 2: Chain 1. Work 2 hdc into each stitch around. Join. (16 stitches)
Round 3: Chain 1. Repeat 1 hdc in the next stitch, 2 hdc in the following stitch around. Join. (24 stitches)
Round 4: Chain 1. Repeat 1 hdc in each of the next 2 stitches, 2 hdc in the following stitch around. Join. (32 stitches)
Round 5: Chain 1. Work 1 hdc into each stitch around. Join. (32 stitches)
The toe should begin forming a rounded cup.
Adjusting the toe width
If your foot is wider, continue increasing gradually until the toe circumference is comfortable.
If your foot is narrower, you may need fewer stitches or a smaller crochet hook.
The most reliable method is to compare the crocheted toe against your actual foot.
The fabric should fit comfortably without stretching excessively.
Step 3: Crochet the Foot Section
Once the toe reaches the desired width, continue working even rounds to create the foot.
Round 6: Chain 1. Work 1 hdc into each stitch around. Join. (32 stitches)
Rounds 7 onward: Repeat Round 6 until the foot section reaches the desired length before the heel.
For a medium adult sock, this section may measure approximately 6–7 inches from the toe, depending on foot length.
Try the sock on occasionally as you work.
Creating a textured appearance
To add subtle texture, alternate between regular half double crochet rounds and rounds worked into the back loop only.
For example:
- Round A: Hdc in each stitch.
- Round B: Hdc BLO in each stitch.
Repeat these two rounds to create a gently ridged surface.
This texture gives the socks a handmade appearance similar to the reference design.
Step 4: Create the Heel Opening
The heel opening is an important part of the sock’s construction.
For this sample, we’ll reserve half the stitches for the heel.
With 32 stitches around the foot, this means reserving 16 stitches.
Create the opening
At the point where the heel should begin:
- Work 16 hdc across the top of the foot.
- Chain 16.
- Skip the remaining 16 stitches.
- Join to the first hdc of the round.
This creates an opening beneath the chain bridge.
Continue crocheting around the 16 hdc stitches and 16 chains to form the ankle section.
Important: Try the sock on before continuing. The heel opening must be large enough to accommodate your heel comfortably. Adjust the number of reserved stitches and chains if necessary.
Step 5: Crochet the Ankle Section
After creating the heel opening, continue working in rounds.
Round 1: Chain 1. Work 1 hdc into each stitch and chain around. Join. (32 stitches)
Rounds 2–6: Chain 1. Work 1 hdc into each stitch around. Join. (32 stitches)
Continue until the ankle reaches your preferred height.
For short slipper socks, approximately 2–3 inches above the heel opening is often sufficient.
If you prefer taller socks, add more rounds.
Fasten off the burgundy yarn once the ankle reaches the desired height.
Step 6: Crochet the Heel
Now return to the opening left beneath the ankle.
Join burgundy yarn at one side of the heel opening.
Work 1 hdc into each of the 16 skipped stitches and 1 hdc into each of the 16 foundation-chain loops around the opening. (32 stitches)
Place a stitch marker at the beginning of the round.
Shape the heel
Round 1: Work 1 hdc into each stitch around. (32 stitches)
Round 2: Work 1 hdc into each of the next 6 stitches, hdc2tog, 1 hdc into each of the next 14 stitches, hdc2tog, and 1 hdc into each of the final 8 stitches. (30 stitches)
Round 3: Work 1 hdc into each stitch around. (30 stitches)
Round 4: Work 1 hdc into each of the next 5 stitches, hdc2tog, 1 hdc into each of the next 13 stitches, hdc2tog, and 1 hdc into each of the final 8 stitches. (28 stitches)
Continue decreasing at opposite sides of the heel, adjusting the placement as needed, until the heel comfortably cups the back of your foot.
Once the opening becomes small enough, fasten off with a long tail.
Use a yarn needle to close the remaining opening securely.
Helpful heel-fitting tip
Heel shaping varies considerably depending on foot size and stitch gauge.
Try the sock on during this stage. If the heel feels too tight, undo the last decrease round and add an even round before decreasing again.
Step 7: Crochet the Cream Ribbed Cuff
The cream cuff is one of the most attractive details of this design.
It creates a beautiful contrast against the rich burgundy body of the sock.
We’ll use back-loop single crochet to create a ribbed texture.
Make the cuff strip
Using cream yarn:
Foundation: Chain 11.
Row 1: Work 1 sc into the second chain from the hook and into each remaining chain. Chain 1 and turn. (10 stitches)
Row 2: Work 1 sc BLO into each stitch across. Chain 1 and turn. (10 stitches)
Rows 3 onward: Repeat Row 2 until the strip fits comfortably around the ankle opening.
The ribbing should stretch slightly without feeling restrictive.
Join the cuff
Fold the ribbed strip so the short ends meet.
Use slip stitches or a yarn needle to join the ends into a circular cuff.
Position the cuff around the top of the burgundy sock.
Sew the lower edge of the cuff evenly to the sock opening, easing the fabric as necessary.
Repeat for the second sock.
Your cozy two-tone crochet slipper socks are now complete!
How to Adjust Crochet Socks for Different Sizes
One of the advantages of handmade socks is the ability to customize the fit.
For smaller feet
Use fewer toe increases and shorten the foot section.
Make sure the heel opening remains comfortable.
For larger feet
Add additional increase rounds to widen the toe.
Continue the foot section until it reaches the appropriate length.
Adjust the heel opening and ankle circumference to match.
For wider ankles
Add stitches to the ankle section or make the ribbed cuff slightly longer.
Avoid making the cuff too tight, as this can cause discomfort.
For taller socks
Simply add more ankle rounds before attaching the cuff.
You can create ankle socks, mid-calf socks, or taller lounge socks using the same general construction method.
Beautiful Crochet Sock Color Combinations
Although burgundy and cream create a classic winter look, there are many other combinations to explore.
| Sock body | Cuff color | Style |
|---|---|---|
| Burgundy | Cream | Classic cozy |
| Dusty pink | Ivory | Soft and feminine |
| Forest green | Beige | Rustic winter |
| Navy blue | Light gray | Timeless |
| Mustard yellow | Cream | Warm autumn |
| Chocolate brown | Oatmeal | Neutral cottagecore |
| Lavender | White | Pastel cozy |
For a cohesive appearance, choose colors that complement your favorite loungewear or home decor.
Creative Crochet Sock Ideas to Try
Once you’ve mastered the basic construction, you can experiment with different styles.
1. Chunky Crochet Slipper Socks
Use bulky yarn and a larger hook to create thick, cozy socks.
These are ideal for lounging during cold winter evenings.
Because thicker yarn changes the gauge significantly, recalculate the stitch counts rather than following the worsted-weight instructions unchanged.
2. Striped Crochet Socks
Alternate two or three yarn colors throughout the foot section.
Stripes are a simple way to make basic crochet socks more playful.
3. Pastel Crochet Socks
Combine soft pink, lavender, cream, and pale blue yarn.
These colors create a delicate handmade look.
4. Textured Crochet Socks
Experiment with front-post and back-post stitches, ribbing, or alternating stitch patterns.
Textured stitches add visual interest and can create a thicker fabric.
5. Crochet Socks With Folded Cuffs
Make the ribbed cuff longer so it can be folded over.
This creates a classic cozy slipper-sock appearance.
6. Christmas Crochet Socks
Use festive colors such as red, forest green, and cream.
These make wonderful handmade holiday gifts.
7. Crochet Socks With Decorative Flowers
Attach a small crochet flower near the outer ankle.
Choose a lightweight appliqué so the decoration doesn’t interfere with comfort.
8. Neutral Minimalist Crochet Socks
Use oatmeal, beige, ivory, or warm gray yarn.
These understated colors work beautifully with simple, textured stitches.
Tips for Making Comfortable Crochet Socks
Crochet socks should feel soft, flexible, and comfortable.
Here are some important tips to keep in mind.
Choose soft yarn. Avoid yarn that feels scratchy against your skin.
Check your gauge. Different crocheters naturally work with different tension, which affects sizing.
Try the socks on regularly. This is particularly important when shaping the toe, heel, and ankle.
Avoid overly tight stitches. Crochet fabric is generally less stretchy than knitted fabric.
Keep seams smooth. Bulky seams around the heel or toe can cause discomfort.
Consider nonslip soles. Crochet socks can be slippery on smooth floors. Apply suitable nonslip grips if they’ll be worn on tile or hardwood.
Common Crochet Sock Mistakes and How to Fix Them
My crochet socks are too tight
You may be using a hook that’s too small or working with tight tension.
Try a larger hook or add more stitches to the foot circumference.
The socks feel too bulky
Choose a lighter yarn or use half double crochet instead of thicker textured stitches.
Avoid overly bulky seams.
My socks keep slipping down
The cuff may be too loose.
Make a slightly shorter ribbed strip so it fits more securely around your ankle.
The heel doesn’t fit properly
The heel opening may be too small or positioned incorrectly.
Try the sock on before closing the heel and adjust the shaping as needed.
My socks are different sizes
Count stitches carefully and measure both socks as you work.
Using stitch markers can help maintain consistent sizing.
How to Wash and Care for Crochet Socks
Proper care can help your handmade crochet socks last longer.
Always follow the washing instructions on your yarn label.
For delicate or wool-blend yarns, gentle hand-washing is often a good option.
Use lukewarm water and a mild detergent.
Avoid twisting or wringing the socks, as this can stretch the stitches.
Gently press out excess water and lay the socks flat to dry.
Reshape them while damp if necessary.
Are Crochet Socks Good Handmade Gifts?
Absolutely!
Crochet socks are thoughtful gifts because they combine comfort with personal craftsmanship.
They make wonderful presents for:
- Christmas and winter holidays
- Birthdays
- Mother’s Day
- Cozy self-care gift baskets
- Handmade gift exchanges
- Friends and family who love comfortable loungewear
For a beautiful presentation, fold the socks neatly and tie them together with a satin ribbon.
You can also include a small handmade gift tag with washing instructions.
Frequently Asked Questions About Crochet Socks
Are crochet socks suitable for beginners?
Yes. Simple crochet slipper socks are suitable for confident beginners who know basic stitches and are ready to learn shaping techniques.
What is the easiest stitch for crochet socks?
Half double crochet is a good choice because it creates a relatively soft fabric and works up quickly.
How much yarn do I need for crochet socks?
A pair of adult slipper socks may require approximately 150–200 g of worsted-weight yarn, depending on size, stitch pattern, and yarn thickness.
Are crochet socks comfortable to wear?
Crochet socks can be comfortable when made with soft yarn and properly fitted. However, they are usually thicker and less stretchy than knitted socks.
Can I wear crochet socks inside shoes?
Thick crochet slipper socks are generally better suited for indoor lounging.
If you want socks for wearing inside shoes, use finer yarn and a more flexible stitch pattern.
How long does it take to crochet a pair of socks?
A simple pair may take approximately three to five hours, although beginners may need more time.
Can I make crochet socks without sewing?
Some sock patterns are constructed entirely in the round with minimal sewing.
This particular design uses a sewn cuff and a closed heel opening.
Can I sell handmade crochet socks?
Yes, you can sell finished socks made from your own original designs. If you use another designer’s pattern, respect any applicable terms.
Final Thoughts
Crochet socks are a wonderful combination of creativity, comfort, and practicality.
Whether you’re making a pair for yourself or preparing a thoughtful handmade gift, these cozy accessories are a satisfying way to explore wearable crochet projects.
The rich burgundy yarn, textured stitches, and soft cream ribbed cuffs give these slipper socks a timeless appearance that’s perfect for cooler weather.
Start with the basic pattern, experiment with different yarn colors, and adjust the fit to create socks that suit your personal style.
With a little practice, you’ll be able to create beautiful crochet slipper socks for yourself, your family, and your friends.
Save these crochet sock ideas for your next cozy handmade project!