Crochet Snail Amigurumi With a Candy Swirl – Cute and Easy Snail Pattern
Some crochet projects are simply too adorable to resist, and this crochet snail amigurumi with a candy swirl is definitely one of them! With...
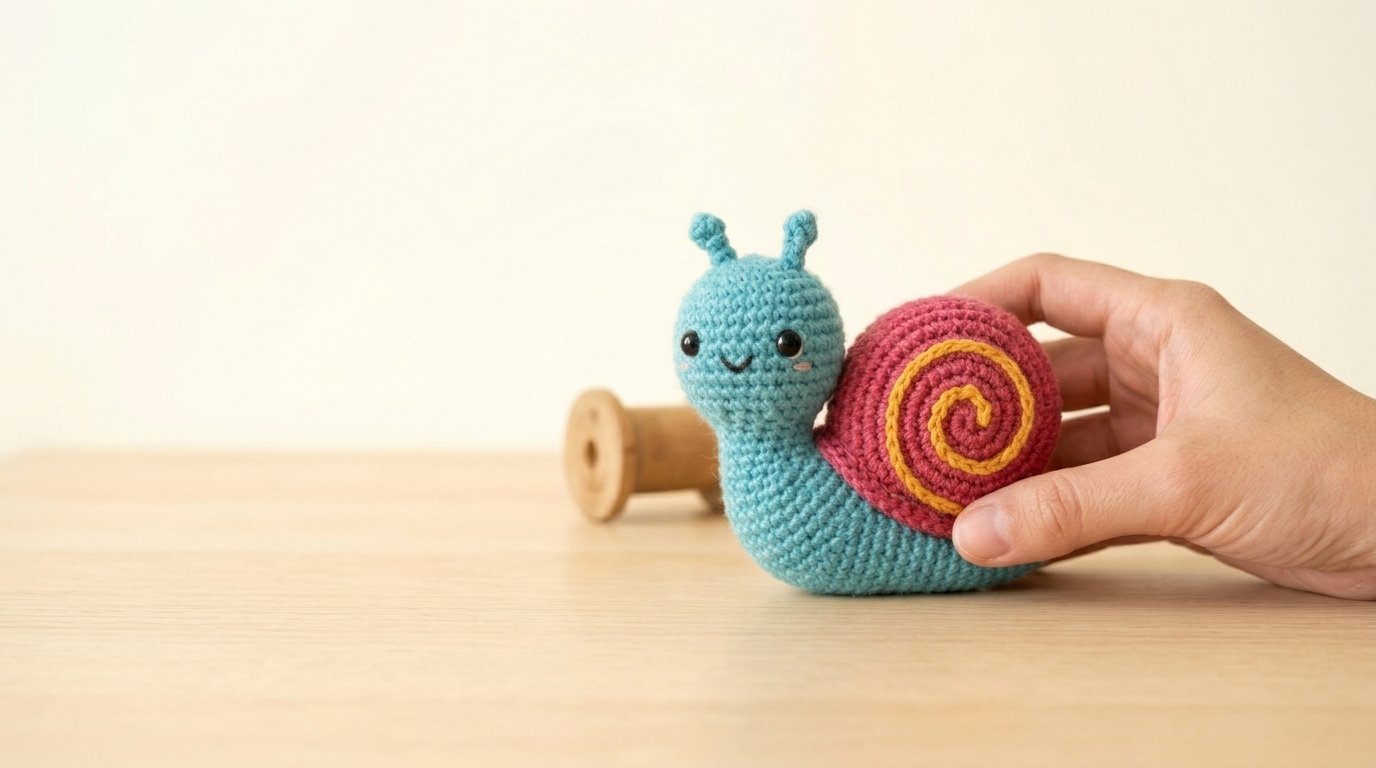
Some crochet projects are simply too adorable to resist, and this crochet snail amigurumi with a candy swirl is definitely one of them! With its soft turquoise body, bright raspberry-pink shell, golden-yellow spiral, and tiny smiling face, this little snail is full of handmade charm.
The design combines rounded shapes, playful colors, and simple crochet stitches to create a miniature creature that looks like it belongs in a magical candy garden. Two little antennae rise above its head, while the colorful shell adds a cheerful finishing touch.
This cute crochet snail pattern is a lovely project for beginners who already know how to work single crochet stitches, increases, and decreases.
You can make it as a small desk decoration, add it to your amigurumi collection, or give it as a thoughtful handmade gift. Best of all, you can complete the project using relatively small amounts of leftover yarn.
Quick Pattern Details
| Detail | Information |
|---|---|
| Skill level | Confident beginner |
| Project type | Crochet snail amigurumi |
| Finished size | Approximately 4–5 inches long |
| Estimated time | 3–5 hours |
| Yarn weight | Medium weight #4 |
| Crochet hook | 3.5 mm (E/4) |
| Main stitches | Single crochet, increases, decreases |
| Construction | Separate body, head, shell, and antennae |
| Crochet terminology | US terms |
The finished measurements are approximate and will depend on your yarn, hook size, and crochet tension.
Materials and Supplies
One of the prettiest features of this little snail is its bright candy-inspired color palette.
Yarn Colors
Turquoise Blue Yarn – Main Color
Choose a soft aqua or turquoise shade for the snail’s body, head, and antennae.
Estimated amount: 50–70 yards.
Raspberry Pink Yarn – Shell Color
Use a cheerful raspberry-pink or hot pink shade for the rounded snail shell.
Estimated amount: 30–45 yards.
Golden Yellow Yarn – Candy Swirl
A warm golden-yellow shade creates the decorative spiral on the shell.
Estimated amount: 5–10 yards.
Black and Soft Pink Yarn – Face Details
Use a small amount of black yarn for the smile and pastel pink for the rosy cheeks.
Additional Supplies
- 3.5 mm crochet hook
- Polyester fiberfill stuffing
- Yarn needle
- Scissors
- Stitch markers
- Two 6 mm safety eyes or black embroidery yarn
- Measuring tape
- Sewing pins
Yarn tip: Cotton yarn creates firm, well-defined amigurumi stitches. Acrylic yarn is another good choice if you prefer a softer, plush appearance.
For a snail intended for a baby or child under three, embroider the eyes instead of using plastic safety eyes, which may detach and become a choking hazard.
Crochet Abbreviations
This pattern uses standard US crochet terminology.
| Abbreviation | Meaning |
|---|---|
| MR | Magic ring |
| ch | Chain |
| sc | Single crochet |
| sl st | Slip stitch |
| inc | Increase: 2 sc in one stitch |
| dec | Invisible single crochet decrease |
| st(s) | Stitch or stitches |
| rnd | Round |
| rep | Repeat |
Magic ring: An adjustable starting loop that closes tightly when you pull the yarn tail.
Single crochet: Insert your hook into the stitch, yarn over and pull up a loop, then yarn over and pull through both loops.
Increase: Work two single crochet stitches into the same stitch.
Invisible decrease: Insert your hook through the front loops of the next two stitches, yarn over and pull through both loops, then yarn over and pull through the remaining loops.
Unless otherwise stated, work in continuous spiral rounds without joining.
Use a stitch marker to keep track of the beginning of each round.
Crochet Snail Amigurumi Pattern: Step-by-Step Instructions
We’ll create the snail in six main sections:
- Crochet the turquoise body.
- Make the upright head and neck.
- Crochet the two little antennae.
- Create the rounded pink shell.
- Add the golden-yellow candy swirl.
- Assemble the snail and embroider its face.
Working each piece separately makes the project easier to follow and allows you to adjust the proportions before sewing everything together.
Step 1: Crochet the Turquoise Snail Body
The snail has a long, gently curved body with a narrow tail and a fuller front section.
We’ll start at the tail tip and gradually increase the stitches to create the rounded shape.
Using turquoise yarn and your 3.5 mm hook:
Round 1: Make a magic ring and work 6 sc into it. (6 stitches)
Round 2: Work 1 sc in every stitch. (6 stitches)
Round 3: Repeat 2 sc, inc twice. (8 stitches)
Rounds 4–6: Work 1 sc in every stitch. (8 stitches per round)
Round 7: Repeat 3 sc, inc twice. (10 stitches)
Rounds 8–10: Work evenly. (10 stitches per round)
Round 11: Repeat 4 sc, inc twice. (12 stitches)
Rounds 12–14: Work evenly. (12 stitches per round)
Round 15: Repeat 2 sc, inc four times. (16 stitches)
Rounds 16–18: Work evenly. (16 stitches per round)
Round 19: Repeat 3 sc, inc four times. (20 stitches)
Rounds 20–22: Work evenly. (20 stitches per round)
Round 23: Repeat 4 sc, inc four times. (24 stitches)
Rounds 24–30: Work 1 sc in every stitch. (24 stitches per round)
The body should now have a tapered tail and a rounded front.
Stuff and Close the Body
Begin stuffing the body with small amounts of fiberfill.
Use a little less stuffing in the narrow tail section so you can gently curve it.
Round 31: Repeat 2 sc, dec six times. (18 stitches)
Round 32: Repeat 1 sc, dec six times. (12 stitches)
Add a little more stuffing to the fuller front section.
Round 33: Work 6 decreases. (6 stitches)
Fasten off, leaving a long yarn tail.
Thread the tail through the front loops of the remaining stitches and pull gently to close the opening.
Weave in the yarn end.
Beginner tip: Avoid overstuffing the tail. A softer tail is easier to shape and gives the snail a more natural appearance.
Step 2: Crochet the Snail’s Head and Neck
The upright head gives this little snail its adorable personality.
We’ll crochet the head from the top downward, then continue into a narrower neck.
Using turquoise yarn:
Round 1: Work 6 sc into a magic ring. (6 stitches)
Round 2: Increase in every stitch. (12 stitches)
Round 3: Repeat 1 sc, inc six times. (18 stitches)
Round 4: Repeat 2 sc, inc six times. (24 stitches)
Rounds 5–10: Work 1 sc in every stitch. (24 stitches per round)
The upper head should now be rounded.
Add the Eyes
If using safety eyes, position them between Rounds 7 and 8, approximately six stitches apart.
Make sure both eyes face forward.
Secure the safety-eye backs before continuing.
If you prefer embroidered eyes, you can add them after assembling the snail.
Shape the Neck
Round 11: Repeat 4 sc, dec four times. (20 stitches)
Round 12: Work evenly. (20 stitches)
Round 13: Repeat 3 sc, dec four times. (16 stitches)
Rounds 14–18: Work 1 sc in every stitch. (16 stitches per round)
Fasten off, leaving a long sewing tail.
Stuff the head firmly and the neck slightly more loosely.
Leave the bottom opening unclosed so you can attach it to the body.
The head should have a rounded top with a short, slightly narrower neck.
Step 3: Crochet the Little Snail Antennae
The two tiny turquoise antennae are one of the sweetest details in this design.
Each antenna has a narrow stalk and a small rounded tip.
Make two identical pieces.
Using turquoise yarn:
Round 1: Work 6 sc into a magic ring. (6 stitches)
Rounds 2–5: Work evenly. (6 stitches per round)
Round 6: Increase in every stitch. (12 stitches)
Rounds 7–8: Work evenly. (12 stitches per round)
Round 9: Work 6 decreases. (6 stitches)
Fasten off, leaving a long sewing tail.
Add a tiny amount of fiberfill to the rounded tip.
The stalk can remain unstuffed.
Shape the Antennae
Gently pinch the narrow section to straighten the stalk.
The rounded tip should look like a tiny ball.
Repeat for the second antenna.
Position them on top of the snail’s head, with a small gap between them.
Use the yarn tails to sew each antenna securely in place.
For a playful look, angle them slightly outward.
Beginner tip: Small amigurumi tubes can feel fiddly at first. Work slowly and use your stitch marker to avoid losing track of the rounds.
Step 4: Crochet the Raspberry-Pink Shell
Now we’ll make the colorful rounded shell that sits on the snail’s back.
The inspiration design features a plump raspberry-pink shell with a bright yellow spiral on its visible side.
We’ll crochet two circular pieces and join them to create a soft, dimensional shell.
Make the Front Shell Piece
Using raspberry-pink yarn:
Round 1: Work 6 sc into a magic ring. (6 stitches)
Round 2: Increase in every stitch. (12 stitches)
Round 3: Repeat 1 sc, inc six times. (18 stitches)
Round 4: Repeat 2 sc, inc six times. (24 stitches)
Round 5: Repeat 3 sc, inc six times. (30 stitches)
Round 6: Repeat 4 sc, inc six times. (36 stitches)
Round 7: Repeat 5 sc, inc six times. (42 stitches)
Round 8: Repeat 6 sc, inc six times. (48 stitches)
Rounds 9–10: Work 1 sc in every stitch. (48 stitches per round)
Fasten off.
This piece forms the slightly rounded front of the shell.
Make the Back Shell Piece
Repeat Rounds 1–8 of the front shell pattern.
Fasten off when you reach 48 stitches.
You should now have two pink circular pieces with matching outer stitch counts.
Join the Shell Pieces
Place the two pieces together with their wrong sides facing inward.
Align the outer edges.
Join pink yarn through one stitch from each piece.
Work single crochet through both layers around the outside.
Stop when approximately one-quarter of the edge remains open.
Add polyester fiberfill between the layers.
Use enough stuffing to create a rounded, plump shell without stretching the stitches.
Continue crocheting through both layers until the entire edge is closed.
You should have 48 joining stitches around the shell.
Fasten off and weave in the yarn tail.
The finished shell should resemble a soft, rounded disk.
Step 5: Add the Golden-Yellow Candy Swirl
The golden spiral is what makes this snail so special.
It looks like a cheerful candy swirl against the raspberry-pink shell.
We’ll create it using surface embroidery.
Mark the Spiral
Lay the pink shell flat with the rounded front facing upward.
Find the center of the shell.
Using a removable stitch marker or small temporary thread, mark a loose spiral beginning near the center and curving outward.
Aim for approximately two to three turns.
Keep the spacing between the curves fairly consistent.
Embroider the Yellow Spiral
Thread your yarn needle with a length of golden-yellow yarn.
- Bring the needle through the shell near the center.
- Make a short stitch following the marked spiral.
- Bring the needle up again a little farther along the curve.
- Continue using short stitches to create a continuous raised line.
- Follow the spiral outward toward the shell’s edge.
- Secure the yarn carefully on the back.
For a thicker candy-swirl effect, stitch over the spiral a second time.
You can also use a simple chain stitch for a more textured line.
Shape the Candy Swirl
Gently smooth the yellow yarn with your fingers.
The spiral should sit slightly raised above the pink crochet surface.
If any stitches appear loose, secure them with small matching stitches.
The finished shell should have a bright, playful candy-inspired appearance.
Helpful tip: Avoid pulling the yellow yarn too tightly. Keeping the embroidery relaxed prevents the shell from becoming puckered.
Step 6: Assemble the Crochet Snail
Now it’s time to bring the pieces together!
Lay the turquoise body on a flat surface.
Position the fuller end toward the front and the tapered tail toward the back.
Attach the Head
Place the open neck section on top of the fuller front portion of the body.
The face should point forward, with the antennae standing upright.
Use the long turquoise yarn tail to sew the neck opening securely to the body.
Work through all 16 stitches around the neck opening, anchoring them evenly into the body fabric.
Add small reinforcing stitches where necessary.
Check that the head stands upright before securing the final stitches.
Attach the Pink Shell
Position the pink shell on the snail’s back, just behind the upright head.
Make sure the golden-yellow spiral faces outward.
Use raspberry-pink yarn and a needle to sew the lower portion of the shell to the turquoise body.
Stitch through several points along the shell’s lower edge.
Avoid sewing the entire shell flat against the body.
Leaving the upper section slightly raised creates the rounded appearance seen in the inspiration image.
If you want both sides of the snail to be decorative, you can embroider a yellow spiral on the back of the shell as well.
Check the Balance
Place the snail on a flat surface.
The bottom of the turquoise body should rest comfortably on the table.
If the snail leans too much, adjust the position of the shell before finishing the attachment.
You can also gently reshape the stuffing to create a more stable base.
Step 7: Embroider the Cute Smiling Face
A sweet little smile gives this crochet snail its friendly personality.
The reference design features two shiny black eyes, a tiny curved mouth, and soft pink cheeks.
Make the Smile
Using black embroidery yarn:
- Thread your yarn needle.
- Bring the needle through the front of the head, beneath the eyes.
- Make a small diagonal stitch downward.
- Add a second short stitch upward to create a gentle smile.
- Secure the yarn on the inside.
The mouth should form a small curved or V-shaped smile.
Add the Rosy Cheeks
Using soft pink yarn:
- Position one cheek just below the left eye.
- Make two or three tiny horizontal stitches.
- Repeat beneath the right eye.
- Secure the yarn ends.
The blush marks should be subtle.
They add just enough color to make the snail look extra adorable.
Finishing Your Crochet Snail
Take a moment to inspect your finished amigurumi.
Weave in any remaining yarn ends.
Check that both antennae are firmly attached.
Gently shape the head and body with your fingers.
Make sure the pink shell sits comfortably against the snail’s back.
Straighten the golden spiral if needed.
You can gently curve the narrow tail upward or to one side for a more natural snail shape.
Your little candy-swirl snail is now ready to display!
Make This Crochet Snail Your Own
One of the nicest things about amigurumi is how easily you can customize your projects.
1. Pastel Candy Snail
Use pale mint green for the body, soft lavender for the shell, and cream for the spiral.
This creates a gentle, dreamy color combination.
2. Strawberry Candy Snail
Choose light pink for the body, bright red for the shell, and white for the candy swirl.
The finished snail will look like a sweet strawberry-inspired character.
3. Rainbow Swirl Snail
Keep the turquoise body but embroider the shell spiral in several different colors.
You can alternate yellow, pink, purple, and blue for a fun rainbow effect.
Creative Ways to Display Your Crochet Snail
This small amigurumi project is perfect for adding personality to little spaces.
Desk decoration: Place your snail beside a notebook or small plant for a cheerful handmade accent.
Bookshelf display: Tuck it between your favorite books or crochet decorations.
Amigurumi collection: Pair it with crochet mushrooms, frogs, bees, and other cute creatures.
Handmade gift: Give it to a friend who loves snails, colorful crafts, or kawaii decorations.
Craft room accessory: Display it near your yarn collection as a reminder of your favorite creative hobby.
The bright pink shell and turquoise body look especially lovely against natural wood and neutral backgrounds.
Tips for Beautiful Crochet Amigurumi
Use tight stitches. A smaller hook helps prevent stuffing from showing through.
Stuff gradually. Adding small amounts of fiberfill creates smoother shapes.
Keep the antennae balanced. Position them before sewing so they look evenly spaced.
Don’t overstuff the shell. Too much stuffing can distort its rounded shape.
Keep embroidery stitches relaxed. Tight stitching may pull the fabric out of shape.
Pin pieces before sewing. This makes it easier to check the proportions and balance.
How to Care for Your Crochet Snail
Handmade amigurumi can stay beautiful with a little gentle care.
- Remove dust using a soft brush.
- Spot-clean with a slightly damp cloth when necessary.
- Follow the care instructions for your chosen yarn.
- Avoid twisting or wringing the stuffed pieces.
- Allow the snail to air-dry completely.
- Keep it away from prolonged direct sunlight to reduce fading.
- Store it in a clean, dry place.
If the antennae become bent during storage, gently straighten them with your fingers.
Frequently Asked Questions
Is this crochet snail amigurumi pattern beginner-friendly?
Yes! It’s suitable for confident beginners who know how to crochet in rounds and make basic increases and decreases. The small antennae and shell assembly require a little patience, but each section is manageable.
What yarn is best for a crochet snail?
Medium-weight cotton or acrylic yarn works well for a soft, structured snail. Cotton offers clear stitch definition, while acrylic produces a slightly softer texture.
How do I make the candy swirl on the snail shell?
The yellow spiral is added using surface embroidery. Simply stitch a curved line from the center of the pink shell outward, following a loose spiral shape.
Can I make this crochet snail smaller?
Absolutely! Use thinner yarn and a smaller crochet hook while following the same stitch counts. The finished snail will be smaller, although the exact dimensions depend on your materials and gauge.
Can I turn this crochet snail into a keychain?
Yes, if you make a miniature version using fine yarn. Attach a sturdy keychain ring through a securely reinforced stitch near the top of the shell, and avoid fragile decorations that may catch on other items.
Conclusion
This crochet snail amigurumi with a candy swirl is a delightful way to turn a few colorful yarn scraps into an adorable handmade character.
The bright turquoise body, raspberry-pink shell, golden spiral, and tiny smiling face create a little snail that’s full of personality.
Take your time with the small details, enjoy shaping the rounded shell, and experiment with different candy-inspired colors.
Whether you keep it on your desk, add it to your amigurumi collection, or give it as a thoughtful handmade gift, this sweet little snail is sure to bring a smile.
Save this cute crochet snail pattern to your favorite Pinterest crochet board so you can return whenever you’re ready to make another adorable handmade creature!