Crochet Slipper Socks Pattern – Cozy Two-Color House Socks
There is something especially comforting about slipping your feet into a pair of soft, handmade socks on a chilly morning. These crochet slipper socks...
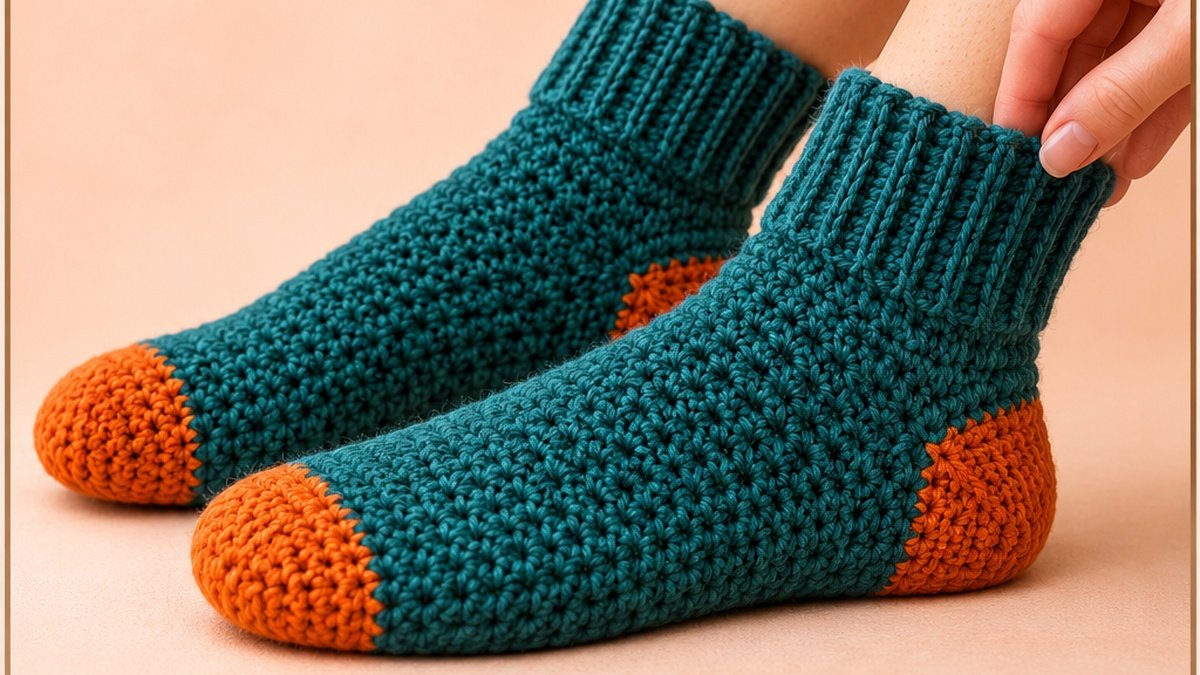
There is something especially comforting about slipping your feet into a pair of soft, handmade socks on a chilly morning. These crochet slipper socks combine cozy texture, cheerful contrasting colors, and practical everyday comfort in one satisfying project.
This design features a rich teal body, burnt-orange toes and heels, and a stretchy-looking ribbed cuff that gives the socks a neat, finished appearance. The bright color combination adds personality without needing complicated decorative stitches.
Unlike lightweight socks intended for wearing inside fitted shoes, these crochet house socks are designed for relaxing indoors. The slightly thicker fabric makes them suitable for cozy evenings, lounging, and thoughtful handmade gifts.
In this free crochet slipper socks pattern, you will learn how to create a rounded toe, crochet a comfortable foot section, shape a contrasting heel, and finish each sock with a textured cuff. The instructions use US crochet terminology and include practical guidance for adjusting the fit.
Why You’ll Love These Crochet Slipper Socks
These socks are a rewarding project for crocheters who already know a few basic stitches and are ready to explore simple shaping.
The main advantages include:
- Cozy construction: Worsted-weight yarn creates a warm fabric suitable for indoor footwear.
- Attractive contrasting colors: Orange toe and heel sections stand out against the deep teal body.
- Simple stitch pattern: Most of the sock uses half double crochet.
- Adjustable foot length: You can customize the length before shaping the heel.
- Textured cuff: Back-loop single crochet creates flexible vertical ribbing.
- Minimal sewing: Only the cuff seam and attachment require joining.
- Gift-friendly design: Choose favorite colors to create a personalized pair.
The construction also gives you opportunities to practice working in rounds, changing colors, and shaping fabric.
Project Overview
This pattern makes a pair of adult ankle-height crochet house socks with a rounded toe and a shaped heel.
| Project Detail | Recommendation |
|---|---|
| Skill level | Confident beginner |
| Estimated time | 5–8 hours per pair |
| Yarn | Worsted weight (#4) |
| Hook | 4.5 mm (US 7) |
| Construction | Toe-up, added heel |
| Main stitches | HDC, SC, SC BLO |
| Finished circumference | Approximately 8 inches |
| Foot length | Adjustable |
| Terminology | US crochet terms |
The sample instructions are intended for an approximate adult medium fit, with an estimated finished foot length of 9–9.5 inches after adjustment.
Actual dimensions depend on yarn, hook size, tension, and individual foot measurements.
Materials and Supplies Needed
Gather the following supplies before starting.
Yarn
Use approximately 260–340 yards of soft worsted-weight yarn for a pair, depending on size and gauge.
- Main Color A: 220–280 yards of deep teal.
- Contrast Color B: 40–60 yards of burnt orange.
Tools
- 4.5 mm crochet hook
- Tapestry needle
- Scissors
- Two removable stitch markers
- Flexible measuring tape
Optional supplies include non-slip fabric dots or a suitable textile grip product for the soles.
Choose a grip treatment specifically intended for fabric and follow its instructions.
Choosing the Right Yarn and Hook
The yarn you select will affect the fit, texture, and durability of your finished socks.
Recommended yarn
For warm indoor socks, choose a soft worsted-weight wool blend or acrylic-wool blend. The fibers should feel comfortable against the skin while providing enough structure to maintain the sock shape.
Wool blends can offer warmth and resilience, while suitable acrylic blends may be easier to care for.
Avoid very stiff cotton yarn for your first pair. Cotton generally has less recovery than springier wool blends, which can make fitting a crocheted sock more challenging.
Crochet hook selection
A 4.5 mm hook is the starting recommendation.
If the fabric is unusually stiff, try a slightly larger hook. If the stitches are too loose and leave large gaps, try a smaller hook.
Aim for a dense yet flexible fabric rather than a rigid slipper.
Gauge
An approximate starting gauge is:
16 half double crochet stitches and 12 rounds = 4 inches.
Measure a circular swatch or the developing sock rather than relying only on a flat swatch.
The target circumference for the 32-stitch version is approximately 8 inches.
Crochet Stitches and Abbreviations
All instructions use American crochet terminology.
| Abbreviation | Meaning |
|---|---|
| ch | Chain |
| sl st | Slip stitch |
| sc | Single crochet |
| hdc | Half double crochet |
| BLO | Back loop only |
| sc2tog | Single crochet two together |
| inc | Two stitches in one stitch |
| st(s) | Stitch(es) |
| rnd | Round |
| rep | Repeat |
Special techniques
Half double crochet (hdc): Yarn over, insert hook into the stitch, yarn over and pull up a loop, yarn over, then pull through all three loops.
Single crochet back loop only (sc BLO): Insert the hook under only the back loop of the next stitch and complete a single crochet.
Single crochet decrease (sc2tog): Insert hook into the next stitch and pull up a loop. Insert into the following stitch and pull up another loop. Yarn over and pull through all three loops.
Magic ring: Create an adjustable starting loop and crochet the required stitches into its center. Pull the tail to close the opening.
Before You Start
For the best fit, measure your foot before beginning.
You will need two measurements:
- Foot circumference: Measure around the widest part of the foot.
- Foot length: Measure from the longest toe to the back of the heel.
Because crochet fabric is usually less stretchy than knitted sock fabric, aim for a comfortable, slightly snug fit without squeezing the foot.
Work the main sock in continuous rounds unless otherwise directed. Place a marker in the first stitch of each round and move it upward as you work.
Size adjustment guide
| Size | Body Stitches | Heel Opening |
|---|---|---|
| Small | 28 | 14 + 14 |
| Medium | 32 | 16 + 16 |
| Large | 36 | 18 + 18 |
These are stitch-count options, not guaranteed shoe-size conversions. Foot measurements and your actual gauge determine the fit.
The full instructions below use the medium, 32-stitch version.
Step-by-Step Crochet Slipper Socks Pattern
Make two identical socks using the following instructions.
Step 1: Crochet the Rounded Toe
With Contrast Color B (burnt orange), create a magic ring.
Round 1: Work 8 hdc into the ring. Pull the ring closed. (8 sts)
Round 2: Work 2 hdc into each stitch around. (16 sts)
Round 3: Repeat 1 hdc in the next stitch, 2 hdc in the following stitch around. (24 sts)
Round 4: Repeat 1 hdc in each of the next 2 stitches, 2 hdc in the following stitch around. (32 sts)
You now have a rounded orange toe.
Check that the center opening is firmly closed and the increases are distributed evenly.
If the toe curls excessively, check your tension before continuing.
Step 2: Crochet the Foot
Change to Main Color A (deep teal).
Round 5: Work 1 hdc in each stitch around. (32 sts)
Round 6 and onward: Repeat 1 hdc in each stitch around, maintaining 32 stitches.
Continue until the sock measures approximately 1.5–2 inches shorter than the intended finished foot length.
For example, for a finished foot length of approximately 9.25 inches, begin checking the heel position when the tube measures roughly 7.25–7.75 inches from the toe.
This measurement is only a starting guide. The added heel creates additional depth, so try the tube against the intended foot and adjust before making the heel opening.
The teal section should remain consistent in width.
Step 3: Create the Heel Opening
Flatten the sock with the toe facing forward.
Position the beginning-of-round marker at one side of the flattened tube so that the next 16 stitches run across the top of the foot.
If necessary, reposition the start of the next round at this side point while maintaining the original 32-stitch circumference.
Heel opening round:
- Work 1 hdc into each of the next 16 stitches across the upper foot.
- Chain 16 loosely.
- Skip the remaining 16 stitches along the underside of the sock.
The chain forms a bridge above the heel opening.
You now have 16 worked stitches and 16 chains forming the next circumference of 32 stitches.
Secure the live teal loop with a removable stitch marker. Do not fasten off yet.
The opening will be filled with burnt-orange heel stitches.
Step 4: Crochet the Contrasting Heel
Turn the sock so that the heel opening is easy to reach.
Attach Contrast Color B at one side of the opening.
Work around the opening using the 16 unused stitches below and the 16 unused underside chain loops above.
Heel Round 1: Work 16 sc into the skipped stitches and 16 sc into the unused loops of the chain bridge. (32 sts)
Mark the beginning of the round.
Heel Round 2: Repeat sc in the next 6 stitches, sc2tog four times. (28 sts)
Heel Round 3: Repeat sc in the next 5 stitches, sc2tog four times. (24 sts)
Heel Round 4: Repeat sc in the next 4 stitches, sc2tog four times. (20 sts)
Heel Round 5: Repeat sc in the next 3 stitches, sc2tog four times. (16 sts)
Heel Round 6: Repeat sc in the next 2 stitches, sc2tog four times. (12 sts)
Heel Round 7: Repeat sc in the next stitch, sc2tog four times. (8 sts)
Fasten off, leaving a yarn tail of approximately 10 inches.
Thread the tail through a tapestry needle and pass it through the front loops of the remaining eight stitches.
Pull gently to close the opening.
Secure the end on the inside.
Inspect both sides of the heel for small gaps where the chain bridge meets the sock body. Close any visible gaps neatly using the yarn tails.
The heel should form a rounded, slightly projecting section rather than a flat patch.
Step 5: Crochet the Ankle Section
Return to the saved teal yarn loop.
Remove the stitch marker and continue working around the 32-stitch upper opening.
First ankle round: Work 16 hdc across the existing upper-foot stitches and 16 hdc into the chain loops reserved for the upper section. (32 sts)
Continue with 1 hdc in each stitch around.
Work approximately 5–7 additional rounds, or until the ankle section reaches the desired height before adding the cuff.
For an ankle-length version, the plain teal ankle section can measure approximately 1.5–2.25 inches above the heel opening.
Fasten off and weave in the end.
Step 6: Make the Ribbed Cuff
The ribbed cuff is worked separately in rows and then attached around the ankle opening.
With Main Color A, chain 9.
Row 1: Work 1 sc in the second chain from the hook and each remaining chain. (8 sc)
Row 2: Chain 1, turn. Work 1 sc BLO in each stitch across. (8 sc)
Rows 3–32: Repeat Row 2.
You should have a narrow rectangular strip with 32 rows of textured ribbing.
The eight-stitch width forms the height of the cuff.
Check the cuff strip around the ankle opening. It should stretch comfortably without being excessively loose.
If necessary, adjust the hook size to match the required circumference.
Step 7: Join the Cuff
Fold the ribbed strip so that the short edges meet.
Use a tapestry needle and matching yarn to sew the short edges together, forming a ring.
Turn the cuff so that the seam is on the inside.
Position the cuff around the top of the ankle section.
The cuff has 32 row ends, and the ankle opening contains 32 stitches.
Use a flexible whipstitch to attach one cuff row end to each ankle stitch.
Avoid pulling the sewing yarn tightly.
The finished cuff should sit neatly around the ankle while allowing the foot to pass through comfortably.
Step 8: Make the Second Sock
Repeat the entire process for the second sock.
Use the same stitch counts, foot length, heel rounds, and cuff measurements.
Before fastening off each major section, compare it with the first sock.
This is particularly important when working the plain foot rounds, as even two extra rounds may make one sock noticeably longer.
Assembly and Finishing
Once both socks are complete, inspect the finishing carefully.
Check the following areas:
- The center of each toe is fully closed.
- The heels have smooth, secure closures.
- The heel corners have no large holes.
- The cuff seams are neat.
- The cuffs stretch without pulling against the ankle.
- All yarn ends are secured inside the socks.
Gently reshape the socks by hand.
If the yarn allows it, use light damp blocking to even the stitches. Avoid stretching the ribbed cuffs too much during drying.
For the best appearance, arrange both socks together and check that the toe color sections, heel placement, and cuff height match.
Tips for the Best Results
Maintain even tension
Consistent tension helps the two socks match in size. Check your crochet gauge after completing the toe and again after several foot rounds.
Count every shaping round
Use a stitch marker when creating the toe and heel. Accurate stitch counts are essential for symmetrical shaping.
Keep the chain bridge flexible
A chain that is too tight can make the heel area uncomfortable. Make the heel-opening chains loosely and evenly.
Try the sock on during construction
Test the foot tube before creating the heel opening and check the fit again after finishing the first heel.
Use comfortable seams
Tuck sewing ends securely inside the fabric without creating hard knots under the foot.
Prioritize fit over speed
Small adjustments to length and tension can make a significant difference in how comfortable the socks feel.
Common Mistakes and Troubleshooting
The sock is too tight
The hook may be too small, or the yarn may have limited stretch.
Check the circumference early. If the fabric feels rigid, use a slightly larger hook or select a more flexible yarn.
The socks are different lengths
This usually happens when the number of plain foot rounds differs.
Record the exact number of rounds used for the first sock and repeat it for the second.
The heel has small holes
Gaps can form at the sides of the chain bridge.
Use the yarn tail to close the corner spaces without pulling the heel out of shape.
The ribbed cuff looks uneven
Make sure you are working only into the back loop of each stitch and maintaining eight stitches per row.
The cuff feels too tight
Try a slightly larger hook for the ribbed section and check that the attachment seam can stretch.
The toe curls inward
Some curling is normal during early rounds. If the toe stays excessively curled, check that every increase was completed correctly and that your tension is not too tight.
Creative Variations and Customization Ideas
Once you understand the basic construction, you can create different styles using the same method.
Make a single-color pair
Crochet the toe, heel, body, and cuff in the same yarn color for a minimal everyday design.
Try a new contrast palette
Good color combinations include navy and mustard, burgundy and cream, lavender and charcoal, or forest green and warm ivory.
Create a taller cuff
Increase the height of the ribbed strip by adding more stitches to the starting chain while keeping the number of rows aligned with the ankle circumference.
Adjust the circumference
For a smaller sock, work 28 body stitches after the toe increases, using 14 stitches on each side of the heel opening.
For a larger sock, work 36 stitches, with an 18-stitch heel opening and a corresponding 36-row cuff.
For either variation, adapt the heel decreases to reduce four stitches evenly per round until eight stitches remain.
Add subtle stripes
Work one or two contrasting rounds along the ankle section for a simple decorative accent.
How to Wear and Style Your Crochet Socks
These socks are especially suited to indoor use during cooler weather.
Wear them while reading, working at a desk, relaxing in the living room, or enjoying a quiet evening at home.
They also make thoughtful gifts for birthdays, winter holidays, and handmade gift baskets.
Because crochet fabric can be thicker and less elastic than traditional knitted socks, these are best considered house socks rather than performance socks or footwear for tight shoes.
Safety tip: Crocheted soles may slip on polished floors or tiles. Consider a suitable non-slip sole treatment and test grip before regular use.
Care and Washing Instructions
Proper care helps your handmade socks retain their shape.
Always begin by checking the washing instructions on the yarn label.
For many wool blends, gentle handwashing is a cautious choice.
- Fill a basin with cool or lukewarm water.
- Add a small amount of suitable mild detergent.
- Gently immerse the socks without aggressive rubbing.
- Rinse carefully.
- Press out excess water using a clean towel.
- Reshape and lay flat to dry.
Avoid hanging wet socks by their cuffs, as the extra weight may stretch the fabric.
Store the socks clean and dry, ideally folded rather than stretched over a hanger.
Frequently Asked Questions
Are crochet slipper socks suitable for beginners?
Yes, for confident beginners who already understand basic stitches and simple increases. The heel construction requires some concentration, but the instructions use straightforward decreases.
What yarn is best for crochet socks?
A soft, resilient wool blend or suitable acrylic blend works well for indoor slipper socks. Choose yarn that feels comfortable and has enough flexibility for the foot.
Can I make these socks without a magic ring?
Yes. Chain four, join into a ring with a slip stitch, and work the starting eight half double crochet stitches into the center.
How can I make the socks larger?
Increase the stitch count to match the required circumference and adjust the heel opening accordingly. Always use your measured gauge rather than assuming a particular shoe size.
Can I make these socks longer?
Yes. Add plain half double crochet rounds before creating the heel opening. Check the length against the intended foot as you work.
How do I make the cuff more comfortable?
Use flexible yarn, avoid tight attachment stitches, and make sure the ribbed strip can stretch sufficiently around the ankle.
Can these socks be worn outdoors?
They are primarily designed for indoor comfort. For outdoor wear, a purpose-made protective sole would be needed, along with appropriate durability and traction.
How much yarn will I need?
Plan for approximately 260–340 yards for an adult medium pair. Larger sizes, longer cuffs, and individual tension may require additional yarn.
Conclusion
Crocheting your own slipper socks is a satisfying way to turn simple stitches into a cozy, practical handmade accessory.
The rich teal fabric, contrasting orange toes and heels, and textured cuffs give this design a cheerful but polished appearance. The toe-up construction also makes the foot length easy to adjust before adding the heel.
Once you complete your first pair, you can experiment with different colors, cuff heights, and sizes to create socks for yourself or as thoughtful gifts.
Choose your favorite soft yarn, prepare your hook, and enjoy bringing these colorful crochet house socks to life.
Related Crochet Projects to Try Next
If you enjoyed making these crochet slipper socks, consider exploring a few coordinating projects:
- Chunky Crochet Slippers: A thicker indoor footwear project with extra warmth.
- Easy Crochet Leg Warmers: A comfortable accessory that pairs beautifully with handmade socks.
- Ribbed Crochet Boot Cuffs: A smaller project for practicing back-loop ribbing.
- Crochet Cozy Fingerless Gloves: A matching cold-weather accessory using similar textured stitches.
Each project offers another opportunity to build your crochet skills while making practical accessories for everyday comfort.