Crochet Scarf Cardigan Pattern with Floral Lace Edging and Balloon Sleeves
A crochet scarf cardigan is a beautiful way to combine the cozy feeling of a handmade scarf with the comfort of an open-front cardigan....
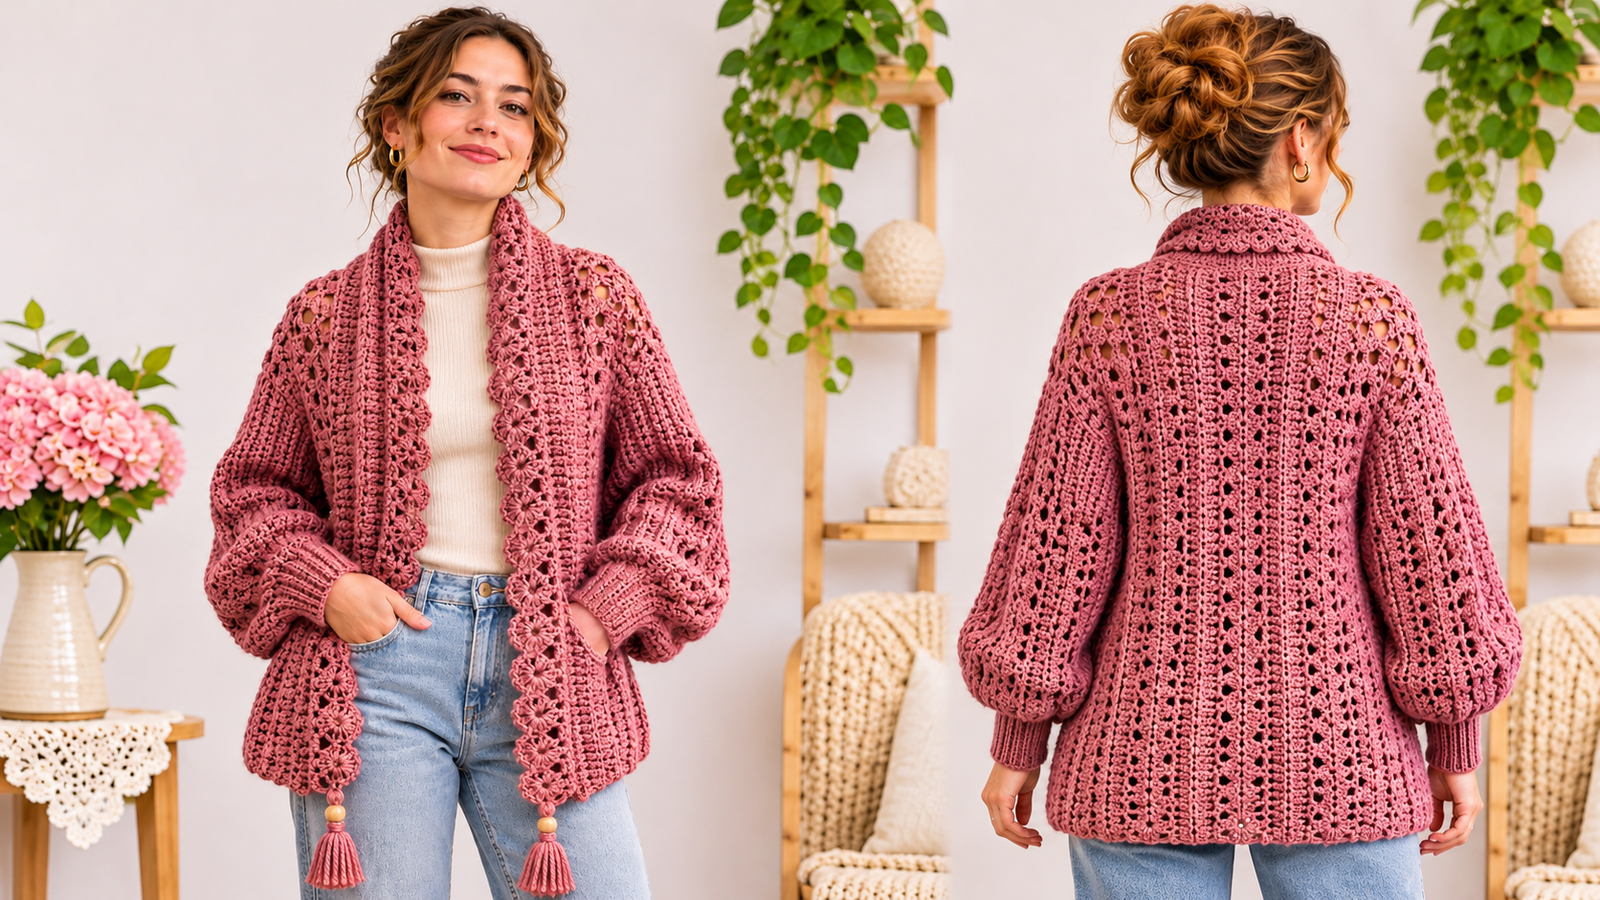
A crochet scarf cardigan is a beautiful way to combine the cozy feeling of a handmade scarf with the comfort of an open-front cardigan. This rose pink design features long waterfall panels, textured openwork stitches, relaxed balloon sleeves, and delicate floral details that give the garment a romantic, handcrafted appearance.
Unlike a traditional fitted sweater, this cardigan has a loose silhouette with extended front panels that drape naturally down the body. The floral edging adds texture and visual interest, while the ribbed cuffs help shape the sleeves without complicated decreases.
The design is created primarily from simple rectangular pieces, making the basic construction approachable for crocheters who are comfortable working in rows. The decorative flowers and garment assembly add a little more challenge, so this project is best suited to confident beginners moving into intermediate crochet.
In this guide, you’ll learn how to make the back panel, two waterfall fronts, relaxed sleeves, ribbed cuffs, decorative flowers, and finishing tassels.
The result is a feminine layering piece that pairs beautifully with jeans, casual tops, and simple dresses.
Why You’ll Love This Crochet Scarf Cardigan
This crochet scarf cardigan combines several practical features with decorative details that make it stand out from an ordinary sweater.
Flowing waterfall fronts: The extended front panels create a soft scarf-like silhouette that moves naturally when worn.
Textured openwork fabric: A repeating combination of half double crochet and chain spaces creates a flexible fabric with small decorative openings.
Comfortable balloon sleeves: The relaxed sleeves provide room around the arms before gathering into fitted ribbed cuffs.
Delicate floral edging: Small crocheted flowers decorate the inner front edges, adding a romantic finishing touch.
Straightforward garment construction: The main body is assembled from rectangular pieces rather than complicated shaped panels.
Beautiful customization options: Change the yarn color, adjust the length, or simplify the floral details to create your own version.
The rose pink palette works especially well with neutral outfits, making this cardigan suitable for spring, fall, and cool evenings.
Project Overview
Before beginning, review the approximate specifications for this design.
| Detail | Information |
|---|---|
| Project | Crochet scarf cardigan |
| Skill level | Intermediate |
| Construction | Five main rectangular pieces |
| Estimated time | 18–28 hours |
| Yarn weight | Medium weight, Category 4 |
| Main hook | 6.0 mm (J/10) |
| Cuff hook | 5.0 mm (H/8) |
| Suggested fit | Relaxed adult medium/large |
| Back panel | Approximately 22 × 24 inches |
| Front panels | Approximately 11 × 34 inches each |
| Sleeves | Approximately 16 × 18 inches before cuffs |
| Main stitches | Hdc, dc, sc, ch, sl st |
| Crochet terms | US terminology |
Important pattern note: This is an original, untested draft developed from an AI-generated design concept. Measurements, material amounts, and gauge are estimates. The photograph is illustrative, and the finished garment may differ in texture and details. Make a gauge swatch and check the fit before completing the seams.
This pattern provides one suggested size with instructions for adjusting the dimensions.
Materials and Supplies Needed
Gather the following materials before starting.
Yarn
Choose approximately 1,400–1,800 yards of medium-weight yarn, allowing extra yarn if you plan to make longer panels or additional flowers.
Suggested color:
- Main color: rose pink or dusty raspberry
- Floral edging: matching rose pink
- Optional contrasting detail: darker raspberry
A soft acrylic or acrylic-wool blend works well for the draped silhouette.
Crochet Hooks and Tools
- 6.0 mm crochet hook
- 5.0 mm crochet hook
- Yarn needle
- Scissors
- Measuring tape
- Stitch markers
- Optional blocking mats
- Two optional wooden beads for tassels
Choose smooth, comfortable yarn that allows the finished fabric to move freely.
Because this cardigan uses long panels, yarn with an extremely heavy or rigid structure may cause the garment to stretch or hang awkwardly.
Choosing the Right Yarn and Hook
Yarn selection affects the cardigan’s softness, drape, stitch definition, and overall comfort.
For this project, medium-weight yarn offers a useful balance between structure and flexibility.
Recommended Yarn Fiber
A soft acrylic blend is a practical choice because it is widely available and usually easy to care for.
A wool blend can create a warmer garment with good stitch definition. However, some wool yarns require handwashing or special care.
Choose yarn that feels comfortable against your neck and arms, especially because the long front panels may touch exposed skin.
Recommended Hook Sizes
Use a 6.0 mm hook for the main body and sleeves.
The slightly larger hook helps create the open, flexible fabric needed for the waterfall effect.
Switch to a 5.0 mm hook for the cuffs.
The smaller hook creates a firmer ribbed texture that helps the cuffs hold their shape.
Yarn Substitutions
You can use a different yarn weight, but this will change the gauge and finished dimensions.
If you choose a thinner yarn, you will usually need more stitches and rows to achieve the same measurements.
Always make a gauge swatch before changing yarn weight.
Crochet Stitches and Abbreviations
This pattern uses standard US crochet terminology.
- ch: Chain
- sc: Single crochet
- hdc: Half double crochet
- dc: Double crochet
- sl st: Slip stitch
- st: Stitch
- sts: Stitches
- sp: Space
- BLO: Back loop only
- RS: Right side
- WS: Wrong side
Half Double Crochet
Yarn over, insert your hook into the indicated stitch, yarn over, and pull up a loop.
Yarn over again and pull through all three loops on your hook.
Double Crochet
Yarn over, insert your hook into the designated stitch, yarn over, and pull up a loop.
Yarn over and pull through two loops.
Yarn over again and pull through the remaining two loops.
Back-Loop Single Crochet
Insert the hook under the back loop of the stitch only.
Yarn over and pull up a loop, then yarn over and pull through both loops.
Working through the back loop creates flexible ribbing for the sleeve cuffs.
Decorative Eyelet Pattern
The main fabric alternates rows of half double crochet with double crochet and chain spaces.
The chain spaces create small openings without requiring complicated lace techniques.
Before You Start
A little preparation will help you create a cardigan that fits comfortably.
Make a Gauge Swatch
Using your main yarn and 6.0 mm hook, make a swatch at least 6 inches wide using the main stitch pattern described below.
The suggested gauge is approximately:
12 stitches and 9 rows = 4 × 4 inches.
The stitch measurement counts both worked stitches and chain-one spaces.
This is an estimated target gauge, not a verified sample measurement.
Measure the middle of your relaxed swatch and adjust the hook size if necessary.
Understand the Construction
The cardigan has five main pieces:
- One rectangular back panel.
- Two long front scarf panels.
- Two rectangular sleeves.
The sleeves are sewn into tubes and attached to the body.
Separate ribbed cuffs gather the sleeve openings, creating the softly rounded balloon shape.
The front panels extend below the back hem to create the waterfall effect.
Decorative flowers are sewn along the inner front edges after assembly.
Check Your Measurements
Measure your upper arms, shoulder width, desired back length, and preferred front-panel length.
The suggested dimensions create a relaxed fit, but the best size will depend on your body measurements and how loosely you want the cardigan to drape.
Step-by-Step Crochet Instructions
The following instructions create a rose pink waterfall scarf cardigan using an alternating eyelet stitch pattern.
Step 1: Learn the Main Stitch Repeat
The main stitch pattern begins with a solid half double crochet foundation row.
Row 1: Work 1 hdc in the third chain from the hook and in every remaining chain.
Turn.
Row 2: Ch 3, which counts as the first dc.
Repeat the following sequence across the row:
Ch 1, skip the next stitch, work 1 dc in each of the next 3 stitches.
The row should end with a group of three double crochet stitches.
Turn.
Row 3: Ch 1, which does not count as a stitch.
Work 1 hdc into the first dc, then work 1 hdc into every remaining dc and every ch-1 space across.
Turn.
Rows 4 onward: Repeat Rows 2 and 3.
This pattern works with a foundation containing a multiple of four stitches plus one.
Maintain the same number of stitch positions in every row, counting chain-one spaces as one position.
Step 2: Crochet the Back Panel
Using your 6.0 mm hook and rose pink yarn:
Foundation: Ch 67.
Row 1: Hdc in the third chain from the hook and in every remaining chain.
Stitch count: 65 hdc.
Row 2: Ch 3, turn. Repeat ch 1, skip 1 stitch, dc in each of the next 3 stitches across.
There should be 16 chain-one spaces and 49 dc, including the turning chain.
Row 3: Ch 1, turn. Work 1 hdc in every dc and ch-1 space.
Stitch count: 65 hdc.
Rows 4–54: Continue repeating Rows 2 and 3.
At the suggested gauge, the panel should measure approximately 22 inches wide and 24 inches long.
Check your measurements before fastening off.
If needed, adjust the number of rows to reach your preferred back length.
Fasten off and weave in the yarn end temporarily, leaving a long tail if you prefer to use it for assembly.
Step 3: Crochet the First Waterfall Front
The front panels are narrower and longer than the back.
Their extended lengths create the scarf-inspired drape.
Foundation: Ch 35.
Row 1: Hdc in the third chain from the hook and in each remaining chain.
Stitch count: 33 hdc.
Row 2: Ch 3, turn.
Repeat ch 1, skip 1 stitch, dc in each of the next 3 stitches across.
You should have eight chain-one spaces and 25 dc, including the turning chain.
Row 3: Ch 1, turn.
Work 1 hdc in each dc and each ch-1 space across.
Stitch count: 33 hdc.
Rows 4–76: Continue alternating the eyelet and solid rows.
The panel should measure approximately 11 inches wide and 34 inches long at the suggested gauge.
Fasten off.
Step 4: Crochet the Second Waterfall Front
Repeat Step 3 to create an identical second panel.
Make sure both fronts contain the same number of rows.
Lay them side by side and compare their lengths.
If one panel appears longer, check your row count and stitch tension before continuing.
Both front panels should have enough flexibility to hang naturally.
Step 5: Crochet the First Sleeve
The sleeves use the same stitch pattern but are wider than the wrist openings.
This extra width creates the balloon effect when the cuffs are attached.
Foundation: Ch 51.
Row 1: Hdc in the third chain from the hook and across.
Stitch count: 49 hdc.
Row 2: Ch 3, turn.
Repeat ch 1, skip 1 stitch, dc in each of the next 3 stitches across.
You should have 12 chain-one spaces and 37 dc, including the turning chain.
Row 3: Ch 1, turn.
Work 1 hdc in each dc and ch-1 space.
Stitch count: 49 hdc.
Rows 4–40: Continue repeating the pattern.
Your sleeve rectangle should measure approximately 16 inches wide and 18 inches long.
The width will become the circumference of the sleeve, while the row length extends from the armhole toward the wrist.
Fasten off, leaving a long sewing tail.
Step 6: Crochet the Second Sleeve
Repeat Step 5 using the same hook, yarn, and number of rows.
Check that both sleeves have matching dimensions.
The sleeves should be wide enough to fit comfortably around your upper arms.
If you need additional arm circumference, increase the foundation stitch count in multiples of four.
For example, adding eight stitches increases the width by approximately 2.7 inches at the suggested gauge.
Adjust the body armholes to match the new sleeve circumference.
Step 7: Create the Ribbed Cuffs
Use your 5.0 mm crochet hook.
Foundation: Ch 13.
Row 1: Work 1 sc in the second chain from the hook and in each remaining chain.
Stitch count: 12 sc.
Row 2: Ch 1, turn. Work 1 sc BLO in every stitch across.
Stitch count: 12 sc.
Rows 3 onward: Repeat Row 2 until the strip fits comfortably around your wrist and stretches enough to pass over your hand.
Aim for approximately 8–9 inches around the wrist before joining, adjusting for your tension and wrist measurement.
The 12-stitch strip creates a cuff approximately 3 inches deep at a typical single crochet gauge.
Fold the strip so its two short ends meet.
Use slip stitches or a yarn needle to join the short ends into a ring.
Repeat to make a second cuff.
Step 8: Join the Shoulder Seams
Lay the back panel flat with the top edge facing upward.
Position one front panel at each upper corner of the back, with the right sides together.
Align approximately 4.5 inches along the top edge of each front panel with the corresponding outer shoulder section of the back panel.
Sew these sections together using mattress stitch or another flexible seam.
Leave the center back neck opening unseamed.
The remaining front-panel width forms loose inner edges that will eventually drape down the body.
Open the garment flat and check that both front panels hang evenly from the shoulders.
Step 9: Sew the Side Seams
With the garment inside out, align the outer side edges of the fronts and back.
Measure approximately 8.25 inches down from each shoulder seam.
Mark these positions as the bottom of the armholes.
Starting at each marker, sew the front panel to the back panel down to the back hem.
Leave the additional length of each waterfall front hanging freely below the back hem.
The two front panels should extend approximately 10 inches below the back.
Repeat on the opposite side.
Step 10: Assemble and Attach the Sleeves
Fold each sleeve rectangle lengthwise so the two long edges meet.
Sew the long edges together to create a tube.
Leave both short ends open.
One opening will attach to the cardigan armhole; the other will receive the cuff.
Turn the cardigan inside out but keep the sleeve right side out.
Insert the sleeve into the armhole, right sides together.
Match the sleeve seam with the underarm seam and distribute the fabric evenly around the armhole.
At the suggested dimensions, the armhole circumference is approximately 16.5 inches, close to the sleeve opening circumference.
Use stitch markers at four evenly spaced points before sewing.
Sew around the opening with a flexible seam.
Repeat for the second sleeve.
Turn the garment right side out and check the fit.
Step 11: Attach the Ribbed Cuffs
Place a ribbed cuff against the wrist opening of one sleeve with the right sides together.
The cuff should be smaller than the sleeve opening.
Use four stitch markers to divide both openings into equal sections.
Match the markers and distribute the sleeve fabric evenly between them.
Sew the sleeve edge to the cuff, gently gathering the extra fabric.
Repeat for the other sleeve.
The gathered sleeve should create the softly rounded balloon shape shown in the design.
Step 12: Crochet the Decorative Flowers
The floral trim adds the signature detail to this cardigan.
Make approximately 12 flowers for each front panel, or 24 flowers in total.
Using your main hook:
Round 1: Make a magic ring. Ch 1 and work 10 sc into the ring.
Pull the ring closed.
Sl st into the first sc to join.
Stitch count: 10 sc.
Round 2: Work the following petal into the first sc:
Sl st, ch 2, 3 dc, ch 2, sl st, all in the same stitch.
Skip the next sc.
Repeat this petal sequence in every other stitch around the ring.
You should create five petals.
Fasten off, leaving a sewing tail.
Repeat for all remaining flowers.
Gently shape each flower with your fingers so the petals sit evenly.
The finished flowers will be small and decorative rather than heavily three-dimensional.
Step 13: Attach the Floral Edging
Lay the cardigan flat with the front opening facing upward.
Arrange the flowers along the inner edges of the two waterfall panels.
Start near the neckline and continue down toward the ends.
Space the flowers approximately 2–2.5 inches apart, adjusting the arrangement to fit your actual panel length.
Pin or mark the flower positions before sewing.
Use a yarn needle to attach each flower securely through its center and selected petal edges.
Avoid pulling the sewing yarn too tightly because this may cause the front panels to pucker.
Repeat along the other front.
Both sides should have balanced floral decoration.
Step 14: Add a Simple Front Border
For a cleaner finish, add a narrow border along the exposed front edges.
With the right side facing you, join yarn at the lower inner corner of one front panel.
Work single crochet stitches evenly along the edge, placing approximately one stitch per row-end area and adjusting the spacing to keep the edge flat.
Where the edge begins to ripple, reduce the number of stitches.
Where it pulls inward, add stitches more frequently.
At corners, work three single crochet stitches in the corner space.
Fasten off and repeat on the other front.
You may work this border before attaching the flowers if you prefer a cleaner sewing surface.
Step 15: Make the Decorative Tassels
Cut approximately 16–20 strands of yarn, each about 8 inches long, for one tassel.
Fold the strands in half.
Use an additional strand to tie the folded bundle approximately half an inch below the top.
Wrap another short piece of yarn around the tassel neck several times and secure it.
Trim the ends to create a neat tassel approximately 4 inches long.
Make a second matching tassel.
Attach one tassel to the bottom of each waterfall front.
If desired, thread a wooden bead onto the attachment cord before securing the tassel.
Make sure the attachment is strong enough for normal adult wear.
Assembly and Finishing
Once all components are attached, inspect the garment carefully.
Check the shoulder seams, sleeve joins, cuff attachments, and flower placement.
Use a yarn needle to weave in loose ends through several nearby stitches.
Trim excess yarn without cutting the crocheted fabric.
Lightly block the cardigan if recommended for your yarn.
Lay it flat and gently reshape the waterfall fronts so they hang evenly.
Avoid overstretching the cuffs.
Allow the cardigan to dry completely before wearing or storing.
Your rose pink crochet scarf cardigan is now ready to style.
Tips for Best Results
Check your measurements often. The waterfall effect depends on the front panels being longer than the back, so measure both panels carefully.
Maintain consistent tension. An even stitch pattern helps the lacy texture appear balanced across the body and sleeves.
Use soft yarn. Drape is especially important for a scarf cardigan. Stiff yarn can make the front panels project outward rather than fall naturally.
Mark the armholes before sewing. This helps keep the sleeve openings symmetrical.
Make both cuffs together. Working the cuffs in the same session can help you maintain consistent tension.
Arrange the flowers before attaching them. Even spacing creates a neater decorative border.
Try the cardigan on before final finishing. Small adjustments to the front drape and sleeve seams are easier before all yarn ends are secured.
Common Mistakes and Troubleshooting
The Front Panels Hang Unevenly
Check that both fronts contain the same number of rows.
If the row counts match, compare your stitch tension and blocking measurements.
The Sleeve Openings Feel Tight
The sleeve rectangle may be too narrow or the armhole too small.
Measure your upper-arm circumference before joining the sleeves.
If necessary, increase the sleeve width and adjust the armhole depth accordingly.
The Cuffs Look Too Loose
The cuff strips may contain too many rows.
Undo the cuff seam and remove a few rows before joining again.
The cuff should fit comfortably without squeezing your wrist.
The Floral Border Is Curling
The flowers may be attached too tightly or positioned too closely together.
Loosen the attachment stitches and redistribute the flowers along the edge.
The Fabric Is Too Heavy
Try a lighter yarn or a larger hook that creates a softer, more open fabric.
A thinner yarn will require gauge adjustments to maintain the same dimensions.
The Cardigan Stretches After Wearing
Some yarns stretch under their own weight.
Store the garment folded instead of hanging it, and consider using a lighter fiber for future versions.
Creative Variations
This crochet scarf cardigan design can be customized in several ways.
Burgundy Floral Cardigan
Use a rich burgundy yarn for a dramatic winter version.
Matching floral edging creates an elegant, coordinated appearance.
Ivory Lace Scarf Cardigan
Choose soft ivory yarn to create a light, romantic layering piece.
This variation pairs beautifully with denim and neutral dresses.
Two-Tone Flower Border
Make the main cardigan in rose pink and crochet the flowers in a deeper raspberry shade.
The contrast highlights the decorative edging.
Minimalist Version
Omit the flowers and tassels for a cleaner waterfall cardigan.
This variation is also faster to complete.
Longer Waterfall Panels
Add additional rows to both fronts for a more dramatic scarf-like effect.
Be aware that longer panels increase yarn usage and garment weight.
Shorter Sleeve Version
Reduce the sleeve length and make narrow cuffs for a lighter cardigan suitable for milder weather.
How to Use or Style Your Crochet Project
The rose pink crochet scarf cardigan is a versatile layering piece that can be styled for different occasions.
For a casual everyday outfit, wear it over an ivory fitted top with light blue jeans.
The relaxed sleeves and flowing front panels add softness to a simple outfit.
For a romantic look, pair the cardigan with a plain cream dress and ankle boots.
Gold jewelry complements the warm rose pink yarn particularly well.
You can also wear the cardigan over a basic top with tailored trousers for a comfortable but polished outfit.
Allow the front panels to hang freely for a waterfall effect.
Alternatively, arrange one panel gently across the front of the body for more coverage, making sure it does not restrict movement.
Because the design contains decorative flowers and tassels, avoid snagging them on jewelry, bag straps, or furniture.
Care and Maintenance
Proper care helps preserve the cardigan’s texture, fit, and decorative details.
Always follow the washing instructions on your yarn label.
For delicate yarn blends, handwash using cool water and a gentle detergent.
Avoid rubbing the flowers or pulling the tassels.
Press excess water out gently with a clean towel rather than twisting the garment.
Lay the cardigan flat on a dry towel or mesh drying surface.
Reshape the front panels and sleeves while the fabric is damp.
Allow it to dry completely before storing.
Store the cardigan folded in a clean, dry location.
Avoid hanging it for long periods because the weight of the waterfall panels can gradually stretch the shoulder seams.
Frequently Asked Questions
Is this crochet scarf cardigan beginner-friendly?
The basic panels use a simple repeating stitch pattern, but the garment assembly, ribbed cuffs, and floral edging make the complete project better suited to confident beginners or intermediate crocheters.
How much yarn will I need?
For the suggested adult medium/large size, plan for approximately 1,400–1,800 yards of medium-weight yarn.
Actual yardage will vary based on your gauge, yarn choice, and finished dimensions.
Can I make this cardigan without the flowers?
Yes. The floral trim is decorative and does not affect the basic construction.
You can omit the flowers and tassels for a simpler design.
Can I use bulky yarn instead?
Yes, but you will need to adjust the hook size, foundation chains, and number of rows.
Bulky yarn will also make the finished cardigan heavier.
How can I make the cardigan larger?
Increase the back-panel width, front-panel widths, and sleeve circumference to suit your measurements.
Because the main stitch repeat uses multiples of four stitches plus one, add foundation stitches in groups of four.
Remember to recalculate shoulder seams and armhole sizes to maintain a comfortable fit.
How do I make the balloon sleeves?
The balloon shape is created by making the sleeves wider than the cuffs.
When you attach the smaller cuff to the larger sleeve opening, the excess fabric gathers gently near the wrist.
Can I make the front panels shorter?
Yes. Simply crochet fewer rows for each front panel.
For a classic cardigan look, make the fronts approximately the same length as the back.
Do I need to block the cardigan?
Blocking is optional but can help improve the drape and even out the stitch pattern.
Use a blocking method appropriate for your yarn fiber.
Conclusion
This crochet scarf cardigan pattern brings together flowing waterfall panels, comfortable balloon sleeves, textured openwork stitches, and romantic floral details.
The rectangular construction makes the main garment relatively straightforward, while the decorative edging provides an opportunity to practice additional crochet techniques.
Whether you choose rose pink, burgundy, ivory, or another favorite color, the design can become a distinctive addition to your handmade wardrobe.
Take your time with the measurements, check the fit during assembly, and enjoy creating a cozy cardigan that reflects your personal style.
Related Crochet Projects to Try Next
If you enjoyed this scarf cardigan, consider exploring these related crochet projects:
- Easy Crochet Waterfall Cardigan: A simple open-front cardigan featuring long, flowing panels.
- Crochet Balloon Sleeve Sweater: A cozy sweater with relaxed sleeves and fitted ribbed cuffs.
- Floral Crochet Shawl: A lightweight wrap decorated with small crocheted flowers.
- Beginner Crochet Kimono Cardigan: A loose-fitting garment made from rectangular crochet panels.
Each project offers another opportunity to practice wearable crochet construction while experimenting with texture, color, and decorative finishes.