Crochet Pumpkin Headband Pattern for Fall
Fall is the perfect season for cozy yarn projects, warm accessories, and adorable pumpkin-inspired designs. This crochet pumpkin headband pattern brings all three together...
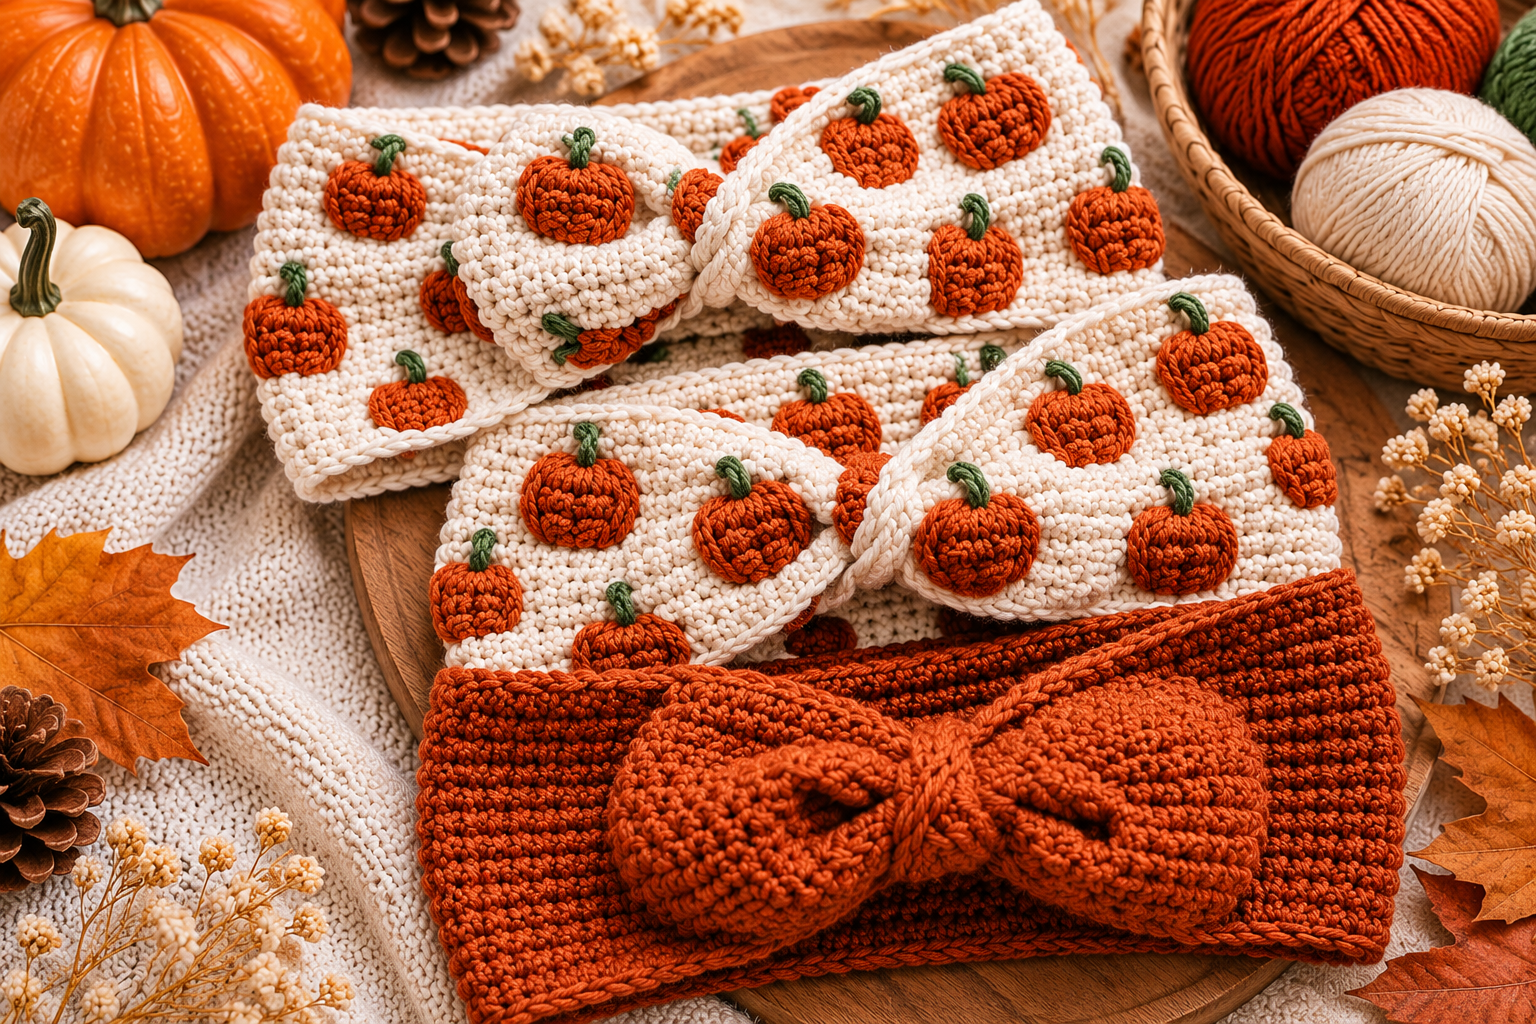
Fall is the perfect season for cozy yarn projects, warm accessories, and adorable pumpkin-inspired designs. This crochet pumpkin headband pattern brings all three together in a charming handmade accessory that looks beautiful with sweaters, scarves, and everyday autumn outfits.
The inspiration features soft cream crochet ear warmers decorated with miniature rust-orange pumpkins and delicate green stems. Several have gathered, twisted-looking fronts that add dimension without overwhelming the decorative pumpkin details. A coordinating solid rust-colored headband features a prominent twisted knot at the center.
The textured fabric, warm seasonal colors, and raised pumpkin motifs create a cozy farmhouse aesthetic that’s especially appealing during autumn.
In this guide, you’ll learn how to plan your headband, create a comfortable crocheted band, shape a decorative twist, make small pumpkin appliqués, and finish your accessory neatly.
You’ll also discover sizing advice, yarn recommendations, customization ideas, and common mistakes to avoid.
What Is a Crochet Pumpkin Headband?
A crochet pumpkin headband is a handmade ear warmer or hair accessory decorated with pumpkin-inspired details.
The featured designs combine two attractive styles: cream headbands featuring miniature pumpkins and a solid rust-orange ear warmer with a central twist.
The cream versions appear to use compact, textured stitches that produce a warm, substantial fabric. Small raised orange pumpkins are arranged across the surface, with short green stems adding contrast.
The rust-colored version uses a similar cozy texture but relies on its gathered center for visual interest.
Why Pumpkin Headbands Are Popular for Fall
Pumpkins are closely associated with autumn, making them a natural inspiration for seasonal crochet accessories.
Unlike larger fall crochet projects, a headband is relatively compact and can be customized with small details.
Reasons to make one include:
- A cozy alternative to a full winter hat
- A seasonal accessory for autumn outfits
- A creative way to practice textured stitches
- Opportunities to use leftover orange and green yarn
- Handmade gifts for friends and family
- Matching headbands for seasonal photographs
- Quick projects between larger crochet makes
The decorative pumpkin motifs can also be used on scarves, bags, and other handmade accessories.
Skill Level and Time Needed
This project is suitable for confident beginners, although the decorative pumpkin motifs and twisted construction may require some extra practice.
A simple ear warmer can be made using basic crochet stitches. The additional details introduce shaping and sewing techniques that help build your crochet skills.
How Long Does It Take?
The time needed depends on your experience and chosen design.
A plain twisted headband may take one or two crafting sessions. Adding several miniature pumpkins requires additional time for crocheting and attaching the motifs.
If you’re new to raised appliqués, begin by practicing a single pumpkin.
Once you’re comfortable with its shape, making several matching motifs becomes easier.
Materials and Tools for Your Pumpkin Headband
The pictured accessories have a soft, fairly thick appearance with clearly defined crochet stitches.
Medium-weight yarn is a practical starting choice, although the ideal yarn depends on how warm and stretchy you want the finished headband to feel.
Materials Checklist
- Cream or ivory yarn for the decorated headband
- Rust-orange yarn for pumpkin motifs
- Darker orange yarn for optional pumpkin details
- Olive or forest-green yarn for stems
- Additional rust yarn for the solid twisted version
- Crochet hook suitable for the yarn
- Yarn needle for sewing and finishing
- Stitch markers
- Scissors
- Flexible measuring tape
- Removable sewing clips
- Optional matching thread for reinforcing attachments
Choose a soft yarn that feels comfortable against your forehead and ears.
Because headbands sit directly against the skin, avoid scratchy fibers that may cause discomfort.
Choosing the Right Yarn
Acrylic yarn is widely available in autumn colors and often provides a comfortable, easy-care fabric.
Wool or wool-blend yarn can offer additional warmth, depending on the fiber and construction.
Cotton produces clearly defined stitches, but some cotton yarns have less elasticity.
For a snug ear warmer, consider how the yarn stretches and recovers before choosing your final size.
Crochet Stitches and Abbreviations
The following stitches are useful for creating the band, pumpkin details, and decorative twist.
All terminology follows US crochet conventions.
| Abbreviation | Meaning |
|---|---|
| ch | Chain |
| sc | Single crochet |
| hdc | Half double crochet |
| dc | Double crochet |
| sl st | Slip stitch |
| BLO | Back loop only |
| FLO | Front loop only |
| inc | Increase |
| dec | Decrease |
| st | Stitch |
| FO | Fasten off |
Helpful Techniques
Single crochet: Produces a compact fabric that works well for ear warmers.
Half double crochet: Creates a slightly taller stitch while maintaining a comfortable texture.
Back loop only: Can produce ribbing that adds visual texture and flexibility.
Slip stitch: Useful for seams and finishing details.
Surface embroidery: Helps add pumpkin segments or small stems.
Consistent stitch tension is especially important for a comfortable headband.
How to Crochet a Pumpkin Headband Step by Step
The photograph provides a useful visual reference, but it does not reveal the original pattern’s stitch counts, construction order, or exact measurements.
The following method offers an adaptable approach to creating a similar fall crochet accessory.
Step 1: Measure for a Comfortable Fit
- Measure around the head where the ear warmer will sit.
- Decide how wide you want the finished band.
- Crochet a small sample using your selected stitch.
- Measure the sample and check how much it stretches.
- Estimate the required foundation chain or number of rows.
- Allow for slight negative ease if your yarn has suitable stretch.
A headband should fit securely without feeling excessively tight.
Avoid relying on a universal adult size because head measurements and yarn elasticity vary.
Step 2: Crochet the Cream Headband Base
Begin with a foundation chain that establishes the desired width or length, depending on your preferred construction.
For a ribbed version, work rows of single crochet or half double crochet through selected loops.
Turn at the end of each row and maintain consistent stitch counts.
Continue until the fabric reaches the length needed to fit around the head.
If you prefer a less ribbed appearance, use a basic stitch pattern that produces a dense, even surface.
Check the fabric against your gauge measurements as you work.
Step 3: Create the Twisted Front
The twisted construction is an attractive feature of the photographed ear warmers.
One common technique uses a flat rectangular band with specially arranged ends.
Fold each short end inward and position the folded ends so their layers interlock.
Sew through the stacked layers using a yarn needle.
When the joined headband is turned right side out, the seam creates a gathered, twisted-looking center.
Practice the folding arrangement before sewing permanently.
Step 4: Crochet the Small Pumpkin Motifs
The cream headbands feature multiple raised pumpkins in a warm orange shade.
A practical approach is to create small oval or rounded motifs.
Begin with orange yarn and make a short foundation chain or compact circular center.
Work increases to widen the motif.
Use taller stitches through the middle to build a rounded silhouette.
Gradually reduce stitch height near the outer edges.
For additional dimension, add narrow embroidered lines that suggest pumpkin segments.
Keep the pumpkins small enough that several can fit comfortably across the band.
Step 5: Add Green Pumpkin Stems
The green stems create the finishing detail that makes each orange shape recognizable as a pumpkin.
Use a short chain, a few slip stitches, or surface embroidery to form the stem.
Attach it near the top center of each pumpkin.
You can introduce a tiny curved detail to resemble a natural pumpkin vine.
Choose dark olive or forest green to contrast against the orange yarn.
Make sure each stem is attached securely without leaving loose loops.
Step 6: Arrange the Pumpkin Appliqués
Lay the finished cream band flat with the front facing upward.
Position your crocheted pumpkins across the surface.
The photograph shows motifs distributed in a repeating pattern rather than one large central decoration.
Place the pumpkins at slightly different angles if you want a playful handmade appearance.
Use removable clips or pins to test the arrangement.
Check that the decorations won’t interfere with the twisted section or make the band uncomfortable.
Step 7: Attach the Pumpkin Decorations
Thread a yarn needle with matching yarn.
Sew each pumpkin onto the headband using secure stitches around the motif’s edges.
Avoid pulling so tightly that the underlying fabric puckers.
If the pumpkin has a raised middle, secure its outer sections while preserving the dimensional texture.
Weave the yarn tails into the back of the headband.
Repeat until all the motifs are attached.
Step 8: Make the Solid Rust Twisted Headband
For a coordinating alternative, crochet a plain rectangular band using rust-orange yarn.
Use the same general sizing process as the cream version.
Work a textured stitch pattern until the fabric reaches your preferred length.
Create the twisted center using the interlocking folded-end construction.
Sew the seam firmly, turn the headband right side out, and gently shape the twist.
This simpler version highlights the stitch texture and rich autumn color without additional appliqués.
Headband Sizing and Fit Tips
A well-fitting crochet headband should cover the ears comfortably while staying in place.
Adjusting the Width
A narrow band works well as a decorative hair accessory.
A wider band provides additional ear coverage during cooler weather.
Choose the width according to your intended use and the flexibility of the fabric.
Checking Stretch
Different stitch patterns have different amounts of elasticity.
Ribbed crochet often stretches more comfortably than dense stitches worked without ribbing.
Test the finished fabric gently before joining the ends.
If it stretches excessively, you may need a shorter band.
If it barely stretches, allow additional length for comfort.
Using Different Yarn Weights
Thinner yarn creates a lighter headband with smaller stitches.
Thicker yarn produces a bulkier accessory that may feel warmer.
Changing yarn weight also affects the pumpkin appliqués, so adjust their size accordingly.
Common Mistakes and How to Avoid Them
Small crochet accessories can be surprisingly sensitive to tension and construction.
Making the Headband Too Tight
A tight ear warmer can become uncomfortable after extended wear.
Measure carefully and account for the fabric’s stretch.
Test the fit before completing the final seam.
Uneven Pumpkin Motifs
If the pumpkins vary dramatically in size, the repeating pattern may look inconsistent.
Use the same yarn and hook for matching appliqués.
Compare each finished motif with the first one.
A Bulky Twisted Seam
Joining too many thick layers can create an uncomfortable lump.
Keep the seam neat and avoid unnecessary yarn buildup.
Position the twist so it sits comfortably at the front.
Loose Decorative Attachments
Pumpkin motifs can lift or curl if they are insufficiently secured.
Sew around stable portions of their edges.
Check the attachments periodically, particularly after washing.
Finishing, Blocking, and Care
Finishing helps the headband maintain its shape and gives the decorative pumpkins a neat appearance.
Weave in all yarn ends carefully.
Check the inside of the headband for knots or rough spots that could rub against the skin.
Should You Block a Crochet Headband?
Light blocking may help even out stitches and flatten unwanted curling.
However, excessive stretching can change the fit.
Follow the yarn manufacturer’s care instructions, especially when using steam.
Washing and Drying
Wash according to the yarn label.
A gentle hand wash may be suitable for many decorated headbands.
Avoid pulling on the pumpkin appliqués.
Reshape the accessory while damp and dry it flat when recommended.
Store the headband loosely to preserve the twisted center.
Creative Variations and Fall Styling Ideas
Pumpkin-inspired crochet headbands are easy to customize for different seasonal looks.
Neutral Farmhouse Pumpkin Headband
Use ivory yarn for the band and muted terracotta for the pumpkins.
Add dark green stems for subtle contrast.
This combination pairs beautifully with neutral autumn clothing.
Colorful Pumpkin Patch Headband
Make pumpkins in several shades of orange, cream, and golden yellow.
Alternate the colors across the headband.
This creates a cheerful pumpkin-patch effect.
Minimalist Twisted Ear Warmer
Omit the pumpkin motifs and focus on textured stitches.
Choose rust, mustard, olive green, or warm beige yarn.
A plain twisted headband offers an understated seasonal accessory.
Ideas for Gifting and Selling
A handmade pumpkin ear warmer can make a thoughtful autumn gift for friends, teachers, and family members.
The compact size also makes it suitable for seasonal gift baskets.
Pair it with a coordinating scarf or handmade gift tag.
If you plan to sell finished headbands, accurately describe the materials, fit, and care requirements.
Photograph the plain and decorated versions separately so customers can see the available styles.
When using another designer’s written pattern, check the applicable licensing terms.
Frequently Asked Questions
Is This Crochet Pumpkin Headband Pattern Beginner Friendly?
A basic crochet headband is suitable for beginners familiar with single crochet or half double crochet. The twisted seam and pumpkin appliqués require a little extra practice. You can begin with the solid rust version before adding decorative pumpkins to another headband.
What Yarn Works Best for Crochet Ear Warmers?
Soft acrylic, wool blends, and other comfortable yarns can work well. Choose a fiber that feels pleasant against the skin and has appropriate stretch. A medium-weight yarn is a useful starting option for clearly defined stitches and a cozy finish.
How Do I Make My Crochet Headband Stretchy?
Try working through the back loops of selected stitches to create ribbing. Check your yarn’s natural elasticity and avoid overly tight tension. Make a gauge swatch and test its stretch before choosing the final headband length.
Can I Crochet the Pumpkins Separately?
Yes. Making individual pumpkin appliqués gives you greater control over their placement. You can prepare several motifs in advance, arrange them across the finished headband, and sew them securely once you’re satisfied with the design.
Can I Make Matching Headbands for Different Ages?
Yes, but each headband should be sized for its intended wearer. Measure carefully and account for the yarn’s stretch. Avoid loose or detachable decorative pieces on accessories intended for very young children, and follow age-appropriate safety considerations.
Make Your Own Crochet Pumpkin Headband Pattern
This crochet pumpkin headband pattern is a charming way to combine cozy texture with colorful autumn details.
The cream ear warmers featuring miniature orange pumpkins create a playful seasonal appearance, while the solid rust twisted headband offers a simpler, elegant alternative.
Start with a comfortable band, practice your favorite textured stitches, and add pumpkin appliqués when you’re ready for extra decoration.
With thoughtful sizing and secure finishing, you can create a beautiful handmade accessory for fall outfits, thoughtful gifts, or seasonal craft projects.
Save this crochet pumpkin headband pattern idea for your next cozy autumn crochet session!