Crochet Potted Bluebell Plant Pattern – Free Step-by-Step Tutorial
Bring the beauty of a spring garden indoors with this charming crochet potted bluebell plant pattern. Featuring delicate purple-blue bell-shaped flowers, gently curved green...
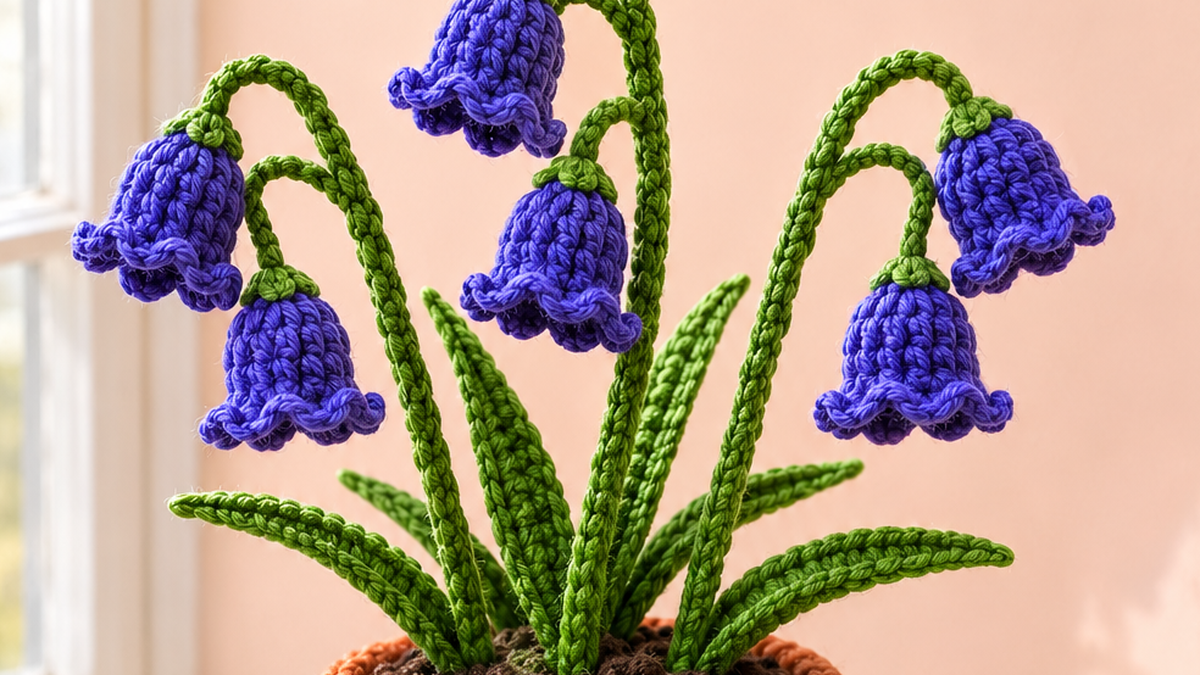
Bring the beauty of a spring garden indoors with this charming crochet potted bluebell plant pattern. Featuring delicate purple-blue bell-shaped flowers, gently curved green stems, pointed leaves, and a textured terracotta-inspired pot, this handmade decoration adds a cheerful botanical touch to any room.
Unlike fresh flowers, these crocheted bluebells won’t need watering or sunlight. You can display them on a bookshelf, windowsill, desk, or entryway table throughout the year.
This free crochet pattern guides you through making six dimensional bluebell flowers, seven decorative leaves, three branching stems, and a sturdy crochet flower pot. Each part uses approachable crochet techniques, making this a rewarding project for crocheters ready to practice shaping and simple assembly.
Why You’ll Love This Crochet Bluebell Plant
This project combines the satisfaction of amigurumi crochet with the elegance of handmade floral decor.
Beautiful dimensional flowers: Each bluebell features a gently expanding shape and a soft scalloped edge that creates the appearance of a real hanging flower.
Long-lasting home decoration: The finished arrangement makes a lovely accent without requiring plant care.
Easy to customize: Choose classic blue-violet yarn, soft lavender, pink, or white to create your own botanical color palette.
Great for using leftover yarn: The individual flowers and leaves require relatively small amounts of yarn.
Thoughtful handmade gift: A crochet flower pot makes a personal gift for birthdays, housewarmings, Mother’s Day, or anyone who enjoys botanical decorations.
The pattern also introduces useful techniques for creating small crochet tubes, shaped leaves, and structured flower arrangements.
Project Overview
Here is a quick overview of the finished design.
| Project Detail | Information |
|---|---|
| Skill Level | Advanced beginner |
| Estimated Time | 5–7 hours |
| Finished Height | Approximately 8–10 inches |
| Pot Diameter | Approximately 3–3.5 inches |
| Yarn Weight | Medium #4 |
| Hook Size | 3.5 mm |
| Crochet Terms | US terminology |
| Construction | Separate pieces, assembled |
All measurements and times are estimates. Your finished size will depend on yarn thickness, crochet tension, and how you shape the stems.
The completed arrangement contains six purple-blue flowers, seven green leaves, three main stems with three side branches, and one crocheted pot with a brown soil insert.
Materials and Supplies Needed
Yarn
Choose medium-weight cotton or cotton-blend yarn in four colors.
- Purple-blue: Approximately 40–60 yards for the six bluebell flowers.
- Fresh green: Approximately 45–65 yards for the leaves, stems, and flower caps.
- Terracotta orange: Approximately 35–50 yards for the flower pot.
- Dark brown: Approximately 15–25 yards for the crochet soil insert.
Keep a little additional yarn available for sewing and adjustments.
Crochet Tools
- 3.5 mm crochet hook
- Yarn needle
- Small scissors
- Stitch markers
- Measuring tape
- Blocking pins, optional
Assembly Supplies
- Six pieces of flexible floral wire for stems and branches
- Additional floral wire or suitable plant-stem supports as needed
- Floral tape, optional
- Small amount of polyester fiberfill
- Cardboard circle for the pot base, optional
- Small piece of felt or additional cardboard to cover secured wire ends
Floral wire provides the flexibility needed to create the curved, hanging stems shown in the design.
Safety note: This arrangement is decorative, not a child’s toy. Bend and secure all wire ends, and keep the finished piece away from young children and pets.
Choosing the Right Yarn and Hook
Cotton yarn works especially well for crochet flowers because it provides clear stitch definition and helps the finished petals retain their shape.
A cotton-acrylic blend is another good choice when you want slightly softer leaves and flowers.
For this project, use medium-weight yarn with a 3.5 mm hook. The slightly smaller hook creates dense stitches and helps prevent visible gaps in the flower pot.
If you substitute thinner yarn, your finished bluebells will be smaller and more delicate. Thicker yarn will create larger flowers and a more substantial arrangement.
Try to use yarns with similar thicknesses throughout the design. This helps the flowers, leaves, and pot look balanced.
Crochet Stitches and Abbreviations
This pattern uses standard US crochet terminology.
| Abbreviation | Meaning |
|---|---|
| MR | Magic ring |
| ch | Chain |
| sc | Single crochet |
| hdc | Half double crochet |
| sl st | Slip stitch |
| inc | 2 sc in one stitch |
| st / sts | Stitch / stitches |
| BLO | Back loop only |
| Rnd | Round |
| FO | Fasten off |
Magic ring: Create an adjustable loop, crochet the required stitches into it, and pull the yarn tail to close the center.
Increase: Work two single crochet stitches into the same stitch.
Back loop only: Insert your hook beneath only the back strand of the stitch instead of both loops.
Unless otherwise stated, the flower and pot rounds are worked in continuous spirals without joining.
Use a stitch marker to identify the first stitch of each round.
Before You Start
A little preparation will make the bluebell plant easier to assemble.
First, organize your yarn by color and check that your hook produces firm, even stitches.
Gauge is not critical for this decorative project, but consistency matters. If your stitches are very loose, switch to a slightly smaller hook.
Make the flower pot first so you can check the size and plan the height of the finished arrangement.
Next, crochet one bluebell flower as a sample before making the remaining five. This lets you confirm that you like the flower size and scalloped edge.
Keep long yarn tails on pieces that will be sewn together.
When preparing the floral wire, cut it to your preferred stem lengths and bend the ends inward so no sharp points remain exposed.
Step-by-Step Crochet Bluebell Plant Pattern
The instructions below create one complete arrangement using six hanging flowers.
Part 1: Crochet the Bluebell Flowers
Make six identical flowers using purple-blue yarn.
Each flower starts at its closed upper tip and gradually widens toward the open lower edge.
Round 1: Make a magic ring and work 6 sc into it. (6 sts)
Round 2: Work 1 sc in each stitch around. (6 sts)
Round 3: Repeat 1 sc, inc three times. (9 sts)
Round 4: Work 1 sc in each stitch around. (9 sts)
Round 5: Repeat 2 sc, inc three times. (12 sts)
Round 6: Work 1 sc in each stitch around. (12 sts)
Round 7: Repeat 1 sc, inc six times. (18 sts)
Your flower should now resemble a small, tapered bell.
Round 8 – Scalloped Flower Edge:
Repeat the following sequence six times:
- Work 1 sc into the next stitch.
- Work 2 hdc into the following stitch.
- Work 1 sl st into the next stitch.
This consumes all 18 stitches from the previous round and creates six small scallops around the opening.
Fasten off and weave in the finishing tail.
Gently shape the flower with your fingers, keeping the opening wider than its upper tip.
Do not stuff the flowers. Leaving them hollow creates a more natural hanging-bell shape.
Repeat until you have six flowers.
Part 2: Crochet the Green Flower Caps
The little green caps at the tops of the bells help create a botanical appearance.
Make six caps.
Round 1: With green yarn, work 6 sc into a magic ring. Join with a sl st. (6 sts)
Round 2: Chain 2, then slip stitch into the next stitch.
Repeat this sequence around the six stitches to create six small pointed loops.
Fasten off, leaving a tail approximately 8 inches long.
Position one green cap over the closed top of each purple-blue flower.
Use the yarn tail to sew around the cap’s center, securing it firmly to the flower.
Leave the little green loops visible around the cap.
Part 3: Crochet the Pointed Leaves
Make seven leaves using green yarn.
Each leaf is worked around both sides of a foundation chain.
Step 1: Chain 14.
Step 2: Starting in the second chain from the hook, work:
- 1 sc in the first chain
- 1 hdc in each of the next 10 chains
- 1 sc in the next chain
- 3 sc in the final chain
The three stitches in the last chain turn the work around the pointed tip.
Step 3: Continue along the opposite side of the foundation chain:
- 1 sc in the next chain
- 1 hdc in each of the next 10 chains
- 1 sc in the final chain
Join with a sl st to the first sc.
Fasten off, leaving a long tail for sewing.
Gently pull the pointed tip into shape.
Repeat until you have seven leaves.
The leaves should look elongated rather than perfectly round. If the edges curl, lightly dampen and pin them flat before assembly.
For the finished plant, arrange three leaves pointing more upright and four spreading outward around the base.
Part 4: Make the Crochet Stems
To give the plant its characteristic drooping flowers, create three main stems and three shorter side branches.
Main Stems
With green yarn, chain 32.
Work 1 sc into the second chain from your hook and across the remaining chains. (31 sc)
Fasten off, leaving a long sewing tail.
Repeat to make three main stem strips.
Place a prepared length of floral wire along the wrong side of each strip.
Fold the crochet strip lengthwise around the wire and carefully sew its long edges together, forming a narrow covered stem.
Secure both wire ends so they cannot protrude through the fabric.
Side Branches
Make three shorter branches.
Chain 18, then work 1 sc in the second chain and across. (17 sc)
Fasten off.
Cover shorter pieces of floral wire using the same folding and sewing technique.
Attach one side branch to each main stem, approximately halfway between the base and upper flower position.
Secure the junction with green yarn and, if needed, a small amount of floral tape beneath the crocheted covering.
Shape the Branches
Gently bend the three main stems into slightly different heights.
Curve their upper sections outward and downward.
Shape each side branch so its tip hangs beside the main stem, leaving room for a flower.
Attach one completed bluebell to each of the six stem tips.
Sew through the green cap and the covered end of the stem several times until the connection is secure.
Make sure each flower hangs with its scalloped opening facing downward.
Part 5: Crochet the Terracotta Flower Pot
Use terracotta orange yarn.
The pot is worked from the base upward.
Round 1: Make 6 sc in a magic ring. (6 sts)
Round 2: Inc in each stitch. (12 sts)
Round 3: Repeat 1 sc, inc six times. (18 sts)
Round 4: Repeat 2 sc, inc six times. (24 sts)
Round 5: Repeat 3 sc, inc six times. (30 sts)
Round 6: Repeat 4 sc, inc six times. (36 sts)
Round 7: Repeat 5 sc, inc six times. (42 sts)
The circular pot base is now complete.
Round 8: Working in BLO, sc in each stitch around. (42 sts)
This creates a distinct turning edge where the base meets the sides.
Rounds 9–16: Work 1 sc into each stitch around. (42 sts per round)
Your work should gradually form an upright cylindrical pot.
Round 17: Repeat 6 sc, inc six times. (48 sts)
Round 18: Work 1 sc into each stitch around. (48 sts)
This creates a gently flared upper rim.
Finish with a neat slip stitch and fasten off.
Shape the pot with your hands.
If desired, place a circular cardboard insert inside the base for stability. Lightly fill the lower portion with polyester stuffing, leaving room for the soil insert.
Part 6: Crochet the Soil Insert
Using dark brown yarn, crochet a flat circular piece.
Round 1: Make 6 sc into a magic ring. (6 sts)
Round 2: Inc in every stitch. (12 sts)
Round 3: Repeat 1 sc, inc six times. (18 sts)
Round 4: Repeat 2 sc, inc six times. (24 sts)
Round 5: Repeat 3 sc, inc six times. (30 sts)
Round 6: Repeat 4 sc, inc six times. (36 sts)
Round 7: Repeat 5 sc, inc six times. (42 sts)
Fasten off, leaving a long tail.
The brown circle will fit inside the upper section of the pot.
For a slightly raised soil texture, you can add a few small brown chain loops across its surface, keeping the central stem-placement area clear.
Part 7: Assemble the Potted Bluebell Arrangement
Place the six flower stems together and check their arrangement.
Aim for a balanced shape with flowers hanging at different heights.
Arrange the stems so they spread naturally instead of pointing straight upward.
Carefully pass the lower covered ends through small openings between stitches in the brown soil circle.
Secure the wire ends beneath the soil insert, keeping every cut edge folded inward and covered. Reinforce the attachment with stitching and an additional felt or cardboard backing.
Sew the three main stems to the soil insert using green yarn.
Attach the seven leaves around the bases of the stems.
Place the assembled soil insert inside the upper opening of the flower pot.
Sew the soil circle to the inside wall of the pot approximately two rounds below the rim.
The brown surface should be visible while the orange rim remains raised around it.
Your crochet bluebell plant is complete.
Assembly and Finishing
Take a few minutes to refine the finished plant.
Check that all six flowers are attached securely and their scalloped edges are visible.
Adjust the curved stems so the flowers hang naturally without crowding one another.
Spread the seven leaves around the lower stems. Position some vertically and others horizontally for a fuller botanical appearance.
Weave in any remaining yarn ends.
Make sure the soil insert remains firmly attached and that the base sits flat.
If the pot tilts forward, adjust the stem placement or add a little weight beneath the soil insert, ensuring all materials remain enclosed.
Tips for Beautiful Crochet Bluebells
Keep your stitches consistent. Firm tension helps the flowers maintain their bell shapes.
Avoid excessive stuffing. The flowers should remain hollow and lightweight.
Shape the stems gradually. Make small bends instead of sharp angles to produce natural curves.
Use balanced flower placement. Positioning all six blossoms at exactly the same height makes the arrangement look stiff.
Secure the leaves carefully. Sewing each leaf at several points around its base will help it retain its chosen position.
Check the pot’s stability. A flat, firm base will support the finished decorative arrangement.
Common Mistakes and Troubleshooting
My bluebell flowers look too narrow
Check the stitch counts in rounds five and seven. Missing an increase can prevent the flower from widening correctly.
You can also gently shape the finished flower opening with your fingers.
My flowers are too flat
Make sure you are working the bell in continuous rounds rather than flattening it while crocheting.
The gradual increases should create a tapered three-dimensional shape.
The leaves keep curling
This is common when working tightly along both sides of a foundation chain.
Try loosening your tension slightly or gently wet-blocking the leaves before attaching them.
The flower pot collapses
Use a smaller hook to create denser fabric, or add a firm circular insert inside the base.
A little stuffing beneath the soil circle can also improve stability.
My stems won’t hold their shape
Check that the floral wire is strong enough for the weight of the flowers.
A more supportive wire or shorter stem may be necessary.
Make sure the wire is securely enclosed before continuing.
Creative Variations and Customization
Once you understand the basic construction, you can personalize your crochet bluebell plant in several ways.
Lavender Bluebells
Replace the deep purple-blue yarn with soft lavender for a lighter spring arrangement.
White Bell Flowers
Use creamy white yarn for the flowers while keeping the green stems and terracotta pot.
Miniature Bluebell Pot
Try sport-weight yarn and a smaller hook for a more delicate miniature decoration. Shorten the stems proportionally.
Colorful Flower Arrangement
Use two coordinating shades of purple or blue across the six flowers while keeping the same construction.
Decorative Flower Pot
Add a narrow contrasting crochet stripe around the pot rim or personalize the pot with simple surface embroidery.
These adjustments allow you to create a fresh arrangement without changing the essential pattern.
How to Style Your Crochet Bluebell Plant
A crochet potted flower looks especially lovely in spaces where real plants may be difficult to maintain.
Place the finished arrangement on a bookshelf beside a small collection of books or decorative objects.
Use it as a colorful accent on an office desk or craft-room shelf.
A bright windowsill is another attractive display location, although prolonged direct sunlight may eventually fade some yarn colors.
You can also display the bluebell plant as part of a handmade spring centerpiece alongside other crochet botanical decorations.
For gifting, wrap the pot in tissue paper or place it in a small decorative gift box that protects the flower stems.
Care and Washing Instructions
Crochet flowers need gentle care to preserve their shape.
Dust the finished arrangement periodically using a soft brush.
For small marks, spot-clean the affected yarn with a damp cloth and mild soap.
Avoid soaking the entire arrangement because its internal support materials, cardboard, and floral wire may be damaged by water.
Allow any cleaned area to air-dry completely.
Keep the pot away from high humidity and strong direct sunlight.
If the stems become misshapen, carefully bend them back into position without pulling on the crochet fabric.
Always check the yarn manufacturer’s care instructions before cleaning.
Frequently Asked Questions
Is this crochet bluebell pattern beginner-friendly?
It is best suited to advanced beginners who are comfortable with single crochet, basic increases, and working in rounds. The assembly requires additional patience.
Can I make the flowers without floral wire?
Yes, you can make the individual bluebell flowers without wire. However, the full potted arrangement will need another suitable support system to hold the stems upright.
How many flowers are included in this pattern?
The finished design contains six bell-shaped flowers, three main stems, three side branches, and seven pointed leaves.
Can I use acrylic yarn instead of cotton?
Yes. Acrylic yarn works, although the flowers may feel softer and require additional shaping.
Can I make larger bluebell flowers?
Yes. Using thicker yarn and a larger hook will naturally increase the flower size. Make sure the stems and pot remain proportional.
Do I need to block the flowers?
Blocking is optional. Gentle shaping is usually enough for the bell flowers, but blocking may help flatten the leaves.
Can I use this pattern to make a crochet bouquet?
Yes. The bluebell flower and stem instructions can be adapted to create individual floral stems for a decorative bouquet.
Can I give this crochet plant to a child?
The wire-supported version is intended for decorative use only, not as a toy. For a child-safe project, the support materials and construction would need to be redesigned and evaluated appropriately.
Conclusion
This crochet potted bluebell plant brings together delicate flowers, textured stitches, and cheerful colors in one beautiful handmade decoration.
With six hanging bluebells, curved stems, detailed leaves, and a terracotta-inspired pot, the finished arrangement captures the charm of a small spring garden.
The project is also a wonderful opportunity to develop your crochet shaping and assembly skills while creating something decorative and personal.
Choose your favorite flower colors, gather your yarn, and enjoy bringing your own little crochet garden to life.
Related Crochet Projects to Try Next
If you enjoy making crochet plants and flowers, these related projects offer more opportunities to practice botanical crochet:
- Crochet Mini Tulip Pot: Create simple upright tulip flowers in a small decorative planter.
- Crochet Lavender Bouquet: Make slender floral stems with delicate purple details.
- Crochet Daisy Flower Pot: Combine bright flower centers with white petals and green leaves.
- Crochet Hanging Ivy Plant: Create trailing crochet vines for shelf or wall decoration.
Each project can help expand your handmade botanical collection with different shapes, stitches, and seasonal colors.