Crochet Peony Flower Pattern With Beautiful Petals
Soft pink petals, delicate yellow centers, and beautifully shaped green leaves make crochet peonies some of the most eye-catching handmade flowers you can create....
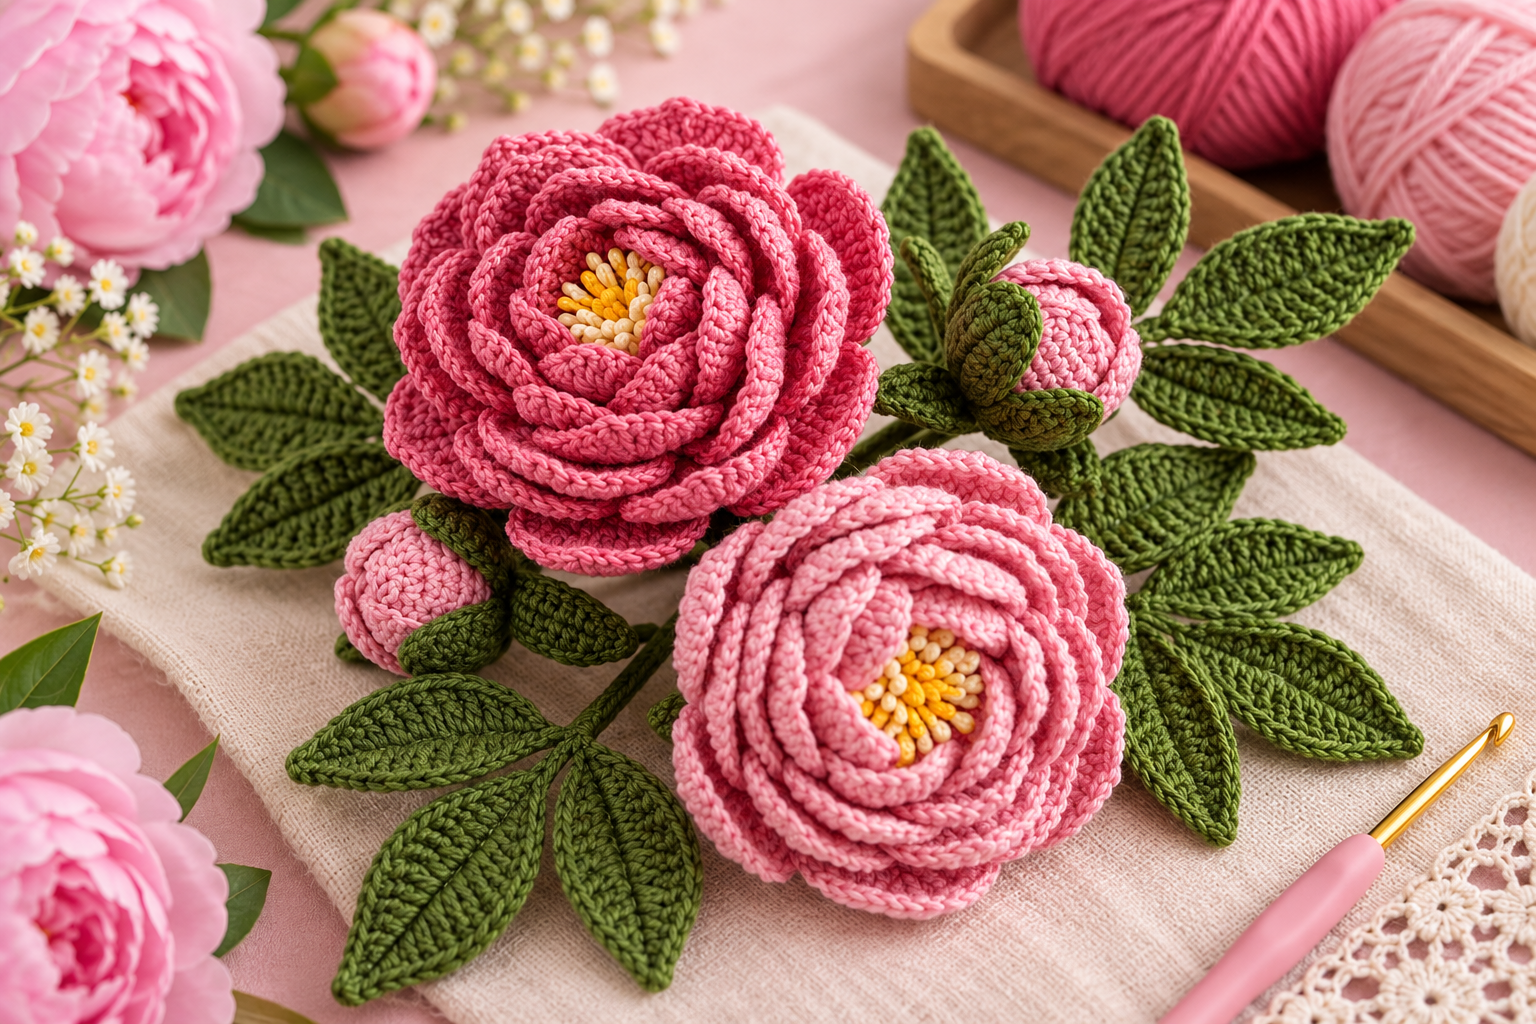
Soft pink petals, delicate yellow centers, and beautifully shaped green leaves make crochet peonies some of the most eye-catching handmade flowers you can create. Their full, layered appearance captures the romantic beauty of real peonies while adding the cozy texture of crochet stitches.
This crochet peony flower pattern guide is inspired by a gorgeous arrangement featuring two open pink peonies, smaller flower buds, and richly textured olive-green leaves. The flowers have overlapping petals that curl gently inward, giving each blossom a realistic, dimensional appearance.
Unlike flat crochet flower appliqués, these peonies are designed to have depth and volume. They look especially lovely when arranged into a decorative bouquet, placed in a handmade vase, or incorporated into floral home decor.
In this tutorial, you’ll learn how to approach the layered petals, create textured flower centers, shape leaves and buds, and assemble your own crochet peony arrangement.
The techniques are adaptable, allowing you to experiment with different flower sizes, yarn colors, and petal arrangements.
What Is a Crochet Peony Flower?
A crochet peony is a handmade flower inspired by the full, rounded blossoms of real peony plants.
It typically features multiple layers of curved petals arranged around a central section.
The design shown here includes dusty pink and light pink flowers with small cream and yellow details at their centers.
Several dark green leaves surround the blossoms, creating a beautiful contrast against the pink yarn.
Why Crochet Peony Flowers Are So Beautiful
Peonies are admired for their generous petals and romantic appearance.
Crochet makes it possible to recreate these features using individual stitches and carefully arranged layers.
The combination of different petal sizes creates a flower that looks full without requiring every petal to be identical.
Crochet peonies are particularly attractive for:
- Handmade flower bouquets
- Cottagecore home decorations
- Decorative wedding arrangements
- Mother’s Day gifts
- Floral wall displays
- Handmade table centerpieces
- Craft-room decorations
Another advantage is that crochet flowers can be made in virtually any color, allowing you to create arrangements that complement your personal style.
Skill Level and Time Needed
This crochet peony flower pattern is best suited to intermediate crocheters or confident beginners looking to practice dimensional flower construction.
The individual stitches are familiar, but assembling several layers requires patience and attention to detail.
You should feel comfortable working in rounds, creating chains, using taller stitches, and sewing crochet pieces together.
How Long Does a Crochet Peony Take?
The time required depends on the flower’s size and number of petals.
A smaller peony bud may be completed during a short crafting session, while a large, fully layered blossom generally requires more time.
Creating a complete bouquet with leaves and multiple blooms can take several sessions.
For an enjoyable workflow, prepare the centers first, crochet the petals in groups, and complete the assembly afterward.
Materials Needed for Crochet Peony Flowers
Choosing appropriate yarn is essential for creating defined, realistic petals.
The reference design features a smooth, slightly plush yarn with visible crochet stitches.
Medium-weight yarn is a practical starting point, particularly if you want substantial flowers with well-defined layers.
Yarn and Supplies
- Dusty pink yarn for darker peonies
- Light pink yarn for softer petals
- Cream yarn for flower centers
- Golden yellow yarn for stamens
- Olive or forest-green yarn for leaves
- Matching green yarn for stems and buds
- Crochet hook suited to your yarn
- Yarn needle
- Stitch markers
- Scissors
- Measuring tape
- Optional floral wire for decorative stems
- Optional lightweight stuffing for flower buds
If you use floral wire, cover any sharp ends securely and keep the finished decoration away from young children.
You can also make an entirely soft arrangement using crocheted cords instead of wire.
Choosing the Best Yarn
Cotton yarn creates crisp stitch definition and structured petals.
Acrylic yarn can produce softer flowers with a slightly fuller appearance.
Cotton-acrylic blends offer another option for balancing softness and shape.
Avoid very fuzzy yarn if you want the individual petal edges to remain clearly visible.
Crochet Stitches and Abbreviations
These common stitches are useful when creating layered peony flowers.
All abbreviations follow US crochet terminology.
| Abbreviation | Meaning |
|---|---|
| ch | Chain |
| sc | Single crochet |
| hdc | Half double crochet |
| dc | Double crochet |
| tr | Treble crochet |
| sl st | Slip stitch |
| inc | Increase |
| dec | Decrease |
| st | Stitch |
| BLO | Back loop only |
| FO | Fasten off |
Techniques to Practice
A magic ring provides a useful foundation for flower centers.
Increasing helps widen individual petals, while taller stitches create their rounded edges.
Slip stitches are helpful for joining sections neatly.
Working through selected loops can create subtle ridges, giving leaves and petals additional texture.
Consistent tension is especially useful when making several petals of similar sizes.
How to Crochet a Peony Flower Step by Step
This crochet peony tutorial explains a flexible construction approach inspired by the photographed design.
Because exact stitch counts cannot be determined from an image, use these techniques as a guide and adjust the dimensions according to your chosen yarn and flower size.
Step 1: Create the Flower Center
- Begin with cream or yellow yarn.
- Make a magic ring and work a small circle of single crochet stitches.
- Tighten the ring to close the central opening.
- Continue with additional stitches if you want a wider center.
- Add short yellow loops or textured stitch clusters to suggest stamens.
- Fasten off, leaving a yarn tail for assembly.
The center should remain relatively compact because the surrounding petals will create most of the flower’s volume.
The featured peonies have small golden details visible between their inner petals.
Step 2: Crochet the Inner Petals
Begin with your chosen pink yarn.
Create small petal motifs using short foundation chains or stitches worked into a circular base.
Use shorter stitches near the petal edges and taller stitches toward the middle.
This creates a rounded shape that can curl naturally around the flower center.
Make several inner petals that are similar in size.
Keep these petals relatively compact so the center remains partially visible.
Step 3: Create the Middle Petal Layer
The middle petals give the peony much of its fullness.
Make these petals slightly wider and taller than the inner layer.
Use combinations of half double crochet, double crochet, and treble crochet stitches to achieve curved edges.
Experiment with subtle increases to create gentle waves.
Avoid making every petal perfectly symmetrical.
Small differences in shape can make the finished flower appear more natural.
Step 4: Crochet the Outer Petals
The outer petals should frame the entire blossom.
Work larger petal sections using the same general technique.
You can make them wider by adding stitches across the middle portion.
For a soft, romantic appearance, allow the edges to curve slightly outward.
The photograph shows outer petals overlapping rather than sitting in one completely flat circle.
Keep this layered effect in mind during assembly.
Step 5: Assemble the Peony Blossom
Position the flower center on your work surface.
Arrange the smallest petals around it, allowing their edges to overlap.
Attach the middle petals behind the first layer.
Continue with the larger outer petals.
Use a yarn needle to secure each layer at its base.
Avoid stitching through the upper portions of the petals, as this may flatten their dimensional shape.
Once assembled, gently adjust the petals until the blossom appears rounded and balanced.
Step 6: Crochet the Green Leaves
Begin each leaf with a foundation chain using olive-green yarn.
Work along one side with stitches that gradually increase in height.
Continue around the opposite side to form a pointed oval.
For additional definition, add a subtle ridge along the center.
You can also use slip stitches around the edges to create a neat outline.
The reference arrangement features elongated leaves with visible texture and pointed tips.
Make leaves in several sizes to complement the larger flowers and smaller buds.
Step 7: Make the Small Peony Buds
A peony bouquet looks more natural when it includes flowers at different stages of opening.
For a closed bud, begin with a small circular foundation.
Increase gradually to form a rounded shape.
Work several even rounds before decreasing to close the bud.
Add a small amount of stuffing if you want a firmer shape.
Create a few green leaf-like sepals and attach them around the base.
Use soft pink yarn for a partially opening bud and green yarn for the surrounding details.
Step 8: Assemble the Floral Arrangement
Lay the finished components on a flat surface.
Position the two largest peonies as the main focal points.
Arrange smaller buds between and behind them.
Place the green leaves around the flowers to create a balanced botanical shape.
If you’re making a bouquet, attach each flower to a suitable crocheted or reinforced stem.
Adjust the position of the leaves so they frame the petals without hiding them.
Secure every component before placing the arrangement in its final display location.
Sizing, Colors, and Yarn Substitution Tips
One of the most enjoyable aspects of making crochet peonies is the ability to customize their appearance.
You can create small flowers for decorative accessories or larger blossoms for a statement bouquet.
Adjusting Flower Size
The finished flower size depends on yarn thickness, hook size, petal width, and the number of layers.
For a smaller blossom, use lighter yarn and fewer petals.
For a larger peony, make wider petals and add additional layers.
Always check the proportions as you work.
A flower with very large outer petals and a tiny center may look unbalanced unless that contrast is intentional.
Beautiful Peony Color Combinations
The reference uses dusty rose and blush pink, but peonies look lovely in many shades.
Consider these combinations:
- Blush pink and ivory
- Dusty rose and pale peach
- Cream and soft yellow
- Coral pink and muted green
- Deep burgundy and rose pink
- Lavender and pale lilac
For added depth, use slightly darker yarn for the inner petals and a lighter shade for the outer layers.
Choosing Substitute Yarn
When substituting yarn, compare its thickness and flexibility.
Cotton creates structured petals, while softer acrylic may produce more relaxed shapes.
Make one test petal before crocheting an entire flower.
If it feels too loose, experiment with a smaller hook.
Common Crochet Peony Mistakes to Avoid
Dimensional flowers require careful shaping, especially when multiple petal layers are involved.
Petals That Look Too Flat
If the petals lie completely flat, the flower may lose its peony-like appearance.
Try gently overlapping them during assembly.
You can also add slightly more fullness to selected petal sections.
Uneven Petal Sizes
Inconsistent tension can create noticeable differences between matching petals.
Use the same yarn, hook, and general stitch structure for each layer.
Small variations are acceptable and can enhance the natural appearance.
A Flower Center That Disappears
Attaching the inner petals too tightly may hide the yellow center.
Position the center slightly forward before sewing.
Check its visibility from the front as you build the surrounding layers.
Too Many Leaves Around the Blossom
Large green leaves can overwhelm delicate pink petals.
Begin with a few leaves and add more only where needed.
A balanced arrangement should allow each flower to remain visible.
Finishing, Blocking, and Caring for Crochet Peonies
Once the flowers are assembled, take time to refine their shape.
Gently separate overlapping petals and adjust their direction.
Check that all yarn tails have been woven securely into the backs of the flowers.
Should You Block Crochet Peony Petals?
Light blocking can help shape individual petals before assembly.
However, avoid flattening the completed flower.
Follow your yarn label’s care instructions, especially when using steam or moisture.
For highly dimensional blossoms, gentle hand shaping may be sufficient.
Cleaning and Storage
Dust the finished flowers with a soft brush.
Spot clean when necessary using a method compatible with your yarn.
Avoid pulling the petals or bending reinforced stems excessively.
Store loose flowers carefully to prevent compression.
For bouquets, choose a display location away from excessive moisture and prolonged direct sunlight.
Creative Variations and Styling Ideas
Crochet peonies can be incorporated into many handmade projects.
Romantic Crochet Peony Bouquet
Combine several fully opened peonies with smaller buds.
Use soft pink, ivory, and dusty rose yarn.
Add textured green leaves to create a delicate arrangement for a vase.
Mini Crochet Peony Decorations
Make smaller flowers using lightweight yarn.
Attach them to decorative gift wrapping, handmade cards, or suitable hair accessories.
Keep any clips and attachments securely fastened.
Cottagecore Floral Wall Decor
Arrange peonies with crocheted vines and leaves on a decorative backing.
Combine different bloom sizes to create visual interest.
Choose muted colors for a soft, vintage-inspired appearance.
Gifting, Selling, and Displaying Crochet Peonies
Handmade crochet peonies make thoughtful gifts for birthdays, anniversaries, housewarmings, and other special occasions.
They can be displayed individually or combined into decorative bouquets.
For gifting, protect the petal layers with loosely arranged tissue paper.
A simple ribbon can make the arrangement feel special without covering the flowers.
If you sell finished crochet flowers, provide accurate measurements, materials, and care instructions.
Photograph the flowers in natural light so the petal layers and yarn texture remain visible.
Make sure any reinforced stems or decorative attachments are safely finished.
Frequently Asked Questions
Is This Crochet Peony Flower Pattern Beginner Friendly?
The individual stitches are suitable for crocheters with basic experience, but assembling layered petals is more challenging. Confident beginners can start with a small flower using fewer layers before attempting a fuller peony with multiple overlapping petals and textured leaves.
What Yarn Is Best for Realistic Crochet Peonies?
Smooth cotton yarn and cotton blends are excellent choices for defined petals. Acrylic can produce softer blossoms. Choose yarn that holds its shape without making the petals too stiff, and experiment with hook size to achieve your preferred texture.
How Many Petals Does a Crochet Peony Need?
The number depends on the desired flower size and fullness. Small decorative peonies require fewer petals, while larger flowers benefit from several overlapping layers. Rather than following an arbitrary number, arrange the petals until the flower looks balanced.
Can I Make Crochet Peonies Without Floral Wire?
Yes. Crochet peonies can be made entirely from yarn, especially when used as appliqués or decorative arrangements. For a freestanding bouquet, you may prefer firmer crocheted stems or other suitable supports that can hold the flower heads upright.
How Do I Keep Crochet Peony Petals Curled?
Use consistent tension and shape the petals gently during assembly. Slightly overlapping the layers helps maintain their rounded appearance. Depending on the yarn, light blocking before assembly can also help establish a curved shape without flattening the completed blossom.
Create Your Own Crochet Peony Flower Pattern
A crochet peony flower pattern offers a wonderful opportunity to explore layered petals, beautiful floral colors, and dimensional crochet techniques.
The soft pink blossoms, delicate yellow centers, and textured green leaves create an arrangement that feels romantic and timeless.
Begin with a single flower, experiment with different petal sizes, and gradually add buds and leaves to build a fuller bouquet.
With patience and careful assembly, you can create gorgeous handmade flowers for gifts, home decor, or seasonal displays.
Save this crochet peony flower pattern idea and enjoy creating your own beautiful yarn bouquet!