Crochet Moon Moth Amigurumi Pattern With Celestial Wings
This moon moth amigurumi crochet pattern creates a cheerful celestial character with a deep-teal body, a warm ivory face, lavender wings, and golden crescent...
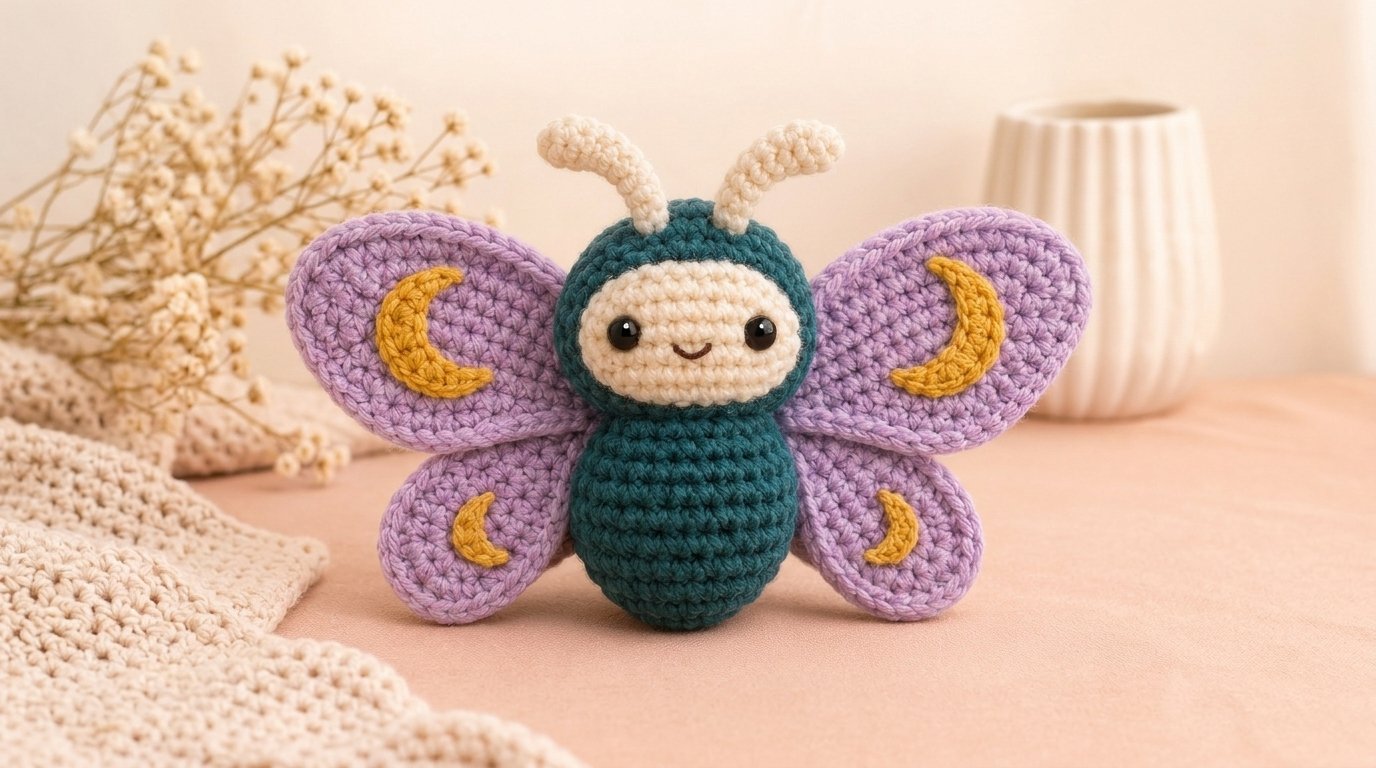
This moon moth amigurumi crochet pattern creates a cheerful celestial character with a deep-teal body, a warm ivory face, lavender wings, and golden crescent markings. The rounded shapes and expressive face give it plenty of personality without requiring complicated sculpting.
The body and head are worked separately in continuous single crochet rounds. Each wing is a flat oval, while the soft antennae are narrow crocheted tubes that require no wire. This approachable construction is suitable for confident beginners who understand increases, invisible decreases, and basic amigurumi assembly.
The finished moth works as shelf decor, a handmade gift, or a whimsical addition to a celestial-themed room. In the instructions below, you will learn how to form the stuffed body and head, crochet matching wings, add embroidered moon markings, and assemble the pieces securely.
Why You’ll Love This Project
The moon moth uses a small group of familiar stitches, making it an excellent project for practicing even single crochet rounds. Most shaping comes from predictable groups of increases and decreases.
Its four separate wings create a dramatic silhouette while remaining simple to crochet. Because the wings are worked flat, they do not need stuffing or complicated joining.
The design is also easy to personalize. You can change the wing colors, substitute stars for the crescent markings, or embroider the face when making the moth for a young child.
Project Overview
- Project type: Stuffed crochet moth
- Difficulty: Confident beginner
- Estimated time: 5–7 hours
- Estimated finished height: 7 inches
- Estimated wingspan: 11–12 inches
- Yarn weight: Medium weight 4
- Hook size: 3.5 mm
- Main techniques: Single crochet, increases, invisible decreases, working around a foundation chain, and basic sewing
- Construction: Separate head, body, face patch, wings, and antennae
- Terminology: US crochet terms
Finished measurements are estimates. Yarn choice, hook size, tension, and stuffing density can change the final dimensions.
Materials and Supplies Needed
- Medium weight 4 cotton or cotton-blend yarn
- Approximately 70 yards deep teal
- Approximately 60 yards lavender
- Approximately 20 yards warm ivory
- Approximately 8 yards golden mustard
- Small amount of dark brown embroidery yarn
- 3.5 mm crochet hook
- Two 10 mm safety eyes or dark yarn for embroidered eyes
- Polyester fiberfill
- Locking stitch marker
- Yarn needle
- Embroidery needle
- Scissors
- Straight pins
- Row counter or notepad
Safety eyes are not suitable for children younger than three. Use firmly embroidered eyes for a baby or toddler’s decorative item, and supervise children around handmade toys.
Choosing the Right Yarn and Hook
A smooth cotton or cotton-acrylic blend provides clear stitch definition and helps the wings hold their shape. A soft acrylic yarn can also work, although the wings may feel more flexible.
Choose four yarn colors with enough contrast to keep the moth’s features visible. The sample palette combines deep teal, lavender, warm ivory, and golden mustard. Naturally saturated colors work especially well for celestial designs.
A 3.5 mm hook is smaller than the hook normally recommended for medium-weight yarn. The tighter gauge prevents stuffing from showing between stitches. If your fabric feels painfully stiff, move up to a 3.75 mm hook. If gaps appear, try a 3.25 mm hook.
Exact gauge is less important than producing dense, even fabric. A useful target is approximately 5–6 single crochet stitches per inch.
Crochet Stitches and Abbreviations
- ch — chain: Yarn over and pull the yarn through the loop on the hook.
- sl st — slip stitch: Insert the hook into the indicated stitch, yarn over, and pull through the stitch and loop on the hook.
- sc — single crochet: Insert the hook, yarn over, pull up a loop, yarn over, and pull through both loops.
- inc — increase: Work two single crochet stitches in one stitch.
- dec — invisible decrease: Insert the hook through the front loops of the next two stitches, yarn over and pull through both front loops, then yarn over and complete one single crochet.
- st/sts — stitch/stitches
- rnd/rnds — round/rounds
- MR — magic ring
- BLO — back loop only
Numbers in parentheses show the stitch count at the end of a round.
Before You Start
The head, body, and antennae are worked in continuous rounds. Do not join unless the instructions specifically tell you to do so. Place a stitch marker in the first stitch of every round and move it upward as you work.
Stuff the head and body gradually. Small pieces of stuffing create a smoother surface than one large piece. The finished fabric should feel firm but should not stretch enough to reveal the filling.
Make both large wings from the same yarn and both small wings from the same yarn. Check the stitch count after every round so the pairs remain symmetrical.
Leave long sewing tails on all components that will be attached later. These tails are easier to hide than newly joined sewing yarn.
Step-by-Step Crochet Instructions
Crochet the Body
Use deep teal yarn.
- Rnd 1: Work 6 sc into an MR. (6)
- Rnd 2: Inc in each st around. (12)
- Rnd 3: Repeat
(sc, inc)around. (18) - Rnd 4: Repeat
(2 sc, inc)around. (24) - Rnd 5: Repeat
(3 sc, inc)around. (30) - Rnds 6–12: Sc in each st around. (30)
- Rnd 13: Repeat
(3 sc, dec)around. (24) - Rnd 14: Sc in each st around. (24)
- Rnd 15: Repeat
(2 sc, dec)around. (18) - Begin stuffing the lower body firmly.
- Rnd 16: Repeat
(sc, dec)around. (12) - Finish stuffing, keeping the upper opening slightly flatter where the head will sit.
- Rnd 17: Dec around. (6)
Fasten off. Thread the tail through the front loops of the remaining stitches, pull closed, and secure.
Crochet the Head
Use deep teal yarn.
- Rnd 1: Work 6 sc into an MR. (6)
- Rnd 2: Inc around. (12)
- Rnd 3: Repeat
(sc, inc)around. (18) - Rnd 4: Repeat
(2 sc, inc)around. (24) - Rnd 5: Repeat
(3 sc, inc)around. (30) - Rnds 6–10: Sc around. (30)
- Rnd 11: Repeat
(3 sc, dec)around. (24) - Rnd 12: Repeat
(2 sc, dec)around. (18)
Pause here to position the face patch and eyes. After installing them, stuff the head firmly but evenly.
- Rnd 13: Repeat
(sc, dec)around. (12)
Fasten off with a long sewing tail. Leave the 12-stitch opening unclosed so it can sit securely over the top of the body.
Make the Ivory Face Patch
Use warm ivory yarn.
- Ch 7.
- Rnd 1: Beginning in the second ch from the hook, work 2 sc in the first ch, sc in the next 4 ch, 3 sc in the final ch, rotate the work, sc in the unused loops of the next 4 ch, and sc once more in the first ch. (14)
- Rnd 2: Inc in each of the first 2 sts, sc in the next 4 sts, inc in each of the next 3 sts, sc in the next 4 sts, inc in the final st. (20)
Join with a sl st and fasten off with a long tail.
Pin the oval horizontally across the front of the head. Place the top of the patch near Round 5 and the bottom near Round 10.
For safety eyes, insert each post through the face patch and head between Rounds 7 and 8. Position the eyes approximately seven stitches apart and attach the washers inside the head.
Sew the outer edge of the patch to the head with small stitches. Add the dark brown mouth after completing the assembly.
Crochet the Large Upper Wings
Make two with lavender yarn.
- Ch 10.
- Rnd 1: Beginning in the second ch from the hook, work 2 sc in the first ch, sc in the next 7 ch, 4 sc in the final ch, rotate, sc in the unused loops of the next 7 ch, and 2 sc in the first ch. (22)
- Rnd 2: Inc in each of the first 2 sts, sc in the next 7 sts, inc in each of the next 4 sts, sc in the next 7 sts, inc in each of the final 2 sts. (30)
- Rnd 3: Repeat
(sc, inc)twice, sc in the next 7 sts, repeat(sc, inc)four times, sc in the next 7 sts, and repeat(sc, inc)twice. (38)
Join with a sl st. Fasten off with a long tail.
The beginning and ending area forms the inner edge that will be sewn against the moth’s body.
Crochet the Small Lower Wings
Make two with lavender yarn.
- Ch 7.
- Rnd 1: Beginning in the second ch from the hook, work 2 sc in the first ch, sc in the next 4 ch, 4 sc in the final ch, rotate, sc in the unused loops of the next 4 ch, and 2 sc in the first ch. (16)
- Rnd 2: Inc in each of the first 2 sts, sc in the next 4 sts, inc in each of the next 4 sts, sc in the next 4 sts, and inc in each of the final 2 sts. (24)
Join with a sl st and leave a long sewing tail.
Add the Crescent Markings
Thread golden-mustard yarn onto an embroidery needle. On each wing, create a small curved line with chain stitch or several closely spaced straight stitches.
Add two parallel curved rows to create a thicker crescent. Keep the marking at least two rounds away from the wing edge.
Make the crescents on the matching wing pairs face in opposite directions so they mirror each other. Secure the yarn ends on the back of each wing.
For a simpler version, embroider one crescent on each large wing and leave the small wings plain.
Crochet the Antennae
Make two with warm ivory yarn.
- Rnd 1: Work 6 sc into an MR. (6)
- Rnds 2–8: Sc around. (6)
Do not stuff the antennae heavily. A tiny amount of fiberfill in the lower half is sufficient. Flatten the open end and fasten off with a long sewing tail.
To create a gentle curve, bend each soft antenna slightly while sewing it to the head. Do not insert wire if the moth may be handled by a child.
Embroider the Mouth
Use dark brown yarn to make a shallow curved mouth centered between and below the eyes. A simple mouth can be formed from two short diagonal stitches that meet at the center.
Keep the embroidery relaxed so it does not pull the face patch inward.
Assembly and Finishing
Arrange all four wings behind the body before sewing. Place the large wings near the upper half of the body and angle them slightly upward. Position the small wings beneath them, angled down and outward.
Sew the inner three or four stitches of each wing firmly to the back and sides of the body. Make several passes through the wing edges and body stitches without pulling so tightly that the body becomes distorted.
Center the head over the body. The face should point forward while the wing arrangement remains symmetrical behind it. Sew through each of the 12 stitches around the head opening and into the upper body. Repeat the seam once for additional stability.
Position the antennae between Rounds 2 and 4 of the head, approximately four stitches apart. Sew around each flattened base. Angle the tips slightly outward.
Weave in every remaining yarn end. Gently shape the head, body, wings, and antennae with your fingers.
Tips for Best Results
- Count every round before proceeding to the next one.
- Use the same hook and yarn for all four wings to maintain symmetry.
- Keep the wing embroidery loose enough for the fabric to remain flat.
- Pin the wings in place and view the moth from the front before sewing.
- Add stuffing in small portions to avoid lumps.
- Use a curved sewing needle if reaching through the stuffed body is difficult.
- Leave the outer edges of the wings unsewn so they retain a soft, dimensional appearance.
Common Mistakes and Troubleshooting
Stuffing Shows Between the Stitches
The fabric may be too loose. Switch to a smaller hook or reduce the amount of stuffing. Pale stuffing is especially noticeable through dark yarn, so spread it evenly.
The Wings Curl
The starting chain may be too tight, or the increases may have been missed. Remake the chain with relaxed tension and confirm the final stitch counts. Light steam blocking can help flatten acrylic wings, but keep the heat source away from the yarn.
The Wings Look Uneven
Place each finished pair on top of one another before assembly. If one wing is noticeably smaller, check for skipped stitches or tension changes.
The Head Tilts Forward
Add a second line of reinforcing stitches where the back of the head meets the body. The open edge of the head should surround the upper curve of the body rather than sitting on a single narrow point.
The Face Patch Buckles
The sewing stitches may be too tight. Remove the affected stitches and resew with lighter tension, allowing the oval to follow the curve of the head.
Creative Variations
Create a rosy maple moth by replacing the teal with golden yellow and using raspberry-pink wings. For a softer nursery palette, try denim blue, warm ivory, and muted lavender.
Replace the crescents with small embroidered dots, stars, or short lines. Avoid heavy beads on the wings because their weight can cause the flat fabric to droop.
For a larger moth, use bulky yarn with a hook small enough to maintain dense fabric. All stitch counts can remain unchanged, but the finished size and required yarn quantity will increase.
You can also crochet each wing in two colors. Change yarn after Round 1 and complete the remaining rounds in a contrasting shade.
How to Use or Style Your Crochet Project
Display the moon moth on a bookshelf, craft-room shelf, or celestial-themed dresser. Its broad wings look especially attractive when the plush has enough open space around it.
It can also be given as a handmade birthday or holiday gift. When making it for a child, substitute embroidered eyes and inspect every seam carefully.
The moth is intended as a soft decorative plush. It should not be hung over a crib, used as a pet toy, or placed near an unattended infant.
Care and Maintenance
Follow the care instructions printed on your yarn label. For cotton and cotton-blend yarn, gentle hand washing is usually the safest option.
Wash the moth in cool water with a small amount of mild detergent. Do not twist or wring it. Press out excess water with a towel, reshape the wings, and allow the project to dry flat.
Store it away from direct sunlight to reduce fading. Avoid hanging the moth by its wings or antennae because prolonged tension may stretch the seams.
Frequently Asked Questions
Can a complete beginner make this moth?
The pattern is best for a confident beginner who has practiced working in continuous rounds, increasing, decreasing, and sewing amigurumi parts.
Can I embroider the eyes?
Yes. Embroidered eyes are the preferred choice when making the moth for a child younger than three. Use several small horizontal stitches and secure the yarn ends inside the head.
Do the wings need stuffing?
No. The wings are worked as flat ovals and remain unstuffed. This keeps them lightweight and easy to position.
Can I make the wings stiffer?
Choose cotton yarn, crochet at a firm tension, and lightly block the wings. A second identical wing layer can be added, although this doubles the wing yarn requirement.
Why are the head and body made separately?
Separate pieces create a clearer head shape and allow the head to cover the upper wing seams. This construction also makes face placement easier.
Can I use blanket yarn?
Yes, but the finished moth will be much larger. Use a hook that creates dense fabric and increase the estimated yarn quantity substantially.
How can I make the wings symmetrical?
Complete matching wings consecutively, count every round, and place the finished pieces on top of each other before adding the embroidery.
Can the antennae contain craft wire?
Soft crocheted antennae are safer and already hold a gentle curve. Avoid wire when the finished project may be handled by children.
Conclusion
This moon moth amigurumi combines simple rounded shapes with bold celestial details. Its single crochet body, flat oval wings, and soft antennae make the construction approachable while leaving plenty of room for color customization.
Choose your favorite night-sky palette, keep the stitch counts consistent, and take time to pin the wings before sewing. Those small steps will help your finished moth look balanced and expressive.
Related Crochet Projects
- Rosy maple moth amigurumi
- Celestial star pillow
- Mini crochet firefly
- Beginner butterfly plush