Crochet Mini Open Tulip: A Tiny Three-Petal Flower Pattern
Introduction This crochet mini open tulip is a tiny bloom caught mid-open — three petals standing upright and curving gently outward, with a bright...
Introduction
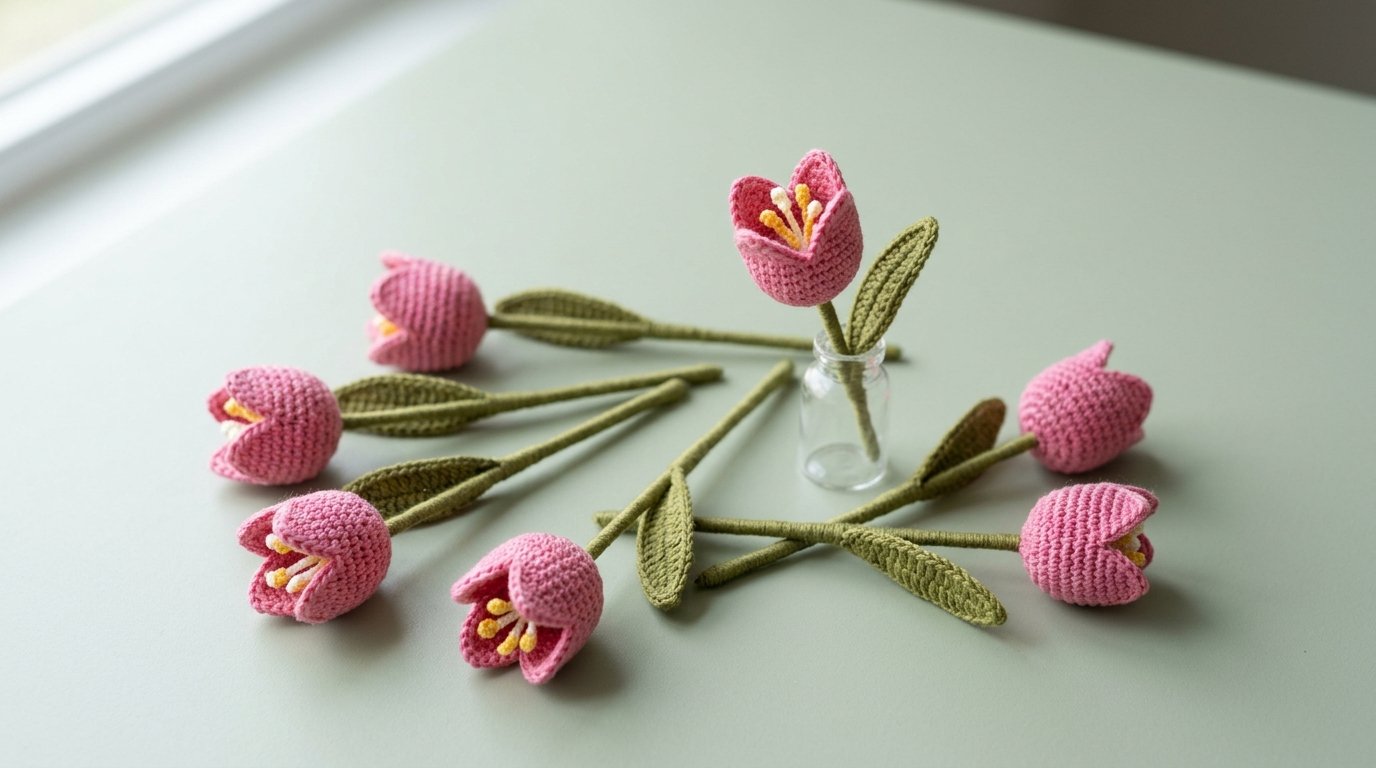
This crochet mini open tulip is a tiny bloom caught mid-open — three petals standing upright and curving gently outward, with a bright yellow stamen center peeking out from the middle. At roughly an inch tall, it’s one of the smallest flowers you can make, and it works up in just a few minutes.
The construction is simple: three small petals, a quick stamen cluster, a short wrapped stem, and one leaf. If you can single crochet and work in the round, you have everything you need. A handful of finished tulips makes an adorable mini bouquet, and a single flower is a charming gift topper or table accent.
Why You’ll Love This Project
- Fast finishes. One tulip takes about 15–20 minutes, so you can build a bouquet in an evening.
- Tiny yarn usage. Each flower uses only a few yards, making this a perfect scrap-yarn project.
- Beginner-friendly. Only chain, slip stitch, single crochet, and basic increases and decreases are used.
- A satisfying center detail. The tiny stamens add realism without any complicated technique.
- Highly giftable. Small flowers tuck neatly into gift wrap, cards, and mini vases.
Project Overview
- Project type: Mini crochet flower with stem, stamens, and leaf
- Difficulty: Beginner
- Estimated time: About 15–20 minutes per tulip, including stem and leaf
- Suggested finished size: Petal cluster roughly 1 inch (2.5 cm) across and 1 inch tall; stem about 4 inches (10 cm) long, adjustable
- Yarn weight: Sport or fine DK cotton
- Crochet hook: 2.0 mm to 2.5 mm
- Main techniques: Working in rounds, basic shaping, tiny stamen assembly, simple stem wrapping
- Construction: Three separate petals joined at the base around a small stamen cluster, attached to a wrapped stem with one leaf
- Terminology: US crochet terms
All sizes and times are estimates and vary with your yarn, hook, and tension.
Materials and Supplies Needed
- Sport or fine DK cotton yarn in rose pink for petals — about 5–8 yards per tulip
- Small amount of yellow cotton yarn for stamens
- Small amount of white cotton yarn for stamen tips
- Olive or leaf-green cotton yarn for the stem and leaf — about 5 yards per tulip
- 2.0 mm to 2.5 mm crochet hook
- Stitch marker
- Yarn needle
- Scissors
- Thin florist wire or a pipe cleaner (optional, for a firmer stem)
Choosing the Right Yarn and Hook
Use smooth cotton or a cotton blend so the tiny stitches stay crisp and defined. Fuzzy or thick yarns blur the petal shapes at this scale and hide the stamen detail.
Because this is a miniature, the hook matters. Choose a 2.0–2.5 mm hook, and check that your fabric is dense enough that no gaps show through the petals. If light comes through in obvious holes, go down a hook size.
Cotton also holds the petals upright better than acrylic, which tends to droop. If you only have acrylic, work your stitches a little tighter to keep the petals standing.
Crochet Stitches and Abbreviations
- ch — chain
- sl st — slip stitch
- sc — single crochet
- sc2tog — single crochet two stitches together (basic decrease)
- st — stitch
- sts — stitches
- inc — increase (two single crochet in the same stitch)
All stitches are standard US single crochet with increases and decreases. No special stitches are required.
Before You Start
Work a test petal first. At this scale, tension matters. Crochet one petal and check that it stands upright without collapsing.
Keep petals identical. Since the three petals form the open shape, working them with the same hook and tension keeps the flower balanced.
Plan the stamens. Decide whether you want the stamens to stay upright in a vase or lie flat for a gift. If they should stand upright, use a thin piece of wire inside the stem.
Mark your rounds. Place a stitch marker in the first stitch of each round so you don’t lose your place in the small rounds.
Step-by-Step Crochet Instructions
Petal (make 3 per tulip)
Work in continuous rounds.
Round 1: Make a magic ring. Work 6 sc into the ring. (6 sts)
Round 2: Work 1 inc in each st around. (12 sts)
Round 3: Sc in next st, inc in next st. Repeat from * to * around. (18 sts)
Round 4: Sc in each st around. (18 sts)
Round 5: Sc in next st, sc2tog. Repeat from * to * around. (12 sts)
Round 6: Sc in each st around. (12 sts)
Fasten off, leaving a long tail. The petal should be a small rounded cup that curves gently outward at the top.
Stamens (make 3 per tulip)
Use yellow yarn for the stems of the stamens and white yarn for the tips.
Stamen stalk: Ch 5. Sl st in each ch back to the base. Fasten off, leaving a short tail.
Stamen tip: With white yarn, make a magic ring and work 4 sc into it. Pull the ring closed. Fasten off, leaving a short tail. Sew the white tip to the top of the yellow stalk.
Repeat to make three stamens. Set aside.
Assembling the Open Tulip Top
Hold the three petals in a triangle, with the openings facing inward and the rounded tops outward. Pin them in place with stitch markers.
Using the petal tails, whipstitch the petals together along their side edges from about one-third of the way up to the base, leaving the top third of each petal free so they open outward.
Before closing the base, insert the three stamens into the center of the flower with the yellow stalks pointing down and the white tips just peeking above the petals. Stitch the stamen bases to the inside of the petal bases so they stay upright.
Close the base opening around the stamens, leaving a small gap in the bottom for the stem.
Stem
Cut a length of florist wire or a pipe cleaner to about 4 inches. If using a yarn-only stem, twist several strands of green yarn together to the same length.
Insert the wire through the base gap into the center of the flower. Wrap green yarn tightly and evenly around the wire, starting at the base of the petals and working downward. Secure the bottom end by threading the tail up inside the wrapping with a yarn needle.
Leaf (make 1 per tulip)
Work in rows.
Row 1: Ch 8. Sc in the second ch from the hook and in each ch across. (7 sts)
Row 2: Ch 1, turn. Sc in each st across. (7 sts)
Row 3: Ch 1, turn. Sc in first 2 sts, 3 sc in next st, sc in remaining 4 sts. (9 sts)
Row 4: Ch 1, turn. Sc in each st across. (9 sts)
Row 5: Ch 1, turn. Sc in first 2 sts, sc2tog, sc in next st, sc2tog, sc in remaining 2 sts. (7 sts)
Row 6: Ch 1, turn. Sc in each st across. (7 sts)
Fasten off, leaving a tail. For a raised center vein, work a row of sl st down the center of the leaf from tip to base.
Attach the leaf base to the stem about halfway down. Angle the leaf outward so it reads naturally.
Size Adjustments
- Larger tulip: Use DK or worsted yarn with a 3.5–4.0 mm hook, following the same rounds.
- Smaller tulip: Use crochet thread and a 1.25 mm hook.
- Shorter stem: Cut a shorter wire core for a gift-topper version.
Assembly and Finishing
Check that the stamens sit upright in the center of the petals. If any tip flops, use a needle to stitch the stamen stalk to the inside petal edge.
Gently shape the petals so they flare outward at the top. Weave in all remaining ends.
If you used wire in the stem, bend the stem very slightly for a natural curve. If not, shape the stem gently with your fingers.
Tips for Best Results
- Keep petals balanced. Work all three petals with the same hook and yarn so the open flower stays symmetrical.
- Don’t over-open the petals. A gentle outward flare reads as realistic; too much and the petals flatten.
- Use a tiny needle. Small details like the stamen tips are much easier to attach with a fine-tipped yarn needle.
- Stuff the stamens slightly. A tiny bit of stuffing at the base of the stamen cluster keeps them upright.
- Check the stem wrap. Overlap each wrap by half so no wire shows.
Common Mistakes and Troubleshooting
Petals droop downward. The petals may be too soft. Switch to cotton yarn or a smaller hook to give them more structure.
Stamens fall to the side. Stitch the stamen bases to the inside of the petal bases, and consider adding a tiny bit of stuffing at the base.
The tulip looks lopsided. One petal may be larger or worked more loosely. Recrochet any petal that stands out from the other two.
The stem is floppy. Add wire or pipe cleaner inside the stem. Yarn-only stems tend to droop at this scale.
Gaps appear between the petals. The petals may not be joined close enough at the base. Recheck that the whipstitched edges meet fully.
Creative Variations
- Two-color petals. Use one color for two petals and a lighter shade for the third for a soft, natural look.
- Darker stamen tips. Use deep orange or gold yarn for the stamen tips instead of white.
- Mini bouquet. Make five to seven tulips in coordinating pinks and arrange them in a small vase.
- Gift topper. Use a short stem and slip the tulip into a ribbon bow.
- Seasonal shades. Soft yellow for spring, red for a bold accent, or white for a minimalist arrangement.
How to Use or Style Your Crochet Project
Place your mini tulips in a small glass bud vase or a tiny ceramic cup for a tabletop accent. A group of them looks charming as a centerpiece, and a single flower works beautifully as a gift tag or tucked into a card. Because these are decorative, keep them out of reach of pets and small children, especially if the stems contain wire.
Care and Maintenance
Dust your tulips gently with a soft brush. Spot-clean with a damp cloth and mild soap if needed, and avoid soaking wired stems. Reshape the petals by hand while slightly damp, then let the flower air-dry fully. Store the tulips in a small box or upright in a vase so the petals aren’t crushed. Always follow your yarn label’s care instructions.
Frequently Asked Questions
How small is one tulip?
The petal cluster is about 1 inch across and 1 inch tall, with a stem around 4 inches long. Sizes vary with yarn and hook.
Can I skip the wire in the stem?
Yes, but the stem will be softer and may droop. Twisting several strands of green yarn together gives the most stability without wire.
Do I have to make the stamens?
The stamens add realism, but you can leave them out for a simpler or flatter flower.
Can I use one color for the whole tulip?
Absolutely. Matching petals and stamens in a single color gives a modern, minimalist look.
How many yards does one tulip use?
Roughly 5–8 yards of pink for the petals, plus a few yards of yellow, white, and green. It’s a great scrap-yarn project.
Can I make this with worsted yarn?
Yes, though the tulip will be larger. Use a 3.5–4.0 mm hook and follow the same rounds.
Will the petals stay upright over time?
Cotton and tight tension hold up best. Storing the flowers upright in a vase also helps the petals keep their shape.
Conclusion
The crochet mini open tulip is a small project with a lot of charm. Three tiny petals, a bright stamen center, and a short wrapped stem come together in a flower small enough to tuck into a gift but detailed enough to look realistic. Make one in an evening, or work up a whole mini bouquet in an afternoon.
Related Crochet Projects
If you enjoy these tiny flowers, you might also like a crochet crocus with upright petals, a crochet daisy with a yellow center, a crochet mini sunflower, or a crochet lavender stem for small vases.