Crochet Lace Flower Pattern With Elegant Petals
Some crochet flowers are designed to look soft and fluffy, while others stand out because of their delicate stitches and intricate details. This crochet...
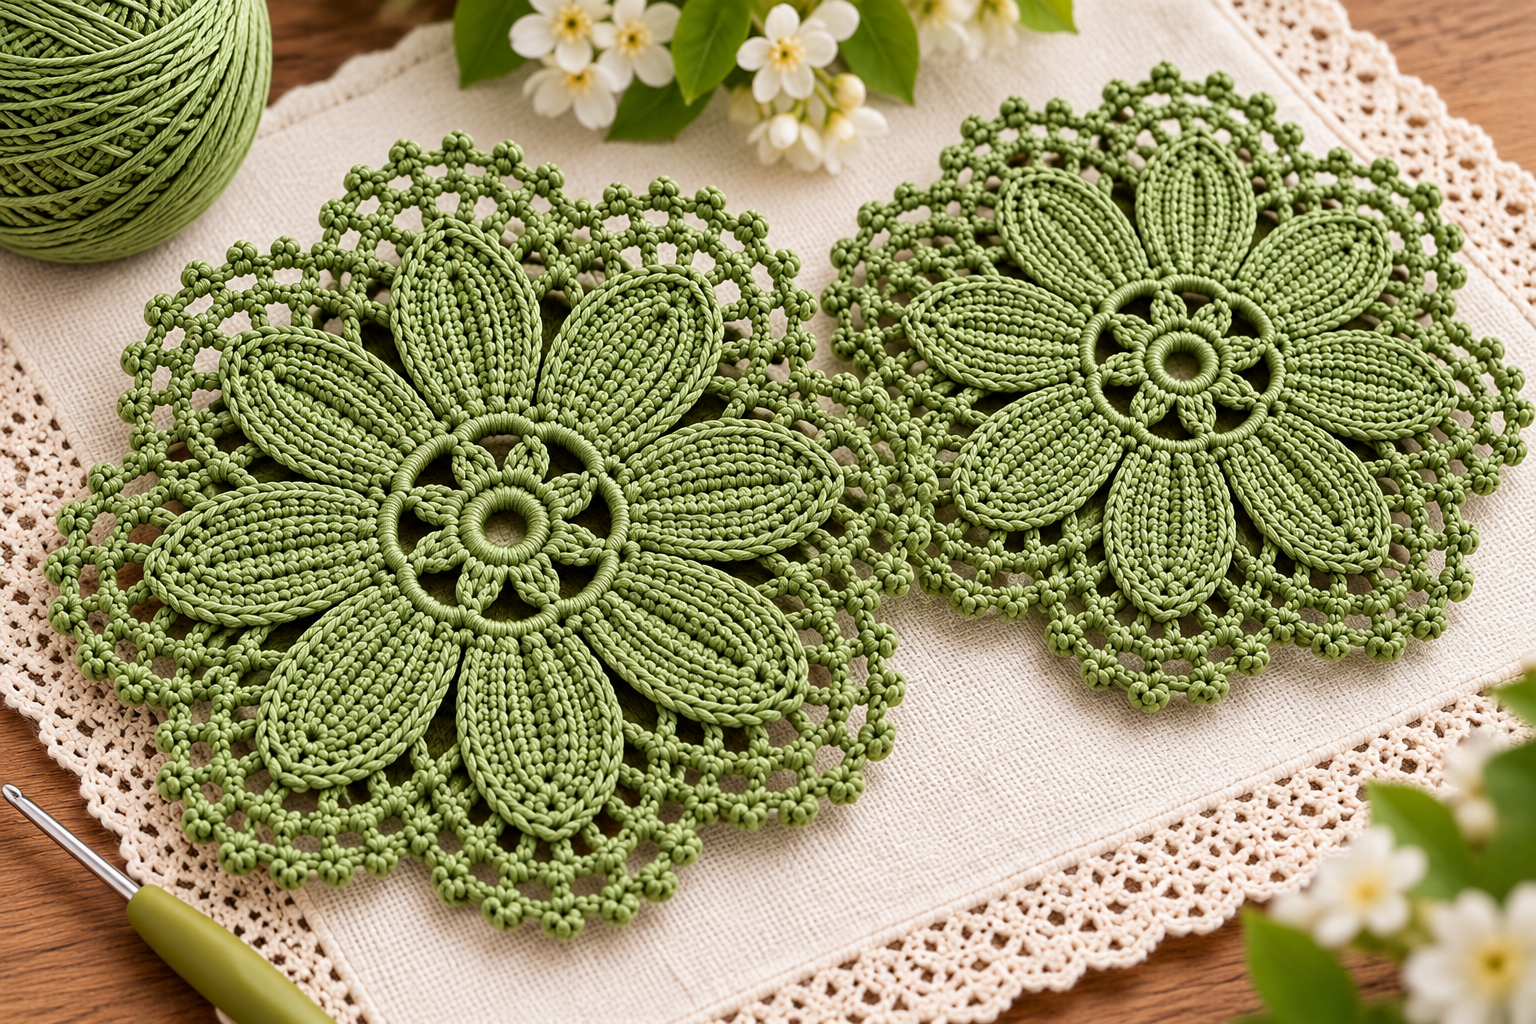
Some crochet flowers are designed to look soft and fluffy, while others stand out because of their delicate stitches and intricate details. This crochet lace flower pattern belongs to the second group, combining elongated petals, an open circular center, and a beautifully textured outer border.
The sage-green motif in the reference has eight narrow petals radiating outward from a small central ring. Each petal features raised stitch lines, creating a delicate ribbed effect. Around the flower, an airy lace border connects the petals and forms a nearly circular silhouette with softly pointed sections.
What makes this design especially appealing is how the solid petals contrast with the openwork edging. The flower looks detailed without appearing heavy, making it suitable for decorative appliqués, joined lace projects, and handmade accessories.
In this guide, you’ll learn how to approach the circular foundation, shape the petals, create a lacy border, and finish the motif neatly. You’ll also discover ideas for joining several flowers into a larger design.
What Is a Crochet Lace Flower Motif?
A crochet lace flower motif is a decorative crocheted shape that combines floral elements with open spaces formed by chains and carefully placed stitches.
Unlike a simple five-petal flower, the photographed design has a more elaborate construction.
Its small circular center is surrounded by eight elongated petals, while open chain spaces connect the outer sections.
The border includes small textured loops and decorative stitch groups that resemble picots or tiny lace clusters.
Why Crochet Lace Flowers Are Popular
Lace motifs are popular among crocheters who enjoy decorative stitchwork and versatile projects.
A single flower can be used as an embellishment, while multiple motifs can be joined to create a larger textile.
This design is especially useful for:
- Decorative table runners
- Crochet lace placemats
- Handmade cushion accents
- Crochet bag embellishments
- Wall decorations
- Joined floral accessories
- Decorative garment panels
- Handmade gifts
The openwork areas give the flower a lighter appearance than a fully solid crochet motif.
Skill Level and Time Needed
This project is best suited to intermediate crocheters or confident beginners who are comfortable reading stitch instructions.
The basic techniques are familiar, but working evenly around eight petal sections requires concentration.
The narrow petals and decorative border also benefit from consistent tension.
How Long Does It Take?
A single motif may take one or more crafting sessions, depending on your experience and yarn thickness.
The first flower will likely require the most attention because you’ll be learning the construction.
Once you’ve established a consistent sequence, making additional motifs becomes easier.
If you’re planning a table runner or joined lace project, prepare several flowers before deciding how to connect them.
Materials and Tools
The photographed motif appears to be made with relatively fine, smooth yarn that creates crisp stitch definition.
A cotton crochet thread or lightweight cotton yarn is a suitable starting choice for this style.
Materials Checklist
- Sage-green cotton thread or lightweight yarn
- Crochet hook compatible with your yarn
- Stitch markers
- Small scissors
- Yarn needle
- Measuring tape
- Blocking pins
- Suitable blocking mat
- Optional rustproof pins for shaping
- Optional contrasting yarn for practice
The reference image includes a recommendation for a small crochet hook, approximately 1.75–2.5 mm, but the appropriate size depends on the specific thread and your tension.
Choosing the Right Yarn
Mercerized cotton can produce smooth, defined stitches and an elegant lace appearance.
Ordinary cotton thread is also suitable.
For a larger motif, experiment with a slightly thicker yarn.
Avoid very fuzzy fibers because they can make the openwork details harder to see.
Crochet Stitches and Abbreviations
This design uses familiar crochet stitches combined into more decorative arrangements.
All abbreviations follow US crochet terminology.
| Abbreviation | Meaning |
|---|---|
| ch | Chain |
| sl st | Slip stitch |
| sc | Single crochet |
| hdc | Half double crochet |
| dc | Double crochet |
| tr | Treble crochet |
| inc | Increase |
| st | Stitch |
| sp | Space |
| ch-sp | Chain space |
| rnd | Round |
| FO | Fasten off |
Important Techniques
Magic ring: Creates an adjustable central opening.
Chain spaces: Form the open sections of the lace.
Double crochet: Provides height for petals and connecting areas.
Slip stitch: Joins rounds or moves the working yarn without adding substantial height.
Picot: Creates a small decorative point using chains and a joining stitch.
Working around a chain: Allows you to build stitches along both sides of a narrow foundation.
Practicing these techniques before beginning can make the flower easier to complete.
How to Crochet a Lace Flower Step by Step
The following construction guide is inspired by the motif shown in the reference image.
The photograph includes a visual tutorial, but the complete stitch counts and instructions cannot be independently verified from the image alone. Use the steps below as an adaptable method and check your stitch counts and gauge while working.
Step 1: Crochet the Center Ring
- Begin with sage-green yarn or crochet thread.
- Create a magic ring or a small chain circle.
- Work a round of evenly spaced stitches into the center.
- Keep the stitches compact while maintaining a visible central opening.
- Join the round with a slip stitch.
- Check that the circle lies flat.
The central ring forms the foundation for the surrounding petals.
Avoid tightening it completely closed if you want to preserve the open center seen in the reference.
Step 2: Divide the Center Into Eight Sections
The finished flower has eight prominent petals.
To prepare for them, divide the circular foundation into eight evenly spaced sections.
Use stitch markers or identify the chain spaces that will support each petal.
Maintain consistent spacing around the ring.
This step is important because uneven intervals can distort the entire motif.
Step 3: Create the First Elongated Petal
Begin working into the first designated petal section.
Create a short foundation chain extending outward from the center.
Work taller stitches along the chain to build a narrow, elongated shape.
Turn around the tip and continue along the opposite side.
This creates a petal with two defined edges and a rounded or softly pointed end.
For the raised appearance seen in the reference, experiment with front-loop placement or surface stitch detailing.
Keep the petal symmetrical around its centerline.
Step 4: Crochet the Remaining Petals
Repeat the construction around the center.
Each petal should have a similar length and width.
Check the flower regularly to make sure the petals radiate outward evenly.
If one petal is noticeably shorter, examine the stitch sequence before continuing.
Once all eight petals are complete, the design should resemble a decorative flower with spaces between the individual sections.
Step 5: Create the First Openwork Border Round
Attach yarn at a suitable point near one petal tip.
Work a series of chain spaces between the petals.
Anchor the chains with slip stitches or single crochet stitches at consistent positions.
Continue around the entire flower.
Keep the chain lengths balanced so the border doesn’t pull the petals inward.
The first openwork round begins connecting the separate petals into a unified motif.
Step 6: Build the Decorative Lace Edging
The reference includes an airy border with small textured loops.
To recreate this appearance, work into the chain spaces from the previous round.
Alternate connecting stitches with decorative chain groups.
Use small picot-style points where you want a slightly raised edge.
The goal is to create an open lace framework around the petals.
Maintain a consistent stitch sequence between each petal section.
Step 7: Shape the Outer Border
The finished motif has a softly scalloped outline with gently pointed sections.
Work additional decorative stitches where extra fullness is needed.
If the edging begins to ripple excessively, you may have too many stitches or overly long chains.
If it pulls inward, the connecting sections may be too short.
Adjust gradually while keeping the eight repeating sections balanced.
Step 8: Finish and Secure the Motif
After completing the final border round, join neatly with a slip stitch.
Fasten off and leave enough yarn to weave in the end.
Use a yarn needle to secure loose tails through neighboring stitches.
Avoid pulling the lace too tightly while weaving.
Lay the finished flower flat and examine the symmetry.
Sizing, Gauge, and Yarn Substitution Tips
One advantage of a crochet lace flower pattern is that the same general structure can produce different results depending on the thread.
Making a Small Lace Motif
Use fine crochet thread and a compatible small hook.
Maintain even tension to keep the petals defined.
Small motifs work well as appliqués and decorative embellishments.
Making a Larger Flower
Use thicker cotton yarn and a suitable hook.
The petals and lace spaces will become more prominent.
A larger motif may be useful for wall decor or decorative cushion panels.
Checking Your Gauge
Unlike fitted garments, decorative motifs usually allow more flexibility in gauge.
However, consistent gauge becomes important when joining several flowers.
Make one completed sample and measure its width after blocking.
Use the same yarn and hook for the remaining motifs.
Common Mistakes and How to Avoid Them
Lace crochet can be delicate, especially when multiple repeating sections must align.
Uneven Petal Lengths
Different stitch counts or inconsistent tension can create irregular petals.
Count carefully and compare each petal as you work.
Use stitch markers to identify the repeated sections.
A Wavy Outer Border
Excessive increases or long chain spaces may cause rippling.
Check whether the border has enough room to lie flat without adding unnecessary fullness.
A Tight Center
If the central ring is pulled too firmly, the petals may bunch together.
Keep the central opening consistent with your chosen design.
Uneven Lace Spaces
Chain tension affects the appearance of the outer border.
Try to maintain similar chain lengths throughout each repeated section.
Finishing and Blocking Your Crochet Lace Flower
Blocking is particularly useful for lace motifs because it helps reveal the stitch pattern.
Once the flower is complete, gently dampen it if your yarn care instructions permit.
Lay it on a suitable blocking mat.
Arrange the eight petals evenly.
Pin the outer border into a balanced shape without overstretching the stitches.
Allow the motif to dry completely before removing the pins.
How to Care for Crochet Lace
Handle the finished motif gently.
Avoid pulling on delicate chain spaces.
For cleaning, follow the thread manufacturer’s instructions.
Dry flat when appropriate and store the flower where the lace won’t become snagged.
Creative Variations and Style Ideas
The sage-green motif looks elegant, but the design can be adapted to different projects.
White Crochet Lace Flowers
Use ivory or white cotton thread for a classic lace appearance.
These flowers work beautifully in table decorations and decorative accessories.
Pastel Floral Motifs
Try dusty pink, lavender, or pale blue yarn.
The soft colors can make the textured petals look delicate and romantic.
Two-Tone Lace Flowers
Use one color for the solid petals and another for the openwork border.
Choose complementary colors that make the stitch details easy to see.
Joined Crochet Flower Panels
Make several matching motifs and arrange them into a larger shape.
Join suitable border points with crochet stitches or a yarn needle.
Test the spacing before permanently connecting all the flowers.
Using, Gifting, and Selling Crochet Lace Motifs
A crochet lace flower can become a decorative embellishment for bags, cushions, or handmade gifts.
Several joined motifs can also create table runners, decorative wall panels, and other lace accessories.
For gifting, place the completed flower on a flat backing to protect its shape.
If you sell finished pieces, include accurate measurements and yarn information.
Photograph the motif against a contrasting background so the openwork details are easy to see.
If using another designer’s written instructions, respect their applicable licensing terms.
Frequently Asked Questions
Is This Crochet Lace Flower Pattern Beginner Friendly?
The basic stitches are familiar, but the eight-petal structure and openwork edging require careful counting. Confident beginners can attempt the motif after practicing chains, double crochet, and slip stitches. Starting with thicker yarn may make the stitch placement easier to see.
What Yarn Is Best for Crochet Lace Flowers?
Smooth cotton crochet thread is a popular choice for detailed lace motifs. Mercerized cotton provides clear stitch definition and a neat finish. Lightweight cotton yarn also works well, especially if you prefer a slightly larger flower.
How Many Petals Does This Crochet Flower Have?
The reference design features eight elongated petals arranged around a small circular center. Each petal contributes to the flower’s symmetrical appearance. Maintaining equal spacing between the petals helps the finished motif lie flat.
Can I Join Multiple Crochet Lace Flowers Together?
Yes. The openwork edging provides useful connection points for joining motifs. Arrange the flowers first, then identify matching border spaces that can be connected with slip stitches, chains, or sewing. Make sure the joins don’t distort the petal shapes.
Should I Block My Crochet Lace Flower?
Blocking is recommended when you want the openwork pattern and petal shapes to appear clearly defined. Use a method suitable for your yarn, pin the motif evenly, and allow it to dry completely before removing it from the blocking surface.
Make Your Own Crochet Lace Flower Pattern
A crochet lace flower pattern is a lovely way to practice decorative stitches, symmetrical petal shaping, and delicate openwork techniques.
The sage-green eight-petal flower combines textured solid sections with an airy outer border, creating a versatile motif for handmade accessories and home decorations.
Start with the central ring, work carefully through each petal, and take your time forming the lace edging.
Once you’ve completed your first flower, experiment with new colors or join multiple motifs into a larger project.
Save this crochet lace flower pattern idea for your next creative crochet session!