Crochet Hibiscus Flower Pattern for Tropical Decor
Bring a touch of tropical beauty into your home with a crochet hibiscus flower pattern inspired by soft pink blossoms, delicate yellow stamens, and...
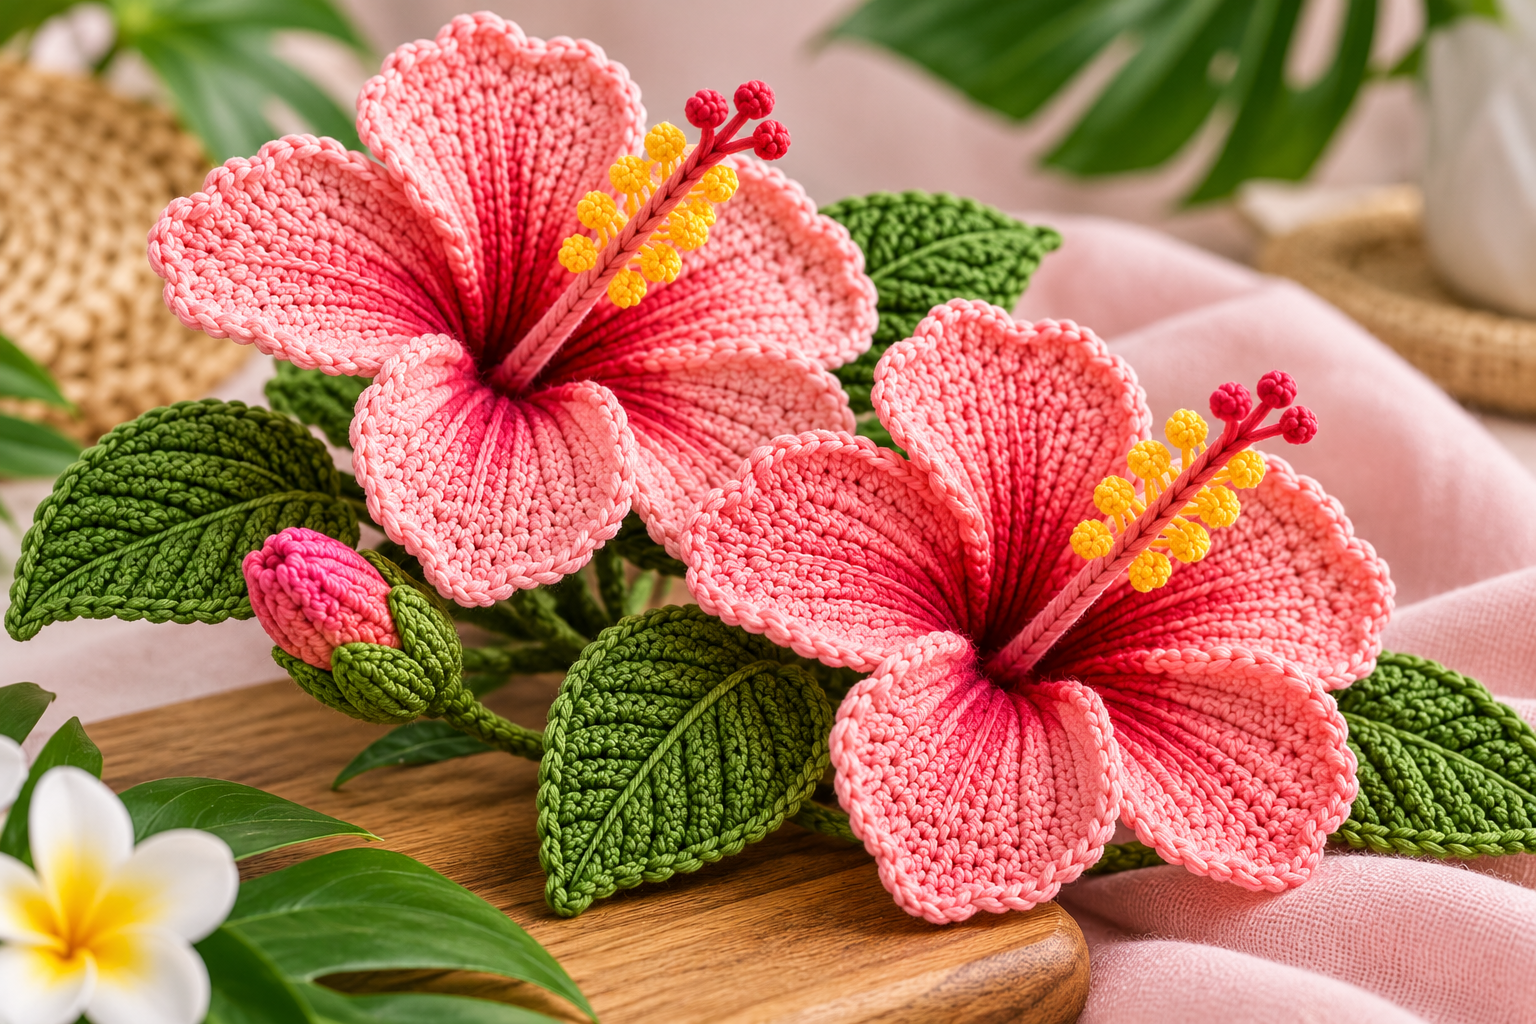
Bring a touch of tropical beauty into your home with a crochet hibiscus flower pattern inspired by soft pink blossoms, delicate yellow stamens, and richly textured green leaves. These handmade flowers capture the distinctive beauty of hibiscus blooms while adding the warmth and detail of crochet.
The featured design showcases two large pink hibiscus flowers with five gently curved petals. Each blossom has a darker pink center and a long, raised stamen decorated with small golden yellow and coral details. Small unopened flower buds and deep olive-green leaves complete the botanical arrangement.
What makes this project particularly attractive is the combination of realistic floral shaping and clearly visible crochet stitches. The petals have subtle ridges, giving each flower beautiful texture and depth.
In this guide, you’ll learn how to approach hibiscus petal construction, create a decorative center, crochet leaves and buds, and assemble your own tropical arrangement.
The techniques are adaptable, making it possible to experiment with different flower sizes and colors.
What Is a Crochet Hibiscus Flower?
A crochet hibiscus flower is a handmade floral motif inspired by the large, colorful blossoms of tropical hibiscus plants.
The most recognizable feature is its arrangement of broad petals surrounding a prominent central stamen.
The design shown here features five rounded pink petals on each flower, a deeper-colored throat, and a protruding central structure with yellow details.
Unlike simple flat crochet flowers, this design has dimensional petals that curve gently outward.
Why Crochet Hibiscus Flowers Are Popular
Tropical flowers make beautiful crochet projects because their distinctive shapes are easy to recognize.
A hibiscus flower can serve as a standalone decoration or become part of a larger handmade arrangement.
Crochet hibiscus flowers are lovely for:
- Tropical-inspired home decorations
- Handmade summer flower bouquets
- Decorative wall hangings
- Floral wreaths and garlands
- Beach-themed craft projects
- Handmade gifts
- Cottagecore and botanical displays
Another advantage is the flexibility of the design.
You can make a delicate pastel hibiscus or a bright tropical version using the same general construction principles.
Skill Level and Time Needed
This crochet hibiscus flower pattern is most suitable for confident beginners and intermediate crocheters.
The individual stitches are familiar, but creating curved petals and assembling the raised stamen require additional attention.
You should feel comfortable working with chains, single crochet, double crochet, increases, and sewing crochet pieces together.
How Long Does It Take?
The time required depends on the flower’s size and level of detail.
A single blossom may take several hours, especially if you’re learning to shape petals.
A complete arrangement with multiple blossoms, leaves, and buds will take longer.
Rather than rushing, work on the project in stages.
Prepare the petals first, crochet the stamens and leaves next, and complete the assembly once every component is ready.
Materials Needed for a Crochet Hibiscus Flower
Choosing suitable yarn is essential for creating structured petals and attractive stitch definition.
The reference design features smooth yarn with a soft, slightly textured appearance.
Cotton or cotton-blend yarn is a practical choice for this type of flower.
Yarn and Supplies
- Light pink yarn for the flower petals
- Coral or darker pink yarn for petal shading
- Yellow yarn for the stamen details
- Pink yarn for the central filament
- Olive-green yarn for leaves
- Dark green yarn for stems and flower buds
- Crochet hook appropriate for your yarn
- Yarn needle
- Stitch markers
- Scissors
- Measuring tape
- Optional removable clips
- Optional floral wire for supported decorative stems
If you use floral wire, cover the ends securely and keep the arrangement away from young children.
You can also use crocheted stems without wire for softer decorative pieces.
Best Yarn for Realistic Hibiscus Flowers
Cotton creates clean stitch definition and helps petals hold their shape.
Acrylic yarn can produce softer, more flexible petals.
Cotton-acrylic blends offer another useful option.
Choose yarn that is firm enough to maintain the flower’s structure without making the petals excessively stiff.
Crochet Stitches and Abbreviations
This project combines basic crochet stitches with shaping techniques.
All abbreviations follow US crochet terminology.
| Abbreviation | Meaning |
|---|---|
| ch | Chain |
| sc | Single crochet |
| hdc | Half double crochet |
| dc | Double crochet |
| tr | Treble crochet |
| sl st | Slip stitch |
| inc | Increase |
| dec | Decrease |
| st | Stitch |
| BLO | Back loop only |
| FO | Fasten off |
Helpful Techniques
A magic ring creates a compact starting point for the flower center.
Increasing helps widen the petals gradually.
Taller stitches create the broad, rounded outer edges.
Slip stitches are useful for joining sections neatly.
Working into selected loops can produce textured ridges that resemble the raised lines on the reference petals.
Practice a single petal before making the complete flower.
How to Crochet a Hibiscus Flower Step by Step
This crochet hibiscus tutorial provides an adaptable construction method inspired by the photographed design.
The exact stitch counts and original construction details cannot be reliably determined from the finished image. Adjust the instructions according to your yarn, hook size, gauge, and desired flower dimensions.
Step 1: Create the Flower Foundation
- Begin with darker pink yarn.
- Make a magic ring.
- Work a compact circular foundation using single crochet stitches.
- Tighten the center opening.
- Increase evenly if a wider foundation is needed.
- Mark five evenly spaced sections for the petals.
- Fasten off or continue directly into the petal construction.
The center should remain relatively small compared with the broad outer petals.
This helps preserve the recognizable hibiscus silhouette.
Step 2: Crochet the First Pink Petal
Attach light pink yarn to one marked section.
Begin with shorter stitches near the base.
Gradually use taller stitches to widen the petal.
Work increases where additional fullness is needed.
As you approach the outer edge, use shaping stitches to create a softly rounded top.
Decrease stitch height as you return toward the foundation.
The finished petal should resemble a broad, gently curved oval with a narrower base.
Step 3: Make the Remaining Four Petals
Repeat the same general petal construction around the center.
Aim for five petals of similar proportions.
The photograph shows subtle overlaps between neighboring petals.
To recreate this effect, allow the edges to curve slightly rather than forcing every petal completely flat.
Small variations are acceptable and can contribute to a natural appearance.
After completing all five petals, gently shape the flower with your fingers.
Step 4: Add Texture and Color Depth
The reference flowers have visible ridges running outward from the center.
One way to suggest this texture is to work selected stitches through particular loops or add subtle surface crochet lines.
You can also introduce darker pink yarn near the petal bases.
Keep the color transition relatively soft.
The darkest area should remain close to the flower’s center, while the outer petals appear lighter.
This contrast helps emphasize the depth of the blossom.
Step 5: Crochet the Hibiscus Stamen
The raised central stamen is one of the most distinctive features of a hibiscus.
Begin with pink yarn and crochet a narrow cord or compact tube.
Make it long enough to extend visibly beyond the petal center.
Add small yellow decorative stitch clusters near its upper section.
Use coral or darker pink yarn to create additional tiny rounded details near the tip.
The result should resemble a slender central filament with a cluster of small stamens and stigma details.
Keep this component lightweight so it doesn’t pull the flower out of shape.
Step 6: Attach the Stamen
Position the completed stamen in the center of the flower.
Use a yarn needle to secure its base.
Make several small attachment stitches to stabilize the central structure.
Check the flower from the front and side.
The stamen should project outward while remaining centered between the petals.
Adjust its angle before completing the final stitches.
Step 7: Crochet the Green Hibiscus Leaves
The photographed arrangement includes large pointed leaves with pronounced surface texture.
Begin each leaf with a foundation chain.
Work along one side using shorter stitches near the tip and taller stitches toward the middle.
Continue around the opposite side to create a broad oval shape with a pointed end.
For extra definition, add a raised center vein with surface slip stitches.
You can also experiment with subtle shaping along the edges.
Make leaves in several sizes to complement the flowers.
Step 8: Make the Pink Flower Buds
Small closed buds make the arrangement appear more botanical.
Begin with pink yarn and a magic ring.
Work compact rounds, increasing gradually to create a rounded shape.
Continue with even rounds before decreasing to close the bud.
Add a little stuffing if you want a firmer form.
Crochet several small green sepals and attach them around the base.
These green sections help frame the pink bud.
Step 9: Assemble the Tropical Arrangement
Lay the finished components on a flat surface.
Position the largest hibiscus flower as the main focal point.
Arrange the second flower slightly lower or to one side.
Place the green leaves behind and around the blossoms.
Add one or two buds to introduce variety.
If you’re making a bouquet, connect the flowers to suitable stems.
Secure every element and inspect the arrangement from multiple angles.
Sizing, Colors, and Yarn Substitution Tips
Crochet hibiscus flowers can be adapted for a variety of decorative projects.
Small flowers work well as appliqués, while larger blossoms are attractive in bouquets.
Adjusting Flower Size
Use finer yarn and a smaller hook for delicate flowers.
Thicker yarn creates larger petals and a more substantial appearance.
You can also change the number of shaping rows within each petal.
Remember that bigger petals require a proportionate center.
Make a sample petal before producing the entire flower.
Beautiful Hibiscus Color Combinations
The reference uses light pink and coral tones, but hibiscus flowers come in many striking colors.
Try these combinations:
- Coral pink with yellow details
- Bright red with a deeper red center
- Peach and soft orange
- Cream with a rosy pink throat
- Lavender and dusty purple
- Golden yellow with coral accents
Choose colors with enough contrast to emphasize the center.
Choosing Substitute Yarn
Different yarn fibers can change the finished flower’s appearance.
Cotton produces structured petals with clear stitches.
Acrylic gives a softer finish.
When substituting yarn, check the gauge and adjust your hook size if necessary.
Avoid combining dramatically different yarn thicknesses unless you want a contrasting texture.
Common Crochet Hibiscus Mistakes to Avoid
Dimensional flowers require attention to shaping and assembly.
Uneven Petal Sizes
Inconsistent tension may cause some petals to appear larger than others.
Use the same stitch sequence for matching petals.
Compare their shapes as you work.
Petals That Curl Too Much
Very tight stitches can cause excessive curling.
Try relaxing your tension or adjusting the number of shaping stitches.
Some natural curvature is desirable, but the petals should remain recognizable.
A Stamen That Falls Forward
A long or heavy central structure may bend.
Use a firm crochet cord and secure its base carefully.
For larger decorative flowers, a properly finished internal support may help.
Leaves That Overwhelm the Flowers
Very large leaves can distract from the hibiscus blossoms.
Begin with fewer leaves and arrange them behind the petals.
Add more only where needed to balance the design.
Finishing, Blocking, and Care Instructions
Finishing makes a noticeable difference to the overall appearance of handmade flowers.
Weave in loose yarn tails carefully.
Gently shape each petal and check the position of the stamen.
Make sure all buds and leaves are securely attached.
Should You Block Crochet Hibiscus Petals?
Light blocking can help refine individual petal shapes.
However, avoid flattening the flower’s center.
Follow your yarn manufacturer’s instructions before using moisture or heat.
For highly dimensional flowers, gentle hand shaping may be sufficient.
Cleaning and Storage
Remove dust using a soft brush.
Spot clean with a suitable damp cloth when necessary.
Avoid soaking flowers containing internal supports.
Allow damp areas to dry completely.
Store the flowers in a roomy container to prevent the petals from becoming compressed.
Creative Variations and Tropical Styling Ideas
Crochet hibiscus flowers can be incorporated into many handmade projects.
Tropical Hibiscus Bouquet
Combine several hibiscus flowers in coral, pink, and yellow.
Add large green leaves and smaller flower buds.
Display the finished bouquet in a decorative vase.
Crochet Hibiscus Garland
Create several smaller flowers.
Attach them along a green crochet cord.
Use the garland for a tropical-themed wall display or seasonal decoration.
Hibiscus Bag Decoration
Make a compact hibiscus flower using lightweight yarn.
Attach it securely to a handmade crochet bag.
Choose colors that complement the bag’s fabric.
Gifting, Selling, and Display Ideas
A handmade crochet hibiscus makes a thoughtful gift for anyone who enjoys tropical flowers or botanical decorations.
The blossoms can be displayed individually or arranged into bouquets.
For gifting, protect the petals with loose tissue paper.
If selling finished flowers, provide accurate dimensions, materials, and care instructions.
Use clear photographs showing the flower from the front and side.
Keep decorative stems and small detachable components out of reach of young children.
Frequently Asked Questions
Is This Crochet Hibiscus Flower Pattern Beginner Friendly?
The basic stitches are accessible to beginners, but shaping five curved petals and constructing the raised stamen require additional practice. Confident beginners can start with a simplified flower before attempting the detailed version with textured leaves and buds.
What Yarn Is Best for Crochet Hibiscus Flowers?
Smooth cotton yarn is useful for well-defined petals and structured flowers. Acrylic creates softer blossoms. Choose a yarn that maintains its shape without feeling overly stiff, and test your preferred hook size before beginning the full flower.
How Many Petals Does a Crochet Hibiscus Need?
The photographed hibiscus has five prominent petals, matching the common five-petal structure of many hibiscus flowers. You can create a similar appearance by arranging five broad petals around a central foundation and allowing their edges to overlap slightly.
Can I Make Crochet Hibiscus Flowers Without Wire?
Yes. A soft decorative flower can be made entirely from yarn. For appliqués and flat decorations, wire is unnecessary. Larger freestanding flowers may benefit from reinforced stems or other suitable supports, depending on their size and weight.
Can I Use Crochet Hibiscus Flowers for Home Decor?
Absolutely. Crochet hibiscus flowers work beautifully in bouquets, wreaths, garlands, and decorative displays. Their tropical appearance makes them especially appealing for summer-themed rooms, craft spaces, and handmade gifts.
Create Your Own Crochet Hibiscus Flower Pattern
A crochet hibiscus flower pattern is a beautiful way to explore dimensional petals, tropical colors, and botanical crochet techniques.
The combination of softly curved pink petals, delicate yellow stamen details, and textured green leaves creates an eye-catching handmade flower inspired by nature.
Begin with a single blossom, practice shaping the petals, and gradually add leaves and decorative buds.
With careful assembly and thoughtful color choices, you can create a lovely tropical arrangement for your home or a meaningful handmade gift.
Save this crochet hibiscus flower pattern idea and enjoy bringing a little tropical charm into your next crochet project!