Crochet Hanging Flower Basket Pattern for Home Decor
A beautiful crochet hanging flower basket can instantly transform an ordinary shelf, window, or cozy corner into a charming handmade display. With delicate pink...
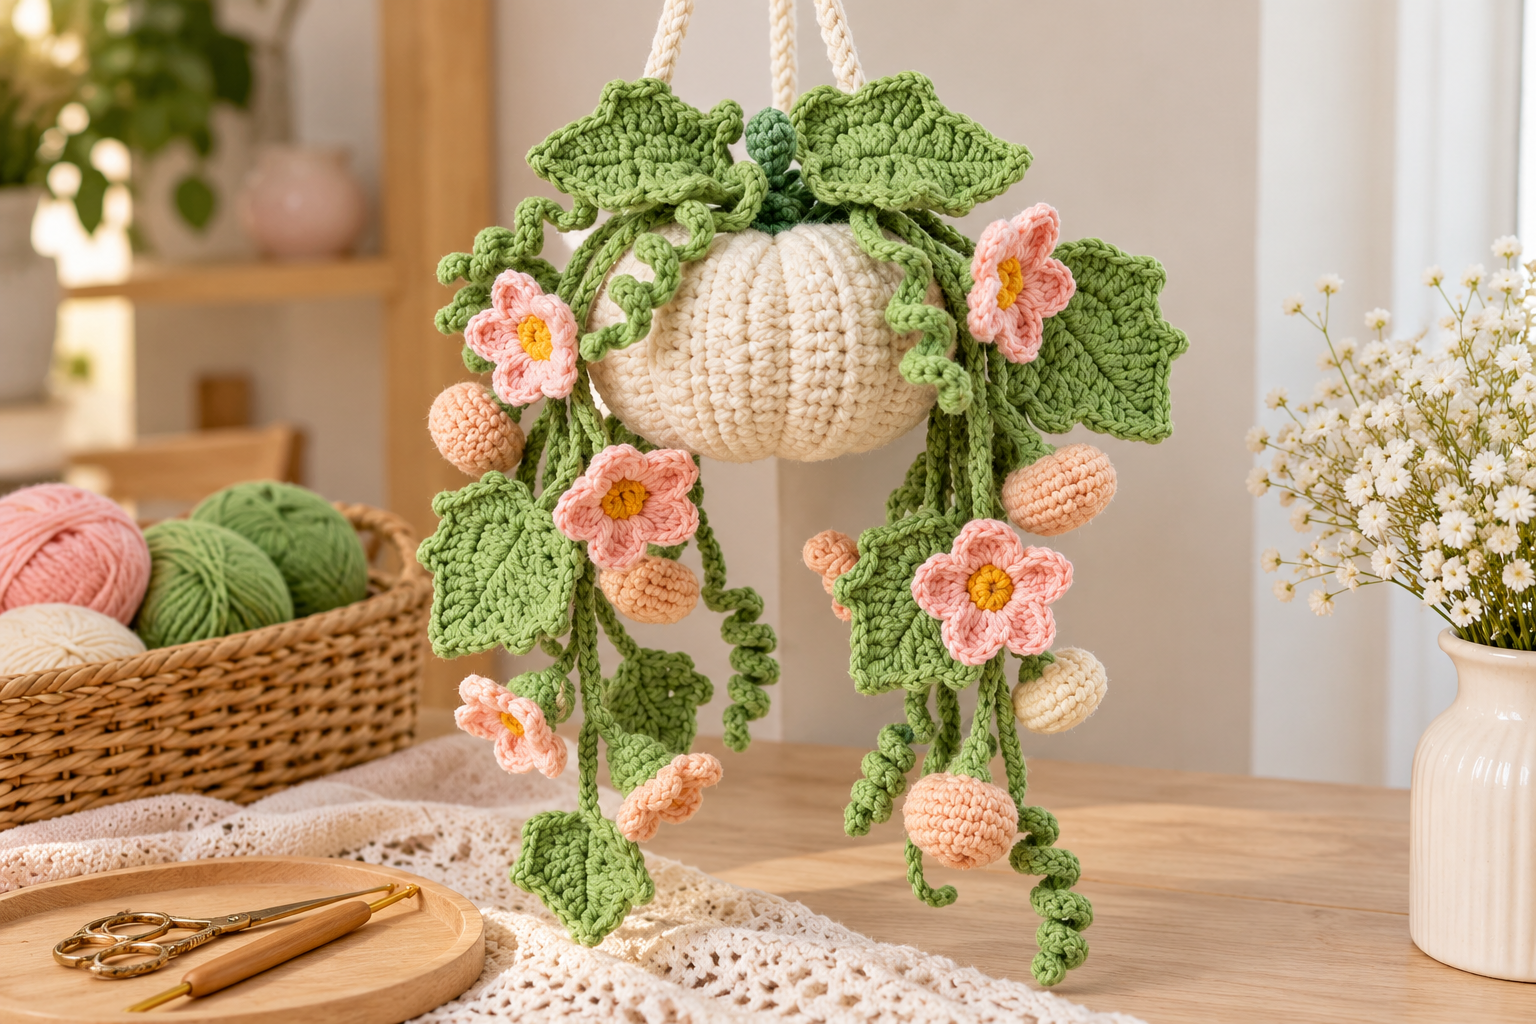
A beautiful crochet hanging flower basket can instantly transform an ordinary shelf, window, or cozy corner into a charming handmade display. With delicate pink flowers, soft green leaves, and gracefully cascading vines, this project brings the beauty of a little indoor garden into your home without needing real plants.
This crochet hanging flower basket pattern is inspired by a lovely design featuring a cream-colored, ribbed basket, a braided hanging cord, peach-colored buds, and pretty pink blossoms with golden yellow centers.
The combination of dimensional stitches and natural-looking floral details creates a sweet cottagecore aesthetic that looks especially lovely in bedrooms, craft rooms, and bright living spaces.
In this tutorial, you’ll learn how to approach the basket construction, create decorative crochet flowers and leaves, assemble trailing vines, and finish a hanging arrangement.
The instructions are adaptable, so you can personalize the dimensions, colors, and flower placement to create your own handmade decoration.
What Is a Crochet Hanging Flower Basket?
A crochet hanging flower basket is a decorative project combining a crocheted container with handmade flowers, foliage, and hanging stems.
Unlike traditional flower baskets, this arrangement can be made entirely from yarn.
The featured design has a rounded cream-colored body with raised vertical ribs, giving the basket a soft, sculptural appearance.
Above the basket are green crochet leaves, while delicate vines extend downward on both sides.
The arrangement includes light pink five-petal flowers, golden yellow centers, and small peach-colored buds.
Why Crochet Hanging Flowers Are Popular
Crochet hanging flowers are a wonderful choice for anyone who enjoys handmade home accessories.
They combine the appearance of botanical decorations with the satisfying texture of crochet stitches.
These floral arrangements offer several advantages:
- No watering or regular plant maintenance
- Customizable colors and flower shapes
- Attractive displays for small spaces
- Opportunities to use leftover yarn
- Unique handmade gifts
- Decorative pieces that can be enjoyed throughout the year
You can also create matching decorations using the same flower and leaf motifs.
A coordinated set might include a hanging basket, floral garland, and small crochet bouquet.
Crochet Hanging Flower Basket Skill Level and Time
This project is most suitable for confident beginners and intermediate crocheters.
Although many individual components are simple, the finished arrangement involves several techniques and careful assembly.
You should be comfortable with basic crochet stitches, working in rounds, increasing, decreasing, and sewing pieces together.
How Long Does It Take?
The time required depends on the size of your basket and the number of decorative elements.
A simplified version with a few flowers may be completed over several crafting sessions.
A fuller basket featuring multiple vines, leaves, flowers, and buds will take longer.
Working on the project in stages makes it easier to maintain consistent results.
You can crochet the basket first, prepare the leaves and flowers next, and save the final assembly for a separate session.
Materials Needed for a Crochet Hanging Flower Basket
Choosing suitable materials makes the project easier and helps the finished arrangement maintain its shape.
The reference design has a soft, chunky appearance with clearly visible crochet stitches.
Medium-weight cotton or acrylic yarn is a practical starting option.
Yarn and Supplies
- Cream or ivory yarn for the basket
- Light green yarn for leaves and vines
- Soft pink yarn for the flowers
- Peach-colored yarn for decorative buds
- Yellow yarn for flower centers
- Crochet hook suited to your chosen yarn
- Stitch markers
- Yarn needle
- Scissors
- Measuring tape
- Small amount of polyester fiberfill
- Optional lightweight basket support
- Removable stitch clips for assembly
For the hanging strap, use sturdy yarn or a firmly crocheted cord.
Avoid loose, stretchy cords that may lengthen significantly when the basket is suspended.
Choosing the Right Crochet Hook
The correct hook size depends on your yarn and personal tension.
A smaller hook generally creates firmer stitches, which can be useful for structural pieces.
A slightly larger hook may produce softer petals and flowing leaves.
Experiment with a small test swatch before committing to the complete project.
Crochet Stitches and Abbreviations
This crochet flower basket uses familiar techniques that can be adapted to different flower styles.
All abbreviations follow US crochet terminology.
| Abbreviation | Meaning |
|---|---|
| ch | Chain |
| sc | Single crochet |
| hdc | Half double crochet |
| dc | Double crochet |
| tr | Treble crochet |
| sl st | Slip stitch |
| inc | Increase |
| dec | Decrease |
| BLO | Back loop only |
| st | Stitch |
| FO | Fasten off |
Important Techniques to Practice
Working into the back loops can create the raised texture seen on the cream basket.
Increasing helps shape the rounded body, while decreasing creates smaller flower buds.
Basic chains and slip stitches are useful for building green stems.
For the flowers, combinations of taller stitches can form gently curved petals.
How to Crochet a Hanging Flower Basket Step by Step
This crochet hanging flower basket pattern guide breaks the project into separate components.
Since exact stitch counts cannot be determined from a finished photograph, use the following construction method as a flexible starting point.
Check your gauge regularly and adjust the number of rounds to achieve your desired proportions.
Step 1: Crochet the Cream Basket Base
- Create a magic ring using cream yarn.
- Work single crochet stitches into the ring.
- Increase evenly in consecutive rounds to widen the base.
- Continue until the base reaches the width you want.
- Begin shaping the sides by working fewer increases.
- Work selected rounds through the back loops to introduce texture.
- Continue shaping until the basket has a rounded appearance.
- Finish the upper edge neatly.
To achieve a more pronounced ribbed effect, you can experiment with raised stitches or a separately crocheted textured covering.
The important goal is to produce a firm, lightweight basket that can support the decorative yarn pieces.
Step 2: Create the Hanging Cord
The reference basket features a cream-colored braided hanging strap.
You can recreate this look with a sturdy crochet cord or braided yarn strands.
Make the strap long enough to form a comfortable loop above the basket.
Attach each end securely near the upper edges.
Check that the basket remains level when suspended.
If one side hangs lower, adjust the strap before adding the flowers.
Step 3: Crochet the Green Leaves
The green leaves are among the most recognizable details of this design.
Begin with a foundation chain and work stitches along both sides.
Use shorter stitches near the pointed ends and taller stitches near the center.
This creates an elongated leaf shape.
For a slightly scalloped edge, add small decorative stitch groups around the outline.
Make several leaves in different sizes.
Large leaves can frame the top of the basket, while smaller leaves look lovely along the hanging vines.
Step 4: Make the Crochet Flower Vines
Create long green chains to serve as the main hanging stems.
Work slip stitches back along the chains for additional strength.
At selected points, add smaller branches to hold individual leaves and flowers.
The arrangement will look more natural when the vines have different lengths.
Some stems can hang close to the basket, while others extend much farther downward.
Avoid overcrowding the vines at this stage.
You’ll have more control over their appearance after attaching the blossoms.
Step 5: Crochet the Pink Flowers
The reference design features soft pink flowers with rounded petals and yellow centers.
Begin each flower with a small yellow center.
You can use a magic ring or join a short chain into a circle.
Attach pink yarn and create petals around the center.
A combination of half double crochet and double crochet stitches can produce gently rounded petals.
Repeat the petal structure evenly around the center.
For fuller flowers, add extra stitches within each petal group.
Fasten off and leave a yarn tail for attaching the flower to a stem.
Step 6: Crochet the Peach Flower Buds
Small peach-colored buds add depth and variety to the hanging arrangement.
Start with a magic ring and crochet a compact circular base.
Increase gradually to create a rounded shape.
Continue working even rounds until the bud reaches your preferred size.
Begin decreasing to close the shape, adding a little fiberfill if needed.
Attach a short green stem or small leaf near the top.
Make several buds in slightly different sizes to avoid an overly uniform appearance.
Step 7: Assemble the Flower Basket
Arrange the completed elements before permanently attaching them.
Position the larger green leaves around the top of the cream basket.
Next, attach the trailing vines at different points along the upper edge.
Sew the pink flowers and peach buds onto the stems.
Alternate blossoms and leaves to create visual balance.
Finally, inspect the entire arrangement from the front and sides.
Make adjustments until the vines hang comfortably and the flowers remain visible.
Sizing and Yarn Substitution Tips
One of the advantages of crochet home decorations is the ability to customize their dimensions.
A miniature hanging basket can decorate a small shelf, while a larger arrangement creates a beautiful focal point.
Adjusting the Basket Size
To create a wider basket, continue increasing the base gradually.
For a taller basket, add additional rounds to the sides.
If you want a compact version, stop increasing earlier and use shorter vines.
Always consider the relationship between basket size and flower size.
Oversized flowers on a tiny basket may appear crowded, while very small flowers can disappear against a large container.
Choosing Different Yarn Weights
Lightweight yarn creates delicate flowers and finer leaves.
Medium-weight yarn offers a useful balance of texture and structure.
Bulky yarn can create oversized blossoms, but it may make the hanging arrangement heavier.
When substituting yarn, crochet a small sample and check how the stitches behave.
Common Mistakes and How to Avoid Them
A few simple adjustments can make your finished hanging flower basket look neater and more balanced.
Uneven Basket Shape
Incorrect increases or inconsistent tension may cause the basket to ripple or curve unevenly.
Use stitch markers to identify round beginnings.
Check the shape regularly rather than waiting until the entire basket is finished.
Loose Flower Attachments
Flowers attached with only one loose stitch can twist or fall forward.
Use the yarn tails to secure each flower at multiple points when appropriate.
Keep the attachment firm without flattening the petals.
Overcrowded Vines
Too many flowers in one area can hide the leaf details.
Spread your blossoms across different stems.
Leave small spaces between the decorative elements to create a lighter appearance.
Stretching Hanging Cords
Soft yarn cords may stretch under the weight of the arrangement.
Use a firm crochet technique and reinforce the attachment points.
Test the finished basket in a safe location before displaying it permanently.
Finishing, Blocking, and Care Instructions
Once assembly is complete, spend some time shaping the individual flowers and leaves.
Gently arrange the petals with your fingers.
Straighten twisted stems and spread the leaves so their shapes remain visible.
Should You Block the Flowers?
Light blocking can help refine the shape of flat leaves.
However, dimensional flowers should not be pressed completely flat.
Check the yarn care instructions before applying moisture or heat.
Cleaning Crochet Home Decor
Dust the arrangement gently with a soft brush.
If necessary, spot clean with a damp cloth suitable for the yarn.
Avoid soaking decorative pieces containing stuffing or internal supports.
Allow any damp areas to dry completely before hanging the basket again.
Creative Variations and Styling Ideas
The original cream, pink, peach, and green color combination creates a soft botanical appearance.
You can adapt the design to match different decorating styles.
Pastel Cottagecore Basket
Use dusty pink blossoms, pale green leaves, and an ivory basket.
Add a few lavender flowers for extra color.
This combination looks especially pretty against light wooden furniture.
Colorful Spring Flower Basket
Experiment with yellow, coral, lavender, and white blossoms.
Choose fresh green yarn for the vines and leaves.
Mixing several flower colors creates a cheerful seasonal decoration.
Minimalist Neutral Basket
For understated decor, use cream flowers and muted sage leaves.
Keep the vines shorter and use fewer blossoms.
The result is a simple arrangement that suits neutral interiors.
Gifting, Selling, and Displaying Your Finished Basket
A handmade crochet hanging flower basket makes a thoughtful gift for friends who enjoy flowers and home decorations.
It can be displayed on a wall hook, shelf support, or other suitable decorative fixture.
For gifting, wrap the flowers loosely to protect their shape.
Include a small care note explaining how to dust and reshape the arrangement.
If you sell finished pieces, provide accurate measurements and material descriptions.
Check any pattern licensing terms if you are using someone else’s written instructions.
Always use secure hanging hardware and keep long yarn cords away from young children and pets.
Frequently Asked Questions
Is a Crochet Hanging Flower Basket Beginner Friendly?
Individual flowers and leaves can be beginner-friendly, especially if you already know basic stitches. Constructing the basket and attaching several vines takes more practice. Start with a few simple flowers before making a larger arrangement.
What Yarn Is Best for Crochet Hanging Flowers?
Cotton and acrylic yarn are both suitable choices. Cotton offers defined stitches and firmer shapes, while acrylic provides a softer appearance. Choose a yarn weight that works well with your preferred hook and desired flower size.
Can I Make the Basket Without the Flowers?
Yes. The cream basket can be used as a decorative piece on its own. You can also add different crochet motifs, such as daisies, roses, or seasonal leaves, to create a customized hanging decoration.
How Can I Make Crochet Leaves Look More Realistic?
Vary the size and shape of your leaves. Use taller stitches near the middle and shorter stitches toward the ends. Slightly curved stems and leaves positioned at different angles can make the arrangement appear more natural.
Can I Hang This Crochet Basket Near a Window?
Yes, provided the hanging fixture is secure and the basket does not interfere with the window. Avoid prolonged direct sunlight because some yarn colors may fade. Keep the arrangement clear of opening windows, heaters, and potential snagging hazards.
Make Your Own Crochet Hanging Flower Basket Pattern
This crochet hanging flower basket pattern offers a lovely way to combine textured crochet, delicate flowers, and trailing greenery in one handmade decoration.
The cream ribbed basket creates a charming foundation, while soft pink flowers, peach buds, and green leaves bring the entire design to life.
Take your time with each component and enjoy experimenting with different flower arrangements.
Once completed, your crochet hanging basket can become a beautiful addition to a cozy room or a thoughtful gift for someone special.
Save this project idea and start planning your own colorful crochet flower display!