Crochet Granny Square Cardigan – Free Colorful Floral Cardigan Pattern
Add color, texture, and personality to your handmade wardrobe with this beautiful crochet granny square cardigan pattern. Featuring rich plum-purple borders, mustard-yellow accents, soft...
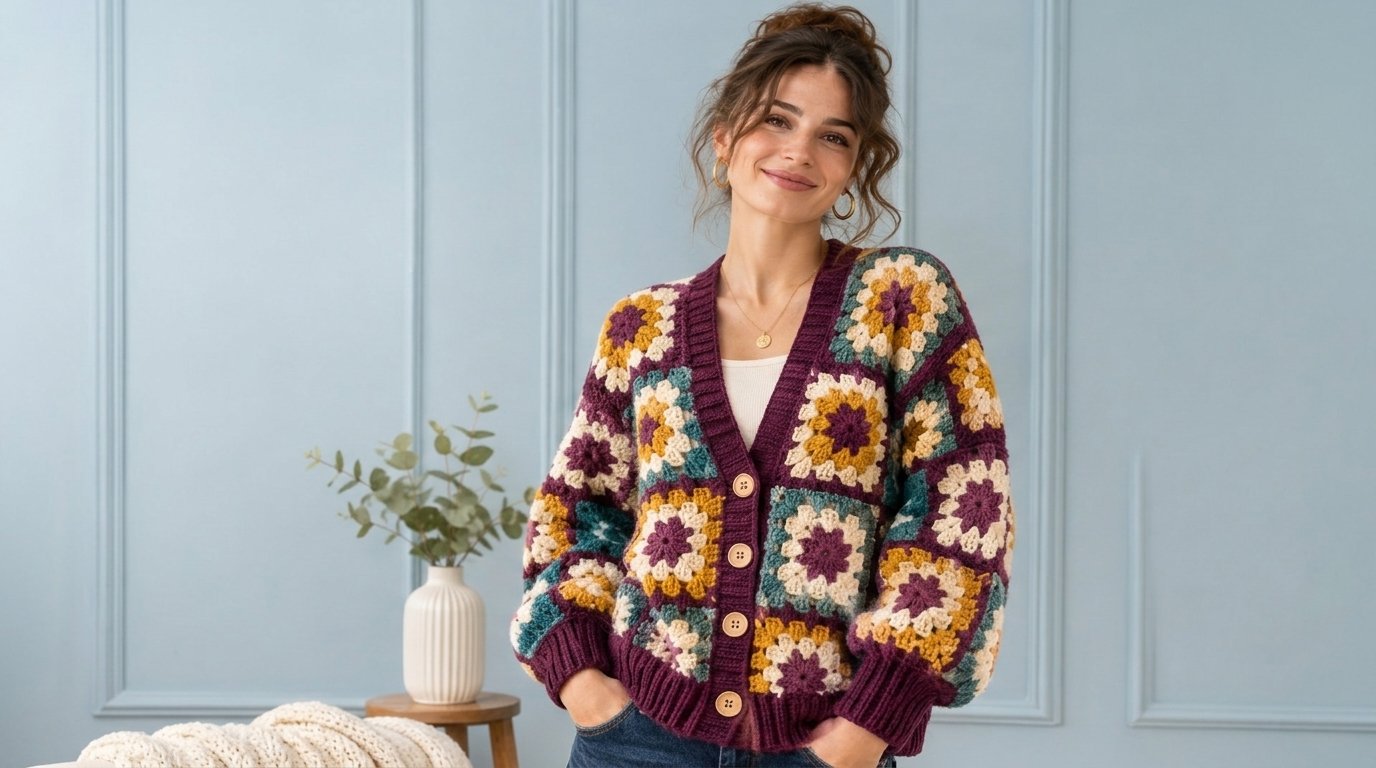
Add color, texture, and personality to your handmade wardrobe with this beautiful crochet granny square cardigan pattern. Featuring rich plum-purple borders, mustard-yellow accents, soft cream details, and muted teal floral motifs, this oversized crochet cardigan is a cozy statement piece that’s perfect for layering.
The combination of vintage-inspired granny squares, relaxed balloon sleeves, ribbed edges, and classic wooden buttons gives this cardigan a charming handmade appearance.
Whether you’re looking for a colorful sweater to wear during fall and winter or want to explore creative crochet clothing patterns, this project offers an enjoyable way to transform individual crochet squares into a wearable garment.
The design combines traditional granny square techniques with raised floral details for additional texture. Each square is made separately before being joined to create the body and sleeves.
In this free crochet cardigan tutorial, you’ll learn how to make the floral granny squares, arrange the colors, assemble the cardigan, create oversized sleeves, and add ribbed finishing details.
What Makes This Crochet Granny Square Cardigan Special?
The most eye-catching feature of this cardigan is its colorful floral granny square construction.
Instead of using plain granny squares, this design features flower-inspired centers surrounded by contrasting rounds of color.
Deep plum-purple flowers form the centers of many squares, while mustard yellow, cream, and teal stitches create beautiful geometric patterns around them.
The dark plum borders connect the individual squares visually, giving the cardigan a coordinated appearance despite its varied colors.
The cardigan also features oversized sleeves that create a comfortable, relaxed silhouette.
Ribbed cuffs, a matching hem, and a wide front button band give the garment a more structured finish.
Four wooden buttons complete the vintage-inspired look.
The finished cardigan works beautifully with jeans, simple tops, and casual everyday outfits.
Why You’ll Love This Crochet Project
There are several reasons to make this colorful crochet granny square cardigan.
- Beautiful floral details: Raised flower centers add texture and personality to classic granny squares.
- Colorful vintage-inspired appearance: Plum, mustard, cream, and teal create a distinctive color combination.
- Relaxed oversized fit: The loose body and roomy sleeves make the cardigan comfortable for layering.
- Modular construction: Individual granny squares can be completed during short crochet sessions.
- Customizable sizing: Adjust the size of the squares or add extra motifs to change the finished dimensions.
- Practical button closure: Wooden buttons make the cardigan functional as well as decorative.
- Great scrap-yarn project: Smaller amounts of coordinating yarn can be incorporated into the flower motifs.
This project is also an excellent opportunity to practice joining techniques, garment construction, and crochet ribbing.
Project Overview
| Project Detail | Description |
|---|---|
| Skill level | Intermediate |
| Crochet terminology | US terms |
| Yarn weight | Worsted Weight #4 |
| Recommended hook | 5 mm or 5.5 mm |
| Ribbing hook | 4.5 mm |
| Construction | Individual granny squares |
| Main design | Floral granny squares |
| Fit | Relaxed and oversized |
| Sleeves | Wide balloon-style sleeves |
| Closure | Four wooden buttons |
| Sample motif count | 56 granny squares |
| Estimated working time | 30–45 hours |
This is an original, untested pattern designed to recreate the overall style of the pictured cardigan. Sizing, yardage, and completion times are estimates. Make a sample square, measure it after blocking, and adjust the layout before committing to the full garment.
Materials and Supplies Needed
Gather your materials before beginning the cardigan.
Yarn Colors
Choose soft worsted-weight yarn in the following colors:
Color A – Deep Plum Purple
Used for floral centers, granny square borders, front button bands, cuffs, and hem.
Color B – Mustard Yellow
Creates warm decorative rounds within the floral squares.
Color C – Cream or Ivory
Provides contrast between the darker floral colors.
Color D – Muted Teal
Adds a complementary botanical-inspired color.
Additional Supplies
- 5 mm or 5.5 mm crochet hook
- 4.5 mm hook for ribbing
- Yarn needle
- Scissors
- Stitch markers
- Measuring tape
- Four wooden buttons, approximately 0.75–1 inch
- Blocking mat
- Rustproof pins
For the sample 56-square layout, approximately 1,800–2,500 yards of worsted-weight yarn is a starting estimate.
The actual amount depends on the size of your squares, yarn type, stitch tension, and garment dimensions.
Purchase additional yarn if you’re planning a longer cardigan or larger size.
Best Yarn and Hook Recommendations
Yarn choice plays an important role in how your finished crochet cardigan looks and feels.
A soft worsted-weight acrylic or wool-blend yarn is a good option for this design.
Acrylic Yarn
Acrylic yarn is widely available, budget-friendly, and often easy to care for.
It’s particularly useful for colorful granny square garments because you can find many coordinating shades.
Wool Blends
A wool-acrylic blend can create a warmer cardigan with a comfortable texture.
Cotton Blends
Cotton blends may provide sharper stitch definition, although the finished cardigan can become heavier.
For the best results, choose yarns with similar thickness and fiber characteristics.
Using different yarn weights within the same garment can cause uneven squares.
Start with a 5 mm crochet hook for the granny squares and a 4.5 mm hook for the ribbed details.
Adjust your hook size until your squares have the measurements and flexibility you want.
Skill Level and Estimated Size
This cardigan is best suited to intermediate crocheters or confident beginners who have already completed basic granny square projects.
The individual motifs use familiar stitches, but assembling a wearable cardigan requires additional attention to measurements, joining, and finishing.
Suggested Finished Measurements
The sample construction uses eight granny-square widths around the chest and four square heights for the body.
| Blocked Square Width | Approx. Finished Chest | Body Length Before Ribbing |
|---|---|---|
| 5 inches | 40 inches | 20 inches |
| 5.5 inches | 44 inches | 22 inches |
| 6 inches | 48 inches | 24 inches |
| 6.5 inches | 52 inches | 26 inches |
| 7 inches | 56 inches | 28 inches |
These figures assume minimal width loss at the seams. Final measurements will vary with joining, blocking, and ribbing.
For an oversized fit, choose a finished chest measurement approximately 6–12 inches larger than your actual bust measurement.
Measure an existing cardigan that fits the way you like and use it as a reference.
The pattern instructions below use approximately 6-inch squares as a sample, but you can adjust the size to suit your measurements.
Crochet Stitches and Techniques Used
This pattern uses standard US crochet terminology.
| Abbreviation | Meaning |
|---|---|
| ch | Chain |
| sc | Single crochet |
| hdc | Half double crochet |
| dc | Double crochet |
| sl st | Slip stitch |
| MR | Magic ring |
| BLO | Back loop only |
| st(s) | Stitch(es) |
| sp | Space |
| rep | Repeat |
| rnd | Round |
Granny Cluster
A granny cluster consists of three double crochet stitches worked into the same space.
Corner Cluster
A corner is formed by working:
3 dc, ch 2, 3 dc
into the same corner space.
Crochet Ribbing
Ribbing is created by working single crochet stitches through the back loop only.
This produces flexible, raised ridges suitable for cuffs, hems, and button bands.
Preparation and Gauge Notes
Before beginning the full cardigan, crochet one complete granny square using your chosen yarn and hook.
Block the square gently and allow it to dry.
Measure its width and height.
For the sample cardigan, aim for an approximately 6 × 6-inch square.
If the square is too small, try a larger hook or add another granny-stitch round.
If it is too large, use a smaller hook or remove a nonessential outer round.
Remember that changing the number of rounds changes the square’s final appearance and color proportions.
All the squares used in one cardigan should have approximately the same dimensions.
Consistent square sizes will make assembly significantly easier.
Step-by-Step Crochet Granny Square Cardigan Pattern
The cardigan is constructed from floral granny squares arranged into separate body and sleeve sections.
For the sample layout, you’ll need:
- 16 squares for the back
- 8 squares for the left front
- 8 squares for the right front
- 12 squares for the first sleeve
- 12 squares for the second sleeve
Total: 56 squares
The body and sleeves use the same basic motif, making this a convenient project for batch crocheting.
Step 1: Crochet the Flower Center
Using Color A, deep plum purple, make a magic ring.
Round 1: Ch 1 and work 8 sc into the magic ring.
Pull the ring tight and join with a sl st to the first sc. (8 sts)
Round 2: In each of the eight stitches, work:
Sl st, ch 2, 3 dc, ch 2, sl st.
Work the entire sequence into the same stitch before moving to the next.
Repeat around to create eight raised petals.
Fasten off.
You should now have a small, dimensional plum-colored flower.
The raised petals provide the textured floral centers seen throughout the cardigan.
Step 2: Turn the Flower into a Granny Square
Join Color B, mustard yellow, in the gap between two petals, working at their bases.
You will use the eight spaces between the flower petals as your attachment points.
Round 3: Flower-to-Square Round
In the first gap, work:
3 dc, ch 2, 3 dc.
This forms the first corner.
Ch 1.
Work 3 dc into the next gap.
Ch 1.
In the following gap, work another corner:
3 dc, ch 2, 3 dc.
Continue around, alternating a corner in every other gap with a regular granny cluster in the remaining gaps.
Ch 1 between groups and join to the first dc.
You should now have four corners and four side clusters.
The flower has been transformed into a square foundation.
Step 3: Add the Cream Granny Round
Join Color C, cream, in any corner space.
Work:
3 dc, ch 2, 3 dc
into the corner.
Ch 1.
Work 3 dc into each chain-1 space along the next side, placing a chain-1 between adjacent clusters.
When you reach the next corner, work:
3 dc, ch 2, 3 dc.
Repeat around all four sides.
Join with a sl st and fasten off.
The cream round provides contrast and highlights the flower center.
Step 4: Add the Teal and Plum Rounds
Join Color D, muted teal.
Repeat the traditional granny square round:
- Work corner clusters in each corner space.
- Work three double crochets into each side chain-1 space.
- Place a chain-1 between neighboring clusters.
Join and fasten off.
For the next round, join Color A, plum purple, and repeat the granny square construction.
Continue with additional granny-stitch rounds if needed until your square measures approximately 6 inches after blocking.
Finish each motif with a plum-purple outer round.
This consistent border color makes joining easier and creates a coordinated look throughout the cardigan.
Step 5: Make All the Granny Squares
Continue crocheting until you have 56 squares for the sample cardigan.
To keep the cardigan visually interesting, vary the order of the mustard, cream, and teal rounds on selected squares.
For example, you can create:
Variation One: Plum flower, mustard, cream, teal, plum border.
Variation Two: Plum flower, cream, mustard, teal, plum border.
Variation Three: Plum flower, teal, cream, mustard, plum border.
Keep the same total number of rounds and the same square dimensions.
Lay the finished motifs on a flat surface and arrange them into a balanced color pattern.
Avoid placing too many identical squares directly next to one another.
Step 6: Assemble the Back Panel
The sample back panel uses 16 granny squares.
Arrange them in a grid of four squares across and four squares down.
Check that the colors are distributed evenly.
Join the squares using your preferred method.
A mattress-stitch seam creates a relatively flat finish, while a single crochet join creates a more visible textured line.
For this cardigan, use plum yarn to create coordinating seams.
First join the squares into horizontal rows.
Then join the rows together to complete the back panel.
Weave in loose ends as you work.
Step 7: Make the Front Panels
Each front panel uses eight squares.
Arrange two squares across and four squares down.
Make two identical-sized panels.
Try to balance the colors so that the left and right front panels complement each other.
Join the squares using the same technique as the back panel.
Place the finished front panels beside the back panel.
The cardigan should now have three separate body sections:
- One wide back panel
- One narrow left front panel
- One narrow right front panel
Step 8: Join the Shoulders and Body
Lay the cardigan pieces flat with the right sides facing inward.
Position the left and right front panels over the back panel, aligning their outer edges.
At each shoulder, sew from the outer edge inward for approximately one and a half square widths.
Leave the remaining inner neckline section open.
This creates a relaxed neckline suitable for the wide ribbed front band.
Next, sew the side seams.
Start at the bottom of the body and sew upward, stopping approximately two square heights below the shoulder seams.
These openings form the armholes.
Make sure both armholes have the same dimensions.
Step 9: Crochet the Balloon Sleeves
Each sleeve uses 12 granny squares.
Arrange the squares into a rectangle measuring four squares across and three squares down.
Join the squares into one large panel.
Fold the rectangle so the four-square-width edges wrap around to form the sleeve circumference.
Sew the long edges together, creating a tube with a wide upper opening.
Repeat for the second sleeve.
The wide sleeve construction creates a relaxed, balloon-inspired silhouette.
Before attaching the sleeves, try holding the sleeve tubes against the body armholes.
The sleeve opening should fit around the armhole without excessive stretching.
If necessary, adjust the number of motifs or use additional partial motifs for a more precise fit.
Step 10: Attach the Sleeves
Turn the cardigan inside out.
Position one sleeve inside its matching armhole with the right sides together.
Align the sleeve seam with the body side seam.
Pin the sleeve evenly around the opening.
Using plum yarn and a yarn needle, sew the sleeve to the body.
Work carefully through corresponding stitches so the attachment remains secure.
Repeat for the other sleeve.
Turn the cardigan right side out.
At this stage, the garment should resemble a loose, open-front cardigan with wide sleeves.
Step 11: Crochet the Ribbed Sleeve Cuffs
Use Color A, plum purple, and a 4.5 mm hook.
Ch 11.
Row 1: Sc in the second chain from the hook and across. (10 sts)
Row 2: Ch 1, turn, sc BLO across. (10 sts)
Repeat Row 2 until the strip is long enough to fit comfortably around your wrist.
Leave sufficient stretch to pull the cuff over your hand.
Join the short ends of the strip to form a loop.
Sew the cuff to the bottom of the sleeve, distributing the wider sleeve fabric evenly around the narrower opening.
This gathers the sleeve and creates the characteristic balloon shape.
Repeat for the second sleeve.
Step 12: Add the Ribbed Hem
Using plum yarn, ch 10.
Row 1: Sc in the second chain from the hook and across. (9 sts)
Row 2: Ch 1, turn, sc BLO across. (9 sts)
Repeat until the ribbed strip fits along the entire lower edge of the open cardigan.
Do not join the strip into a circle, because the cardigan opens at the front.
Sew the ribbing evenly along the lower body edge.
You can gather the fabric slightly for a more fitted hem or attach it without gathering for a straighter silhouette.
Step 13: Make the Front Button Bands
The front button bands create the polished plum-colored edges shown in the design.
Using plum yarn, ch 10.
Row 1: Sc in the second chain from the hook and across. (9 sts)
Row 2: Ch 1, turn, sc BLO across. (9 sts)
Continue making the first ribbed strip until it matches the length of the cardigan’s front opening.
Fasten off and sew it along one front edge.
For the second band, use the same technique but create four buttonholes at evenly spaced intervals.
On each selected buttonhole row, work:
3 sc, ch 2, skip 2 stitches, 4 sc.
On the following row, work two sc into the chain-2 space to restore the original stitch count.
Continue ribbing until the band reaches the correct length.
Attach it to the opposite front edge.
Add a coordinating ribbed strip around the remaining back-neck opening, joining it neatly to the tops of the front bands.
Step 14: Sew on the Wooden Buttons
Lay the cardigan flat with the button bands overlapping slightly.
Mark the four button positions.
Using strong matching yarn or sewing thread, attach the wooden buttons opposite the buttonholes.
Make sure each button is securely fastened.
Test the button closure before weaving in your final ends.
The buttons should pass through the holes comfortably without stretching the surrounding stitches excessively.
Assembly and Finishing
Once every component is attached, inspect the cardigan carefully.
Check that the shoulders and side seams are secure.
Make sure the sleeves are evenly attached and the cuffs sit comfortably around your wrists.
Trim loose yarn tails and weave in any remaining ends.
Blocking
Blocking helps the granny squares relax and gives the cardigan a more even appearance.
Follow the care instructions for your chosen yarn.
Gently dampen the garment if appropriate, then lay it flat on a clean blocking surface.
Arrange the squares so they sit evenly.
Avoid overstretching the ribbed bands or pulling the cardigan out of shape.
Allow it to dry completely before wearing.
Tips for a Beautiful Granny Square Cardigan
Block your squares before joining. Consistent square dimensions make garment assembly easier.
Use a coordinated color palette. Four complementary colors create visual interest without making the cardigan look too busy.
Keep your tension consistent. Uneven tension can cause squares to vary in size.
Plan the layout before sewing. Arrange all the squares on a flat surface and photograph your preferred composition.
Choose comfortable yarn. A cardigan should feel soft against your skin and allow easy movement.
Check your measurements frequently. Compare your panels with a cardigan that fits well.
Secure every button carefully. Strong button attachments help the closure withstand regular use.
Troubleshooting Common Crochet Mistakes
Why Are My Granny Squares Different Sizes?
Differences in tension, hook size, or stitch count can produce uneven motifs.
Check your stitch counts and block the squares before joining.
Why Does My Cardigan Feel Too Heavy?
Some yarns create denser, heavier fabric.
Choose a lighter worsted-weight yarn or use a slightly larger hook for more drape.
Why Are My Sleeves Too Wide?
The four-square sleeve circumference may be larger than you prefer.
Try smaller motifs or adjust the layout using partial squares.
Why Does the Front Band Curl?
The band may be too short, attached too tightly, or crocheted with uneven tension.
Remove it and adjust the length before sewing it back into place.
Why Are the Shoulder Seams Stretching?
Heavy crochet fabric can place stress on shoulder seams.
Use secure joins and avoid hanging the finished garment for long periods.
Creative Variations and Customization Ideas
This floral granny square cardigan offers endless opportunities for personalization.
Pastel Flower Cardigan
Use blush pink, lavender, cream, and sage green for a soft spring-inspired design.
Autumn Granny Square Cardigan
Combine rust orange, mustard yellow, chocolate brown, and olive green.
Neutral Vintage Cardigan
Choose cream, beige, taupe, and warm brown for a timeless look.
Cropped Granny Square Cardigan
Use fewer body rows to create a shorter silhouette that pairs beautifully with high-waisted jeans.
Long Oversized Cardigan
Add more granny square rows for a cozy, longer layering piece.
Minimalist Granny Square Cardigan
Replace the raised floral centers with classic granny square motifs.
Colorful Scrap-Yarn Cardigan
Use leftover yarn from previous projects while keeping the outer square borders consistent.
How to Style Your Crochet Granny Square Cardigan
A colorful granny square cardigan can become the main feature of a casual outfit.
Pair it with a plain white top and dark denim jeans to let the crochet colors stand out.
For a cozy fall outfit, wear it with a fitted turtleneck and ankle boots.
You can also style it over a simple dress for a playful, vintage-inspired look.
The plum-purple borders look particularly beautiful with dark denim, cream, beige, and earthy autumn colors.
For accessories, choose simple gold jewelry or a neutral handbag.
Because the cardigan already features strong colors and textures, keeping the rest of your outfit simple creates a balanced appearance.
Care and Washing Instructions
Proper care will help your handmade cardigan maintain its shape and texture.
Always follow the washing instructions for your chosen yarn.
For delicate or multicolored crochet garments, gentle handwashing is often a good option.
Use cool water and mild detergent.
Avoid scrubbing or twisting the fabric.
After washing, gently squeeze out excess water.
Roll the cardigan inside a clean towel to absorb moisture.
Lay it flat to dry, reshaping the granny squares and ribbed edges as needed.
Avoid hanging the cardigan while wet because the yarn’s weight may stretch the garment.
For storage, fold it neatly rather than leaving it on a hanger for extended periods.
Frequently Asked Questions
Is This Crochet Granny Square Cardigan Beginner-Friendly?
The individual granny squares are approachable for confident beginners. However, garment assembly, sleeve attachment, ribbing, and buttonhole construction make the complete cardigan better suited to intermediate crocheters.
How Many Granny Squares Do I Need?
The sample cardigan uses 56 squares: 32 for the body and 24 for the sleeves.
You can adjust the quantity to suit your desired size and construction.
What Yarn Is Best for a Granny Square Cardigan?
Soft worsted-weight acrylic, wool blends, or suitable cotton blends work well. Choose a yarn that feels comfortable and offers enough drape for clothing.
Can I Make This Cardigan Without Buttons?
Yes. Simply omit the buttonholes and wooden buttons to create an open-front cardigan.
Can I Make the Cardigan Longer?
Absolutely. Add another row of granny squares to the body sections before assembling the garment.
How Do I Make the Sleeves Less Oversized?
Use smaller squares or adjust the sleeve construction to reduce its circumference.
Make sure the upper sleeve opening still matches the armhole.
Can I Use Different Colors?
Yes. This pattern is easy to customize with your favorite colors, from soft pastels to bold jewel tones.
Should I Block the Granny Squares Before Joining?
Blocking is recommended because it helps the squares achieve consistent dimensions and makes the seams easier to align.
Conclusion
This crochet granny square cardigan pattern is a wonderful combination of vintage-inspired style, beautiful floral motifs, and comfortable handmade clothing.
The rich plum borders, mustard-yellow details, cream accents, and muted teal squares create a colorful garment that’s full of personality.
With its oversized sleeves, ribbed edges, and classic wooden buttons, the finished cardigan offers both cozy comfort and distinctive style.
Although the project requires time and patience, creating individual granny squares allows you to make steady progress at your own pace.
You can customize the colors, adjust the fit, and experiment with different motifs to make the cardigan uniquely yours.
Gather your favorite yarn colors, crochet your first flower granny square, and enjoy the process of creating a beautiful handmade cardigan.