Crochet Frog Amigurumi for Christmas
A crochet frog amigurumi for Christmas is an adorable handmade project that brings a playful touch to your holiday decorations. With its bright turquoise...
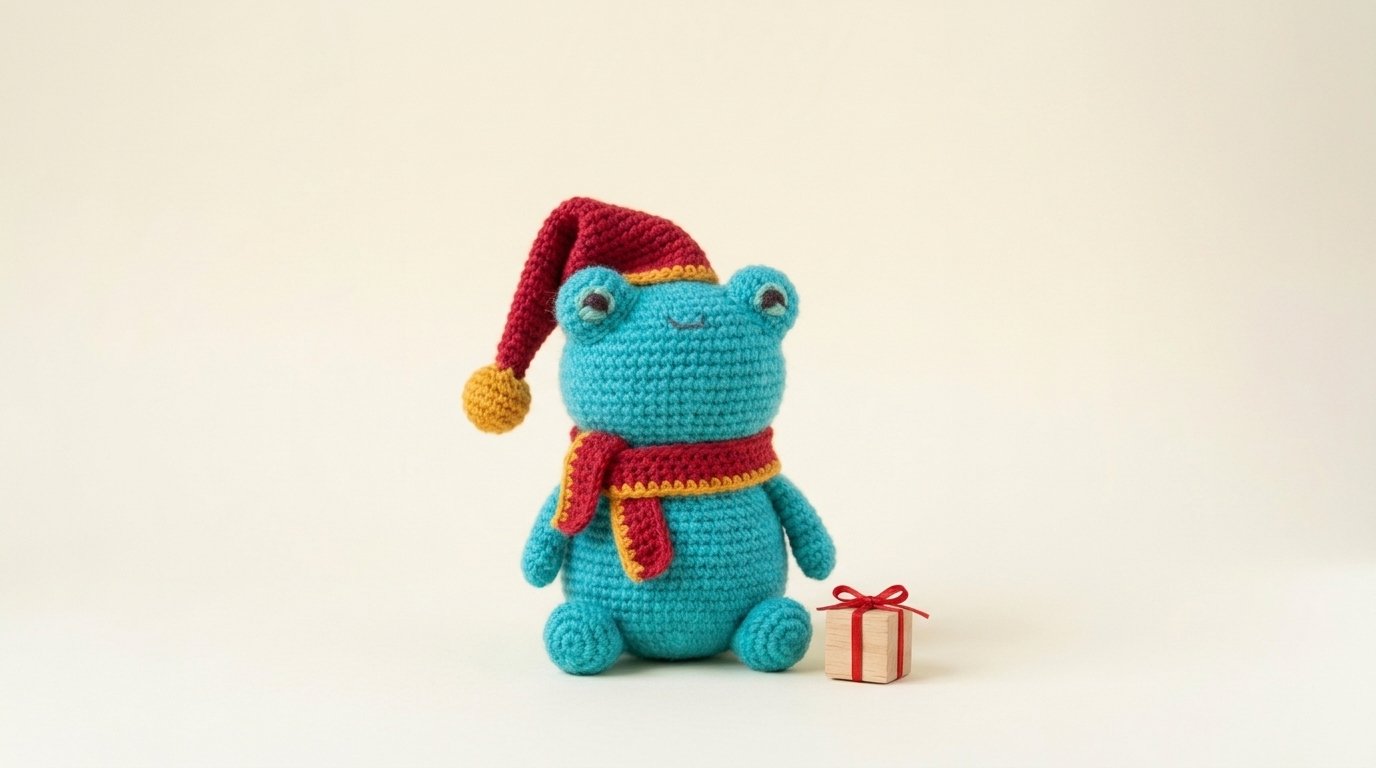
A crochet frog amigurumi for Christmas is an adorable handmade project that brings a playful touch to your holiday decorations. With its bright turquoise body, cheerful embroidered face, floppy red Santa hat, and cozy matching scarf, this little frog is ready to celebrate the festive season.
Unlike traditional green crochet frogs, this Christmas design features a vibrant blue-turquoise color that contrasts beautifully with the deep red accessories and golden-yellow details. Its rounded head, raised eyes, tiny arms, and soft feet give it a sweet, cuddly appearance.
This Christmas frog makes a lovely handmade gift, a cheerful addition to a holiday display, or a fun decoration for your craft room. The pattern uses basic amigurumi techniques and includes separate instructions for the frog, Santa hat, scarf, and finishing details.
What You Need for This Crochet Frog Amigurumi Pattern
Gather your yarn and supplies before beginning. Most of the project is worked in single crochet stitches, making it manageable for crocheters familiar with basic amigurumi construction.
Materials and Supplies
- Turquoise yarn: Worsted-weight cotton or acrylic yarn for the frog’s head, body, arms, legs, and raised eyes.
- Red yarn: Worsted-weight yarn in a rich Christmas red for the Santa hat and scarf.
- Golden-yellow yarn: A small amount for the hat pom-pom and decorative edging.
- Dark brown or black embroidery floss: For the frog’s sleepy eyes and smiling mouth.
- Pale mint-green yarn: For the lighter details beneath the eyes.
- Crochet hook: 3.5 mm (E/4), or the size needed to create tight stitches.
- Fiberfill stuffing: For shaping the frog and its accessories.
- Yarn needle: For sewing the pieces together.
- Stitch markers: For tracking rounds.
- Scissors: For trimming yarn ends.
- Straight pins: Optional, for positioning pieces before sewing.
Skill Level and Finished Size
Skill level: Confident beginner
Estimated time: 5–8 hours
Finished height: Approximately 9–11 inches, including the Santa hat, depending on yarn, hook size, and stuffing.
The finished frog is designed to sit upright, with its round body supported by two small crocheted feet.
Crochet Abbreviations
This pattern uses US crochet terminology.
- MR: Magic ring
- ch: Chain
- sc: Single crochet
- sl st: Slip stitch
- inc: Work 2 single crochet stitches in the same stitch
- dec: Single crochet decrease, preferably invisible decrease
- BLO: Back loop only
- st(s): Stitch(es)
- Rnd: Round
- FO: Fasten off
The number in parentheses indicates the total stitch count at the end of each round.
Work in continuous spiral rounds unless otherwise instructed. Use a stitch marker to identify the beginning of each round.
How to Crochet the Frog’s Head
The frog’s large rounded head is one of its most recognizable features.
Use turquoise yarn and your 3.5 mm crochet hook.
Step 1: Crochet the Rounded Head
Rnd 1: Work 6 sc into a magic ring. (6)
Rnd 2: Inc in each stitch around. (12)
Rnd 3: Repeat (1 sc, inc) six times. (18)
Rnd 4: Repeat (2 sc, inc) six times. (24)
Rnd 5: Repeat (3 sc, inc) six times. (30)
Rnd 6: Repeat (4 sc, inc) six times. (36)
Rnd 7: Repeat (5 sc, inc) six times. (42)
Rnd 8: Repeat (6 sc, inc) six times. (48)
Rnd 9: Repeat (7 sc, inc) six times. (54)
Rnd 10: Repeat (8 sc, inc) six times. (60)
Rnd 11–20: Work 1 sc in each stitch around. (60)
You should now have a large rounded shape with enough room for the embroidered face.
Step 2: Shape and Close the Head
Continue using turquoise yarn.
Rnd 21: Repeat (8 sc, dec) six times. (54)
Rnd 22: Repeat (7 sc, dec) six times. (48)
Rnd 23: Repeat (6 sc, dec) six times. (42)
Rnd 24: Repeat (5 sc, dec) six times. (36)
Rnd 25: Repeat (4 sc, dec) six times. (30)
Begin filling the head with fiberfill.
Add small amounts at a time, distributing the stuffing evenly.
Rnd 26: Repeat (3 sc, dec) six times. (24)
Rnd 27: Repeat (2 sc, dec) six times. (18)
Rnd 28: Repeat (1 sc, dec) six times. (12)
Add a little more stuffing if necessary.
Rnd 29: Dec six times. (6)
Fasten off and use a yarn needle to close the remaining opening.
The head should feel firm but still slightly soft when squeezed.
How to Crochet the Raised Frog Eyes
The raised eyes give the Christmas frog its sweet, friendly personality.
Make two matching eye bumps using turquoise yarn.
Step 3: Crochet the Eye Bumps
Rnd 1: Work 6 sc into a magic ring. (6)
Rnd 2: Inc in each stitch around. (12)
Rnd 3: Repeat (1 sc, inc) six times. (18)
Rnd 4–5: Work 1 sc in each stitch around. (18)
Rnd 6: Repeat (1 sc, dec) six times. (12)
Fasten off, leaving a long yarn tail for sewing.
Add a small amount of fiberfill to each eye bump.
Position the eyes near the upper left and right sides of the frog’s head.
Leave a comfortable space between them so the face appears wide and cheerful.
Sew the eyes securely in place, keeping their rounded tops slightly raised above the head.
Step 4: Embroider the Frog’s Face
Using dark brown or black embroidery floss, stitch a small curved line across the front of each raised eye.
These curved lines create the frog’s relaxed, sleepy expression.
Add a small pale mint-green stitch beneath each dark eye line for a gentle contrast.
Next, embroider a tiny curved smile in the center of the face, approximately three or four crochet rounds below the eyes.
Use two or three short embroidery stitches to make the smile.
Avoid pulling the embroidery thread too tightly.
The finished expression should look soft, simple, and friendly.
How to Crochet the Frog’s Body
The body is slightly smaller than the head, creating the adorable proportions commonly found in amigurumi toys.
Step 5: Crochet the Rounded Body
Using turquoise yarn:
Rnd 1: Work 6 sc into a magic ring. (6)
Rnd 2: Inc in each stitch around. (12)
Rnd 3: Repeat (1 sc, inc) six times. (18)
Rnd 4: Repeat (2 sc, inc) six times. (24)
Rnd 5: Repeat (3 sc, inc) six times. (30)
Rnd 6: Repeat (4 sc, inc) six times. (36)
Rnd 7: Repeat (5 sc, inc) six times. (42)
Rnd 8–18: Work 1 sc in each stitch around. (42)
Rnd 19: Repeat (5 sc, dec) six times. (36)
Rnd 20–22: Work 1 sc in each stitch around. (36)
Rnd 23: Repeat (4 sc, dec) six times. (30)
Rnd 24: Repeat (3 sc, dec) six times. (24)
Begin stuffing the body firmly.
Rnd 25: Repeat (2 sc, dec) six times. (18)
Rnd 26: Repeat (1 sc, dec) six times. (12)
Fasten off, leaving a long tail for attachment. Close the opening with the yarn tail.
The body should have a gently rounded lower section and a narrower upper portion.
Step 6: Attach the Head to the Body
Place the finished head on top of the body.
Check that the face is centered and pointing forward.
Using the long yarn tail from the body and a yarn needle, sew the two pieces together.
Work around the connection several times to create a strong join.
The frog’s head is relatively large, so securing it carefully will help the finished toy sit upright.
How to Crochet the Frog’s Arms
The arms are small and slightly tapered, matching the simple style of the pictured frog.
Make two.
Step 7: Crochet the Arms
Using turquoise yarn:
Rnd 1: Work 6 sc into a magic ring. (6)
Rnd 2: Repeat (1 sc, inc) three times. (9)
Rnd 3–11: Work 1 sc in each stitch around. (9)
Rnd 12: Repeat (1 sc, dec) three times. (6)
Fasten off, leaving a long tail.
Stuff only the lower part of each arm lightly, or leave the arms unstuffed for a softer appearance.
Flatten the upper opening.
Attach the arms to the sides of the body, just below the head.
Angle them slightly downward so they rest naturally at the frog’s sides.
How to Crochet the Frog’s Feet
The short, rounded feet help the Christmas frog sit comfortably on a shelf or tabletop.
Make two matching pieces.
Step 8: Crochet the Feet
Using turquoise yarn:
Rnd 1: Work 6 sc into a magic ring. (6)
Rnd 2: Inc in each stitch around. (12)
Rnd 3: Repeat (1 sc, inc) six times. (18)
Rnd 4–6: Work 1 sc in each stitch around. (18)
Rnd 7: Repeat (1 sc, dec) six times. (12)
Rnd 8: Work 1 sc in each stitch around. (12)
Fasten off, leaving a long tail.
Add a small amount of fiberfill, keeping the feet slightly flattened.
Sew the feet onto the lower front of the frog’s body.
Position them so they extend forward, creating the relaxed sitting pose shown in the design.
How to Crochet the Red Santa Hat
The floppy Santa hat gives this turquoise frog its festive Christmas personality.
The hat features a deep red body, narrow golden-yellow edging, and a matching yellow pom-pom.
Step 9: Crochet the Santa Hat
Using red yarn:
Rnd 1: Work 6 sc into a magic ring. (6)
Rnd 2: Work 1 sc in each stitch around. (6)
Rnd 3: Repeat (1 sc, inc) three times. (9)
Rnd 4: Work 1 sc in each stitch around. (9)
Rnd 5: Repeat (2 sc, inc) three times. (12)
Rnd 6: Work 1 sc in each stitch around. (12)
Rnd 7: Repeat (3 sc, inc) three times. (15)
Rnd 8: Work 1 sc in each stitch around. (15)
Rnd 9: Repeat (4 sc, inc) three times. (18)
Rnd 10: Work 1 sc in each stitch around. (18)
Rnd 11: Repeat (5 sc, inc) three times. (21)
Rnd 12: Work 1 sc in each stitch around. (21)
Rnd 13: Repeat (6 sc, inc) three times. (24)
Rnd 14: Work 1 sc in each stitch around. (24)
Rnd 15: Repeat (3 sc, inc) six times. (30)
Rnd 16: Work 1 sc in each stitch around. (30)
Rnd 17: Repeat (4 sc, inc) six times. (36)
Rnd 18: Work 1 sc in each stitch around. (36)
Rnd 19: Repeat (5 sc, inc) six times. (42)
Rnd 20: Work 1 sc in each stitch around. (42)
Rnd 21: Repeat (6 sc, inc) six times. (48)
Rnd 22–23: Work 1 sc in each stitch around. (48)
Fasten off the red yarn.
Join golden-yellow yarn and work one round of single crochet around the lower edge. (48)
Fasten off and weave in the ends.
The finished hat should have a wide opening and a long, narrow top that naturally bends to one side.
Step 10: Crochet the Yellow Pom-Pom
Using golden-yellow yarn:
Rnd 1: Work 6 sc into a magic ring. (6)
Rnd 2: Inc in each stitch around. (12)
Rnd 3–4: Work 1 sc in each stitch around. (12)
Rnd 5: Dec six times. (6)
Stuff lightly.
Fasten off and close the opening.
Sew the pom-pom securely to the narrow tip of the Santa hat.
Gently bend the upper part of the hat to one side.
For a natural floppy shape, leave the hat unstuffed.
Step 11: Position the Hat
Place the Santa hat on the frog’s head at a slight angle.
Let the long tip hang toward the left side, with the yellow pom-pom resting beside the frog’s face.
The yellow edging should sit just above the raised eyes without covering their embroidered details.
Secure the hat with several small stitches around the lower edge if you want it to remain permanently attached.
How to Crochet the Christmas Scarf
The red scarf with golden-yellow edging creates a coordinated holiday outfit.
Step 12: Make the Red Scarf
Using red yarn:
Row 1: Chain 6. Work 1 sc in the second chain from the hook and in each remaining chain. (5)
Row 2: Chain 1, turn, and work 1 sc in each stitch. (5)
Repeat Row 2 until the scarf is long enough to wrap comfortably around the frog’s neck, with two short ends hanging down the front.
For a frog made with worsted-weight yarn, approximately 14–18 inches is a useful starting length.
Fasten off the red yarn.
Step 13: Add the Yellow Scarf Edging
Join golden-yellow yarn at one corner.
Work slip stitches evenly along the outer edges of the scarf.
Keep the tension relaxed so the edges don’t curl.
You can also use a single crochet border if you prefer a more pronounced yellow trim.
Fasten off and weave in all loose ends.
Wrap the scarf loosely around the frog’s neck.
Cross the ends at the front and allow one end to hang slightly longer than the other.
For a toy intended for small children, stitch the scarf permanently in place instead of leaving it as a removable accessory.
Final Assembly and Finishing Details
Before displaying your Christmas frog, check that every piece is securely attached.
Gently adjust the head, arms, and feet to create a balanced sitting position.
Make sure the Santa hat is positioned at a playful angle and that the yellow pom-pom remains visible.
Arrange the scarf so the red fabric contrasts clearly with the turquoise body.
Use your yarn needle to weave any remaining yarn tails into the back of the crochet pieces.
If the frog doesn’t sit upright, gently redistribute the stuffing in the body and adjust the feet.
Avoid using loose beads, plastic eyes, or detachable decorations if the finished frog will be handled by young children. Embroidered facial details and firmly sewn accessories are preferable, although every seam still needs to be checked for safety.
Your crochet Christmas frog is now ready for its festive debut!
Three Tips for a Beautiful Crochet Frog Amigurumi
Keep Your Crochet Stitches Tight
Amigurumi looks best when the stitches are firm enough to prevent fiberfill from showing through.
If you notice large gaps, try using a slightly smaller crochet hook.
Stuff the Head Evenly
The frog’s large head is an important part of its cute appearance.
Add stuffing gradually and gently shape the head with your hands.
Avoid adding too much stuffing, which can stretch the stitches and distort the round shape.
Take Your Time With the Face
Small facial details can completely change the frog’s expression.
Position the raised eyes carefully before sewing them into place.
A tiny curved mouth and simple embroidered eyelids create a friendly, relaxed face without needing plastic safety eyes.
Three Creative Christmas Frog Variations
Traditional Green Christmas Frog
Replace the turquoise yarn with bright grass green.
Keep the deep red Santa hat and scarf for a classic Christmas color combination.
This version looks especially cheerful beside handmade Christmas trees and other holiday amigurumi.
Pastel Christmas Frog
Use soft mint-green yarn for the body, dusty pink for the hat, and cream for the scarf edging.
The gentle colors create a sweet winter-inspired frog that also works well as a nursery decoration.
Mini Christmas Frog Ornament
Use lightweight cotton yarn and a smaller crochet hook to create a miniature version.
Shorten the arms, feet, and scarf to suit the smaller size.
Add a securely sewn hanging loop to the top of the hat if the finished frog will be used as a Christmas tree ornament.
Frequently Asked Questions
Is this crochet frog amigurumi pattern beginner-friendly?
Yes. The basic frog uses single crochet stitches, increases, and decreases. Confident beginners who have already practiced working in continuous rounds should be able to follow the pattern. The Santa hat and embroidered facial details may require a little extra patience.
What yarn works best for crochet frog amigurumi?
Worsted-weight cotton or acrylic yarn is a good choice. Cotton creates clear stitch definition and a firm shape, while acrylic produces a softer, lightweight toy. Choose yarn that works well with a small hook and creates tight stitches.
How do I make my crochet frog sit upright?
Stuff the lower body evenly and attach the feet so they extend slightly forward. A firm connection between the head and body also helps prevent the frog from leaning. If necessary, gently adjust the stuffing before closing the pieces.
A Cute Crochet Christmas Frog to Make This Holiday Season
This crochet frog amigurumi for Christmas is a fun handmade project that combines cheerful colors, simple crochet techniques, and adorable festive accessories.
The bright turquoise body, sleepy embroidered eyes, deep red Santa hat, golden-yellow pom-pom, and cozy matching scarf give this little frog plenty of personality.
You can display it on a holiday shelf, include it in a handmade Christmas collection, or give it as a thoughtful gift to someone who loves cute crochet characters.
Save this Christmas frog crochet pattern to your Pinterest board, gather your favorite holiday yarn colors, and enjoy making a sweet little amigurumi friend that can bring smiles throughout the festive season.